Nokia 8800 Handleiding
Lees hieronder de 📖 handleiding in het Nederlandse voor Nokia 8800 (209 pagina's) in de categorie Mobiel. Deze handleiding was nuttig voor 43 personen en werd door 2 gebruikers gemiddeld met 4.5 sterren beoordeeld
Pagina 1/209

User Guide Manual del Usuario
1
Nokia 8800 and
Nokia 8801 User Guide
9232467
Issue 1_draft07
Nota: La traducción en español de este manual inicia en la Página 99.

2
LEGAL INFORMATION
DECLARATION OF CONFORMITY
We, NOKIA CORPORATION declare under our sole responsibility that the products RM-13 and
RM-33 are in conformity with the provisions of the following Council Directive:1999/5/EC.
A copy of the Declaration of Conformity can be found at
http://www.nokia.com/phones/declaration_of_conformity/.
PART NO. 9238831, ISSUE NO. 1
Copyright © 2005 Nokia. All rights reserved.
Nokia, Nokia Connecting People, Nokia 8800, Nokia 8801, Pop-Port, PC Suite, and the Nokia
Original Enhancements logos are trademarks or registered trademarks of Nokia Corporation.
Other company and product names mentioned herein may be trademarks or trade names of
their respective owners.
Nokia tune is a sound mark of Nokia Corporation.
US Patent No 5818437 and other pending patents. T9 text input software
Copyright © 1999-2005. Tegic Communications, Inc. All rights reserved.
Includes RSA BSAFE cryptographic or security protocol software from
RSA Security.
Java is a trademark of Sun Microsystems, Inc.
Bluetooth is a registered trademark of Bluetooth SIG, Inc.
This product is licensed under the MPEG-4 Visual Patent Portfolio License (i) for personal and
non-commercial use in connection with information which has been encoded in compliance
with the MPEG-4 Visual Standard by a consumer engaged in a personal and non-commercial
activity and (ii) for use in connection with MPEG-4 video provided by a licensed video
provider. No license is granted or shall be implied for any other use. Additional information
including that relating to promotional, internal and commercial uses may be obtained from
MPEG LA, LLC. See http://www.mpegla.com.
The information contained in this user guide was written for the Nokia 8800 and Nokia 8801
products. Nokia operates a policy of ongoing development. Nokia reserves the right to make
changes to any of the products described in this document without prior notice.

3
UNDER NO CIRCUMSTANCES SHALL NOKIA BE RESPONSIBLE FOR ANY LOSS OF DATA OR
INCOME OR ANY SPECIAL, INCIDENTAL, AND CONSEQUENTIAL OR INDIRECT DAMAGES
HOWSOEVER CAUSED. THE CONTENTS OF THIS DOCUMENT ARE PROVIDED "AS IS." EXCEPT
AS REQUIRED BY APPLICABLE LAW, NO WARRANTIES OF ANY KIND, EITHER EXPRESS OR
IMPLIED, INCLUDING, BUT NOT LIMITED TO, THE IMPLIED WARRANTIES OF MERCHANTABILITY
AND FITNESS FOR A PARTICULAR PURPOSE, ARE MADE IN RELATION TO THE ACCURACY AND
RELIABILITY OR CONTENTS OF THIS DOCUMENT. NOKIA RESERVES THE RIGHT TO REVISE THIS
DOCUMENT OR WITHDRAW IT AT ANY TIME WITHOUT PRIOR NOTICE.
EXPORT CONTROLS
This device may contain commodities, technology, or software subject to export laws and
regulations from the U.S. and other countries. Diversion contrary to law is prohibited.
FCC/INDUSTRY CANADA NOTICE
Your device may cause TV or radio interference (for example, when using a telephone in close
proximity to receiving equipment). The FCC or Industry Canada can require you to stop using
your telephone if such interference cannot be eliminated. If you require assistance, contact
your local service facility. This device complies with part 15 of the FCC rules. Operation is
subject to the condition that this device does not cause harmful interference.

C o n t e n t s
4
Contents
For your safety...................................................................................... 5
1. Welcome ......................................................................................... 8
2. Getting started ............................................................................. 10
3. Your phone ................................................................................... 14
4. Phone security.............................................................................. 17
5. Call functions ............................................................................... 19
6. Phone menus................................................................................ 21
7. Messages....................................................................................... 22
8. Contacts........................................................................................ 37
9. Call log.......................................................................................... 43
10. Settings......................................................................................... 44
11. Operator menu ............................................................................. 54
12. Gallery........................................................................................... 55
13. Media............................................................................................ 56
14. Organizer ...................................................................................... 61
15. Applications.................................................................................. 69
16. Web............................................................................................... 71
17. SIM services.................................................................................. 78
18. Computer connectivity ................................................................ 79
19. Enhancements .............................................................................. 80
20. Reference information................................................................. 81
Care and maintenance ....................................................................... 88
Statements from other agencies ....................................................... 89
Index.....................................................................................................96

F o r y o u r s a f e t y
5
For your safety
Read these simple guidelines. Not following them may be dangerous or illegal.
Read the complete user guide for further information.
SWITCH ON SAFELY
Do not switch the device on when wireless phone use is prohibited or
when it may cause interference or danger.
ROAD SAFETY COMES FIRST
Obey all local laws. Always keep your hands free to operate the
vehicle while driving. Your first consideration while driving should be
road safety.
INTERFERENCE
All wireless phones may be susceptible to interference, which could
affect performance.
SWITCH OFF IN HOSPITALS
Follow any restrictions. Switch the phone off near medical equipment.
SWITCH OFF IN AIRCRAFT
Follow any restrictions. Wireless devices can cause interference
in aircraft.
SWITCH OFF WHEN REFUELING
Do not use the phone at a refuelling point. Do not use near fuel
or chemicals.
SWITCH OFF NEAR BLASTING
Follow any restrictions. Do not use the phone where blasting is
in progress.
USE SENSIBLY
Use only in the normal position as explained in the product
documentation. Do not touch the antenna unnecessarily.
QUALIFIED SERVICE
Only qualified personnel may install or repair this product.
ENHANCEMENTS AND BATTERIES
Use only approved enhancements and batteries. Do not connect
incompatible products.
F o r y o u r s a f e t y
6
BACKUP COPIES
Remember to make back-up copies or keep a written record of all
important information.
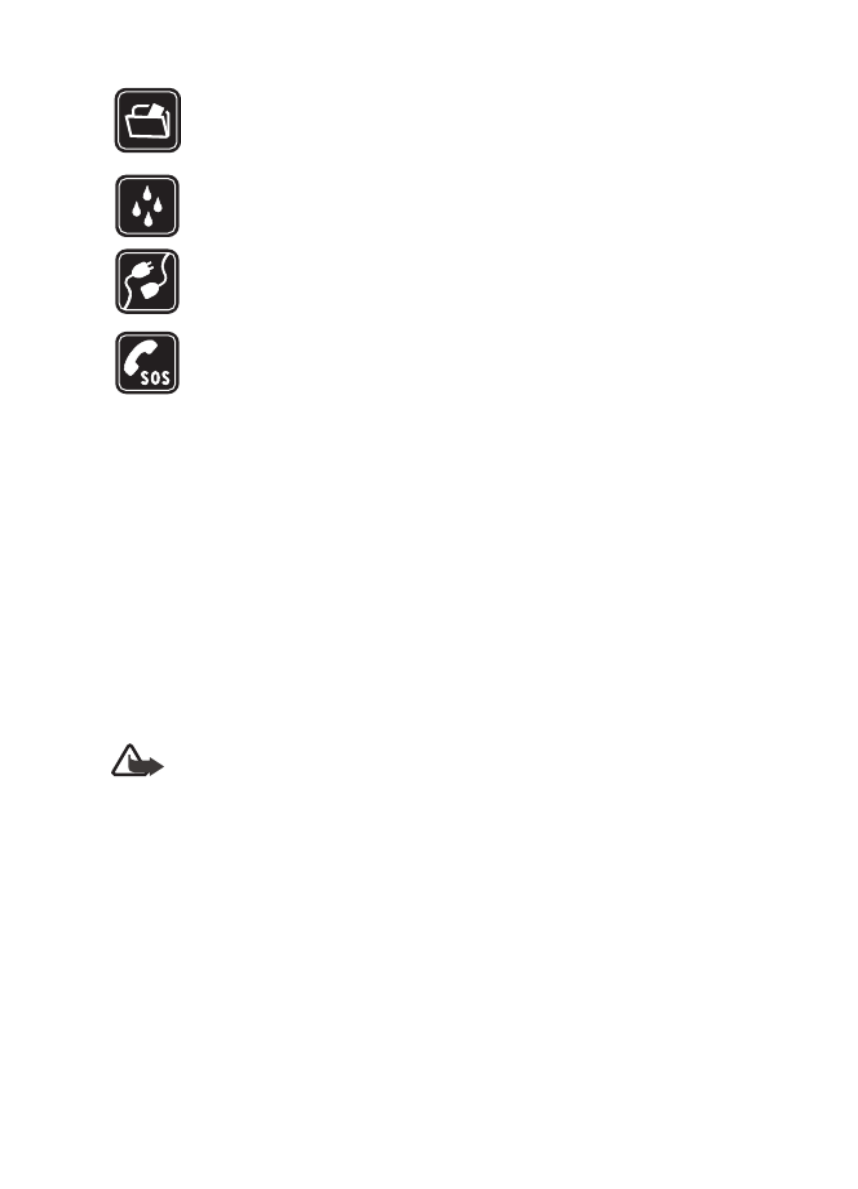
WATER-RESISTANCE
Your phone is not water-resistant. Keep it dry.
CONNECTING TO OTHER DEVICES
When connecting to any other device, read its user guide for detailed
safety instructions. Do not connect incompatible products.
EMERGENCY CALLS
Ensure the phone is switched on and in service. Press the end key as
many times as needed to clear the display and return to the start screen.
Enter the emergency number, then press the call key. Give your location.
Do not end the call until given permission to do so.
■About your device
The wireless device described in this guide is approved for use on the EGSM 850,
EGSM 900, GSM 1800, and EGSM 1900 networks:
When using the features in this device, obey all laws and respect privacy and
legitimate rights of others.
Warning: To use any features in this device, other than the alarm clock,
the phone must be switched on. Do not switch the device on when
wireless phone use may cause interference or danger.
■Network services
To use the phone you must have service from a wireless service provider. Many of
the features in this device depend on features in the wireless network to function.
These network services may not be available on all networks or you may have to
make specific arrangements with your service provider before you can utilize
network services. Your service provider may need to give you additional instructions
for their use and explain what charges will apply. Some networks may have
limitations that affect how you can use network services. For instance, some
networks may not support all language-dependent characters and services.
Nokia 8800 phone RM-13 900, 1800, and 1900 networks
Nokia 8801 phone RM-33 850, 1800, and 1900 networks

F o r y o u r s a f e t y
7
Your service provider may have requested that certain features be disabled or not
activated in your device. If so, they will not appear on your device menu. Your
device may also have been specially configured. This configuration may include
changes in menu names, menu order and icons. Contact your service provider for
more information.
■Shared memory
The phone has two different memory allocations. The following features in this
device may share the first memory: contacts, text messages, multimedia messages
(but no attachments), instant messages, groups, voice tags, calendar, and to-do
notes. The second shared memory is used by files stored in the Gallery, attachments
of multimedia messages, e-mail, and JavaTM applications. Use of one or more of
these features may reduce the memory available for the remaining features sharing
memory. For example, saving many Java applications may use all of the available
memory. Your device may display a message that the memory is full when you try
to use a shared memory feature. In this case, delete some of the information or
entries stored in the shared memory features before continuing. Some of the
features, such as text messages, may have a certain amount of memory specially
allotted to them in addition to the memory shared with other features.

W e l c o m e
8
1. Welcome
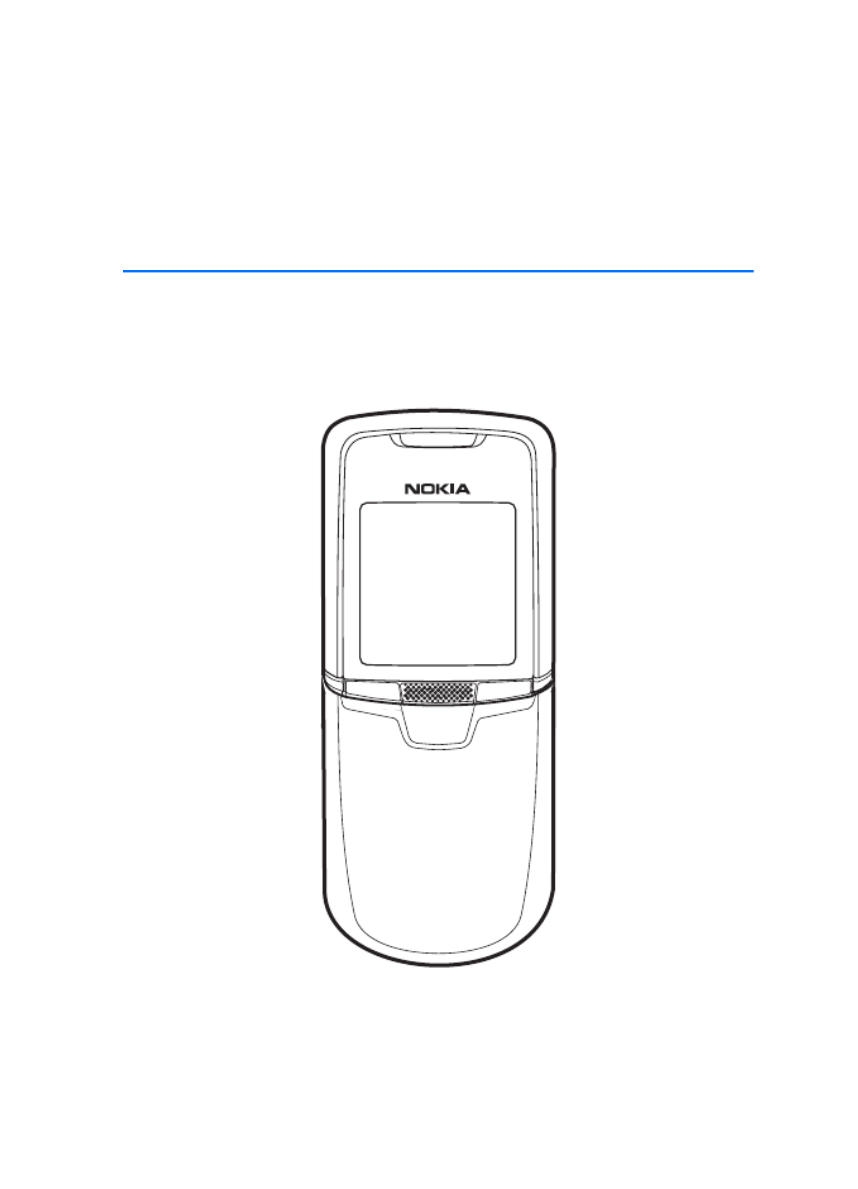
Congratulations on your purchase of the Nokia 8800 or Nokia 8801 mobile phone.
This is a product of superior design and craftsmanship, so please handle your
phone with special care. Besides your mobile phone having stainless steel covers
and a glass display treated for scratch resistance, some of its other features include
a calendar, a clock, an alarm clock, a radio, a music player, and a built-in camera.
■Updates
From time to time, Nokia may update this guide to reflect changes. The latest
version may be available at www.nokiausa.com. Also, an interactive tutorial may
be available at www.nokiausa.com.
■Register your phone
Make sure to register your phone at www.warranty.nokiausa.com or call
1-888-NOKIA-2U (1-888-665-4228) so that we can serve your needs better if
you should need to call a customer center or to have your phone repaired.
■Get help
Find your phone label
If you need to call the Nokia Customer Care
Center or your service provider, you will
need to provide specific information about
your phone. This information is provided on
the phone label (1), which is on the back of
the phone (under the battery). It contains
the model and serial numbers, as well as
other important information about your phone.
To help Nokia promptly answer your questions, please have the following
information available before contacting the Nokia Customer Care Center:
• Your phone model number (8800 or 8801)
• Type number (RM-13 or RM-33)
• International mobile equipment identity (IMEI)
• Your zip code
• The phone or enhancement in question

W e l c o m e
9
■Accessibility solutions
Nokia is committed to making mobile phones easy to use for all individuals,
including those with disabilities. For more information, visit the web site at
www.nokiaaccessibility.com.
■E-newsletters
When you register your phone, you can sign up for the Nokia e-newsletter, Nokia
Connections. You will receive tips and tricks on using your phone, enhancement
information, and special offers.
■Copyright protection
Copyright protections may prevent some images, ringing tones, and other content
from being copied, modified, transferred, or forwarded.
■Configuration settings service
To use some of the network services, such as mobile Internet services, multimedia
messaging service (MMS), or remote Internet server synchronization, your phone
needs the correct configuration settings. You may be able to receive the settings
directly as a configuration message. After receiving the settings, you need to save
them on your phone. The service provider may provide a PIN that is needed to
save the settings. For more information on availability of the settings, contact
your service provider.
When you have received a configuration message, Configuration settings
received is displayed.
• To save the settings, select Show > Save. If the phone requests Enter settings'
PIN:, enter the PIN code for the settings, and select OK. To receive the PIN code,
contact the service provider who supplies the settings. If no settings are saved
yet, these settings are saved and set as default configuration settings.
Otherwise, the phone asks, Activate saved configuration settings?.
• To discard the received settings, select Show > Discard.
• To edit the settings, see "Configuration" on page 51.
■Network support
This device supports WAP 2.0 protocols (HTTP and SSL) that run on TCP/IP protocols.
Some features of this device, such as text messages, multimedia messages, instant
messages, e-mail, presence enhanced contacts, mobile Internet services, content
and application downloads, and synchronization with a remote Internet server,
require network support for these technologies.

G e t t i n g s t a r t e d
10
2. Getting started
■SIM card installation
Keep all SIM cards out of the reach of small children. For availability and
information on using SIM card services, contact your SIM card vendor. This may
be the service provider, network operator, or another vendor. Before installing
the SIM card and removing the battery, always make sure that the phone is
switched off and disconnected from any enhancement.
The SIM card and its contacts can easily be damaged by scratches or bending, so
be careful when handling, inserting, or removing the card.
To install the SIM card:
1. Push the sideways release buttons to
release the back cover of the phone.
2. Slide the back cover to remove it from
the phone.
3. Unlock the battery for the Nokia 8801
phone. See "Battery lock" on page 11.
Remove the battery, as shown in the
illustration.
4. Insert the SIM card into the SIM card
holder as shown. Make sure that the gold
colored contact area on the SIM card is
facing downwards.

G e t t i n g s t a r t e d
11
5. Position the
battery so the
gold colored
contacts match
up with those on
the phone. Insert
the battery,
contact end first
into the battery
slot. Snap the other end of the battery into place. Lock the battery for the
Nokia 8801 phone. See "Battery lock" on page 11.
6. Slide the back cover into place.
■Battery lock
The battery lock feature allows the phone battery to remain securely in place. The
battery lock is only available in the Nokia 8801 phone.
• To lock the battery, push the battery lock mechanism to the right (1) until it
locks into place (2).
• To unlock the battery, push the battery lock mechanism to the left until it unlocks.
■Charge the battery
Warning: Use only batteries, chargers, and enhancements approved by
Nokia for use with this particular model. The use of any other types may
invalidate any approval or warranty, and may be dangerous.
This device is intended for use with the BL-5X battery. Always use original Nokia
batteries. See "Nokia battery authentication guidelines" on page 81.
G e t t i n g s t a r t e d
13
■Normal operating position
Use the phone only in its normal
operating position.
Your device has an internal antenna.
Note: As with any other radio transmitting device, do not touch the
antenna unnecessarily when the device is switched on. Contact with the
antenna affects call quality and may cause the device to operate at a
higher power level than otherwise needed. Avoiding contact with the
antenna area when operating the device optimizes the antenna
performance and the battery life.
Y o u r p h o n e
15
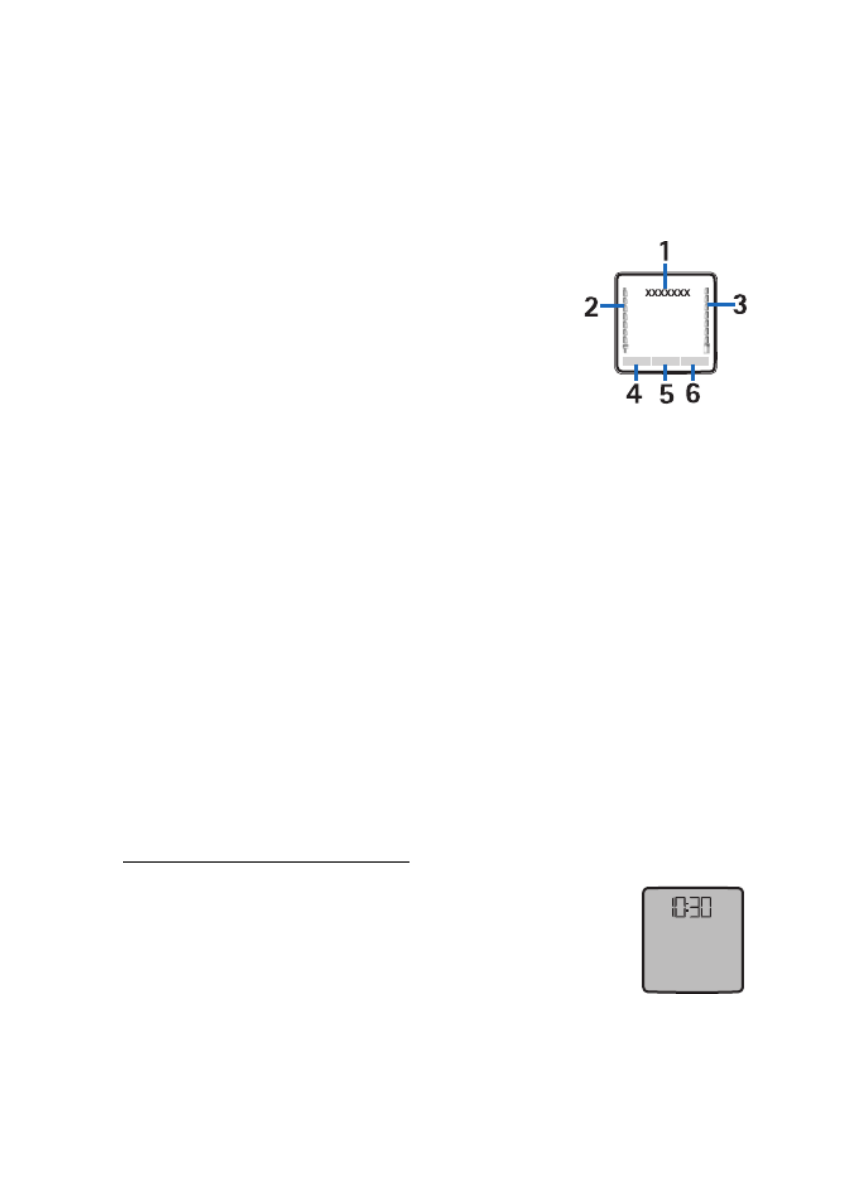
■Standby mode
When you turn on your phone, the first screen that appears is the start screen,
which indicates your phone is in the standby mode. When your phone is in the
standby mode, the selection keys access specific functions, and the indicators
appear on the start screen. Indicators show the status of the phone.
• The name of the wireless service provider (1) displays
in the middle of the start screen.
• The signal strength indicator (2) shows the strength
of the signal to your phone. The higher the bar, the
stronger the signal.
• The battery strength indicator (3) shows how much
power is left in your phone battery. The higher the
bar, the more power in the battery.
• The left selection key (4) in the standby mode is Go to. Your most frequently
used functions can be quickly accessed from the Go to menu.
To activate a function, select it.
To view a list with available functions, select Options > Select options. To
add a function to the shortcut list, select Mark or to remove a function from
the list, select Unmark.
To rearrange the functions in your personal shortcut list, select Options >
Organize. Scroll to the function you want, select Move, and scroll to where
you want to move the function.
• The middle selection key in the standby mode is Menu (5).
• The right selection key in the standby mode may be Names (6) to access the
Names menu, an operator-specific key to access an operator’s home page, or
a specific function that you have selected in the right selection key menu.
Power saving screen saver
To save power, a digital clock screen saver overwrites the
display when no function of the phone has been used for a
certain period of time. Select Menu > > Settings Display >
Power saver > On to activate the screen saver or press any key
to deactivate it.

Y o u r p h o n e
16
■ Indicators and icons
Your phone has two types of identifiers: indicators and icons.
Indicators
See "Standby mode" on page 15 for information on indicators.
Icons
Icons are graphical representations of a specific item or situation. The following
list describes each icon.
You have received one or several text or multimedia messages.
You have received one or several multimedia messages.
The phone registered a missed call.
The phone keypad is locked.
The phone does not ring for an incoming call or text message when
Incoming call alert is set to Off and Message alert tone is set to Off.
The alarm clock is set.
Shown in the top left of the display when the packet data connection
mode Always online is selected and the packet data service is available.
Shown in the top left of the display when the packet data connection
is established.
Shown in the top right of the display when the packet data connection
is suspended (on hold); for example, if there is an incoming or outgoing
call during the packet data connection.
Indicates an active Bluetooth wireless connection.

P h o n e s e c u r i t y
17
4. Phone security
Your phone is equipped with different security features that allow you to avoid
making accidental calls and prevent unauthorized use of your phone.
■ Keypad lock (keyguard)
The keyguard disables your keypad to prevent accidental key presses.
• To lock the keypad and the power key, close the slide, and press the left
selection key (Lock) to confirm; or select Menu and press * within 3.5seconds.
• To unlock the keypad, open the slide; or select Unlock and press *
within 1.5 seconds.
If the Security keyguard is set to On, enter the security code if requested.
To answer a call when the keyguard is on, press the call key. When you end or
reject the call, the keypad is automatically locked.
When the keyguard is on, calls still may be possible to the official emergency number
programmed into your phone. Enter the emergency number and press the call key.
For information about Automatic keyguard and Security keyguard, see "Phone"
on page 50.
■ Access codes
Security code
The security code (5 to 10 digits) helps to protect your phone against unauthorized
use. The preset code is 12345. To change the code, and to set the phone to
request the code, see "Security" on page 52.
PIN codes
The PIN (personal identification number) code and the UPIN (universal personal
identification number) code (4 to 8 digits) help to protect your SIM card against
unauthorized use. See "Security" on page 52.
The PIN2 code (4 to 8 digits) may be supplied with the SIM card and is required to
access some functions, such as call counters.
The module PIN is required to access the information in the security module. See
"Security module" on page 76.
The signing PIN is required for the digital signature. See "Digital signature" on
page 77.

P h o n e s e c u r i t y
18
PUK codes
The PUK (personal unblocking key) code and the UPUK (universal personal unblocking
key) code (8 digits) is required to change a blocked PIN code and UPIN code,
respectively. The PUK2 code (8 digits) is required to change a blocked PIN2 code.
Call restrictions password
The call restrictions password (4 digits) is required when using the Call restrictions
function. See "Security" on page 52.
Wallet code
The wallet code (4 to 10 digits) is required to access the wallet services.
For further information, see "Wallet" on page 63.

C a l l f u n c t i o n s
20
■ Options during a call
Many of the options that you can use during a call are network services.
For availability, contact your network operator or service provider.
To increase or decrease the volume during a call, press the navigation key right or left.
For some of the following options, select during a call:Options
Mute or Unmute, Contacts, Menu, Record, Lock keypad, Loudspeaker or Handset,
and the network services Hold or Unhold, Answer and Decline, New call, Touch
tones (to send tone strings), Swap (to switch between the active call and the call
on hold), Transfer calls (to connect a call on hold to an active call and disconnect
yourself), Conference (to make a conference call that allows up to five persons to
take part in a conference call), Add to conference, Private call (to discuss privately
in a conference call), End call, and End all calls.
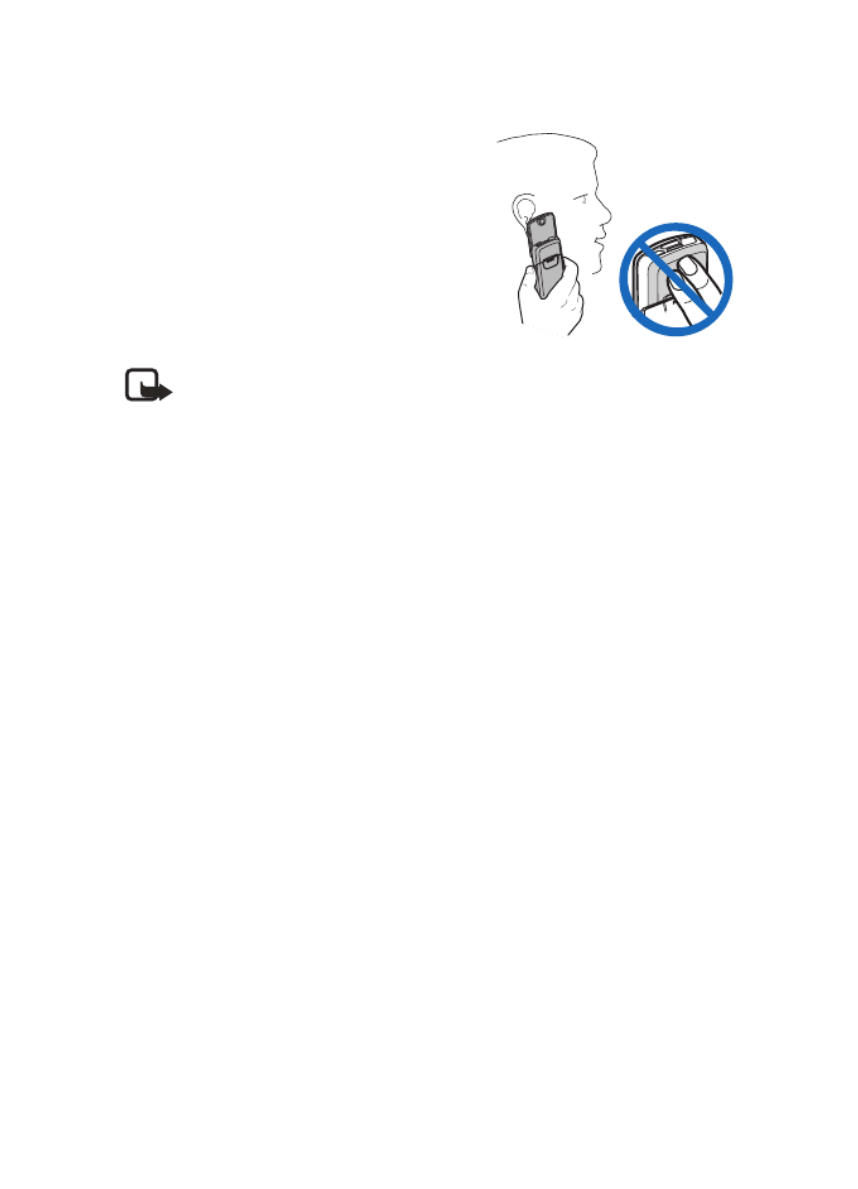
Do not hold the device near your ear when the loudspeaker is in use, because the
volume may be extremely loud.

P h o n e m e n u s
21
6. Phone menus
Phone features are grouped according to function and are accessed through the
main menus of your phone. Each main menu contains submenus and lists from
which you can select or view items and customize phone features. You can access
these menus and submenus by using the scroll method.
Some menus may not be available, depending on your network. For more information,
contact your service provider.
■ Menu views
Your phone may have two types of menu views: List and Grid.
In the List interface, images introduce every menu. Use the scroll up and scroll down
keys to navigate through the menus. As you scroll through the menus, the menu
number appears in the upper right corner of the display. Below the menu number is a
scroll bar with a tab. The tab moves up or down as you scroll through the menus,
providing a visual representation of your current position in the menu structure.
In the Grid interface, multiple menu icons appear on a single display. Use the
four-way scroll key to navigate through the icons. The name of the menu appears
at the top of the display and the icon for the selected menu is outlined.
To change the menu view, select Options > Main menu view > List or Grid.
■ Access a menu function
1. Select Menu and the menu you want.
2. If the menu contains submenus, select the one that you want.
3. If the selected menu contains further submenus, select the one that you want
4. To return to the previous menu level, select Back. To exit the menu, select Exit.

M e s s a g e s
22
7. Messages
You can use mobile messages to keep in touch with friends,
family, and business associates by using the short message
service (SMS). Not all messaging features are available in all
wireless networks. Contact your service provider for availability
and subscription information.
When sending messages, your phone may display the words Message sent. This is
an indication that the message has been sent by your device to the message
centre number programmed into your device. This is not an indication that the
message has been received at the intended destination. For more details about
messaging services, check with your service provider.
■Text messages (network service)
Your device supports the sending of text messages beyond the character limit for a
single message. If your message exceeds 160 characters, it will be sent as a series
of two or more messages. In the navigation bar, you can see the message length
indicator counting backwards from 160. For example, 10/2 means that you can
still add 10 characters for the text to be sent as two messages.
Using special (Unicode) characters, such as ë, â, á, ì, takes up more space. If there
are special characters in your message, the indicator may not show the message
length correctly. Before the message is sent, the device tells you if the message
exceeds the maximum length allowed for one message. You can cancel sending
by selecting Cancel or you can save the message in the inbox.
You can add pictures and templates to your text messages. Text templates are
indicated by and picture templates are indicated by . Each picture message
is made up of several text messages. Therefore, sending one picture message may
cost more than sending one text message. Contact your service provider for
pricing information.
Before you can send any text, picture, or e-mail message, you need to save some
message settings. See "Message settings" on page 34.
To check SMS e-mail service availability and to subscribe to the service, contact
your service provider.

M e s s a g e s
23
Text entry
You can enter text while writing messages by using traditional or predictive text
input. When using traditional text input, press a number key, 1 to 9, repeatedly
until the character you want appears. In predictive text input you can enter a
letter with a single key press.
When you write text, appears at the top left of the display, indicating predictive
text input, and appears, indicating traditional text input. , , or
appears next to the text input indicator, indicating the character case. To change the
character case, press #. indicates number mode. To change from the letter to
number mode, press and hold #, and select Number mode.
Settings
To set the writing language to a language other than that selected (see Phone
language on page 50), select Options > Writing language. Predictive text input
is only available for the languages on the list.
To set the predictive text input option, select Options > Dictionary on, or to set
traditional text input option select Options > Dictionary off.
Predictive text input
Predictive text input allows you to write text quickly by using the phone keypad
and a built-in dictionary.
1. Start writing a word, using the keys, 2 to 9, and press each key only once for
one letter. The word changes after each keystroke.
2. When you finish writing the word and it is correct, press 0.
3. If a displayed word is not correct, press * repeatedly or select Options >
Matches. When the word that you want appears, select Use.
4. If the ? character is displayed after the word, the word you intended to write
is not in the dictionary. To add the word to the dictionary, select Spell. The
phone displays the entered letters. Enter the word (traditional text input is
used), and select Save.
Traditional text input
Press a number key, 1 to 9, repeatedly until the character you want appears. Not
all characters available under a number key are printed on the key. The characters
available depend on the selected writing language. See "Settings" on page 23.
If the next letter you want is located on the same key as the present one, wait
until the cursor appears, or press any of the navigation keys, and enter the letter.
The most common punctuation marks and special characters are available under
the number key 1 and a space can be inserted by pressing 0.

M e s s a g e s
24
Write and send
1. Select Menu > Messages > Create message > Text message.
2. Enter a message. See "Text entry" on page 23.
3. To insert a template to the text message, select Use template and the
template you want to insert.
4. To send the message, select Send > Recently used, To phone number, To
many, or To e-mail address and enter a phone number or e-mail address.
5. To send a message using a predefined message profile, select Via sending profile.
For the sending profile, see "Text and SMS e-mail" on page 34.
Read and reply
is shown when you have received a message or an e-mail using SMS.
The blinking indicates that the message memory is full. Before you can
receive new messages, delete some of your old messages in the Inbox folder.
1. To view a new message, select Show. To view it later, select Exit.
To read the message later, select Menu > Messages > Inbox. If more than
one message has been received, select the message that you want to read.
indicates an unread message.
2. While reading a message, select Options and delete or forward the message,
edit the message as a text message or an SMS e-mail, rename the message you
are reading or move it to another folder, or view or extract message details.
You can also copy text from the beginning of the message to your phone
calendar as a reminder note. To save the picture in the Templates folder when
reading a picture message, select Save picture.
3. To reply as a message, select Reply > Text message or Multimedia msg..
Enter the reply message. When replying to an e-mail, first confirm or edit the
e-mail address and subject.
4. To send the message to the displayed number, select Send > OK.
Templates
To access the template list, select Menu > Messages > Saved items > Text
messages > Templates.

M e s s a g e s
25
■Multimedia messages (network service)
Note: Only devices that offer compatible multimedia message or e-mail
features can receive and display multimedia messages. Multimedia
message objects may contain viruses or otherwise be harmful to your
device or PC. Do not open any attachment if you are not sure of the
trustworthiness of the sender.
A multimedia message can contain text, sound, a picture, a calendar note, a business
card, or a video clip. The phone supports multimedia messages that are up to 300KB
(some operators/networks may limit this to 100 KB) in size. If the message is too
large, the phone may not be able to receive it. Some networks allow text messages
that include an Internet address where you can view the multimedia message.
Multimedia messaging supports the following formats:
• Picture: JPEG, GIF, WBMP, BMP, and PNG
• Sound: MP3, AAC, Scalable polyphonic MIDI (SP-MIDI), AMR audio and
monophonic ringing tones
• Video clips: 3GP format with QCIF and SubQCIF image size and AMR, WB
AMR, or ACC LC audio
You cannot receive multimedia messages during a call, a game, another Java
application, or an active browsing session over GSM data. Because delivery of
multimedia messages can fail for various reasons, do not rely solely upon them
for essential communications.
Write and send
To set the settings for multimedia messaging, see "Multimedia" on page 34. To
check availability and to subscribe to the multimedia messaging service, contact
your service provider.
1. Select Menu > Messages > Create message > Multimedia msg..
2. Enter a message. See "Text entry" on page 23.
• To insert a file from the Gallery, select Options > Insert > Image, Sound
clip or Video clip and the option you want.
If you select Options > Insert > New sound clip, the Recorder opens, and
you can start a new recording. When you have finished the recording, it is
added to the message.
If you select Options > Insert > New image, the Camera opens, and you
can take a new photo to add to the message.
• To insert a business card or a calendar note in the message, select
Options > Insert > Business card or Calendar note.

M e s s a g e s
26
• Your phone supports multimedia messages that contain several pages
(slides). Each slide can contain text, one image, a calendar note, a
business card, and one sound clip. To insert a slide in the message,
select Options > Insert > Slide.
To open the slide you want (if the message contains several slides),
select Options > Previous slide > Next slide or Slide list.
To set the interval between the slides, select Options > Slide timing.
To move the text component to the top or bottom of the message,
select Options > Place text first or Place text last.
• The following options may also be available: Delete to delete an image,
slide or sound clip from the message, Clear text, Preview, Save message.
In More options, the following options may be available: Insert contact,
Insert number, Message details, and Edit subject.
3. To send the message, select Send > Recently used, To phone number,
To e-mail address or To many.
4. Enter the recipient’s phone number or e-mail address, or search for it in
Contacts > Names Outbox. Select OK and the message is moved to the
folder for sending.
While the multimedia message is being sent, the animated icon is displayed
and you can use other functions on the phone. If the sending fails, the phone
tries to resend it a few times. If this fails, the message remains in the Outbox
folder and you can try to resend it later.
If Save sent messages > Yes is selected, the sent message is saved in the Sent
items folder. See "Multimedia" on page 34. When the message is sent, it is not
an indication that the message has been received at the intended destination.
Read and reply
The default setting of the multimedia message service is generally on. The appearance
of a multimedia message may vary depending on the receiving device.
When your phone is receiving a multimedia message, the animated icon is
displayed. When the message has been received, and the text Multimedia
message received are shown.
1. To read the message, select Show. To view it later, select Exit.
To read the message later, select Menu > Messages > Inbox. In the list of
messages, indicates an unread message. Select the message that you
want to view.

M e s s a g e s
27
2. The function of the middle selection key changes according to the currently
displayed attachment in the message.
To view the whole message if the received message contains a presentation,
select Play.
Otherwise, select Play to listen to a sound clip or view a video clip attached to
the message. To zoom in on an image, select Zoom. To view a business card or
a calendar note, or to open a theme object, select Open. To open a streaming
link, select Load.
3. To reply to the message, select Options > Reply > Text message or Multimedia
msg.. Enter the reply message, and select Send. You can send the reply message
only to the person who sent you the original message.
Select Options and some of the following options may be also available: Play
presentation, View text, , Open image, Open sound clip or Open video clip
Save image, Save sound clip, Save video clip, Details, Delete message, Reply,
Reply to all, Forward to no., Forward to e-mail or Forward to many, Edit,
and Message details.
Memory full
When you have a new multimedia message waiting and the memory for the messages
is full, blinks and Multimedia memory full. View waiting message. is shown.
To view the waiting message, select Show. To save the message, select Save.
To delete old messages, select the folder and the message you want to delete.
To discard the waiting message, select Exit > Yes. If you select No, you can view
the message.
Folders
The phone saves received text and multimedia messages in the Inbox folder.
Multimedia messages that have not yet been sent are moved to the Outbox folder.
If you have selected Message settings > Text messages > Save sent messages >
Yes > Message settings > Multimedia msgs. > Save sent messages > Yes, the
sent messages are saved in the Sent items folder.
To save the text message that you are writing and wish to send later in the Saved
items folder, select Options > Save message > Saved text msgs. For multimedia
messages, select the option Save message. indicates unsent messages.
To organize your text messages, you can move some of them to My folders, or
add new folders for your messages. Select Messages > Saved items > Text
messages > My folders.

M e s s a g e s
28
To add a folder, select Options > Add folder. If you have not saved any folders,
select Add.
To delete or rename a folder, scroll to the folder you want, and select Options >
Delete folder or Rename folder.
■Instant messaging (network service)
You can take text messaging to the next level by experiencing instant messaging
(IM) in a wireless environment. You can engage in instant messaging with friends
and family, regardless of the mobile system or platform (like the Internet) they
are using, as long as you all use the same instant messaging service.
Before you can start using instant messaging, you must first subscribe to your
wireless service provider’s text messaging service and register with the instant
messaging service you want to use. You must also obtain a user name and
password before you can use instant messaging. See "Register with an instant
messaging service" on page 28 for more information.
Note: Depending on both your IM service provider and your wireless
service provider, you may not have access to all of the features
described in this guide.
To set the required settings for the instant messaging service, see Connect. settings
in "Access" on page 28. The icons and texts on the display may vary, depending
on the instant messaging service.
Depending on the network, the active instant messaging conversation may consume
the phone battery faster, and you may need to connect the phone to a charger.
Register with an instant messaging service
You can do this by registering over the Internet with the IM service provider you
have selected to use. During the registration process, you will have the opportunity
to create the user name and password of your choice. For more information about
signing up for instant messaging services, contact your wireless service provider.
Access
To access the menu while still offline, select Menu > Messages > Instant
messages. If more than one set of connection settings for instant messaging
service is available, select the one you want. If there is only one set defined, it is
selected automatically.
The following options are shown: Login to connect to the instant messaging service,
Saved conversations to view, erase or rename the instant messages conversations
that you have saved during the instant messages session, or Connect. settings to
edit the settings needed for messaging and presence connection.

M e s s a g e s
30
Accept or reject an invitation
In the standby mode, when you are connected to the instant messaging service
and you receive a new invitation, New invitation received is displayed. To read
it, select Read. If more than one invitation is received, scroll to the invitation you
want, and select Open. To join the private group conversation, select Accept, and
enter the screen name; or to reject or delete the invitation, select Options >
Reject or Delete.
Read an instant message
In the standby mode, when you are connected to the instant messaging service,
and you receive a new message that is not a message associated with an active
conversation, New instant message is displayed. To read it, select Read. If you
receive more than one message, scroll to the message, and select Open.
New messages received during an active conversation are held in Instant messages >
Conversations. If you receive a message from someone who is not in IM contacts,
the sender ID is displayed. To save a new contact that is not in the phone memory,
select Options > Save contact.
Participate in a conversation
Join or start an IM session by selecting Write. Write your message, and select
Send or press the call key to send it. If you select Options, some of the following
options are available: View conversation, Save contact, Group members, Block
contact, and End conversation.
Set your availability
You can determine if other users can tell whether you are available or not.
1. Connect to the instant messaging service.
2. To view and edit your own availability information, or screen name,
select My settings.
3. To allow all the other instant messaging users to see you as being online,
select Availability > Available for all.
To allow only the contacts in your instant messaging contacts list to see you
as being online, select Availability > Avail. for contacts.
To appear as being offline, select Availability > Appear offline.
When you are connected to the instant messaging service, indicates that you
are online and that you are not visible to others.

M e s s a g e s
31
IM contacts
To add contacts to the instant messaging contacts list, connect to the instant
messaging service, and select IM contacts. To add a contact to the list, select
Options > Add contact, or if you have no contacts added, select Add. Select
Enter ID manually, Search from serv., Copy from server, or By mobile number.
Scroll to a contact, and to start a conversation, select Chat, or select Options >
Contact info, Block contact (or Unblock contact), Add contact, Remove contact,
Change list, Copy to server, or Availability alerts.
Block or unblock messages
To block messages, connect to the instant messaging service, and select
Conversations > IM contacts; or join or start a conversation. Scroll to the
contact from whom you want to block incoming messages, select Options >
Block contact > OK.
To unblock the messages, connect to the instant messaging service, and select
Blocked list. Scroll to the contact from whom you want to unblock the messages,
and select Unblock.
Groups
You can create your own private groups for an instant messaging conversation,
or use the public groups provided by the service provider. The private groups exist
only during an instant messaging conversation, and the groups are saved on the
server of the service provider. If the server you are logged into does not support
group services, all group-related menus are dimmed.
Public
You can bookmark public groups that your service provider may maintain. Connect
to the instant messaging service, and select Groups > Public groups. Scroll to a
group with which you want to chat, and select Join. If you are not in the group,
enter your screen name as your nickname for the group. To delete a group from
your group list, select Options > Delete group.
To search for a group, select Groups > > Public groups Search groups. You can
search for a group by a member in the group, by group name, topic, or ID.
Private
Connect to the instant messaging service, and select Groups > Create group.
Enter the name for the group and the screen name that you want to use. Mark the
private group members in the contacts list, and write an invitation.

M e s s a g e s
33
Read and reply
Select Menu > Messages > E-mail > Inbox and Options to view the
available options.
To reply to an e-mail, select Reply > Original text or Empty screen. To reply to
many e-mails, select Options > Reply to all. Confirm or edit the e-mail address
and subject, then write your reply. To send the message, select Send > Send now.
Inbox and other folders
Your phone saves e-mails that you have downloaded from your e-mail account in
the Inbox folder. Other folders contains the following folders: Drafts for saving
unfinished e-mails, Archive for organizing and saving your e-mails, Outbox for
saving e-mails that have not been sent, and Sent items for saving e-mails that
have been sent.
To manage the folders and their e-mail content, select Options > Manage folder.
Delete messages
1. Select Menu > Messages > E-mail > Options > Manage folder and the
folder you want.
2. Select the messages that you want to delete and Options > Delete.
Deleting an e-mail from your phone does not delete it from the e-mail server. To set
the phone to delete the e-mail from the e-mail server, select Menu > Messages >
E-mail > Options > Extra settings > Leave c. on server > Delete retr. msgs.
■Voice messages (network service)
If you subscribe to voice mail, your service provider will furnish you with a voice
mailbox number. You need to save this number to your phone to use voice mail.
When you receive a voice message, your phone lets you know by beeping, displaying
a message, or both. If you receive more than one message, your phone shows the
number of messages received.
To call your voice mailbox, select Menu > Messages > Voice messages > Listen
to voice messages. To enter, search for, or edit your voice mailbox number, select
Voice mailbox number.
If supported by the network, shows new voice messages. Select Listen to
call your voice mailbox number.
■Info messages (network service)
With the message network service, you can receive short text messages from
your service provider on various topics, such as weather and traffic conditions.
Contact your service provider for more information.

M e s s a g e s
35
•Allow multimedia reception. To receive or to block the multimedia message,
select Yes or No. If you select In home network, you cannot receive
multimedia messages when outside your home network.
•Incoming multimedia messages. To allow the reception of multimedia messages
automatically, manually after being prompted, or to reject the reception, select
Retrieve, Retrieve manually, or Reject, respectively.
•Configuration settings > Configuration. Only the configurations that support
multimedia messaging are shown. Select a service provider, Default, or
Personal config. for multimedia messaging.
Select Account and a multimedia messaging service account contained in
the active configuration settings.
•Allow advertisements to receive or reject advertisements. This setting is not
shown if Allow multimedia reception is set to No.
E-mail
The settings affect the sending, receiving and viewing of e-mail.
You may receive the configuration settings for the e-mail application as a
configuration message. See "Configuration settings service" on page 9. You can
also enter the settings manually. See "Configuration" on page 51.
To activate the settings for the e-mail application, select Menu > Messages >
Message settings > E-mail messages and one of the following options:
•Configuration. Select the set that you would like to activate.
•Account. Select an account provided by the service provider.
•My name. Enter your name or nickname.
•E-mail address. Enter your e-mail address.
•Include signature. You can define a signature that is automatically added to
the end of your e-mail when you write your message.
•Reply-to address. Enter the e-mail address to which you want the replies to
be sent.
•SMTP user name. Enter the name that you want to use for outgoing mail.
•SMTP password. Enter the password that you want to use for outgoing mail.
•Display terminal window. Select Yes to perform manual user authentication
for intranet connections.
•Incoming server type. Select either POP3 or IMAP4 depending on the type of
e-mail system that you are using. If both types are supported, select IMAP4.

M e s s a g e s
36
• Incoming mail settings
If you selected POP3 as the incoming server type, the following options are
shown: Retrieve e-mails, POP3 user name, POP3 password, and Display
terminal window.
If you selected IMAP4 as the incoming server type, the following options are
shown: Retrieve e-mails, Retrieval method, IMAP4 user name, IMAP4
password, and Display terminal window.
Other settings
To select other settings for messages, select Menu > Messages > Message
settings > Other settings.
• To change the font size for reading and writing messages, select Font size.
• To set the phone to replace character-based smileys into graphical ones,
select Graphical smileys > Yes.
Message counter
The message counter gives you information on how many text messages have
been sent and received. You can view the amount of sent and received messages,
view details about the messages and reset the counter. To access the message
counter, select Menu > Messages > Message counter.

C o n t a c t s
42
To check the voice tags, select Menu > Contacts > Voice tags. Scroll to the
contact with the voice tag that you want, and select an option to listen to, delete,
or change the recorded voice tag.
Make a call using a voice tag
If the phone has an application running that is sending or receiving data using a
GPRS connection, you must end the application before voice dialing.
1. In the standby mode, press and hold the right selection key. A short tone is
heard, and Speak now is displayed.
2. Say the voice tag clearly. The phone plays the recognized voice tag, and dials
the phone number of the voice tag after 1.5 seconds.
If you are using a compatible headset with the headset key, press and hold the
headset key to start the voice dialing.
■Info, service and my numbers
Select Menu > Contacts and one of the following functions, which may be available:
Info numbers to call the information numbers of your service provider if the
numbers are included on your SIM card (network service).
My numbers to view the phone numbers assigned to your SIM card, if the numbers
are included on your SIM card.
Service numbers to call the service numbers of your service provider if the
numbers are included on your SIM card (network service).

C a l l l o g
43
9. Call log
The phone registers the phone numbers of identified missed,
received, and dialed calls, and the approximate length of your
calls. The phone registers missed and received calls only if the
network supports these functions, and the phone is switched on
and within the network’s service area.
■Recent calls list
When you select Options in the Missed calls, Received calls, Dialed numbers,
or Message Recipients menu, you can view the time of the call; edit, view or call
the registered phone number; add it to the memory; or delete it from the list.
You can also send a text message. To delete the recent calls lists, select Delete
recent call lists.
■Counters and timers
Note: The actual invoice for calls and services from your service
provider may vary, depending upon network features, rounding-off for
billing, taxes and so forth.
Some timers may be reset during service or software upgrades.
Select Menu > Call log > Call timers, Packet data counter, or Packet data
conn. timer for approximate information on your recent communications.
■Positioning information
The network may send you a location request. You can ensure that the network will
deliver location information of your phone only if you approve it (network service).
Contact your service provider to subscribe and to agree upon the delivery of location
information. Some networks allow you to request the position of the phone
(network service).
To accept or reject the location request, select Accept or Reject. If you miss the
request, the phone automatically accepts or rejects it according to what you have
agreed with your service provider. The phone displays 1 missed position request.
To view the missed location request, select Show.
To view the information on the 10 most recent privacy notifications and requests
or to delete them, select Menu > Call log > Positioning > Position log > Open
folder or Delete all.

S e t t i n g s
46
■ My shortcuts
You can set your most frequently used functions to be quickly accessed through
the My shortcuts feature.
Right selection key
To set a specific function (from a predefined list) to the right selection key, select
Menu > Settings > My shortcuts > Right selection key. This function can be
used only if it is supported by your service provider.
Navigation key
To assign other phone functions (from a predefined list) to the navigation key,
select Menu > Settings > My shortcuts > Navigation key.
Voice commands
To activate phone functions by saying a voice tag, select Menu > Settings > My
shortcuts > Voice commands. Select a folder, scroll to a function to which you
want to add a voice tag, and select Add. indicates a voice tag.
■ Connectivity
You can connect your phone to compatible devices by using Bluetooth wireless
technology. For example, you can connect to a Bluetooth stereo headset or a
Bluetooth equipped PC. You can also define the settings for packet data
dial-up connections.
Bluetooth wireless technology
This device is compliant with Bluetooth Specification 1.2 supporting the following
profiles: hands-free, object push profile, file transfer profile, dial-up networking
profile, SIM access profile, service discovery profile, generic access profile, serial
port profile, advanced audio distribution profile, and audio video remote control
profile. To ensure interoperability between other devices supporting Bluetooth
technology, use Nokia approved enhancements for this model. Check with the
manufacturers of other devices to determine their compatibility with this device.
There may be restrictions on using Bluetooth technology in some locations.
Check with your local authorities or service provider.
Features using Bluetooth technology, or allowing such features to run in the
background while using other features, increase the demand on battery power
and reduce the battery life.

S e t t i n g s
48
To define how to use the service, select Menu > Settings > Connectivity >
Packet data > Packet data connection and one of the following:
•When needed — to set the packet data registration and connection to
established when an application using packet data needs it and closed when
you end the application.
•Always online — to set the phone to automatically register to an packet data
network when you switch the phone on. is shown.
Modem settings
You can connect the phone to a compatible computer by using Bluetooth wireless
technology. The phone can be used as a modem to enable EGPRS connectivity from
the computer.
To define the settings for connections from the PC, select Menu > Settings >
Connectivity > Packet data > Packet data settings > Active access point,
activate the access point you want to use, and select Edit active access point.
Select Alias for access point, and enter a nickname for the currently selected
access point. Select Packet data access point, and enter the access point name
(APN) to establish a connection to an EGPRS network.
You can also set the dial-up service settings (access point name) on the computer,
by using the Nokia Modem Options software. See "Nokia PC Suite" on page 79. If
you have set the settings both on the PC and your phone, the PC settings are used.
Data transfer and synchronization
Synchronize your data from calendar, notes, and contacts with another compatible
device (for example, a mobile phone), a compatible PC, or a remote Internet server
(network service).
Partner list
To copy or synchronize data from your phone, the name of the device and the
settings must be in the list of partners in transfer contacts. If you receive data
from another compatible device, the partner is automatically added to the list,
using the contact data from the other device. Server sync and PC sync settings
are the original items in the list.
To add a new partner to the list, such as a new device, select Menu > Settings >
Connectivity > Data transfer > Options > Add transfer contact > Phone sync
or Phone copy, and enter the settings according to the transfer type.
To edit the copy and synchronize settings, select a contact from the partner list,
and select Options > Edit.
To delete a selected partner, select Options > Delete. You cannot delete Server
sync and Phone sync.

S e t t i n g s
49
Data transfer with a compatible device
For synchronization, Bluetooth wireless technology is used. The other device is in
the standby mode.
To start a data transfer, select Menu > Settings > Connectivity > Data transfer,
and the transfer partner from the list, other than Server sync and PC sync. Based
upon the settings, the selected data will be copied or synchronized.
Data transfer with SIM card
Your phone allows the data transfer without having a SIM card inserted.
Turn on your phone (with no SIM card inserted), and select Transfer and from the
following options:
Transfer contacts and select a contact, other than Server sync and PC sync,
from the partner list to transfer data from your phone. The phone starts a
synchronization or copy session.
Select Receive data > Via Bluetooth to receive data from the other phone.
Synchronize from a compatible PC
To synchronize data from calendar, notes, and contacts from a compatible PC,
use Bluetooth wireless technology. You also need the correct version of Nokia PC
Suite software for your phone installed on the PC. See ""Computer connectivity,"
on page 79" for information about Nokia PC Suite.
Synchronize the data in the phone contacts, calendar, and notes to correspond
with the data of your compatible PC by starting the synchronization from the PC.
Synchronize from a server
To use a remote Internet server, you have to subscribe to a synchronization service.
For more information and the settings required for this service, contact your
service provider. You may receive the settings as a configuration message. See
"Configuration settings service" on page 9 and "Configuration" on page 51.
If you have saved data on the remote Internet server, you can synchronize your
phone by starting the synchronization from your phone.
Select Menu > Settings > Connectivity > Data transfer > Server sync.
Depending on the settings, select Initializing sync or Initializing copy.
If the contacts or calendar are full, synchronizing may take up to 30
minutes to complete, when synchronizing for the first time, or after an
interrupted synchronization.

O p e r a t o r m e n u
54
11. Operator menu
Your service provider may have programmed an operator-specific menu into your
phone. If this menu exists in your phone, its functions depend entirely upon the
service provider. Contact your service provider for more information.

M e d i a
56
13. Media
■Camera
You can take photos or record video clips with the built-in camera. The
camera produces pictures in JPEG format and video clips in 3GP format.
When taking and using images or video clips, obey all laws and respect
local customs, as well as privacy and legitimate rights of others.
Take a photo
1. Select Menu > Media > Camera > Capture.
The phone saves the photo in Gallery > Images.
2. To take another photo, select Back.
3. To send the photo as a multimedia message, select Send.
4. To view the options, select Options.
Record a video clip
Select Menu > Media > Camera. To select the video mode, scroll left or right, or
select Options > Video, and select Record. To pause the recording, select Pause;
to resume the recording, select Contin. To stop the recording, select Stop. The phone
saves the recording in Gallery > Video clips. To view the options, select Options.
■Media player
With the media player you can view, play, and download files, such as images,
audio, video and animated images. You can also view compatible streaming
videos from a network server (network service).
Select Menu > Media > Media player > Open gallery, Bookmarks, Go to
address, or Media downloads.
When pressing the navigation key right (fast forward button) or the navigation
key left (rewind button), select FF/rew interval to set the length of a scrolling
jump during streaming audio.
Set for streaming service
You may receive the configuration settings required for the streaming as a
configuration message from the network operator or service provider. See
"Configuration settings service" on page 9. To enter the settings manually, see
"Configuration" on page 51.

M e d i a
59
4. Select Options and one of the following options:
•Turn off — to turn off the radio.
•Volume — to change the volume level by pressing the navigation key left
or right.
•Save channel — to save a new channel by entering the channel’s name.
•Channels — to select the list of saved channels. To delete or rename a
channel, scroll to the channel you want, and select Options > Delete
channel or Rename.
•Loudspeaker or Headset — to listen to the radio using the loudspeaker or
headset. Keep the headset connected to the phone. The lead of the headset
functions as the radio antenna.
•Set frequency — to enter the frequency of the radio channel you want.
You can normally make a call or answer an incoming call while listening to the
radio. During the call, the volume of the radio is muted.
When an application using a packet data or HSCSD connection is sending or
receiving data, it may interfere with the radio.
■ Recorder
You can record pieces of speech, sound, or an active call. This is useful when
recording a name and phone number for writing them down later.
The recorder cannot be used when a data call or GPRS connection is active.
Record sound
1. Select Menu > Media > Recorder.
2. To start the recording, select . To start the recording during a call, select
Options > Record. While recording a call, all parties to the call hear a faint
beeping sound approximately every five seconds. When recording a call, hold
the phone in the normal position near to your ear.
3. To end the recording, select .
The recording is saved in Gallery > Recordings.
4. To listen to the latest recording, select Options > Play last recorded.
5. To send the last recording using Bluetooth, or as a multimedia message,
select Options > Send last recorded.

M e d i a
60
List of recordings
1. Select Menu > Media > Recorder > Options > Recordings list.
The list of folders in the Gallery is shown.
2. Open Recordings to see the list with recordings.
3. Select Options to select options for files in the Gallery. See "Gallery" on page 55.
■ Equalizer
You can control the sound quality when using the music player by amplifying or
attenuating frequency bands.
1. Select Menu > Media > Equalizer.
2. To activate a set, scroll to one of the equalizer sets, and select Activate.
3. To view, edit, or rename a selected set, select Options > View, Edit, or Rename.
Not all sets can be edited or renamed.

O r g a n i z e r
65
5. When viewing a note, select Edit to edit it or select Options and one of the
following options:
Send via text msg. — to copy the note as a text message.
Copy to calendar — to copy the note to the calendar as a memo.
Use detail — to extract numbers and e-mail and Web addresses from a note.
Delete — to delete the note.
Create a profile
When you have saved your personal card details, you can combine them together
into a wallet profile. You can use the profile to retrieve wallet data from different
cards while browsing.
1. Select Menu > Organizer > Wallet, enter your wallet code, and select OK >
Wallet profiles.
2. To create a new wallet profile if no profile is added, select Add; otherwise,
select Options > Add new.
3. Fill in the following fields. Some of the fields contain data that is selected from
the wallet. You must save this data before you can create a wallet profile.
Select payment card next and select a card from the payment card list.
Select loyalty card next and select a card from the loyalty card list.
Select access card next and select a card from the access card list.
Select user info card next and select a card from the user data card list.
Select billing address next and select an address from the address card list.
Select shipping address next and select an address from the address card list.
Select receipt delivery address next and select an address from the address
card list.
Select receipt delivery method next and select the means of delivery:
To phone number or To e-mail address.
Wallet profile name: enter a name for the profile.
4. Select Done.
Settings
1. Select Menu > Organizer > Wallet, enter your wallet code, and select
OK > Settings.
2. To change the wallet code, select Change code.

O r g a n i z e r
66
3. To set the radio frequency identification (RFID) code and type, select RFID >
RFID code and RFID type.
RIFD is a method of remotely storing and retrieving data using devices called RFID
tags. This technology offers a secure way to protect your commercial transactions.
Purchases (network service)
To do your shopping, access a Web site that supports the wallet. The service must
support the Electronic Commerce Modeling Language specification. See "Connect
to a service" on page 72. Choose the product you want to buy and read carefully
all provided information before your purchase. The text may not fit within a
single screen. Therefore, make sure to scroll through and read all of the text
before your purchase.
To pay for the items you want to buy, you are asked whether you want to use the
wallet and your wallet PIN code.
1. Select the payment card you want to use from the Payment cards list.
If the data form you receive from the service provider supports the Electronic
Commerce Modeling Language specification, the phone automatically fills in
the credit card information or the wallet profile from the wallet.
2. Approve the purchase, and the information is forwarded.
You may receive an acknowledgement or a digital receipt of the purchase.
3. To close the wallet, select Close wallet.
If you do not use the wallet for five minutes, it closes automatically.
4. If you have tried to access or have accessed confidential information requiring
passwords (for example, your bank account), empty the cache of your phone after
each use. See "Cache memory" on page 75 for more information.
■ Calculator
The calculator in your phone adds, subtracts, multiplies, divides, calculates the
square and the square root, and converts currency values.
Note: This calculator has limited accuracy and is designed for simple
calculations.
A p p l i c a t i o n s
69
15. Applications
■ Games
Your phone software includes some games.
Launch
Select Menu > Applications > Games, scroll to the game you
want, and select Open, or press the call key.
For options related to a game, see "Other application options" on page 69.
Downloads
Select Menu > Applications > Options > Downloads > Game downloads. The
list of available bookmarks is shown. Select More bookmarks to access the list of
bookmarks in the Web menu. See "Bookmarks" on page 74.
Important: Only install and use applications and other software from
sources that offer adequate security and protection against harmful
software.
Settings
To set sounds, lights, and shakes for the game, select Menu > Applications >
Options > Application settings.
■ Collection
Your phone software includes some Java applications specially designed for this
Nokia phone.
Launch an application
Select Menu > Applications > Collection, scroll to an application, and select
Open, or press the call key.
Other application options
Delete — to delete the application or application set from the phone.
Details — to give additional information about the application.
Update version — to check if a new version of the application is available for
download from the Web (network service).

W e b
72
Activate the settings
Make sure that the Web settings of the service you want to use are activated.
1. Select Menu > Web > Settings > Configuration settings > Configuration.
Only the configurations that support the browsing service are shown.
2. Select a service provider, Default, or Personal config. for browsing.
3. Select Account and a browsing service account contained in the active
configuration settings.
4. If you want to perform manual user authentication for intranet connections,
select Display terminal window > Yes.
Connect to a service
There are several ways to connect to a service.
• To open the service’s home page, select Menu > Web > Home; or in the
standby mode, press and hold 0.
• To select a bookmark, select Menu > Web > Bookmarks.
• To select the last viewed web site, select Menu > Web > Last web address.
• To enter the address of the service, select Menu > Web > Go to address,
enter the address of the service, and select OK.
■ Browse
It should not be necessary to manually configure the browser on your phone.
Normally this is done by your service provider once you have subscribed to the
feature. Contact your service provider if you have problems using the browser.
After you make a connection to the service, you can start browsing its pages. The
function of the phone keys may vary in different services. Follow the text guides
on the phone display. For more information, contact your service provider.
If packet data is selected as the data bearer, is shown in the top left of the
display during browsing. If you receive a call or a text message, or make a call
during a packet data connection, is shown in the top right of the display to
indicate that the packet data connection is suspended (on hold). After a call, the
phone tries to reconnect the packet data connection.
Phone keys
• Press the scroll key in any direction to browse through the page.
• To select a highlighted item, press the call key.
• To enter letters and numbers, press the keys, 0 to 9.
• To enter special characters, press *.
Product specificaties
| Merk: | Nokia |
| Categorie: | Mobiel |
| Model: | 8800 |
| Kleur van het product: | Zwart |
| Gewicht: | 150 g |
| Breedte: | 109 mm |
| Diepte: | 45.6 mm |
| Hoogte: | 14.6 mm |
| Capaciteit van de accu/batterij: | 1000 mAh |
| Bluetooth: | Ja |
| Beeldschermdiagonaal: | 2 " |
| Resolutie: | 320 x 240 Pixels |
| Touchscreen: | Nee |
| Ondersteund audioformaat: | eAAC+, mp3 |
| Vormfactor: | Schuif |
| Resolutie camera achterzijde (numeriek): | 3.2 MP |
| Automatisch scherpstellen: | Ja |
| Maximale beeldsnelheid: | 15 fps |
| Opnameresolutie: | 640 x 480 Pixels |
| MMS: | Ja |
| Instant messaging (IM): | Ja |
| Persoonlijke informatie management: | Alarm clock, Calculator, Calendar, Notes, Stopwatch, To-do list |
| Luidspreker: | Ja |
| Trilalarm: | Ja |
| Beeldscherm, aantal kleuren: | 16.78 miljoen kleuren |
| FM-radio: | Ja |
| Digitale zoom: | 8 x |
| Videomogelijkheid: | Ja |
| Stemopname: | Ja |
| Intern geheugen: | 4096 MB |
| Aansluitingen: | Micro-USB, USB 1.2 |
| Gesprekstijd (2G): | 3 uur |
| Text-to-speech berichten lezer: | Ja |
| Camera voorzijde: | Ja |
| Frequentie: | 900/1800/1900 MHz |
| Type ringtone: | Polyfonisch |
| Java-technologie: | Ja |
| Camera achterzijde: | Ja |
| Muziekspeler: | Ja |
| Standby time (2G): | 300 uur |
| Flash card support: | Nee |
| Tweede camera resolutie: | 2048 x 1536 Pixels |
| Infrarood datapoort: | Nee |
| Inclusief microfoon: | Ja |
| Netwerkverbindingen: | GSM, EGSM |
| Batterijtechnologie: | Lithium-Ion (Li-Ion) |
| Type beeldscherm: | OLED |
| Type batterij: | BL-4U |
| Support voor e-mail bijlages: | Ja |
Heb je hulp nodig?
Als je hulp nodig hebt met Nokia 8800 stel dan hieronder een vraag en andere gebruikers zullen je antwoorden
Handleiding Mobiel Nokia

17 Augustus 2022
16 Augustus 2022
21 November 2021
9 Februari 2022
7 Februari 2022
8 Februari 2022
1 December 2021
16 Augustus 2022
8 Februari 2022
3 Februari 2022
Handleiding Mobiel
- Mobiel Bosch
- Mobiel Philips
- Mobiel HP
- Mobiel Samsung
- Mobiel Casio
- Mobiel Panasonic
- Mobiel Brondi
- Mobiel LG
- Mobiel Huawei
- Mobiel AEG
- Mobiel Fysic
- Mobiel Garmin
- Mobiel Gigaset
- Mobiel Motorola
- Mobiel Medion
- Mobiel Siemens
- Mobiel Toshiba
- Mobiel Acer
- Mobiel ACN
- Mobiel Airbus
- Mobiel Alcatel
- Mobiel Aligator
- Mobiel Allview
- Mobiel Amplicom
- Mobiel Amplicomms
- Mobiel AT Mobile
- Mobiel AT-T
- Mobiel Auro
- Mobiel Avus
- Mobiel Beafon
- Mobiel Benefon
- Mobiel BenQ Siemens
- Mobiel Binom
- Mobiel Black-Berry
- Mobiel Blu
- Mobiel Doro
- Mobiel Ecom
- Mobiel Elliptik 8
- Mobiel Elson
- Mobiel Emporia
- Mobiel Energizer
- Mobiel Ericsson
- Mobiel Eten
- Mobiel Geemarc
- Mobiel Gionee
- Mobiel GoldGMT
- Mobiel Google
- Mobiel Hagenuk
- Mobiel Hi
- Mobiel Hiptop
- Mobiel Hisense
- Mobiel HTC
- Mobiel Hyundai
- Mobiel I-mate
- Mobiel Iget
- Mobiel Itel
- Mobiel ITT
- Mobiel Kazam
- Mobiel Kdi
- Mobiel KhoCell
- Mobiel Kruidvat
- Mobiel Lava
- Mobiel Lenovo
- Mobiel Matsunichi
- Mobiel Maxcom
- Mobiel Meizu
- Mobiel Mobistel
- Mobiel Multi Care Systems
- Mobiel Nec
- Mobiel Neonode
- Mobiel NGM
- Mobiel Palm
- Mobiel Pantech
- Mobiel Peaq
- Mobiel Phicomm
- Mobiel Polaroid
- Mobiel Profoon
- Mobiel Qtek
- Mobiel Raytac
- Mobiel RCA
- Mobiel Real Phone
- Mobiel Sagem
- Mobiel Sanyo
- Mobiel Sencor
- Mobiel Sendo
- Mobiel Sharp
- Mobiel Simvalley
- Mobiel Siswoo
- Mobiel Sonim
- Mobiel Sony Ericsson
- Mobiel STK
- Mobiel Sunstech
- Mobiel Swisstone
- Mobiel Swissvoice
- Mobiel Sydney
- Mobiel T-Mobile
- Mobiel Technisat
- Mobiel Tecmobile
- Mobiel Telefunken
- Mobiel Teleline
- Mobiel Telme
- Mobiel Telstra
- Mobiel Ubiquio
- Mobiel Ulefone
- Mobiel Utano
- Mobiel Vodafone
- Mobiel WayteQ
- Mobiel ZTE
- Mobiel Jablotron
- Mobiel O2
- Mobiel Olympia
- Mobiel Orange
- Mobiel Crosscall
- Mobiel Uniwa
Nieuwste handleidingen voor Mobiel

28 September 2024

13 November 2024

14 Februari 2024

23 Oktober 2023
23 Oktober 2023
23 Oktober 2023
13 Oktober 2023
13 Oktober 2023
13 Oktober 2023
13 Oktober 2023