Motorola i930 Handleiding
Motorola
Smartphone
i930
Lees hieronder de 📖 handleiding in het Nederlandse voor Motorola i930 (177 pagina's) in de categorie Smartphone. Deze handleiding was nuttig voor 147 personen en werd door 2 gebruikers gemiddeld met 4.5 sterren beoordeeld
Pagina 1/177

Motorola
iDEN
Digital Multi-service Data-capable Phone
i930 Phone User’s Guide
Smartphone Information Provided by Microsoft

MOTOROLA, the Stylized M Logo and all other trademarks indicated as such herein are trademarks of
Motorola, Inc. ® Reg. U.S. Pat. & Tm. Off. © 2005 Motorola, Inc. All rights reserved.
Microsoft and Microsoft Internet Explorer are registered trademarks of Microsoft Corporation.
T9 is a trademark owned by Tegic Communications.
T9® Text Input Patent and Trademark Information
This product is covered by U.S. Pat. 5,818,437, U.S. Pat. 5,953,541, U.S. Pat. 6,011,554 and other
patents pending.
Java and all other Java-based marks are trademarks or registered trademarks of Sun Microsystems, Inc.
in the U.S. and other countries.
All other product names or services mentioned in this manual are the property of their respective
trademark owners.
Information in this document, including URL and other Internet Web site references, is subject to change
without notice. Unless otherwise noted, the example companies, organizations, products, domain names,
email addresses, logos, people, places and events depicted herein are fictitious, and no association with
any real company, organization, product, domain name, email address, logo, person, place or event is
intended or should be inferred. Complying with all applicable copyright laws is the responsibility of the
user. Without limiting the rights under copyright, no part of this document may be reproduced, stored in or
introduced into a retrieval system, or transmitted in any form or by any means (electronic, mechanical,
photocopying, recording, or otherwise), or for any purpose, without the express written permission of
Microsoft Corporation.
Microsoft may have patents, patent applications, trademarks, copyrights, or other intellectual property
rights covering subject matter in this document. Except as expressly provided in any written license
agreement from Microsoft, the furnishing of this document does not give you any license to these patents,
trademarks, copyrights, or other intellectual property.
© 2003 Microsoft Corporation. All rights reserved. Microsoft products are licensed to OEMs by Microsoft
Licensing Inc., a wholly owned subsidiary of Microsoft Corporation.
Microsoft, ActiveSync, MSN, Outlook, Windows, the Windows logo, and Windows Media are either
registered trademarks or trademarks of Microsoft Corporation in the United States and/or other countries.
The names of actual companies and products mentioned herein may be the trademarks of their respective
owners.
Software Copyright Notice
The Motorola products described in this manual may include copyrighted Motorola and third party software
stored in semiconductor memories or other media. Laws in the United States and other countries preserve
for Motorola and third party software providers certain exclusive rights for copyrighted software, such as
the exclusive rights to distribute or reproduce the copyrighted software. Accordingly, any copyrighted
software contained in the Motorola products may not be modified, reverse-engineered, distributed, or
reproduced in any manner to the extent allowed by law. Furthermore, the purchase of the Motorola
products shall not be deemed to grant either directly or by implication, estoppel, or otherwise, any license
under the copyrights, patents, or patent applications of Motorola or any third party software provider,
except for the normal, non-exclusive, royalty-free license to use that arises by operation of law in the sale
of a product.

Contents
Getting Started ............................................................................................................... 1
Getting to Know Your Smartphone ............................................................................... 1
Setting Up Your Smartphone ........................................................................................ 6
Installing ActiveSync ................................................................................................... 11
Turning Your Smartphone On ..................................................................................... 12
i930 Sync Cradle......................................................................................................... 12
Synchronizing by Using ActiveSync............................................................................ 16
Accessories................................................................................................................. 16
Finding More Information ............................................................................................ 17
The Basics .................................................................................................................... 18
Navigation Methods .................................................................................................... 18
Understanding Status Indicators ................................................................................. 22
Backlight Dimming ...................................................................................................... 23
Finding Your Phone Number and Other Basic Information......................................... 24
Entering Text and Numbers ........................................................................................ 24
Securing Your Smartphone......................................................................................... 28
Using a Headset.......................................................................................................... 33
Navigating and Managing Stored Files ....................................................................... 34
Managing Memory ...................................................................................................... 34
Phone Calls .................................................................................................................. 35
Making a Phone Call ................................................................................................... 35
Receiving a Phone Call............................................................................................... 39
Managing Phone Calls ................................................................................................ 40
Call Forwarding ........................................................................................................... 41
Using the Flip to Answer or End Calls......................................................................... 42
Retrieving Voice Mail Messages ................................................................................. 42
Speed Dials and Voice Shortcuts................................................................................ 42
Advanced Calling Options........................................................................................... 45
Private Calls, Call Alerts, and Group Calls................................................................ 47
Making a Private Call .................................................................................................. 47
Receiving a Private Call .............................................................................................. 49
Managing Private Calls ............................................................................................... 50
Voice Shortcuts ........................................................................................................... 50

One Touch PTT........................................................................................................... 52
Call Alerts.................................................................................................................... 52
Group Calls ................................................................................................................. 55
Recent Calls ................................................................................................................. 56
Viewing the Recent Calls List...................................................................................... 56
Saving to Contacts ...................................................................................................... 57
Making Calls From the Recent Calls List .................................................................... 57
Deleting Items From the Recent Calls List.................................................................. 59
Returning to the Home Screen After a Call................................................................. 59
Contacts, Calendar, and Tasks................................................................................... 60
Using Contacts............................................................................................................ 60
Using Calendar ........................................................................................................... 65
Using Tasks ................................................................................................................ 67
SIM Manager................................................................................................................. 69
Using SIM Manager .................................................................................................... 69
Changes When Contacts Are Copied to Your SIM Card ............................................ 72
Voice Notes .................................................................................................................. 73
Settings......................................................................................................................... 74
Viewing and Changing Settings .................................................................................. 74
Display Properties ....................................................................................................... 74
Phone Calls................................................................................................................. 76
PTT ............................................................................................................................. 80
Vibrate All.................................................................................................................... 81
Notifications................................................................................................................. 82
Voice Volume .............................................................................................................. 84
Power Management .................................................................................................... 84
Accessibility................................................................................................................. 85
Regional Settings ........................................................................................................ 85
Date and Time............................................................................................................. 86
Phone Networks.......................................................................................................... 86
Data Connections........................................................................................................ 87
Beam........................................................................................................................... 93
Certificates .................................................................................................................. 93
Flight Mode ................................................................................................................. 94

Profiles ........................................................................................................................ 94
Security ....................................................................................................................... 96
Owner Information....................................................................................................... 97
Phone Information....................................................................................................... 97
Remove Programs ...................................................................................................... 99
Messaging Features .................................................................................................. 100
Understanding Messaging Features ......................................................................... 100
Setting up Messaging................................................................................................ 101
Working with Accounts.............................................................................................. 102
Creating Messages ................................................................................................... 103
Sending and Receiving Messages............................................................................ 106
Importing Text Messages .......................................................................................... 107
Viewing and Responding to Messages ..................................................................... 107
Working with Message Folders ................................................................................. 111
Configuring Message Notifications............................................................................ 112
Sending and Receiving Instant Messages................................................................ 113
Camera and Camcorder ............................................................................................ 116
Pictures ..................................................................................................................... 116
Video Clips................................................................................................................ 118
Sending Captured Pictures and Video Clips ............................................................. 121
Closing the Camera and Camcorder......................................................................... 122
Media Theater............................................................................................................. 123
Pictures ..................................................................................................................... 123
Video Clips................................................................................................................ 127
Audio Only Files ........................................................................................................ 129
Sending Video Pictures and Clips ............................................................................. 129
Opening Camera and Camcorder ............................................................................. 130
GPS Enabled .............................................................................................................. 131
IMPORTANT: Things to Keep in Mind ...................................................................... 131
Making an Emergency Call ....................................................................................... 132
Viewing Your Approximate Location ......................................................................... 133
Enhancing GPS Performance ................................................................................... 134
Updating Satellite Almanac Data .............................................................................. 135
Setting Privacy Options............................................................................................. 135

Using GPS with Map Software.................................................................................. 136
Java Applications ...................................................................................................... 139
Deleting Java Applications ........................................................................................ 140
Java Applications and GPS Enabled ........................................................................ 140
Beaming Information................................................................................................. 143
ActiveSync.................................................................................................................. 145
Understanding ActiveSync ........................................................................................ 145
Setting up ActiveSync ............................................................................................... 145
Synchronization Methods.......................................................................................... 149
Deciding Which Information to Synchronize ............................................................. 151
Using Your Smartphone as a Modem ...................................................................... 153
Internet........................................................................................................................ 154
Browsing the Web ..................................................................................................... 154
Using Your Phone Internationally ............................................................................ 158
Features Available at Home and Abroad .................................................................. 158
Setting the Way Your Phone Searches for Networks ............................................... 158
Searching for a Network............................................................................................ 159
Windows Media Player .............................................................................................. 160
Games......................................................................................................................... 171
Solitaire ..................................................................................................................... 171
Calculator ................................................................................................................... 172

Getting Started 1
Getting Started
Congratulations on the purchase of your new i930 phone, a Smartphone with Windows
Mobile™ software! This chapter will help you familiarize yourself with your i930 phone
and get it ready to use. You will also find information about installing Microsoft®
ActiveSync®, how to purchase accessories, and where to find additional help for using
your i930 phone.
Getting to Know Your Smartphone
Before you set up your i930 phone and start using it, take a moment to get familiar with
your Smartphone.
Flip Closed — External Features
Retractable Antenna
The retractable antenna on your Smartphone is designed to be extended during calls.
To extend the antenna, pull gently on the rounded tip until the antenna is fully extended
and clicks into position.
When finished with a call, retract the antenna by pushing gently on the rounded tip until
the antenna clicks into place.
To optimize your Smartphone’s performance, extend the antenna when you make or
receive a call, and avoid touching the antenna with any body part.
Important: Failure to fully extend or retract the antenna until the antenna clicks
into place causes severely degraded performance, which may result
in missed calls, dropped calls, or garbled audio.
volume
controls
accessory connector
stereo
audio port
speaker
(in back)
retractable
antenna
external
display
flip open
button
camera
short-range
flash light
camera
lens
smart key
SD card slot
status light
speaker key
SD card slot
infrared port

Getting Started
2
Flip Open Button
Press this to open your Smartphone’s flip easily.
Status Light
The status light appears as a ring around the flip open button.
The status light also flashes when you recieve a call, a call alert, or message notification,
or play a .midi audio recording on your phone.
You can set the status light not to light up. See “Turn the status light on or off” on page
84.
Camera Lens
Lets you take pictures with your Smartphone.
Camera Short-Range Flash Light
Helps light the pictures you take with your Smartphone.
Volume Controls
Sets the volume of the sound coming out of the earpiece and speaker. When your
Smartphone is in a call, the volume controls set the volume of calls. When your
Smartphone is not engaged in any activity, the volume controls set the volume of the
ringer and of multimedia audio.
The volume controls can also by used to scroll through lists that appear on the external
display.
Push-to-Talk (PTT) Button
Lets you make Private calls and group calls.
External Display
Shows a portion of the information on the internal display. To see more information, open
the flip.
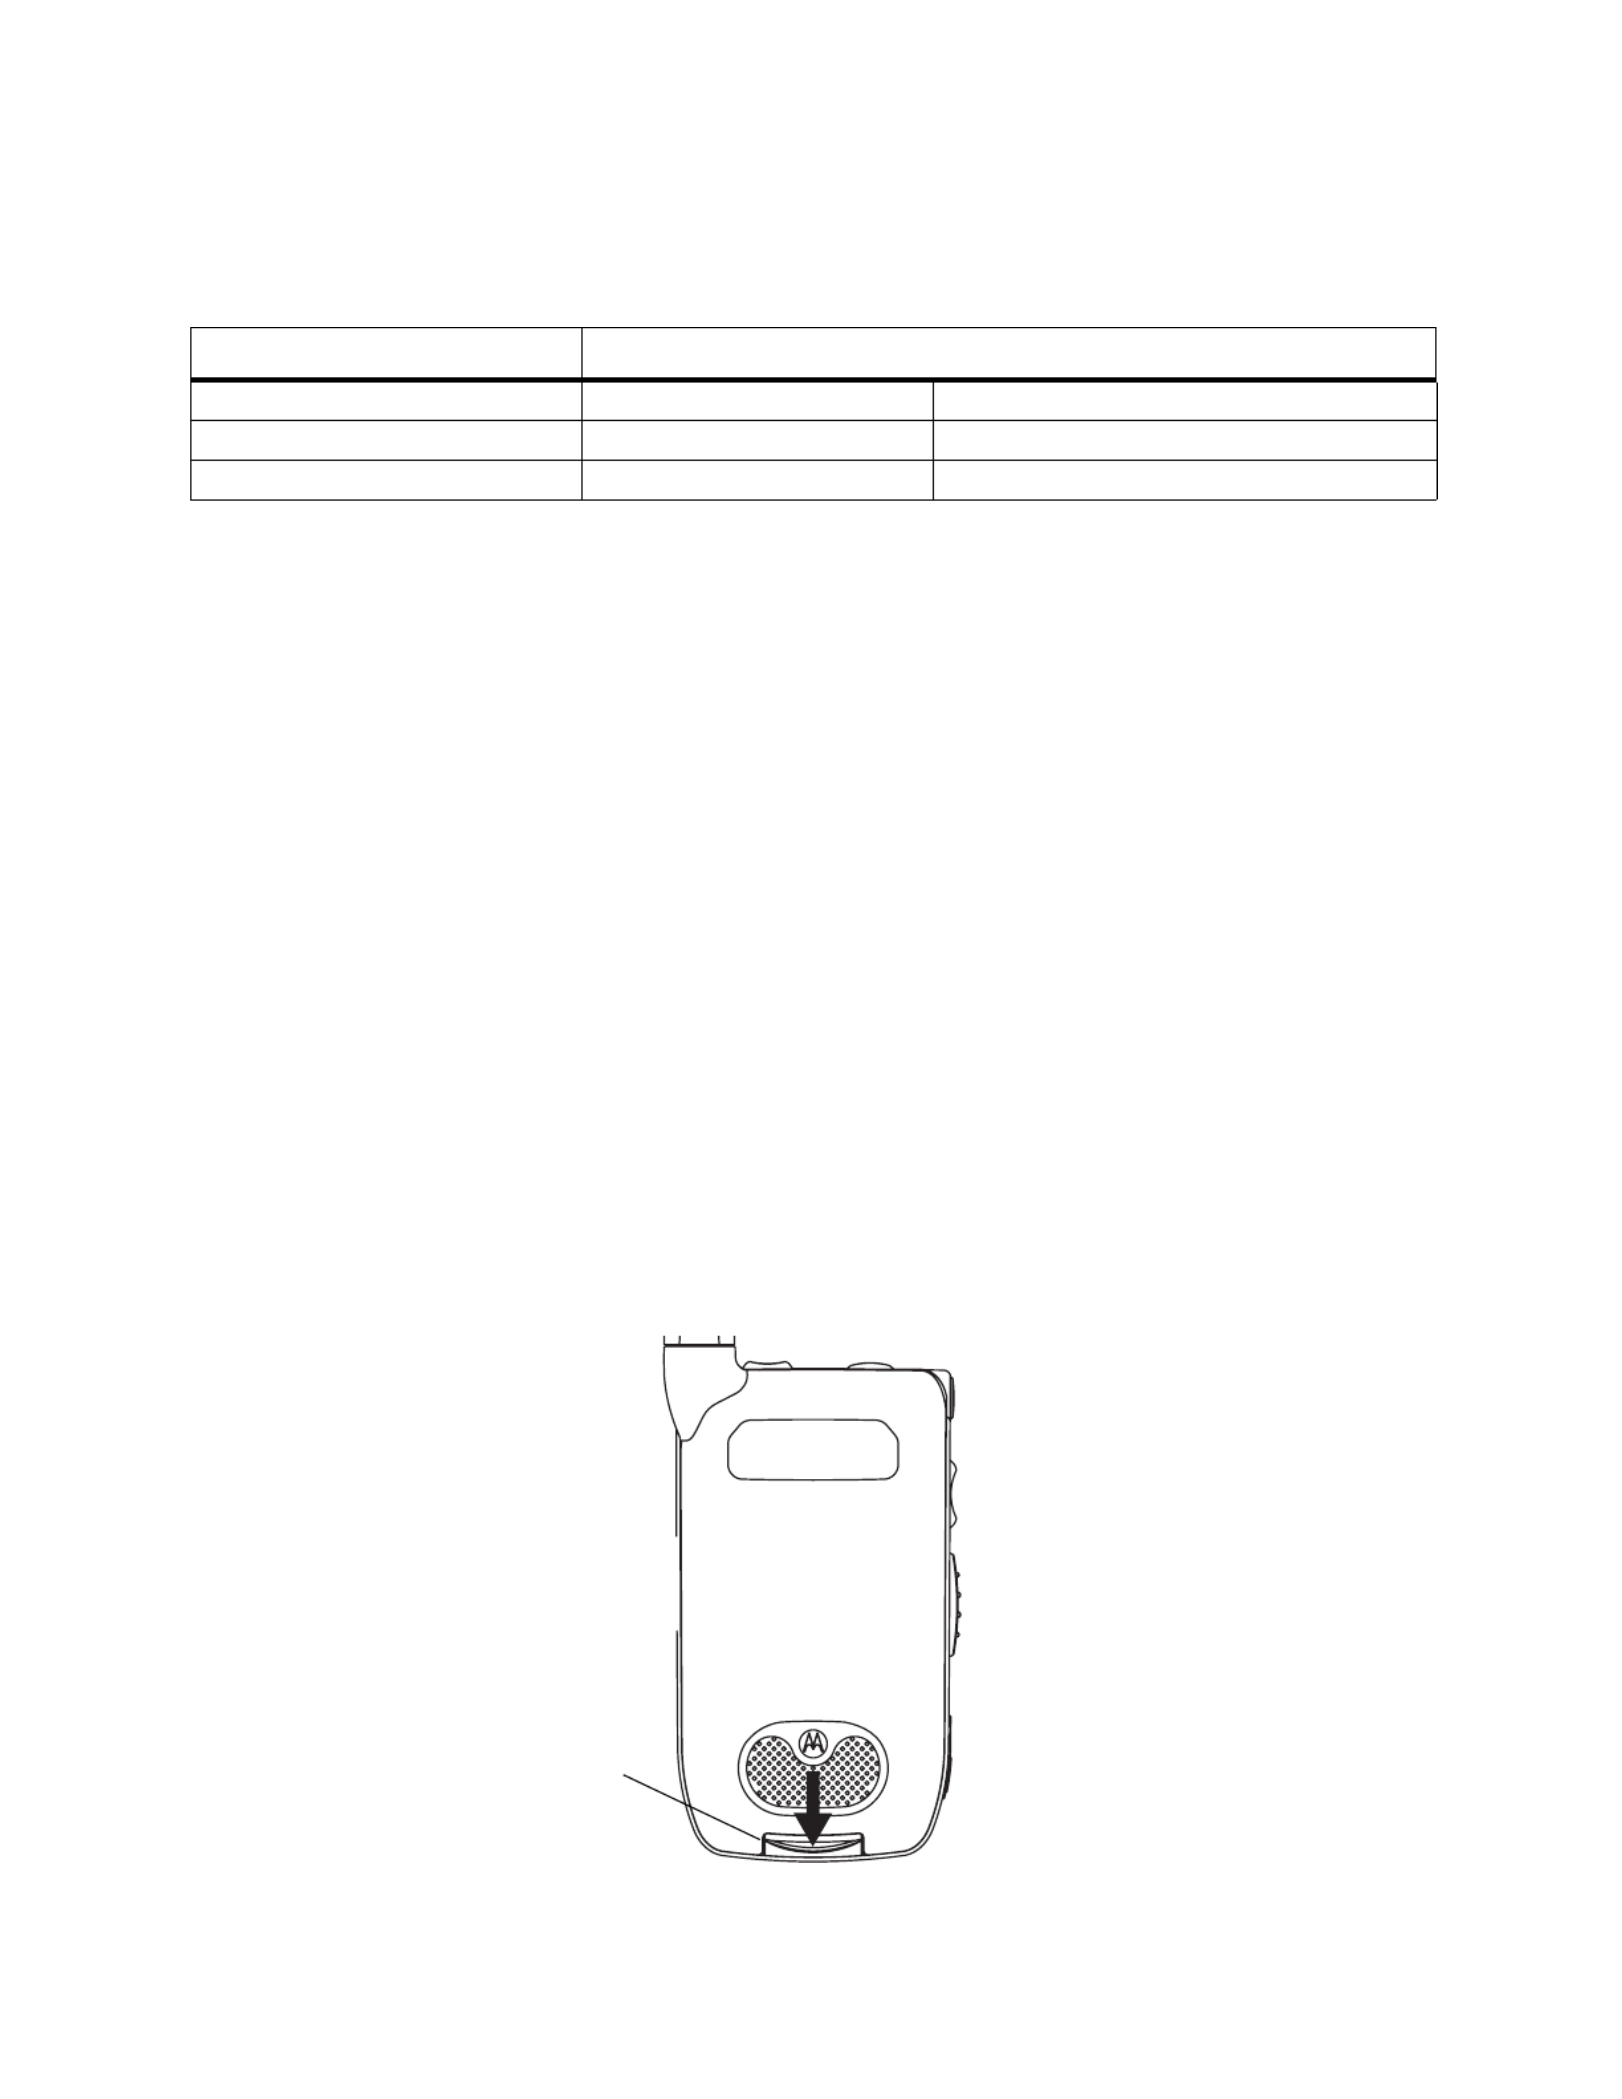
Speaker
Sound comes out of your Smartphone here when you have the speaker turned on.
Stereo Audio Port
Insert headset connector here.
Note: The stereo audio port is compatible with non-stereo headsets.
Accessory Connector
Insert the connectors of accessories such as a charger, ActiveSync cradle, or data cable
here.
Status Light Meaning when phone is on Meaning when phone is off
Flashing green In service. N/A
Solid red No service. Connected to the charger and charging.
Solid green Making a call or in a call. Connected to the charger, and fully
charged.

Getting Started 3
Infrared Port
The infrared port on your Smartphone enables you to send and receive (beam) contact
cards, calendar appointments, messages, pictures, and video clips using infrared
technology.
SD Card Slot
A secure disk flash memory card (SD card) can be use with the Smartphone. If one has
not been given to you by your service provider, you can purchase one.
Speaker Key
The speaker key (t):
•Acts like the s when your Smartphone’s flip is closed.
•Turns speaker on and off.
•Used with voice shortcuts.
Smart Key
The smart key (.):
•Acts like e when your Smartphone’s flip is closed.
•Accesses recent calls when the flip is closed.
•Suspends and resumes Java applications when the flip is closed.

Getting Started
4
Flip Open — Keypad, Navigation Area, and More
Earpiece
Sound comes out of the earpiece when the speaker is off.
Power Key
When the Smartphone is turned off:
•Press and hold the Power key (p) for 2 to 3 seconds to turn on the Smartphone.
When the Smartphone is on:
•Press p to display the Quick List, a fast way to change your profile settings or lock
the Smartphone.
•Press and hold p to turn off the Smartphone. Or, press p and then press 1.
Internal Display
The internal display shows the following information:
•At the top of the screen are status indicators about the current mode, the name of the
current activity, or the name of the active program, if one has been selected.
•In the center of the screen is the active menu or program.
•At the bottom of the screen are menus or commands related to the active program.
microphone light sensor
soft keys
earpiece
internal
display
power key
back key
end key
OK key
navigation pad
home key
send key
navigation
area
keypad

Getting Started 5
Navigation Area
This area contains the keys and controls used to:
•Navigate through your phone’s menus, lists, and screens.
•Perform commands.
•Begin phone calls, end phone calls, and put phone calls on hold.
Navigation pad
Use the navigation pad to move the selection focus up, down, left, or right. This is called
“scrolling.” In a text field, use the navigation pad to move the cursor right or left, character
by character.
OK Key
Press the OK key (O) to open a highlighted item, or to select or clear a check box. The
OK key works much like the ENTER key on a keyboard, and is sometimes referred to as
the Action key or the “Do It” key.
Soft Keys
Press a soft key (A or B) to open the menu or perform the command shown on the
screen immediately above the key.
Send Key
Press the send key (s) to:
•Dial a phone number that you entered or selected.
•Answer an incoming call.
•Place a call on hold to answer a second incoming call (call waiting).
•Change between an active call and a call that is on hold.
End Key
Press the end key (e) to:
•End a call when 1 party is on the line, and end the active call when multiple parties are
connected.
•Return to the Home screen.
Press and hold e to lock the keypad.
Home Key
Press the home key (h) to view the Home screen. The Home screen is described later, in
“Using the Home Screen” on page 19.
Back Key
Press the back key (m) to go to the previous screen or to end a Private call.
In a text field:
•Press m to backspace over 1 or more characters.
•Press and hold m to delete the entire contents of the field.

Getting Started
6
Keypad
Press keys on the keypad to enter numbers and characters.
* Key
•Press * to change between uppercase and lowercase in text input modes.
•Press and hold * to change between text and numeric input modes.
# Key
•Press and hold # to view a list of symbols that you can enter as text.
•On the Home screen, press and hold # to switch between phone lines. This feature
is available if your phone supports 2 phone lines.
Note: If you are not provisioned for a second line and you set your line to line 2, you
will not be able to make or receive calls.
Setting Up Your Smartphone
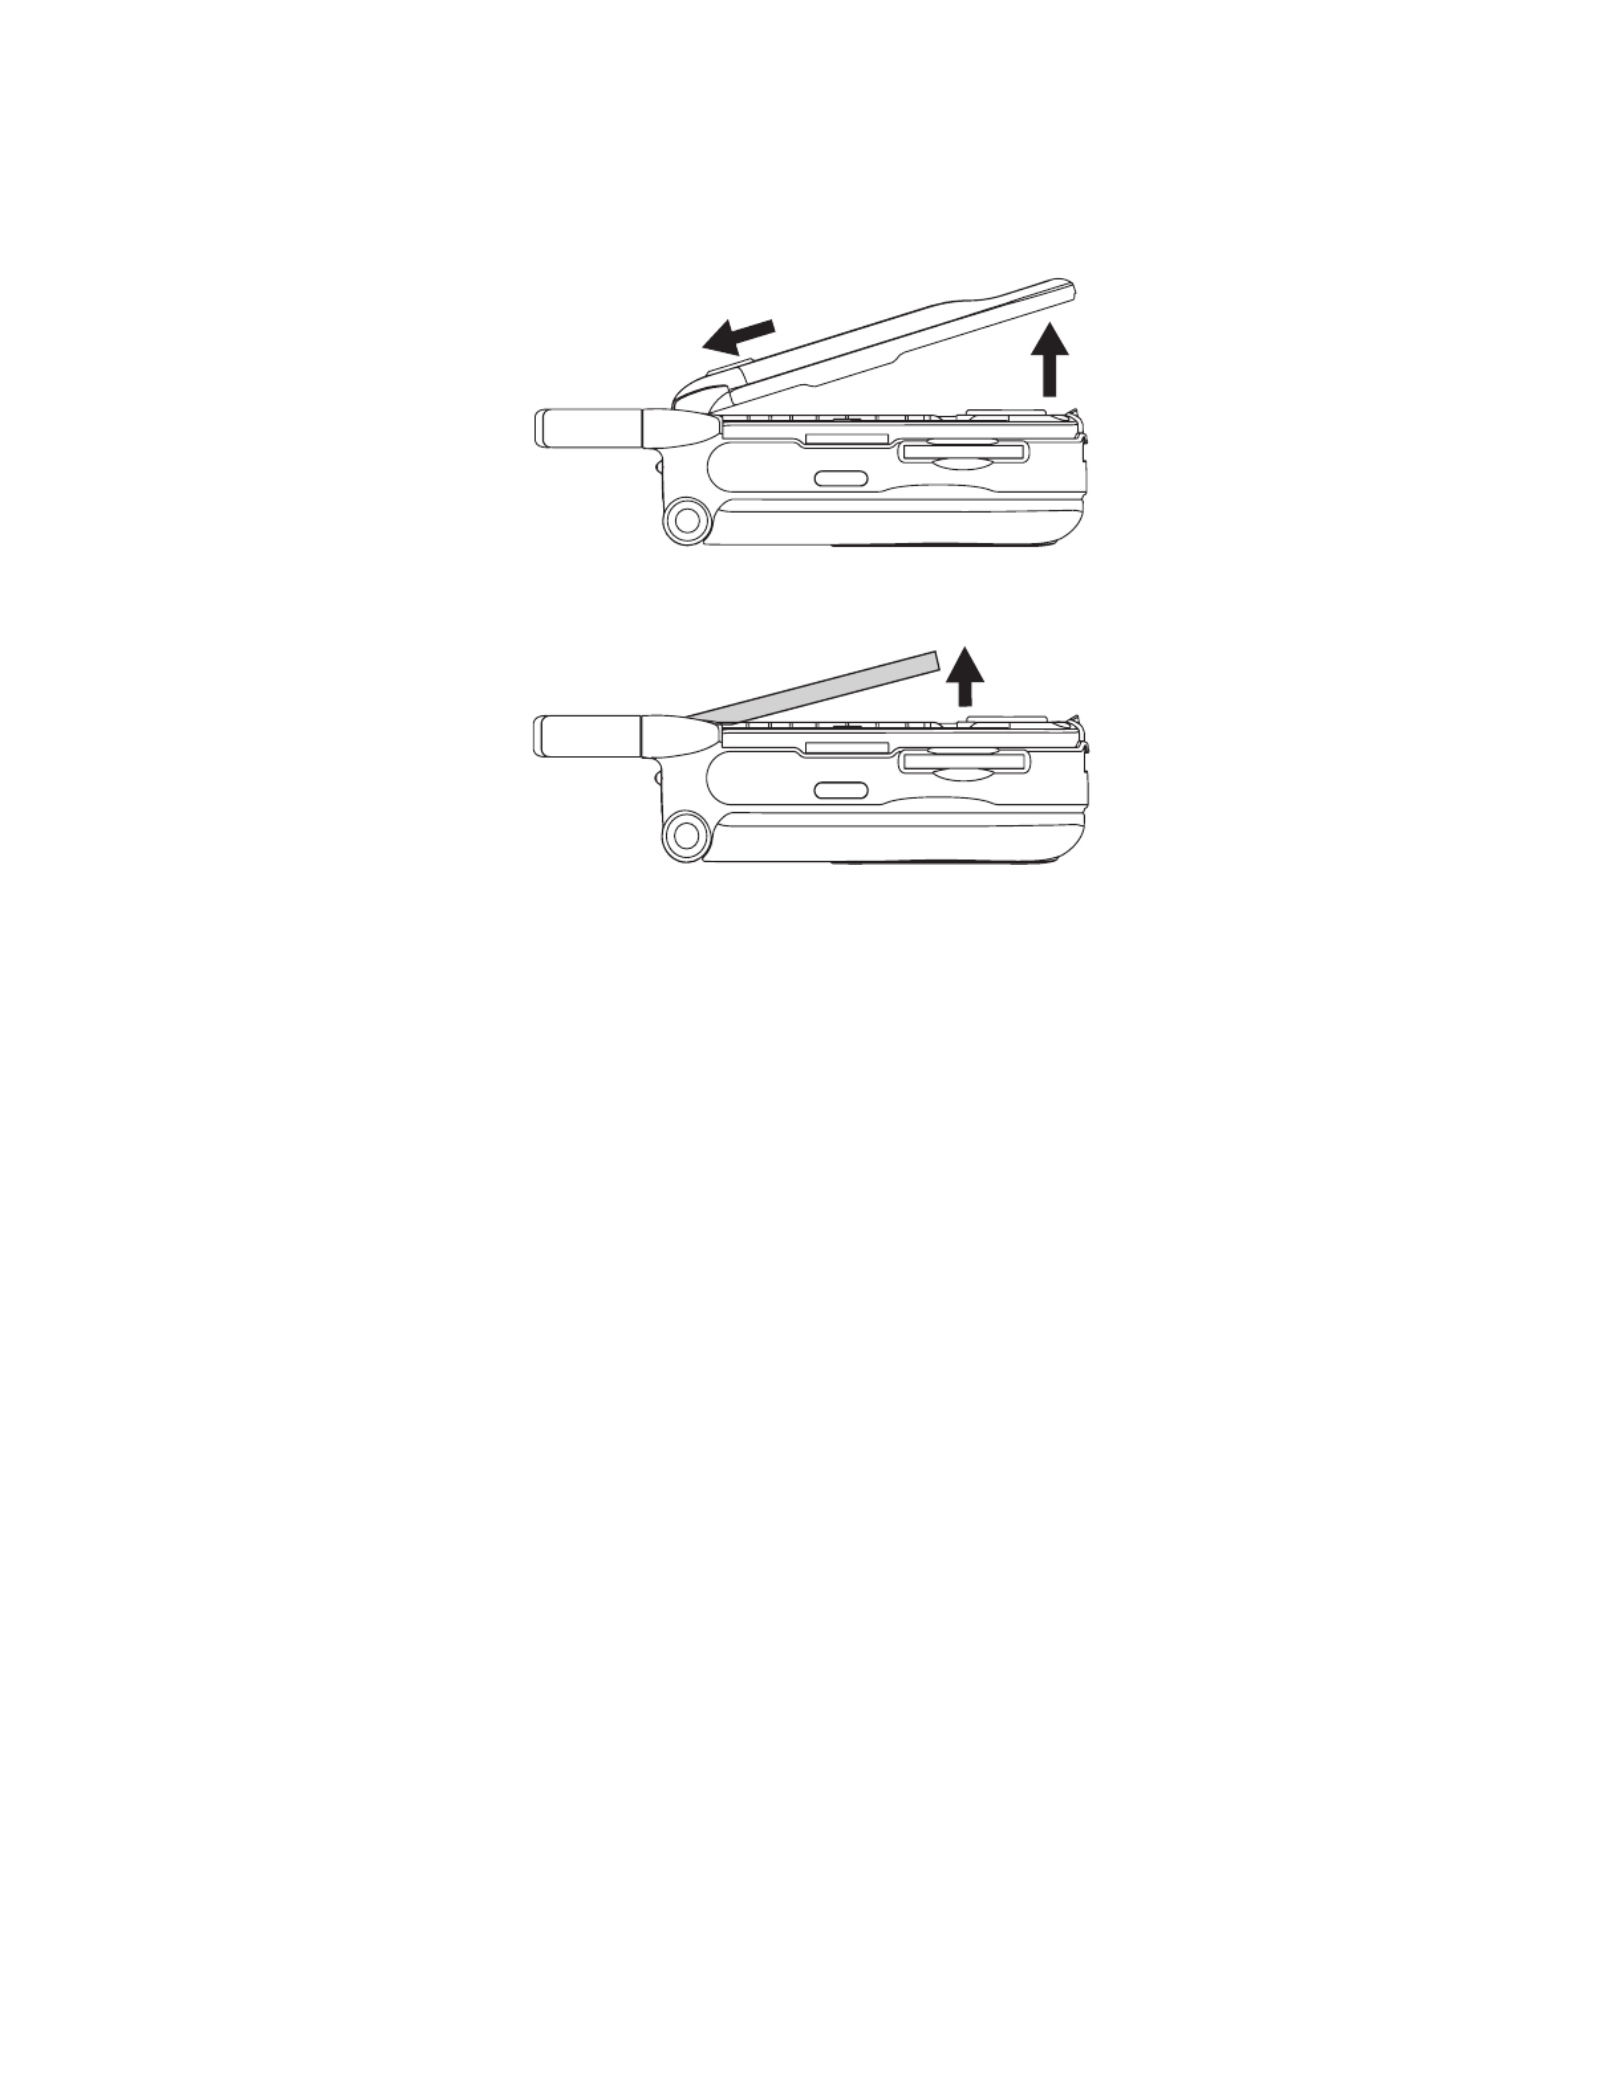
Locating Your SIM Card
Remove the battery door
1Slide the release button back until it releases the battery door.
release
button

Getting Started 7
2Allow the battery door to pop up, slide it forward, and remove it from the back of your
Smartphone.
Your SIM (Subscriber Identity Module) card is a small piece of plastic located in the SIM
card holder in the back of your Smartphone, underneath the battery.
If there is no SIM card in your Smartphone, contact your service provider.
SIM card

Getting Started
8
Charging the Battery
Your Smartphone comes with a High Performance Lithium Ion Battery and a rapid travel
charger to charge it.
Insert the battery before charging it
1Slide the release button back until it releases the battery door.
2Allow the battery door to pop up, slide it forward, and remove it from the back of your
Smartphone.
3Insert the top of the battery into the battery area. Press the bottom of the battery to
secure it.
release
button

Getting Started 9
4Replace the battery door and press it gently until you hear a click.
Charge the battery
1Plug the charger into an electrical outlet.
2Open the connector cover.
3Plug the other end of the charger into the accessory connector.
Tip: To remove the charger from the accessory connector: Press the buttons on the
sides of the plug. Pull the plug straight out.
4If you have purchased optional batteries or chargers, see “Charging Times”.
connector
cover
Getting Started
10
Charging Times
Check your battery and charger type against the grid below to determine appropriate
charging times.
For best results, charge the batteries within the temperature range of 50°F to 104°F
(10°C to 40°C).
Prolonged charging is not recommended.
Battery Use and Maintenance
•The Motorola iDEN Approved Lithium Ion chargers provide optimum performance.
Other chargers may not fully charge the iDEN Lithium Ion battery or may yield a
reduced number of lifetime charge cycles.
•Extreme temperatures degrade battery performance. Do not store the battery where
temperatures exceed 140°F (60°C) or fall below 4°F (-20°C).
•Lithium Ion batteries have a self discharge rate and without use, lose about 1% of
their charge per day.
•The battery capacity is degraded if the battery is stored for long periods while fully
charged. If long term storage is required, store at half capacity.
Removing the Battery
Normally, it is not necessary to remove your Smartphone’s battery, but you may want to
if you have purchased an optional charger or want to remove your SIM card.
Remove the battery
1Power off your Smartphone.
2Slide the release button back until it releases the battery door.
Battery Charger
Rapid Standard
High Performance 2 hours 4 hours
Extra Capacity 2.5 hours 5.5 hours
release
button
Getting Started 11
3 Allow the battery door to pop up, slide it forward, and remove it from the back of your
Smartphone.
4 Remove the battery by pushing it toward the antenna and lifting it out.
Installing ActiveSync
You can use Microsoft ® ActiveSync ® technology to synchronize the information on your
Smartphone with information on your desktop computer and optionally, a server running
Microsoft® Exchange ® Server with Exchange ActiveSync.
Install ActiveSync on the desktop computer
1 Insert the Smartphone CD into the CD drive of your desktop computer. The CD
screen will open.
2 Click Getting Started with Windows Mobile.
3 Click Start Here.
4 Click Install ActiveSync.
5 Click Install.
6 Follow the instructions.

Getting Started
12
Turning Your Smartphone On
Turn On
Press and hold the power button for 2 or 3 seconds.
While your Smartphone powers on for the first time, you will receive an alert to select OK
to restart the device. Select OK when prompted.
Note: This step is only necessary the first time you power on your Smartphone.
Turn Off
Press and hold the power button for 2 or 3 seconds.
Or, press the power button and then press 1.
i930 Sync Cradle
Depending on your service provider, your Smartphone may come with an i930 Sync
Cradle and mini USB cable that you use when using ActiveSync. Before using
ActiveSync, assemble the i930 Sync Cradle, connect the mini USB cable, and place the
Smartphone in the cradle.
Place the Smartphone in the cradle with the Smartphone powered off unless you have
already installed ActiveSync on your desktop computer. Do not power on the
Smartphone while it is in the cradle until you have installed ActiveSync on your desktop
computer.
Tip: You can also use the i930 Sync Cradle to charge the battery in your
Smartphone.
Assemble the i930 Sync Cradle
1 Place the tabs of the phone support into the slots in the base of the cradle.
• If you are using a High Performance Lithium Ion battery, place the tabs in the slots
closest to the front of the base.
• If you are using an Extra Capacity Lithium Ion battery, place the tabs in the slots
just behind the slots closest to the front.
power
button

Getting Started 13
2 Press the phone support downward on to the base of the cradle, until it cannot easily
be removed.
Connect the mini USB cable
1 Insert the cable’s smaller connector into the cradle’s USB port.
2 Insert the cable’s large connector into desktop computer’s USB port.
tabs
slots
USB port

Getting Started
14
Place the Smartphone into the cradle
1 Open the Smartphone’s connector cover.
2 Place the Smartphone into the cradle, inserting the connector in the base of the
cradle into the Smartphone’s accessory connector.
Using the i930 Sync Cradle to Charge Your
Smartphone
You can use the i930 Sync Cradle to charge your Smartphone any time, whether or not
you are using ActiveSync or have the mini USB cable attached.
Charge the battery
1 Plug the charger into an electrical outlet.
connector
cover

Getting Started 15
2 Plug the other end of the charger into the cradle’s charger port.
3 Open the Smartphone’s connector cover
4 If you have not yet installed ActiveSync on your desktop computer, make sure your
Smartphone is powered off.
5 Place the Smartphone into the cradle, inserting the connector in the base of the
cradle into the Smartphone’s accessory connector.
charger port
connector
cover

Getting Started
16
Synchronizing by Using ActiveSync
You can use Microsoft ® ActiveSync ® technology to synchronize the information on your
Smartphone with information on your desktop computer and optionally, a server running
Microsoft® Exchange ® Server with Exchange ActiveSync. When you do this, ActiveSync
compares the information on the Smartphone with the information on the desktop
computer and Exchange Server, and updates all locations, keeping you up to date with
the most recent information. You can even synchronize on a customizable schedule, or
as items arrive.
Use the 930 Sync Cradle and mini USB cable included with your Smartphone to connect i
your Smartphone to your desktop computer.
To successfully connect your Smartphone to your desktop computer and synchronize
information, you must first install ActiveSync on your desktop computer.
Do not connect your desktop computer and Smartphone with the USB cable until after
you have installed ActiveSync.
After synchronizing for the first time, take a look at Calendar, Contacts, and Tasks on the
Smartphone. You will notice that your information has been copied to the Smartphone.
Disconnect the Smartphone from the desktop computer and you are ready to go!
Tip: Before you copy your Outlook Contacts to your Smartphone Contact list, it is a
good idea to clean up your Outlook Contacts list to avoid duplication of Contacts
that may already be on your Smartphone, and to assure that your Contacts are
alphabetized consistently with the Contacts on your Smartphone. Your Outlook
Contacts are combined in the same list as your Smartphone Contacts.
For more information about installing and using ActiveSync, see “ActiveSync” on page
145.
Setting Up a Partnership
After you install ActiveSync, assemble the i930 Sync Cradle and use it to connect your
Smartphone to your desktop computer. You are now ready to set up a partnership
between your Smartphone and your desktop computer.
Run the ActiveSync New Partnership Wizard
1 Press and hold p for 2 to 3 seconds to power on the Smartphone.
2 When your desktop computer detects the USB connection, it will start the ActiveSync
New Partnership Wizard. Follow the instructions on the screen.
After you finish using the wizard, your data will begin to synchronize between your
desktop computer and your Smartphone.
Accessories
To order accessories, log on to our Web site at www.motorola.com/store/iden or contact
your Motorola Authorized Retailer.

Getting Started 17
Finding More Information
The following table is a guide to finding more information about using your Smartphone.
Information about Source
Making a phone call This user guide: “Phone Calls” on page 35.
SIM card This user guide: “Securing Your Smartphone” on page
28 and “SIM Manager” on page 69.
Entering text This user guide: “Entering Text and Numbers” on page
24.
Customizing your Smartphone’s features This user guide: “Settings” on page 74.
Programs on the Smartphone This user guide: “Using the Start Menu” on page 20.
Additional programs that you can install on the
Smartphone
Companion CD.
Connecting to and synchronizing with a desktop
computer or a Microsoft Exchange Server
Welcome Guide or ActiveSync Help on the desktop
computer.
Motorola warranty service or other information. http://www.motorola.com/iden/support
Last-minute updates and detailed technical
information
Readme files, located in the Microsoft ActiveSync folder
on the desktop computer.
Up-to-date information on using ActiveSync with
your Smartphone
http://www.microsoft.com/mobile

The Basics 19
Using Menus
On many screens, the right soft key is the Menu soft key. Pressing this soft key displays
a list of commands for the current screen. Depending on the menu, selecting a command
has one of the following results:
• Performs the command.
• Takes you to another screen where you can perform the command.
• Displays another menu.
• Opens a program.
Use a menu command
1 Select Menu by pressing B beneath Menu on any screen where Menu is displayed.
2 Select a command by scrolling to it and pressing O.
Navigate a menu
• You can choose menu commands quickly by pressing the number on the keypad that
corresponds to the number shown next to the command you want.
• When the top menu command is selected, scrolling up moves the selection focus to
the menu item on the bottom of the screen.
• To see more of a menu that takes up more than one screen, select More from the
menu or press 9.
Using the Home Key
Pressing h takes you to the Home screen.
Using the Home Screen
The Home screen is your starting place for most tasks. You can gain access to all of the
Smartphone features and programs from the Home screen.
The Home screen displays automatically when you turn on the Smartphone or leave the
Smartphone idle when it is on, but you can go to it at any time by pressing h.
You can control what displays on your Home screen by choosing from 6 Home screen
layout settings: Motorola Basic, Motorola Default, Windows Simple, Windows Default,
Windows Basic, and Large Font.
When you recieve your Smartphone the Home screen layout setting is Motorola Default.
Motorola Default Layout
The Home screen displays:
• Status icons
• Icons for the 5 programs that you have most recently used.
• The name of the program associated with the icon selected in the row above
• Your service provider’s name
• The time and date
• Information about items in your recent calls list, if you are not in a call. Information
about active calls and calls on hold, if you are in a phone call.
• The upcoming appointments stored in the phone Calendar.

The Basics
20
• The number of voice mail messages you have. Select this area to go to your voice
mail messages.
• The number of email messages and text messages (SMS). Select this area to go to
your Inbox.
• The Start menu, on the left. Pressing the soft key for this menu takes you to the list of
installed programs.
• A variable option, on the right. Pressing this soft key opens the associated program.
Change the Home screen layout
1 On the Home screen, select Start.
2 Select Settings and then Display Properties.
3 In Home screen layout, select the option you want.
4 Select Done.
Note: To change other display property settings, see “Display Properties” on page 74.
Open programs from the Home screen
For all Home screen layouts:
• To open a program from the list of programs on the Start menu, select the start menu
by pressing A beneath Start, and then select a program by scrolling to it and
pressing O.
• To open the program that appears as the right variable option, such as Contacts,
press B beneath it.
For some Home screen layouts:
• To open any the programs that you have most recently used, select the icon
associated with the program by scrolling to it (you can scroll left and right by pressing
the left and right parts of your navigation pad) and pressing O.
• To go to your list of voice mail messages, select voice mail by scrolling to the voice
mail area of the screen and pressing O.
• To go to your Inbox for your email messages and text messages (SMS), select the
Inbox by scrolling to the message area of the screen and pressing O. If you have
additional email accounts set up, scroll down to view and select them.
• To go to the recent calls list, select it by scrolling to the area showing information
about the recent calls list and pressing O.
• To go to the Calendar, select it by scrolling to the area showing information about
upcoming appointments and pressing O.
Using the Start Menu
You can access most of your Smartphone’s features directly from the Start menu.
Pre-installed programs appear on the Start menu, as do programs you install on your
phone, such as Java applications.
Open a program
1 On the Home screen, select Start by pressing A beneath Start.
2 Select a program by scrolling to it and pressing O.

The Basics 21
Assigning a Speed Dial Number to a Program
To make a program on the Start menu easier to access, you can assign that program a
speed dial number. When you press and hold the number you have assigned, the
program will open.
Assign a speed dial number to a program
1 On the Home screen, select Start by pressing A beneath Start.
2 Highlight the program you want to assign a speed dial number to.
3 Select Menu.
4 Select Add Speed Dial.
5 In the screen that appears, you can assign a speed dial number and the name that
will appear for the speed dial number in your list of speed dial numbers, or accept the
default values that are shown.
6 Select Done.
Using the Quick List
The Quick List provides a list of commands that you can use to quickly perform common
actions.
Use the Quick List
1 Press p.
2 Select the Quick List command you want by scrolling to it and pressing O.
Commands are described in the following table.
To Select this Quick List
Command
Turn off the Smartphone. Power off
Turn off wireless capability. You can turn off wireless capability to
conserve battery life when you do not want to make or receive calls,
or in environments where cell phones must be turned off. When the
wireless capability is turned off you can still use the other Smartphone
features.
Flight mode
Lock the keypad so that you cannot make accidental keypresses. To
unlock the keypad, select Unlock, and then press #.
Key lock
Turn on all wireless capability, so that you can make and receive calls. Flight mode off
Make one of these profiles the active profile. Normal
Silent
Meeting
Outdoor
Automatic
Headset
Car
Speakerphone

The Basics 23
Backlight Dimming
A backlight lights the display and keypad when you make or receive a call, open or close
the flip, or press keys or buttons.
If you do not do any of these things for 10 seconds, the backlight of the internal display
dims. If you do not do any of these things for 30 seconds or more, the backlight turns off.
While on an active call with the flip open or closed, the internal display or external display
will remain dimly lit for the duration of the call.
When the backlight is off, pressing a key on the keypad turns the backlight on but does
not perform the action associated with the key.
Set time it takes for the backlight to turn off
1 On the Home screen, select Start.
2 Select Settings and then Power Management.
3 In Backlight timeout, select the amount of time for the Smartphone before the
backlight turns off, if you do not make or receive a call, open or close the flip, or press
keys or buttons.
4 Select Done.
Packet data exchanging for IDEN mode
Roaming
Sync error
Radio off
Ringer off
Vibrate instead of ringing
Speakerphone on — Phone call sounds come through the speaker
Speaker on — Private call and group call sounds come through the speaker
Speaker off — Private call and group call sounds come through the earpiece
Indicator Meaning

The Basics
24
Finding Your Phone Number and Other
Basic Information
The Owner Information screen displays the following information about your
Smartphone:
Access the Owner Information screen
1 On the Home screen, select Start.
2 Select Settings and then select Owner Information.
Entering Text and Numbers
You can enter text and numbers by using the keypad. Smartphone supports 4 input
modes for entering text and numbers: Multipress, T9, Numeric, and Symbols. Multipress
and T9 modes are used for entering text, Numeric mode is used for entering numbers,
and Symbols is used for entering symbols.
When you select a field that requires text or numbers, Smartphone automatically selects
the appropriate input mode.
The status indicator on the top right side of the display screen shows the input mode and
capitalization that you are currently using.
This Field Displays
Name If you want to fill in this field, enter your name.
Line 1 Your phone number. This number appears when your receive your first
phone call.
Line 2 Your Smartphone’s second line, if you have one.
PTT Your Private ID, the number others use to contact you on Private calls.
Email address If you want to fill in this field, enter your email address here.
PTT Group ID The number of the Talkgroup you have joined.
Carrier IP The IP address assigned to your service provider. This field is filled in
when you register for packet data services.
IP Address - 1 The IP address you use to access the Internet with your Smartphone.
This number appears when you register for packet data service.
IP Address - 2 The IP address you use to access the Internet with your Smartphone.
This number appears when you register for packet data service.
Circuit Data The number you want if you want you use your Smartphone to transfer
circuit data. See “Using Your Smartphone as a Modem” on page 153. You
get this number from your service provider.
Notes: If you want to fill in this field, enter the note you want to appear here.
Indicator Input mode
Multipress text input mode, lowercase
Multipress text input mode, uppercase 1 letter
Multipress text input mode, caps lock

The Basics 25
If you are using Symbols mode, a page of symbols for you to choose from appears on
the screen, but no status indicator appears.
Change input modes and capitalization
To choose Multipress, T9, Numeric, or Symbols mode:
1 Press and hold * until a menu appears showing all input modes.
2 Select the mode you want.
To choose Multipress, T9, or Numeric mode, and choose the capitalization you want:
• Press * repeatedly until the status indicator for the input mode you want is shown on
the top of the display screen.
To select Symbols mode:
• Press and hold #.
Delete characters
• Press m to delete character to the left of the cursor.
• Press and hold m to delete all the characters in a line.
Insert a space
• Press #.
Entering Text in Multipress Mode
To enter a letter in Multipress mode, press the number key on which the letter appears.
To enter the first letter on the number key, press the key once. To enter the second
letter, press the key twice, and so on.
For example:
• To enter the letter “s,” press 7777.
• To enter the word “hat,” press 44, 2 8, .
The letter entered most recently is underlined until you have completed the keypresses
for the letter and moved on to the next letter. When you enter letters that are on the same
number key, you must pause after entering the first letter and wait until the underline
disappears before entering the next letter so that the first letter can be processed. For
example:
• To enter the word “cat,” press 222, pause, press 2, pause, and press 8.
The pause between keypresses is called the Multipress time out, and you can adjust the
length of the pause.
T9 text input mode, lowercase
T9 text input mode, uppercase 1 letter
T9 text input mode, caps lock
Numeric input mode
Indicator Input mode

The Basics
26
Change the Multipress time out
1 On the Home screen, select Start.
2 Select Settings and then Accessibility.
3 Select Multipress Timeout.
4 In Multipress time out, select the length of the pause between keypresses.
5 Select Done.
Enter Punctuation in Multipress Mode
• Press 1 repeatedly until you see the punctuation mark that you want.
Tip: To see all of the available symbols, press and hold #.
Entering Text in T9 Mode
To form a word in T9 mode, press the number keys that contain the letters you want. As
you enter letters, T9 analyzes your keypresses and attempts to complete the word. For
example, to enter the word “shoe,” press 7 4, , 6 3, .
Enter text in T9 mode
1 Select T9 as your input mode.
2 Enter letters by pressing the keys on which the letters appear. Press a key only once
for each letter.
Tip: If your word is 3 letters long or longer, it is best to press the keys for at least the
first 3 letters.
3 If the word you want appears:
• Scroll right to accept the word and move the cursor to the end of the word.
• Scroll left to accept the word and move the cursor to the beginning of the word.
• Press # O or to accept the word and enter a space after it.
4 If you want to view a list of available words, use the navigation pad to scroll up or
down. When the word you want is highlighted:
• Scroll right to accept the word and move the cursor to the end of the word.
• Scroll left to accept the word and move the cursor to the beginning of the word.
• Press # O or to accept the word and enter a space after it.
If you do not see the correct word, backspace to delete the word you entered, press and
hold * to change to Multipress mode, and then manually enter the word.
Enter compound words in T9 mode
You can string short words together to create longer, compound words like “mailman” or
“cannot”.
1 Enter the word that is the first part of the compound word, like “mail” or “can”.
2 Scroll right to accept the word and move the cursor to the end of the word.
3 Enter the word that is the next part of the compound word, like “man” or “not”.
Enter punctuation in T9 mode
• Press 1, then use the navigation pad to scroll through a list of common punctuation
and select the one you want.

The Basics 27
Enter “emoticons” in T9 mode
1 Press 1 twice or 3 times, depending on the number of characters in the “emoticon”
you want.
2 Use the navigation pad to scroll through a list of “emoticons” and select the one you
want.
Having Trouble Entering a Word in T9 Mode?
T9 cannot always find the word you want in the list of possible words; in these cases, add
the word to the T9 dictionary. Next time, you will be able to enter the word in T9 mode.
Add a word to the T9 dictionary
1 Scroll to the end of the list of words and select Add Word?.
2 Enter the word in Multipress mode.
3 Select Done.
Entering Numbers
You can enter numbers by using Numeric mode. If you need to enter a number within a
line of text, you can change to Numeric mode to enter the number, and then change back
to Multipress or T9 mode to finish entering the text.
Enter a number
1 If necessary, change to Numeric mode by pressing and holding *.
2 On the keypad, press the number you want.
3 Change back to Multipress or T9 input mode by pressing and holding *, and then
finish entering your text.
Note: If a field permits a numeric entry only, such as the Work phone field in
Contacts, the input mode automatically defaults to Numeric mode.
Entering Symbols
In Multipress and T9 modes, you can access some symbols by pressing 1.
In any mode you can access all symbols by pressing and holding # until a page of
symbols appears. When you select the symbol you want, you are returned to the
previous mode.
Enter a symbol
• In Multipress or T9 mode, press 1 repeatedly until the symbol you want appears.
• In any mode, press and hold # and select the symbol you want.
Performing Common Input Tasks
Enter a space
• In Multipress or T9 mode, press #.
Start a new line
• In any input mode, press O.

The Basics
28
Delete characters
• Press m to delete the character to the left of the cursor.
• Press and hold m to delete all the characters in a line.
Change between uppercase and lowercase
• In Multipress or T9 mode, press *.
Tip: In Multipress or T9 mode, the first letter of a sentence is automatically
capitalized.
Lock caps
• In Multipress or T9 mode, press * twice. Press * again to return to lowercase.
Enter a symbol
• In any input mode, press and hold # and select a symbol.
Enter the plus (+) sign for international calls
• Press and hold 0.
Securing Your Smartphone
You can secure your Smartphone by:
• Using your SIM card PIN feature
• Removing the SIM card from your Smartphone
• Locking the Smartphone’s keypad
For more security settings, see “Security” on page 96.
Using the SIM Card PIN
To prevent unauthorized use of your Smartphone, your SIM card can be protected by a
PIN that you enter each time the Smartphone is powered on. You can change the PIN,
and you can select whether you want the requirement that it be entered on or off. The
default selection is off.
When the SIM PIN requirement is off, your Smartphone can be used without entering a
PIN.
Important: When the SIM PIN requirement is off, the personal data on your SIM
card is not protected. Anyone can use your Smartphone and access
your personal data.
When the SIM PIN requirement is on, you are prompted to enter your PIN each time you
power on your Smartphone.
Note: If a SIM PIN is required, your Smartphone will not function until the SIM PIN is
entered, except for making emergency calls.

The Basics 29
Turn the PIN requirement on or off
1 On the Home screen, select Start.
2 Select Settings then Security.
3 Select Enable SIM PIN or Disable SIM PIN.
4 Enter your PIN and select Done.
Note: The default SIM PIN is 0000. Change your PIN to prevent fraudulent use of the
SIM card (see “Change the PIN”).
Enter the PIN
1 When the screen appears after you power on your Smartphone, enter Enter PIN
your SIM PIN.
2 Select Done.
Note: If you enter your PIN incorrectly 3 times, your SIM card is blocked. To unblock
your SIM card, you must contact your service provider. See “Unblock the PIN”
on page 29.
Change the PIN
Note: The SIM PIN requirement must be turned on in order to access this feature.
1 On the Home screen, select Start.
2 Select Settings and then Security.
3 Select Change PIN.
4 In Old PIN, enter the current PIN number.
5 In New PIN, enter the new PIN number.
6 In Confirm new PIN, enter the new PIN number again, and select Done.
Important: Be sure to make a note of your PIN. When the SIM lock is enabled,
you must provide this PIN when you turn on your Smartphone to
make calls.
Unblocking the PIN
If you enter your PIN incorrectly 3 times, your SIM card is blocked. To unblock your SIM
card, you must contact your service provider to get a PIN Unblock Code (PUK).
Important: If you unsuccessfully enter the PUK code 10 times, your SIM card is
permanently blocked and must be replaced. If this happens, all data
is lost. You will get a message to contact your service provider.
Except for making emergency calls, your Smartphone will not
function with a blocked SIM card.
Unblock the PIN
1 Contact your service provider.
2 At your service provider’s representative’s request, provide the information needed to
give you a PUK code.
3 Select Unblock PIN.
4 Enter the PUK code.
5 Enter a new 4- to 8-digit SIM PIN.
6 Re-enter your SIM PIN.

The Basics 31
4 Remove the battery by pushing it toward the antenna and lifting it out.
5 Slide your SIM card out of the SIM card holder.
Return the SIM card to your Smartphone
1 Make sure the Smartphone is powered off
2 If necessary, remove the battery door and battery.
3 Hold your SIM card and Smartphone in the orientation shown in step 4.
4 Carefully slide your SIM card into your Smartphone until it lines up with the marks
above and below the SIM card holder.
SIM card
holder
SIM card
holder
Product specificaties
| Merk: | Motorola |
| Categorie: | Smartphone |
| Model: | i930 |
| Kleur van het product: | Zwart, zilver |
| Gewicht: | 168 g |
| Breedte: | 49 mm |
| Diepte: | 30 mm |
| Hoogte: | 88 mm |
| Bluetooth: | Nee |
| Beeldschermdiagonaal: | 2.2 " |
| Resolutie: | 176 x 220 Pixels |
| Touchscreen: | Nee |
| Vormfactor: | Clamshell |
| Type camera achterzijde: | Enkele camera |
| Compatibele geheugenkaarten: | MMC, SD |
| MMS: | Ja |
| Tekstvoorspellingssysteem: | Ja |
| Trilalarm: | Ja |
| Beeldscherm, aantal kleuren: | 65536 kleuren |
| FM-radio: | Nee |
| Digitale zoom: | 4 x |
| Intern geheugen: | 32 MB |
| Ingebouwde camera: | Ja |
| Gesprekstijd (2G): | 2.75 uur |
| Text voorspellingssysteem: | T9 |
| Type ringtone: | Polyfonisch |
| Standby time (2G): | 65 uur |
| Tweede camera resolutie: | 640 x 480 Pixels |
| Batterijtechnologie: | Lithium-Ion (Li-Ion) |
| Type beeldscherm: | TFT |
Heb je hulp nodig?
Als je hulp nodig hebt met Motorola i930 stel dan hieronder een vraag en andere gebruikers zullen je antwoorden
Handleiding Smartphone Motorola

25 Februari 2025
10 Januari 2025
19 December 2024
19 Juni 2023
14 Juni 2023
14 Juni 2023
12 Juni 2023
12 Juni 2023
7 Juni 2023
27 Mei 2023
Handleiding Smartphone
- Smartphone Philips
- Smartphone HP
- Smartphone Sony
- Smartphone Samsung
- Smartphone Xiaomi
- Smartphone Panasonic
- Smartphone Brondi
- Smartphone LG
- Smartphone Huawei
- Smartphone Asus
- Smartphone AEG
- Smartphone Fysic
- Smartphone Garmin
- Smartphone Gigaset
- Smartphone Honeywell
- Smartphone Medion
- Smartphone Nokia
- Smartphone Toshiba
- Smartphone Wiko
- Smartphone Yarvik
- Smartphone Acer
- Smartphone Aiwa
- Smartphone Albrecht
- Smartphone Alcatel
- Smartphone Alcatel-Lucent
- Smartphone Alecto
- Smartphone Aligator
- Smartphone Allview
- Smartphone Amazon
- Smartphone Amplicom
- Smartphone Amplicomms
- Smartphone Androidtech
- Smartphone Apple
- Smartphone AQISTON
- Smartphone Archos
- Smartphone AT Telecom
- Smartphone Audioline
- Smartphone Auro
- Smartphone Avus
- Smartphone Beafon
- Smartphone Benefon
- Smartphone BenQ
- Smartphone Binatone
- Smartphone Blackberry
- Smartphone Blaupunkt
- Smartphone Blu
- Smartphone Bluebird
- Smartphone BQ
- Smartphone Brigmton
- Smartphone Bury
- Smartphone Danew
- Smartphone Dell
- Smartphone Denver
- Smartphone Doogee
- Smartphone Doro
- Smartphone Easypix
- Smartphone Echo
- Smartphone Ecom
- Smartphone Emporia
- Smartphone Energizer
- Smartphone Energy Sistem
- Smartphone Fairphone
- Smartphone Fero
- Smartphone Garmin-Asus
- Smartphone Geemarc
- Smartphone General Mobile
- Smartphone Gigabyte
- Smartphone Gionee
- Smartphone Goclever
- Smartphone Google
- Smartphone GreatCall
- Smartphone Haier
- Smartphone Hammer
- Smartphone Handheld
- Smartphone Hannspree
- Smartphone Hisense
- Smartphone HomTom
- Smartphone Honor
- Smartphone HTC
- Smartphone Hyundai
- Smartphone I.safe Mobile
- Smartphone Iget
- Smartphone Infinix
- Smartphone InFocus
- Smartphone Intermec
- Smartphone Intex
- Smartphone Itel
- Smartphone ITT
- Smartphone Kazam
- Smartphone Klipad
- Smartphone Kodak
- Smartphone Kogan
- Smartphone KPN
- Smartphone Kurio
- Smartphone Kyocera
- Smartphone Lava
- Smartphone Leagoo
- Smartphone Lenovo
- Smartphone Leotec
- Smartphone Lexibook
- Smartphone Logicom
- Smartphone Lumigon
- Smartphone Manta
- Smartphone Maxcom
- Smartphone Maxx
- Smartphone Media-tech
- Smartphone Meizu
- Smartphone Micromax
- Smartphone Microsoft
- Smartphone Mio
- Smartphone Mitsubishi
- Smartphone Mobistel
- Smartphone Mpman
- Smartphone Mustang
- Smartphone Nec
- Smartphone Nedis
- Smartphone Neffos
- Smartphone NGM
- Smartphone Nordmende
- Smartphone NTech
- Smartphone NUU Mobile
- Smartphone Palm
- Smartphone Pantech
- Smartphone Phicomm
- Smartphone Polaroid
- Smartphone Prestigio
- Smartphone Profoon
- Smartphone Razer
- Smartphone RCA
- Smartphone Realme
- Smartphone RugGear
- Smartphone Sagem
- Smartphone Sanyo
- Smartphone Sencor
- Smartphone Sharp
- Smartphone Silvercrest
- Smartphone Sonim
- Smartphone Sony Ericsson
- Smartphone Spice
- Smartphone Storex
- Smartphone Sunny
- Smartphone Sunstech
- Smartphone Swissvoice
- Smartphone Switel
- Smartphone T-Mobile
- Smartphone TCL
- Smartphone Tecdesk
- Smartphone Telefunken
- Smartphone Telme
- Smartphone Telstra
- Smartphone Tesla
- Smartphone Thomson
- Smartphone Tiptel
- Smartphone TP Link
- Smartphone Trekstor
- Smartphone Ulefone
- Smartphone UMi
- Smartphone UTStarcom
- Smartphone Vestel
- Smartphone Vivax
- Smartphone Vivo
- Smartphone Vodafone
- Smartphone Wileyfox
- Smartphone Wolder
- Smartphone Wolfgang
- Smartphone Xtreamer
- Smartphone Yota
- Smartphone Zipy
- Smartphone ZTE
- Smartphone O2
- Smartphone OK
- Smartphone Olympia
- Smartphone OnePlus
- Smartphone Oppo
- Smartphone Overmax
- Smartphone CSL
- Smartphone Krüger And Matz
- Smartphone NGS
- Smartphone Umidigi
- Smartphone Facom
- Smartphone Bush
- Smartphone Infiniton
- Smartphone Nevir
- Smartphone Aplic
- Smartphone Alba
- Smartphone Majestic
- Smartphone Trevi
- Smartphone XD
- Smartphone AT&T
- Smartphone Billow
- Smartphone SPC
- Smartphone EVOLVEO
- Smartphone Lark
- Smartphone BGH
- Smartphone CAT
- Smartphone Coolpad
- Smartphone Crosscall
- Smartphone Custom
- Smartphone EStar
- Smartphone Freeman
- Smartphone Karbonn
- Smartphone Keneksi
- Smartphone Konrow
- Smartphone M3 Mobile
- Smartphone Maxwest
- Smartphone Mediacom
- Smartphone ORA
- Smartphone Oukitel
- Smartphone Piranha
- Smartphone Plum
- Smartphone TAG Heuer
- Smartphone Tremay
- Smartphone Cubot
- Smartphone JCB
- Smartphone Aspera
- Smartphone CRUX
- Smartphone Casper
- Smartphone Unnecto
- Smartphone MyPhone
- Smartphone Primux
- Smartphone ToughGear
- Smartphone Komu
- Smartphone Verykool
- Smartphone Senifone
- Smartphone Syco
- Smartphone Pharos
- Smartphone ITTM
- Smartphone Cyrus
- Smartphone Posh Mobile
- Smartphone THL
- Smartphone NGM-Mobile
- Smartphone Nothing
- Smartphone Tecno
- Smartphone Olitech
- Smartphone Mobiola
- Smartphone TIM
- Smartphone Nubia
- Smartphone LeEco
- Smartphone Best Buy
- Smartphone GSmart
- Smartphone Bea-fon
- Smartphone Opticon
- Smartphone Saiet
- Smartphone Jitterbug
- Smartphone POCO
- Smartphone HMD
- Smartphone Opis
- Smartphone Krüger&Matz
- Smartphone Volla
- Smartphone Nothing Tech
- Smartphone Kalley
Nieuwste handleidingen voor Smartphone

2 April 2025

29 Maart 2025
9 Maart 2025
25 Februari 2025
25 Februari 2025
25 Februari 2025

25 Februari 2025
25 Februari 2025
25 Februari 2025
25 Februari 2025