Medion Akoya E4271TG Handleiding
Lees hieronder de 📖 handleiding in het Nederlandse voor Medion Akoya E4271TG (52 pagina's) in de categorie Laptop. Deze handleiding was nuttig voor 37 personen en werd door 2 gebruikers gemiddeld met 4.5 sterren beoordeeld
Pagina 1/52

35.5 cm / 14‘‘ Notebook
Instruction Manual

2
Table of Content
1. Information about these operating instructions 4 ......................................
1.1. Explanation of Symbols 4 ......................................................................................
1.2. Proper Use................................................................................................................6
2. EU Declaration of Conformity 6 .....................................................................
2.1. Information on WLAN ..........................................................................................7
3. Information on trademarks 8 ........................................................................
4. Safety Instructions 8 ......................................................................................
4.1. Dangers for children and people with reduced ability to operate
electronics................................................................................................................8
4.2. Operational Safety 9 ................................................................................................
4.3. Never carry out repairs yourself 11 .....................................................................
4.4. Setup Location 11 .....................................................................................................
4.5. Environmental Requirements 12 .........................................................................
4.6. Power Supply 13 .......................................................................................................
4.7. Notes on the Battery 14 ..........................................................................................
4.8. Cabling ....................................................................................................................14
4.9. Information about the Touchpad 15 ..................................................................
4.10. Protecting the Display 16 ......................................................................................
4.11. Data backup 17 ..........................................................................................................
4.12. Ergonomics ............................................................................................................17
5. Included with your Notebook 19 ...................................................................
6. Unpacking .................................................................................................. 19
7. Views and description of the controls 20 ......................................................
7.1. Open Notebook 20 ...................................................................................................
7.2. Left Side 21 ..................................................................................................................
7.3. Right Side 21 ...............................................................................................................
7.4. Bottom View ..........................................................................................................22
7.5. Stand Mode 22 ...........................................................................................................
7.6. Tablet-Mode ..........................................................................................................22
7.7. Presentation Mode 23 .............................................................................................
8. Operating and Status LEDs 24 .......................................................................
9. Power Supply 24 .............................................................................................
9.1. On/Off Switch 24 .......................................................................................................
10. Preparation for Starting-Up 24 ......................................................................
10.1. Starting the Notebook 25 ......................................................................................
11. AC Power 26 ....................................................................................................
12. Changing the System Language 26 ...............................................................
13. General Handling of Rechargeable Batteries 27 ..........................................
13.1. Battery Mode 28 ........................................................................................................

3
14. Power Management (Power Options) 29 ......................................................
14.1. Energy Saving Tips ..............................................................................................29
15. Display ........................................................................................................ 30
15.1. Opening and Closing the Display 30 .................................................................
15.2. Touch Screen 30 .........................................................................................................
15.3. Connecting an External Monitor 31 ...................................................................
16. Data Input 31 ..................................................................................................
16.1. Keyboard ................................................................................................................31
16.2. Touchpad ...............................................................................................................32
17. Sound System 33 ............................................................................................
17.1. External Audio Connections 33 ...........................................................................
18. Network Operation 33 ....................................................................................
18.1. Wi-Fi (Wireless Network) 33 ...................................................................................
18.2. Bluetooth® .............................................................................................................34
18.3. Airplane Mode 34 ......................................................................................................
19. microSD Card Reader 35 ................................................................................
19.1. Inserting a Memory Card 35 ..................................................................................
19.2. Removing Memory Cards 35 .................................................................................
20. USB Port 35 .....................................................................................................
21. Slot for M.2 2280 flash memory 36 ...............................................................
21.1. Safety information 36 ..............................................................................................
21.2. Replacing in-built flash memory 36 ...................................................................
21.3. Inserting a flash memory 37 .................................................................................
22. Securing Your Notebook ........................................................................... 37
22.1. Password Setting (Power-on) 37 ..........................................................................
22.2. Fingerprint Sensor (optional)..........................................................................38
23. Resetting the notebook to its Factory Settings 38 ......................................
23.1. System recovery with PowerRecover (optional) 39 ......................................
23.2. System Restore with Windows Recovery Options 40 ...................................
24. UEFI Configuration 41 ....................................................................................
24.1. Executing the UEFI Configuration 41 .................................................................
25. FAQs – Frequently Asked Questions 41 ........................................................
26. Customer Service 43 .......................................................................................
26.1. What To Do in Case of Hardware Problems 43 ..............................................
26.2. Find the Cause 43 .....................................................................................................
26.3. Do You Need More Help? 43 .................................................................................
26.4. Driver Support 44 ......................................................................................................
26.5. Transport ................................................................................................................44
26.6. Cleaning and Maintenance 45 .............................................................................
26.7. Storage when not in use 45 ...................................................................................

4
27. Upgrading/Modifying and Repair 46 ............................................................
27.1. Notes for Service Technicians 46 .........................................................................
28. Disposal ...................................................................................................... 47
29. Information on Display Errors 47 ..................................................................
29.1. European EN ISO 9241-307 Class II Standard 47 ............................................
30. Service information 49 ...................................................................................
31. Legal Notice................................................................................................ 50
32. Index ........................................................................................................... 51

5
1. Information about these operating
instructions
Thank you for choosing our product. We hope you enjoy using it.
Read the safety instructions and all other instructions carefully before
using the device for the first time. Note the warnings on the device and
in the operating instructions.
Always keep the operating instructions close to hand. If you sell the device or give it
away, please ensure that you also pass on these operating instructions. They are an
essential component of the product.
1.1. Explanation of Symbols
If a block of text is marked with one of the warning symbols listed below, the hazard
described in that text must be avoided to prevent the potential consequences
described there from occurring.
DANGER!
Warning of immediate risk of fatal injury!
WARNING!
Warning: danger of electric shock!
WARNING!
Warning: possible mortal danger and/or serious
irreversible injuries!
WARNING!
Warning: danger due to excessive volume!
CAUTION!
Warning: possible light or moderate injuries!
NOTICE!
Please follow the guidelines to avoid property
damage.

6
Additional information on using the device.
Please follow the guidelines in the operating instructions.
• Bullet point/information on operating steps and results
` Tasks to be performed
Declaration of conformity (see section ‘Declaration of
conformity’): Products that feature this symbol meet the
requirements of the EC directives.
Due to the 5 GHz frequency range of the used wireless LAN
solution, use in EU countries is only permitted inside buildings.
Indoor use
Devices with this symbol are only suitable for use indoors.
Fig. A
Fig. B
Polarity symbols
On devices with barrel connectors, these symbols indicate the
polarity of the plug. There are two variants for the polarity:
either the inner contact is positive and the outer contact is
negative (Fig. A) or the inner contact is negative and the outer
contact is positive (Fig. B).

7
1.2. Proper Use
This device is designed for the use, management and editing
of electronic documents and multimedia content, as well as for
digital communication. The device is intended for private use
only and not for industrial/commercial use.
Please note that we shall not be liable in cases of improper use:
• Do not modify the device without our consent and use
only spare parts and accessories which we have supplied or
approved.
• Follow all instructions in this manual, especially the safety
information. Any other use is deemed improper and can
cause personal injury or damage to the product.
• Do not use the device in extreme environmental conditions.
2. EU Declaration of Conformity
MEDION AG hereby declares that this product conforms with the essential
requirements and the remaining relevant regulations:
• RE Directive 2014/53/EU
• Ecodesign Directive 2009/125/EC
• RoHS Directive 2011/65/EU
Full declarations of conformity are available at www.medion.com/conformity.
Should your device work with a network connection in the 5 GHz frequency range
of the inbuilt wireless LAN solution, use in EU countries (see table) is only permitted
inside buildings.
Make sure you always comply with the law in the country of use.

8
AT BE BG CZ DK
EE FR DE IS IE
IT EL ES CY LV
LI HULT LU MT
NL NO PL PT RO
SI SK TR FI SE
CH UK HR
AT = Austria, BE = Belgium, CZ = Czech Republic, DK = Denmark, EE = Estonia,
FR = France, DE = Germany, IS = Iceland, IE = Ireland, IT = Italy, EL = Greece,
ES = Spain, CY = Cyprus, LV = Latvia, LT = Lithuania, LU = Luxembourg,
HU = Hungary, MT = Malta, NL = Netherlands, NO = Norway, PL = Poland,
PT = Portugal, RO = Romania, SI = Slovenia, SK = Slovakia, TR = Turkey, FI = Finland,
SE = Sweden, CH = Switzerland, UK = United Kingdom, HR = Croatia
2.1. Information on WLAN
Frequency range: 2.4 GHz/5 GHz
Wi-Fi standard: 802.11 a/b/g/n/ac
Encryption: WEP/WPA/WPA2
Frequency range/MHz Channel Max. transmission power/
dBm
WLAN 2,4 Ghz 2400 - 2483,5 1 - 13 < 20
WLAN 5 Ghz 5150 - 5250 36 - 48 < 23
WLAN 5 Ghz 5250 - 5350 52 - 64 < 23
WLAN 5 Ghz 5470 - 5725 100 - 140 < 30
WLAN 5 Ghz 5735 - 5835 149 - 165 -- (if available < 14)

9
3. Information on trademarks
Windows® is a registered trademark of Microsoft®. Intel, the Intel Logo, Intel Inside,
Intel Core, device, and Core Inside are trademarks of Intel Corporation in the U.S.
and/or other countries.
The Bluetooth® word mark and logos are registered trademarks of Bluetooth SIG,
Inc. and are used by Lenovo/MEDION under licence.
DolbyTM is a registered trademark of Dolby Laboratories.
Other trademarks and brand names are the property of the respective owner.
4. Safety Instructions
4.1. Dangers for children and people with reduced
ability to operate electronics
This device may be used by children over the age of 8 and by
persons with limited physical, sensory or mental abilities or by
those without experience and knowledge, if they are supervised
or have been instructed in the safe use of the device and
understand the ensuing dangers.
• Children should be supervised to ensure that they do not play
with the device.
• Cleaning and user maintenance must not be carried out by
children unless they are supervised.
• Keep the device and accessories out of reach of children.
DANGER!
Risk of suffocation!
Packaging material is not a toy!
Packaging film can be swallowed or used improperly.
Therefore, there is a risk of suffocation!
`Keep packaging material such as plastic film or
plastic bags away from children.

10
WARNING!
Impairment to hearing!
Listening through earphones or headphones at
excessive volume levels, as well as changes to the basic
settings of the equaliser, drivers, software or operating
system generates excessive acoustic pressure and can
lead to damage or loss of hearing.
`Before pressing play, set the volume to the lowest setting.
`Start playback and increase the volume to a
comfortable level.
4.2. Operational Safety
Please read this section carefully and follow all instructions given.
The instructions will help you to operate the notebook reliably
and increase its service life.
Liquids penetrating the device may impair the electrical
safety of the product.
`Avoid exposing the device to water droplets or spray and do
not place anything containing water, e.g. vases, on or near the
device.
`Do not pour any fluids into the device.
`In order to avoid any damage to the device, ensure that the
plug contacts do not come into contact with water under any
circumstances. If this should occur, it is imperative that the plug
contacts are dried thoroughly before the device is used again.
DANGER!
Danger of electric shock!
There is a risk of electric shock or fire if the mains
adapter is open!
`Never open the housing of the device or the mains
adapter!
`Never operate the device if the housing is open.
`Never tamper with the mains adapter or live parts!

11
The slots and openings on the device are for ventilation
purposes.
`Do not cover these openings, as this could cause the device
to overheat or even catch fire.
`Do not insert anything into the device through the slots and
openings. This could result in an electric shock or even ignite a
fire which will damage your device.
Should the below occur, switch the device off immediately/
do not switch the device on, disconnect the mains plug and
contact customer services if:
• unusual noises can be heard coming from the mains adapter
or the notebook, or you notice smoke rising from the
notebook or mains adapter.
• the AC adapter or the attached power cable or plug is burnt
or damaged.
`Replace faulty mains cables/mains adaptors only with
original parts. These parts should not be repaired under any
circumstances.
• the device housing is damaged or liquid has penetrated into
the device.
`Have the device inspected by customer services. Otherwise,
it may not be possible to operate the device safely. There may
be a risk of electric shock!
WARNING!
Risk of explosion!
Risk of explosion from the rechargeable integrated
battery.
`Never throw the notebook into an open fire.

12
4.3. Never carry out repairs yourself
CAUTION!
Risk of electric shock!
There is a risk of electric shock if repairs are not carried
out by qualified personnel!
`Never open the housing of the notebook or the
mains adapter!
`In the event of a fault, please contact the Service
Centre or an approved repair specialist.
4.4. Setup Location
• The notebook may only be used indoors (due to the use of
5 GHz Wi-Fi technology).
• Do not use the device in areas where there is a risk of
explosion such as tank farms, fuel storage depots or areas in
which solvents are processed. It is also not permitted to use
this device in those areas where the air is polluted with fine
particles (e.g. flour dust or sawdust).
• Keep your notebook and all connected devices away
from moisture and avoid dust, heat and direct sunlight.
Non-compliance with these instructions can lead to faults or
damage to the notebook.
• Do not use the notebook outdoors because external elements,
such as rain, snow, etc., could damage it.
• Set up and operate all components on a stable, level and vibration-
free surface to prevent the notebook from falling down.
• Maintain a distance of at least one metre from sources of
high-frequency and magnetic interference (TV sets, speakers,
mobile phones, DECT telephones, etc.) in order to avoid
malfunctions and data loss.

13
• Do not operate the notebook or power adaptor for long
periods on your lap or any other body part as the heat
dissipation on the underside can result in uncomfortable
overheating.
• This device is not suitable for use with VDU workstations.
4.5. Environmental Requirements
• The notebook is most reliably operated at an ambient
temperature between 5 °C (+41 °F) and 30 °C (+86 °F) and
at a relative humidity between 20% and 80% (without
condensation).
• When switched off, the notebook can be stored for up to four
weeks at temperatures between 0 °C and 60 °C. In the event
of storage for a longer period, the notebook can be stored
between 0 °C and 25 °C, although storage at 20 °C ± 5 °C is
recommended.
• During a thunderstorm, unplug the AC adapter from the wall
outlet. For extra safety, we recommend using an overvoltage
protection device to prevent the notebook from sustaining
damage as a result of power surges or lightning strikes.
NOTICE!
Risk of damage!
Large changes in temperature or fluctuations in
humidity can cause moisture build up within the
notebook due to condensation. This can cause an
electrical short circuit.
`After transporting the notebook, wait until the
device has reached room temperature before
switching it on.

14
4.6. Power Supply
CAUTION!
Risk of electrical shock!
There are live components inside this AC adapter. In
the event of an unintentional short circuit of this AC
adapter, there is a risk of electrical shock or fire!
`Do not open the housing of the AC adapter.
`Do not cover the mains adapter.
`Never touch the mains adapter with wet hands.
• The socket outlet must always be close to the notebook and
easily accessible.
• Always hold the mains adapter by the housing if you wish to
unplug it.
• To disconnect the power supply from your notebook (via the
AC adapter), pull the plug from the power outlet.
• Plug the notebook’s AC adapter into AC 100 – 240 V~ 50/60 Hz
earthed sockets only. If you are not sure about the power supply
at the set-up location, please ask your electricity supplier.
• For extra safety, we recommend using an overvoltage
protection device (surge protector) to prevent your notebook
from sustaining damage as a result of power surges or
lightning strikes.
• The only devices which may be connected to the device are
those that meet the requirements set out in the EN60950
standard “Information Technology Equipment – Safety” or
devices that meet the EN60065 standard “Audio, video and
similar electronic apparatus – Safety requirements”.

16
• Please note that only shielded cables that are shorter than
3 metres may be connected to the external interfaces of this
notebook.
• Do not exchange the supplied cable for another one. Use only
the supplied cable as this cable has been extensively tested in
our laboratory.
• In addition, when connecting your peripherals only use the
connecting cables supplied with those devices.
• Ensure that all connection cables are connected to their
corresponding peripheral device to avoid any interference
radiation.
• Remove any unnecessary cables from your notebook to avoid
possible interference.
4.9. Information about the Touchpad
NOTICE!
Risk of damage!
The touchpad is a highly sensitive input device and it
will respond to a light touch and minimal pressure.
`Never use undue force to operate the touchpad as
this could damage or destroy it.
The touchpad is operated with the thumb or another finger and
reacts to the energy given out by the skin. Dust or grease on the
touchpad can affect its sensitivity.
• Do not use pens or other objects as these can damage your
touchpad.
• Remove the dust or grease from the surface of the touch pad
with a soft, dry and lint-free cloth.

17
4.10. Protecting the Display
The display is the most sensitive component part of the device
as it consists of thin glass.
The display can break if subjected to too much stress.
• Do not allow any objects to drop onto the display.
• Do not place any objects on the display.
• Do not scratch the display with your fingernails or hard
objects.
• Never lift the notebook up by the display as this could break
the hinges.
• Always hold the display firmly by the middle when folding it
back, adjusting the position and closing it.
• If the screen breaks, there is a danger of injury. If this happens,
pick up the shattered pieces wearing protective gloves and
send them to your service centre for professional disposal.
Finally, wash your hands with soap, as the pieces may have
been contaminated with chemicals.
• Avoid contact between the display and hard objects (e.g.
buttons, wristwatch).
• The touch display should only be operated with your fingers
or a suitable stylus.
NOTICE!
Risk of damage!
The touch display is a highly sensitive input device and
it will respond to a light touch and minimal pressure.
`Never use undue force to operate the touch display
as this could damage or destroy it.

18
4.11. Data backup
Back up your data to external storage media before each update. We do
not accept any liability for claims for compensation arising from loss of
data or any consequential loss or damage.
4.12. Ergonomics
Avoid dazzle, reflections and a light-dark contrast that is too strong in
order to protect your eyes.
The notebook should never be placed next to a window because this is the
brightest part of the room in daylight. This brightness can make it more difficult for
the eyes to adjust to the darker display. The notebook should always be positioned
so that the direction of vision is parallel to the window front.
Setting up the notebook with your back to the window is incorrect as reflections
from the bright window on the screen will then be unavoidable. A position looking
onto the window is also incorrect as the contrast between the dark screen and the
bright daylight can cause problems for the eyes to adjust and result in problems.
The parallel line of vision should also be maintained in relation to artificial lighting
equipment.
In other words, the same criteria and principles apply where the workspace is
illuminated with artificial light. Where space restrictions make it impossible to set up
the screen as described, then correct positioning (rotating, tilting) of the notebook/
screen can prevent dazzling, reflections and excessive bright-dark contrast, etc. In
many cases, an improvement can also be achieved by using slats or vertical blinds
on the windows, partition walls or by changing the artificial lighting equipment.
Take regular breaks when working at your notebook to prevent
tenseness and fatigue.
Sitting for a long time without changing position can be uncomfortable. Correct
posture is very important for minimising the risks of physical problems or damage.

19
90°
40 - 45°
50 - 60 cm
46 - 55 cm
66 - 71 cm
• – change your position frequently (around every 20-30 minutes) and In general
take regular breaks to avoid tiredness.
• – when sitting at your workstation, your back must be supported by your Back
chair’s backrest, which must be upright or angled slightly back.
• – your arms and elbows should be relaxed and loose. Your elbows should Arms
be close to your body. Hold your forearms and hands roughly parallel to the
floor.
• Wrists – when working with the keyboard, mouse or trackball, your wrists
should be stretched out and not bent at an angle of more than 10°, where
possible. Make sure that your wrists are not resting on the table edge itself.
• – your thighs should be horizontal or angled slightly down. Your lower legs Legs
should form an angle with your thighs of approximately 90°. Your feet should be
resting flat on the floor. Use a foot rest if you need one, but first make sure that
your seat height has been adjusted correctly.
• – your head should be upright or bent very slightly forward. Do not work Head
with your head or upper body twisted.
As you work, the top edge of the monitor should be at eye level or very slightly
lower.
The distance between the monitor and the person viewing it depends on
individual requirements. Distances between 50 and 70cm are commonly used.

20
5. Included with your Notebook
Risk of suffocation!
Packaging material is not a toy!
There is a risk of suffocation if plastic packaging is
swallowed or used inappropriately!
`Keep packaging material, e.g. plastic film or bags,
away from children.
`Check your purchase to ensure all items are included and contact us within 14
days of purchase if anything is missing.
`If there is any damage, please also contact our Service Department.
Please check that the contents are complete and notify us within 7 days of purchase
if any of the following components are missing:
• notebook with battery
• AC adapter
• Instruction Manual
• Warranty documents
6. Unpacking
`Choose a suitable place to set up the device before unpacking it.
`Remove all the packaging material.
`Please keep the packaging material in a safe place and only use this to transport
the notebook.
The surfaces of the device are covered in protective film to prevent
scratching during production and transport.Remove the film once the
device has been set up properly and before you use it.

21
7. Views and description of the controls
7.1. Open Notebook
1
2
3
4
7
5
6
1Webcam
2Microphones
3Touch screen
4Operating and Status LEDs
5Keyboard
6Fingerprint Sensor (optional)
7Touchpad
22
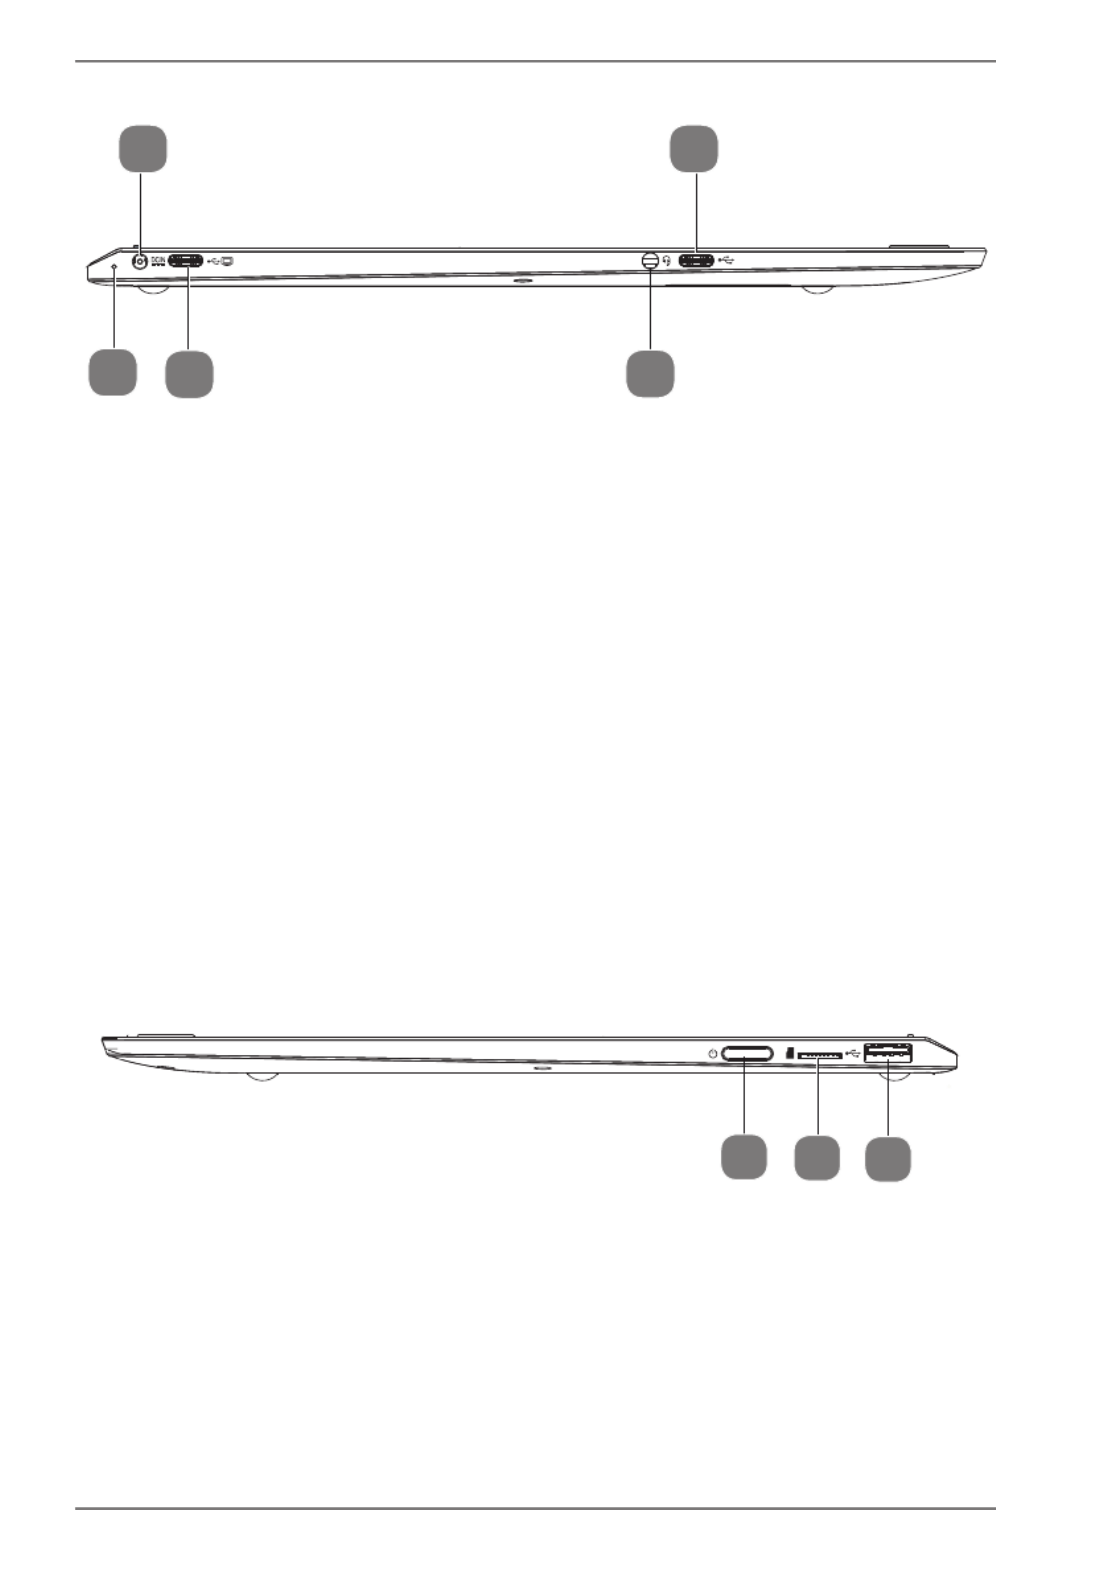
7.2. Left Side
10
8
1211
9
8Power Supply (DC In)
9USB Port 3.1 (type C)
10 LED for the mains adapter connection
The LED lights up red with a charge level of 0–94%.
The LED lights up green with a charge level of over 95%.
11 E series:
USB 3.1 port (Type-C) with DisplayPort function
(only with a suitable adapter, not included in the scope of delivery)
S series:
USB 3.1 port (Type-C) with DisplayPort function/charge function (only
with a suitable adapter, not included in the scope of delivery)
12 Audio combi connection (Mic-in, headphones)
7.3. Right Side
13 14 15
13 ON/OFF switch
14 microSD Card Slot
15 USB Port 2.0

25
8. Operating and Status LEDs
The system displays power supply status and operating modes via LEDs. The
operating lights also light up during notebook activity:
Operating Indicator
This indicator lights up when the system is powered on.
A
Capital Lock
This LED lights when CAPS-Lock has been activated. This sets the
keyboard to capital letters.
1
Num Lock
This LED lights when NUM-Lock has been activated.
9. Power Supply
9.1. On/Off Switch
`Open the notebook and hold the on/off switch down briefly to switch the
notebook on or off.
If it is no longer possible to switch off the notebook via the software,
keep the On/Off switch pressed down for about 10 seconds.
Do not switch your notebook off while the HDD/SSD is being accessed.
Otherwise data may be lost. To protect the HDD/SSD, you should always
wait for 5 seconds after switching off the notebook before switching it
back on again.
10. Preparation for Starting-Up
To operate your notebook safety and ensure a long service life, you have to read the
“Operational Safety” chapter at the beginning of this manual. All operating software
is already fully preinstalled on the notebook so there is no need for you to install
any more drivers and you can get started right away.
`Plug the power cord into the notebook and connect the AC adapter to an easily
accessible power outlet.
`Open up the display to the desired position using your thumb and forefinger.
Always hold the display firmly by the middle when folding it back, adjusting the
position and closing it. Failure to do so may damage the display. Never use force
to open the display.
When first operating your notebook please ensure that the AC adapter
is connected.

26
`Switch the notebook on by pressing the on/off switch. The notebook will now
start and run through various installation steps.
The operating system cannot be used unless you agree to the terms and conditions
of use during the installation process. Have the information ready for access to Wi-Fi
or your email inbox in case you wish to set this up now.
The operating system will be loaded from the HDD/SSD. The loading process takes
a little longer during the initial setup. Once all the necessary data has been entered,
the operating system will be set up. The operating system is fully loaded once the
Windows® start-up screen appears.
NOTICE!
Loss of data!
The initial installation may take a few minutes. Do not
unplug the notebook from the power source or switch
it off during the initial installation. This may adversely
affect the installation.
`Do not switch off the notebook until after the
installation has been completed successfully and the
startup screen appears.
10.1. Starting the Notebook
`Open up the display as described above and press the on/off switch.
`Follow the instructions on the screen. Step by step instructions will guide you
through the process to be followed.
The welcome procedure takes you through several screens and dialogues.
`Select your desired language and then the corresponding country settings.
`Connect to the Internet if you have a properly-equipped Internet connection.
If you choose to skip this point, you can connect to the Internet later via the
Windows® interface.
If you have already set up an Internet connection, you can now log in to your
notebook using a Microsoft account.
The Microsoft Store allows you to purchase new apps or update previously installed
apps. If you log in on a local account, you can set up a Microsoft account later at any
time.
Licence Agreement
Please read through the licence agreement carefully. It provides important legal
information about the use of your software product. To view the text in full, you
must slide the scroll bar downwards using the mouse until you reach the end of the
document. You accept the licence agreement by checking . Only this entitles Accept
you to use the product in accordance with the terms and conditions.

27
The following animated windows simply contain information about using the
new Windows® operating system. No entries of any kind may be made during the
animation. The Windows® interface appears after the login process.
In the first few days following the initial installation, Windows® may
update and configure data (e.g. with new updates) which can result in
delays in the notebook shutting down and starting up. For this reason,
do not switch the notebook off prematurely. This may adversely affect
the installation.
11. AC Power
Your notebook comes with a universal AC power supply for alternating current
which automatically adapts to the available power source. The following values are
supported: AC 100 – 240 V~ 50/60 Hz. Observe the safety information concerning
the power supply.
The adapter supplies the notebook with power and also charges the battery. Your
battery will also be charged while you work on your notebook with the AC adapter
connected. The AC adapter also consumes power when the notebook is not
connected to it. You should therefore always remove the AC adapter plug from the
wall outlet when it is not connected to the notebook.
Make sure that you only use the supplied mains adapter with this
notebook.
12. Changing the System Language
In Windows you can change the preinstalled system language.
Proceed as described below, making sure you carry out the steps in the given order:
To change the system language, you require an Internet connection.
1) Click the Windows start button.
2) Select the menu option .Settings
3) In the , select Settings Time & language, speech, region, date.
4) Under > , open Time & language Region & language Add a language and
select the language you want to add.
5) If necessary, select the desired region.
6) Click the selected language once more.
7) Now click the button to make the selected language the system Set default
language.

29
13.1. Battery Mode
Batteries store electrical energy in their cells and then release it again as
required. Please charge and discharge the new battery completely two
or three times consecutively to ensure that it reaches its optimum
performance!
13.1.1. Shipping Mode
The notebook is in secure transport mode after being unpacked; this prevents
accidental switching on and discharging the battery.
`Before switching on for the first time, you must connect the AC adapter and wait
around 8 seconds before activating the on/off switch.
13.1.2. Charging the Battery
The battery is charged using the AC adapter. When the AC adapter is connected, the
battery charges automatically regardless of whether or not the notebook is switched on
or not. A complete charge takes a few hours with the notebook switched off. With the
notebook switched on, the charging process takes significantly longer.
The charging process is interrupted if the temperature gets too high.
Left-click on the battery symbol in the taskbar to display the battery
status, and, if necessary, use the key to open Windows Help.F1
13.1.3. Discharging the Battery
Operate the notebook on battery power until it turns itself off due to low battery charge.
NOTICE!
Loss of data!
A sudden power failure may result in the loss of data.
`Be sure to save your open files promptly to prevent
any data loss.
13.1.4. Battery life
The actual operating time varies depending on the configuration of the power-
saving functions. Note: your notebook consumes more power when running certain
applications.
The battery life will be reduced if the processor or graphics components of the
notebook are used to capacity over an extended period of time. This can occur in the
case of games with elaborate graphics, videos, music editing or graphics editing.
If you ignore the low battery warning, your notebook will shut down.

30
14. Power Management (Power Options)
Your notebook offers automatic and user selectable power-saving and energy
functions that can be used to optimize battery life and reduce the overall operating
costs.
If you need help with the power management of your notebook, press
the key for Windows Help.F1
14.1. Energy Saving Tips
• Tune the settings in Power Options to optimise the computer’s power
management.
• Always disconnect the AC power cord or uninstall the battery pack or switch off
the wall outlet if the computer would be left unused for a certain time to
achieve zero energy consumption.
The power management feature allows the computer to initiate a lower-power or
“Sleep” mode after a period of user inactivity.
To take advantage of these potential energy savings, the power management
feature has been preset to behave in the following ways when the system is
operating on AC power:
• Turn off the display after 10 minutes
• Initiate Sleep after 30 minutes
when the system is operating on DC power:
• Turn off the display after 5 minutes
• Initiate Sleep after 15 minutes
The notebok exits Sleep when the On/Off button is pressed.

31
15. Display
15.1. Opening and Closing the Display
The special design of the display hinges keeps the display closed without the need
for an additional catch.
`To open the notebook, fold the display up to the desired position using your
thumb and forefinger.
NOTICE!
Risk of damage!
Forcibly opening up the screen may damage the
notebook.
`Always hold the display firmly in the middle when
folding it open, adjusting the position and closing it.
The opening and closing of the display can be assigned different functions, e.g.
power save, hibernate and shut down, via Settings -> System -> Mains operation
and Power save.
15.2. Touch Screen
Your device is supplied with a touch-sensitive screen. Please follow the instructions
below in order to optimise its use:
NOTICE!
Risk of damage!
Improper handling may damage the device.
`Do not touch the screen with sharp or pointed
objects as these may damage the screen.
`Make sure you only use your finger or a special stylus
pen for touch displays.
Product specificaties
| Merk: | Medion |
| Categorie: | Laptop |
| Model: | Akoya E4271TG |
Heb je hulp nodig?
Als je hulp nodig hebt met Medion Akoya E4271TG stel dan hieronder een vraag en andere gebruikers zullen je antwoorden
Handleiding Laptop Medion

10 Februari 2025
5 Februari 2025
7 December 2024
7 December 2024
7 December 2024
7 December 2024
7 December 2024
7 December 2024
7 December 2024
7 December 2024
Handleiding Laptop
- Laptop HP
- Laptop Sony
- Laptop Samsung
- Laptop Xiaomi
- Laptop Panasonic
- Laptop LG
- Laptop Huawei
- Laptop Asus
- Laptop Toshiba
- Laptop Acer
- Laptop Airis
- Laptop Alienware
- Laptop Apple
- Laptop Dell
- Laptop Denver
- Laptop Emachines
- Laptop Ematic
- Laptop Evga
- Laptop Fellowes
- Laptop Fujitsu
- Laptop Gigabyte
- Laptop Goclever
- Laptop Haier
- Laptop Hannspree
- Laptop Hercules
- Laptop Honor
- Laptop Hyundai
- Laptop Ibm
- Laptop Kogan
- Laptop Lenovo
- Laptop Lexibook
- Laptop Micromax
- Laptop Microsoft
- Laptop Mpman
- Laptop MSI
- Laptop Nec
- Laptop Packard Bell
- Laptop Peaq
- Laptop Pyle
- Laptop Razer
- Laptop Ricatech
- Laptop Schneider
- Laptop Sylvania
- Laptop Targa
- Laptop Thomson
- Laptop Trekstor
- Laptop Viewsonic
- Laptop Vizio
- Laptop Zebra
- Laptop Jay-tech
- Laptop Odys
- Laptop Olidata
- Laptop Oregon Scientific
- Laptop Naxa
- Laptop Aplic
- Laptop ADATA
- Laptop Humanscale
- Laptop Hamilton Buhl
- Laptop Compaq
- Laptop SIIG
- Laptop Tripp Lite
- Laptop SPC
- Laptop Prixton
- Laptop Coby
- Laptop AORUS
- Laptop Hähnel
- Laptop XPG
- Laptop ECS
- Laptop Inovia
- Laptop Ergotron
- Laptop Atdec
- Laptop Getac
- Laptop Vulcan
- Laptop System76
- Laptop General Dynamics Itronix
- Laptop CTL
- Laptop Everex
- Laptop Dynabook
- Laptop TechBite
- Laptop Schenker
Nieuwste handleidingen voor Laptop
2 April 2025

28 Maart 2025

27 Maart 2025
26 Maart 2025

4 Maart 2025
10 Februari 2025
10 Februari 2025
5 Februari 2025
30 Januari 2025

27 Januari 2025