Kathrein UFE 336-S CI Handleiding
Kathrein
Satellietontvanger
UFE 336-S CI
Lees hieronder de 📖 handleiding in het Nederlandse voor Kathrein UFE 336-S CI (39 pagina's) in de categorie Satellietontvanger. Deze handleiding was nuttig voor 72 personen en werd door 2 gebruikers gemiddeld met 4.5 sterren beoordeeld
Pagina 1/39

Operating Manual
DVB Satellite Receivers
UFE 335/335S - 336/336S
Order no.: 20210028/20210029 – 20210030/20210031
New.: 20210036/20210037 - 20210038/20210039


Preface
3
Preface
Dear Customer,
The following operating manual will help you obtain the best possible
use from the extensive features of your new satellite receiver.
We have written this operating manual as comprehensibly as possible
and as concise as necessary. A brief lexicon containing specialised
terms not easily translatable has been appended at the end of this
manual.
We have taken the environment into account with the mains switch.
Therefore, during longer pauses separate your receiver from the
mains in order to save energy. During short pauses, you should
switch the receiver to standby with the remote control, so the least
amount of energy is consumed.
We wish you a great reception and much enjoyment with your new
satellite receiver.
Your,
KATHREIN-Euroline Team
Important notes
If you have any unexpected problems with your receiver, please
contact your specialist supplier.
With regard to the programme allocation of the satellites and trans-
ponders, changes always occur. In such cases, it is necessary to
carry out new programme settings, even though factory
pre-programming is always in accordance with the respective latest
developments. You can gather the details for the new setting from
teletext on SAT 1, the internet or relevant magazines.
Your receiver has been equipped with the latest software
at the factory. We are always trying to adjust the software to the
desires of our customers and the state-of-the-art technology. Refer to
section "Software and programme list update" for more information.
Please keep the original packaging for the purpose of returning
the unit!
UFE 335/335S FTA free-to-air programmes only (no CI-slot!)
UFE 336/336S CI free-to-air and encrypted programmes
(diagram on front page)

Contents
4
Contents
Preface.............................................................................................................................................................. 3
Contents ........................................................................................................................................................... 4
Safety instructions .......................................................................................................................................... 6
Extended absence / thunderstorms............................................................................................................ 6
Mains lead .................................................................................................................................................. 6
Cleaning ..................................................................................................................................................... 6
Children-at-play .......................................................................................................................................... 6
Repairs ....................................................................................................................................................... 6
Connections................................................................................................................................................ 6
Grounding................................................................................................................................................... 7
Place of installation..................................................................................................................................... 7
Ventilation................................................................................................................................................... 7
Moisture, exposure to sunlight, heat .......................................................................................................... 7
Mains supply............................................................................................................................................... 7
Connections, operation and displays............................................................................................................ 8
Operation.......................................................................................................................................................... 9
Local control................................................................................................................................................... 9
Functions of remote control......................................................................................................................... 10
Remote control command sets................................................................................................................. 10
Programme selection .................................................................................................................................... 12
Programme selection with the numerical buttons [0]-[9], [▲ ▼], [ ] and list .................................................. 12
„Last programme“ with the [E] button........................................................................................................... 12
„Zapper function“ with the [OK] and [◄▲►] [ ] [ ] [▼] buttons...................................................................... 12
Programme management with 10 favourite lists.......................................................................................... 13
Information for switching programmes......................................................................................................... 14
TV/radio switch-over .................................................................................................................................... 14
Volume settings............................................................................................................................................ 15
Language selection...................................................................................................................................... 15
Timer ............................................................................................................................................................ 16
EPG – Programme information (Basis navigator)........................................................................................ 17
Menu structure............................................................................................................................................... 19
Programmes................................................................................................................................................. 19
Favourite list ............................................................................................................................................. 19
Changing the names of the favourite lists ................................................................................................ 23
Programme pool....................................................................................................................................... 23
Antenna signal and reception parameters ............................................................................................... 24
Parental lock............................................................................................................................................. 24
Search.......................................................................................................................................................... 26
Satellite search......................................................................................................................................... 26
Transponder search ................................................................................................................................. 27
Manual entry (for experts) ........................................................................................................................ 27
Satellites....................................................................................................................................................... 27
Installation .................................................................................................................................................... 29
Time offset................................................................................................................................................ 29
Menu language......................................................................................................................................... 29
Selecting the font...................................................................................................................................... 29
Signal paths.............................................................................................................................................. 30
Picture format ........................................................................................................................................... 30
LNB settings ............................................................................................................................................. 30
DiSEqC (Digital Satellite Equipment Control) ........................................................................................ 31
DiSEqC ................................................................................................................................................... 31
UFO® ........................................................................................................................................................ 31
Download-over-air (Software updating via satellite)................................................................................. 32
CA (Conditional Access) = Encrypted programmes (only for UFE 336/336S!) ........................................... 33

Contents
5
General..................................................................................................................................................... 33
Reception of encrypted programmes ....................................................................................................... 34
Glossary ......................................................................................................................................................... 35
Technical data................................................................................................................................................ 36
Safety instructions
6
Safety instructions
Important notes regarding operation
The following section contains important information relating to the
operation, place of installation and connection of the receiver.
Read these notes carefully before putting the unit into operation.
Extended absence / thunderstorms
Always switch the unit off via its mains switch located on the right on
the front panel during periods of extended absence or at the onset of
thunderstorms. This also applies to any other equipment which is
connected to the receiver.
However, take into account any possible timer programming, and
switch the unit on again in good time prior to the recording time.
Mains lead
Make certain that the mains lead (power supply lead) is undamaged.
Never put the unit into operation if the mains lead is damaged.
Cleaning
Withdraw the mains plug before cleaning the unit. Use a dry cloth for
cleaning. Clean the surface only, and nothing else.
On no account open the housing. There is a risk of electric shock if
components within the unit are touched!
Children-at-play
Pay attention that children do not insert objects into the ventilation
slots. There is a risk of mortal danger due to electric shock.
Repairs
Only have qualified specialists carry out repairs and adjustments to
your receiver. Unauthorised opening of the receiver and attempts at
repair entail loss of guarantee.
Unauthorised tampering with the device can jeopardise the electrical
safety of the receiver.
The manufacturer is not liable for accidents occurring to the user as a
result of opening the receiver.
Connections
The unit may be rendered inoperative or not work properly if the
connections are not wired up properly.

Safety instructions
7
Grounding
The parabolic antenna is to be grounded in accordance with regula-
tions. The relevant local and/or German VDE regulations are to be
complied with here.
Important notes for siting and installation.
Place of installation
Every electronic device generates heat. The rise in temperature,
however, lies within a safe range. Slight colour changes may occur to
sensitive furniture surfaces and veneers over the course of time due
to the constant effect of heat. In conjunction with treated furniture sur-
faces, the unit’s rubber feet can, likewise, give rise to changes in col-
our. Where necessary, place the unit on a suitable pad.
Ventilation
The heat which is generated in this unit is dissipated quite adequately.
Never install the receiver in a cabinet, shelf or rack with inadequate
ventilation. Never block the cooling slots on the unit.
Do not place objects on top of the unit. Maintain a clearance of at
least 10 cm above the unit, so that the heat generated within the unit
can disperse without obstruction.
Moisture, exposure to sunlight, heat
Protect the unit against moisture, drips and splashing.
Do not place the unit close to radiators nor expose it to direct sunlight.
Mains supply
Operate the receiver only with a mains voltage of 230V / 50 Hz.
First connect the antenna and the television set, before connecting the
receiver to the mains power supply and switching it on.

Connections, operation and displays
8
Connections, operation and displays
The following connections are found on the rear panel of the receiver:
230V / 50 Hz Connect the mains cable with the mains socket.
AUDIO TV L a. R Audio output, left and right channel for connection to a stereo system.
TV Connect the TV socket with your television set via the supplied Scart
cable.
VCR VCR Scart socket for connection of a video recorder.
SAT IF INPUT Sat IF input and output for LNB supply and control signals. Connect
the cable of your satellite system with this socket.
SAT IF OUTPUT IF signal output (Loop-through e.g. to an analogue receiver).
DATA INTERFACE RS 232 interface for serial data transmission for service.
0 modem cable (Pin 2 and 3 crossed, Pin 1, 4, 6-9 are not used).
Receiver: PC:
Pin 2 = RXD Pin 2 = RXD
Pin 3 = TXD Pin 3 = TXD
Pin 5 = GND Pin 5 = GND

Operation
9
Operation
Local control
Open (and close) the flap on the front panel of the unit by applying
pressure on the dotted area (left).
The local operation consists of the buttons, [STANDBY], [▲] and [▼]
for switching programmes (ascending/descending), as well as [ - ] and
[ + ] for adjusting the volume.
To switch between radio and TV operation, press the [STANDBY] but-
ton and then within 1 second press the [ - ] button for radio or [ + ] for
TV operation.
The LED display shows the switch-over operation for a Radio/TV
second.
The receiver has an On/Off mains switch with mains separation.
The programme numbers are displayed on a 4-digit, green, 7-segment
display!
Display of TV programmes
Display of radio programmes
Display t = TV mode (and programme number of the satellite re-
ceiver)
The points appear when the unit is “muted.“
Display ‚Vcr‘:
The video/audio signal from the video recorder is automatically fed to
the television set during playback – also in standby.
Display ‚Vcr-‘: Through-connection in standby.
The unit is in standby and can be switched on by pressing the
[STANDBY] button.
P 9 9 9
r 2 5
t 1 2 3
P 2.3.4.
[
r t
]
V c r
-
V c r -
VOLUME CHANNEL
▼
▲

Functions of remote control
11
Keep the button “RC” pressed.
Use the numbered buttons to input “902”.
In order to confirm the code, press “RC”, then switch receiver 2 to
standby by pressing and then switch back on again. Also switch
on receiver 1.
Keep the button “RC” pressed and use the numbered buttons to
input “903”.
The remote control must point to the active receiver for the first two
settings.
You can now use the button “RC” to switch between the command
sets A and B (toggle function), operating the two receivers alternately.
Command set 1 is the factory pre-setting.
If you are only operating one receiver and the active command set
has been switched by mistake so that the receiver can no longer be
operated, it is easy to switch the remote control back to command set
1. This process has already been described above.
Note: The remote control help (explanation of the remote control) is not dis-
played if you are operating two receivers!

Programme selection
12
Programme selection
Programme selection with the numerical buttons [0]-[9], [▲ ▼], [ ] and list
The programme setting is carried out by direct entry of the programme
number with the numerical buttons (0 is also a programme number).
With the [▲ ▼]/[ ] buttons, you can switch back/forward to the previous/
next programme.
After pressing the [OK] button twice, a list appears which is organised
according to programme numbers.
The desired programme can be called up with the [◄ ►]/[ ] and
[▲]/[▼] buttons and set by pressing the [OK] button. Exit the list by
pressing the [OK] button once more or the [E] button.
„Last programme“ with the [E] button
With the [E] button, you can switch between the last two set pro-
grammes.
„Zapper function“ with the [OK] and [ ] [ ] [ ] [◄ ▲ ► ▼] buttons
If the current „desired programme“ is interrupted by advertisements,
many users „zap“ to a „substitute programme“ or to a second or third
programme. It often occurs that the user can’t find the way back to the
programme originally being watched.
The „zapper function” stores three further “substitute programmes,”
which were zapped to after the „desired programme.“ Only
programmes watched for at least 5 seconds can be saved.
The last 4 watched programmes can be directly called up by pressing
the [OK] button and then the [◄ ► ▲], [ ], [ ] or [▼] button.

Programme selection
13
Programme management with 10 favourite lists
Digital television technology offers viewers a variety of
programmes. Depending on the number of received satellites, up to
2,000 TV and radio programmes are at one’s disposal.
In order to control such an enormous array of programmes, ten freely
definable favourite lists are available to the user, which allow clear
management and sorting of the programmes.
A favourite list is a list, in which any of the programmes selected from
a programme pool can be categorised.
The names of the lists are predefined at the factory comparable to the
following example. The names of the favourite list can be individually
changed. In each favourite list, the programme numbers P000 to P999
can be used.
Favourite list: Name Sorted programmes (example)
F0: GENERAL (e.g. All free-to-air programmes from the
programme pool)
F1: NEWS (e.g. PHOENIX, n-TV, N-24…)
F2: SPORT (e.g. DSF, EuroSport, Motors-TV)
F3: MUSIC (e.g. MTV, VIVA, VIVA 2…)
F4: TRAVEL (e.g. Travel-Channel…)
F5: SHOPPING (e.g. Home Shopping, QVC…)
F6: CHILDREN (e.g. KIKA and other programmes for
children)
F7: DIVERSE (e.g. All programmes, which are yet not
classified in a category)
F8: ABC (e.g. ...)
F9: XYZ (e.g. ...)
The desired programmes can be taken from the programme pool,
which contains all the programmes in alphabetical order, and copied
into one of the ten favourite lists.
All programmes from the programme pool are saved in the favourite
list F0 = GENERAL upon delivery. The favourite list F0 = GENERAL
contains all the programmes known thus far for satellite receivers.
Some of the programmes of the satellites, Astra 19.2° and EUTEL-
SAT/HOTBIRD, are already additionally contained in various favourite
lists.
The desired favourite list is selected by pressing the [F] button and
one of the assigned numerical buttons [0]-[9].

Programme selection
14
Information for switching programmes
This display bar appears every time you switch programmes – it is
displayed on the screen for approx. 3 seconds. It contains the follow-
ing information:
- Favourite list
- Programme slot and name
- If several audio and language channels are available, an „A“ is
displayed in the left-hand box next to the time (see item „select
language“).
- Current time
- Start and end times of the current programme
- Start and end times of the next programme
TV/radio switch-over
The switch-over to radio or TV is carried out with the [R] or [TV]
button. Both buttons effect the so-called switching voltage of the TV
Scart socket. If you also receive programmes via antenna or cable on
your TV set, you can switch between the programmes received via the
television set or the satellite receiver, provided that the switching
voltage from the television set is recognised and processed, with the
[TV] button.
Note: All the programme functions (Last programme, zapper function, fa-
vourite lists, programme lists and programme pool etc.) for TV can
also be separately used for 2,000 radio programmes.

Programme selection
15
Volume settings
a) The volume of the receiver can be set in 20 steps with the
[◄] or [►] button.
The current volume status appears in the programme display.
b) [ : ] Sound on/off (mute) – For „sound off,“ a respective OSD sym-
bol is displayed for ca. 2 seconds. The function „sound off“ is also
removed by pressing the volume button [◄] or [►].
Language selection
After pressing the [A] button, a menu appears for selecting the lan-
guage. The number of available languages depends on the
programme. The selection of the desired language is carried out as
usual with the [▼] or [▲] button.
After exiting the menu with the [E] button, the originally set language
remains active.
If you exit the menu with the [OK] button, the newly selected language
is saved.
Note: Please keep in mind that many programmes only offer one language.
However, there are radio stations which offer up to 20 or more „sub-
programmes.“ These programmes can be selected in the radio mode
with the [A] button.
L 2 0

Programme selection
16
Timer
The „Timer programming“ menu is called up by pressing the
[] button. Up to 8 timer events can be alternatively entered
in with TV or radio programmes.
Note: Keep in mind that the video recorder must be identically set to the
same recording times.
Note:
Please note that remote control commands are not accepted during
timer recording to assure that undesired OSD displays are not re-
corded. The volume is set to the maximum level during a recording.
Once a command is recognised from the remote control, „r E c“ ap-
pears on the programme display on the unit to indicate that a re-
cording is in progress.
The timer recording can only be cancelled prematurely by pressing
the [
] button. After the cancellation, „End“ is displayed. The unit now
operates as normal.
If the timer recording is started in standby, the unit switches back to
standby after the end of the recording.
[1-8] Select the next open entry field with the numerical buttons
[1]-[8] or with [▼] or [▲].
[►][◄] Select the entry field for {Date} {Start} {Stop} and {Pro-
gramme} one after the other (the entry position is highlighted
in white).
[OK] Activate the entry in the selected field by pressing [OK]
(the entry position is highlighted in black).
Enter in the respective event either directly with the numeri-
cal buttons [0]-[9] or by using the [► ◄] [ ] buttons.
[OK] End the entry with [OK] and select the next entry field.
[ E ] After entering the {Date} {Start} {Stop} and {Programme},
you can confirm the entry and exit the timer menu by press-
ing the [E] button, or enter another event.
E n d
r E c

Programme selection
17
The data from the programme preview can be transferred to the re-
cording timer by pressing only one button. If the programme preview
is available, then select the desired programme and transfer the data
directly to the timer by pressing the [] button.
Deleting a timer programming:
[1-8] Select the timer line which you would like to delete with the
numerical buttons [1]-[8] or with [▼] or [▲],
[OK] and delete the programmed data by pressing the OK button.
Note: If you have accidentally deleted a line and would like to restore the
original information, exit the timer menu by pressing the [E] button
twice.
Note: Time and date are taken from the DVB data which is transmitted by
the broadcaster. Please correct the „time offset“ for for summer and
winter time in the „Installation“ menu.
For CET summer time = {+2 h}
For CET winter time = {+1 h}
Please keep in mind that some „exotic programmes“ do not transmit
the correct time.
Control the date and time in the „Timer programming“ menu, when
you carry out a programming.
EPG – Programme information (Basis navigator)
In the EPG (Electronic Programme Guide), information about the cur-
rent or following programmes is displayed.
The amount of this programme-accompanying information is deter-
mined by the respective programme provider and varies considerably
from programme to programme. Many programmes can be transmit-
ted without usable supplementary information (SI data).
It is just the same for the programme preview. Some programme pro-
viders do not transmit data. Others transmit a programme overview
with supplementary information covering several days.
Call up and exit the EPG using the [ i ] button.
a) Current and following programme
[ i ] Shows title, start and end of the current programme, and
information about the programme depending on the
programme provider.
[ i ] After pressing the button again, the title, start and end of the
following programme and supplementary information about
the programme, depending on the programme provider, are
displayed.
[ i ] Exits the programme information display.
[ E ] Immediately exits the programme information display.
b) Further programme preview and supplementary information
Programme selection
18
[ i ] Activates the basis navigator, displays information about cur-
rent programme.
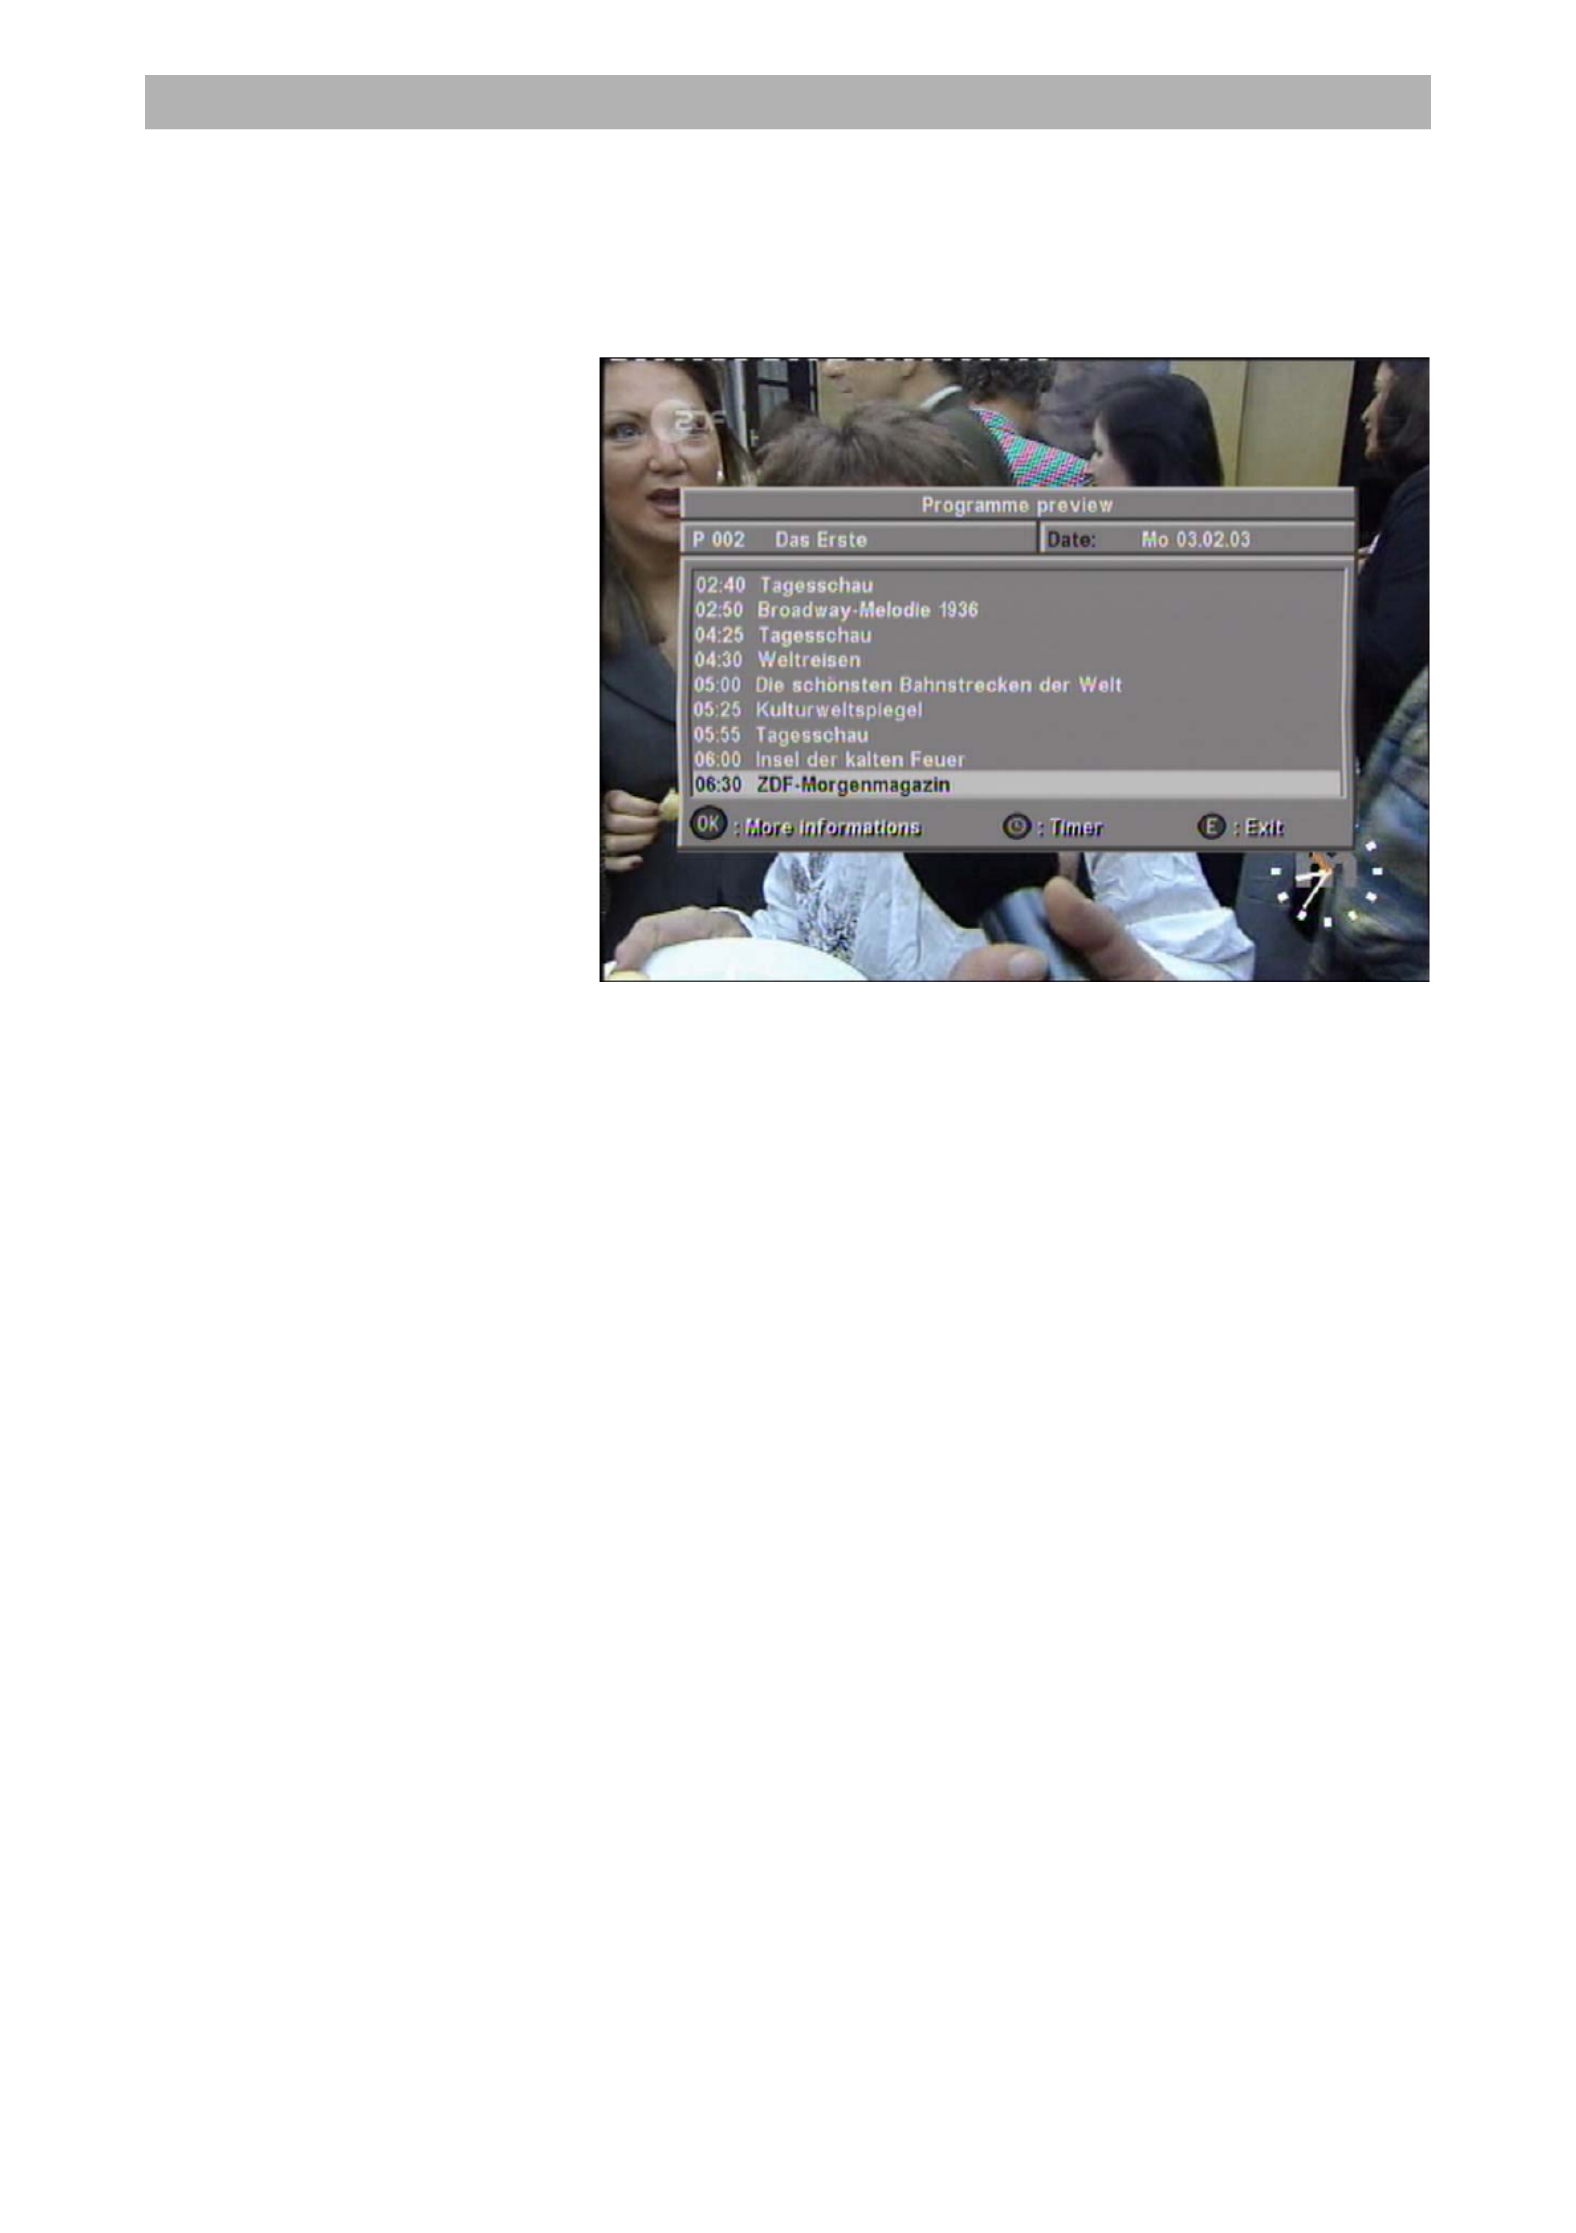
[OK] Calls up the programme preview.
Depending on the programme provider, you can receive pro-
gramme lists for the current day or the next several days.
You can switch to the desired programme line-by-line or page-by-
page by using the [▼ ▲] [ ] or [► ◄] [ ] buttons.
[OK] When you have selected the desired programme, you can
call up other detailed information by pressing the [OK] but-
ton. If supplementary information is not available, a
corresponding message is displayed.
If the text of the supplementary information exceeds the page, you
can scroll up and down line-by-line using the [▼ ▲] [ ] buttons.
With the [OK] or [ E ] button, exit the display of the
supplementary information and return to the programme preview once
more.

Menu structure
19
Menu structure
Programmes
Favourite list
With the [M] button, call up the main menu and then press the [OK]
button twice.
You can sort, exchange, copy and delete programmes – all in one
menu.
[ i ] Select one of the favourite lists 0-9.
[M] Select the satellites (e.g. ASTRA, EUTELSAT or other).

Menu structure
21
Place it in the centre field with the [ : ] button.
Select the desired programme number with the [▼ ▲] [ ] buttons
or [0-9],
and add the programme by pressing [ A ] – finished!
Deleting: Move the programme, you would like to delete, to the red bar by using
the [▼ ▲] [ ] buttons (or by direct entry of the programme number),
Move the desired programme to the red bar with the [▼ ▲] [ ] buttons
(or by direct entry of the programme number)
and then move it to the centre field by pressing the [ : ] button.
Exit the menu with the [E] button, and ‚delete‘ by pressing [OK] – fin-
ished!
Note: „Deleted“ programmes are only removed from the favourite list and
are still available in the programme pool. They can be newly added to
the favourite list at any time!
The switch-over to the left menu window is carried out with the [▼]
and [▲] buttons. The switch-over to the right menu window is carried
out with the [◄] and [►] buttons.

Menu structure
23
Press the [OK] button – finished!
Note: If the unit recognises programmes, which are already in the current
favourite list, the following message appears above the [OK] symbol:
Note: If you have accidentally deleted programmes, or want to restore
changes, then exit the menu by pressing the [E] button two times.
Once you press the [OK] button, the changes are saved.
Changing the names of the favourite lists
First press the [OK] button.
Select the entry field {NAME} with [0]-[9] or [ ], and activate the ▼ ▲] [
field by pressing [OK].
With the [▼] or [▲] button, select the letters (capitalised and
lowercased) or digits.
With the [►] or [◄] button, you can move the entry position to the
right or left.
After entering the desired name, deactivate the entry field by pressing
the [OK] button.
Programme pool
The programme pool contains all programmes in alphabetical order.
Press the [M] button to select the satellites, and press the [TV] button
to select free-to-air or encrypted programmes. In „All free“ („All CA“)
you will find all the free-to-air (encrypted) programmes of the satellite,
and also the new free or encrypted programmes after a satellite
search.
[▼] [▲] Selects programmes in the rows.
[◄] [►] Selects programmes in the columns.
All selected programmes are immediately set by the receiver and dis-
played in the background. For encrypted programmes, the respective
CA module must be available.
Channel
already in the
favo
u
rite list
Menu structure
24
With the [F] button and (within 2 seconds) with the [◄] or [►] button,
the transparency of the screen
display can be changed.
The satellite is selected by pressing the [M] button.
[TV] Selects free-to-air or encrypted programmes.
(:) After pressing the [mute] button, individual programmes can
also be deleted; e.g. programmes, which the company has
set.
( R ) Here the programme pool which is activated with the [M] and
[TV] buttons can be cleared out, which means all „unused“
programmes or all displayed programmes can be deleted.
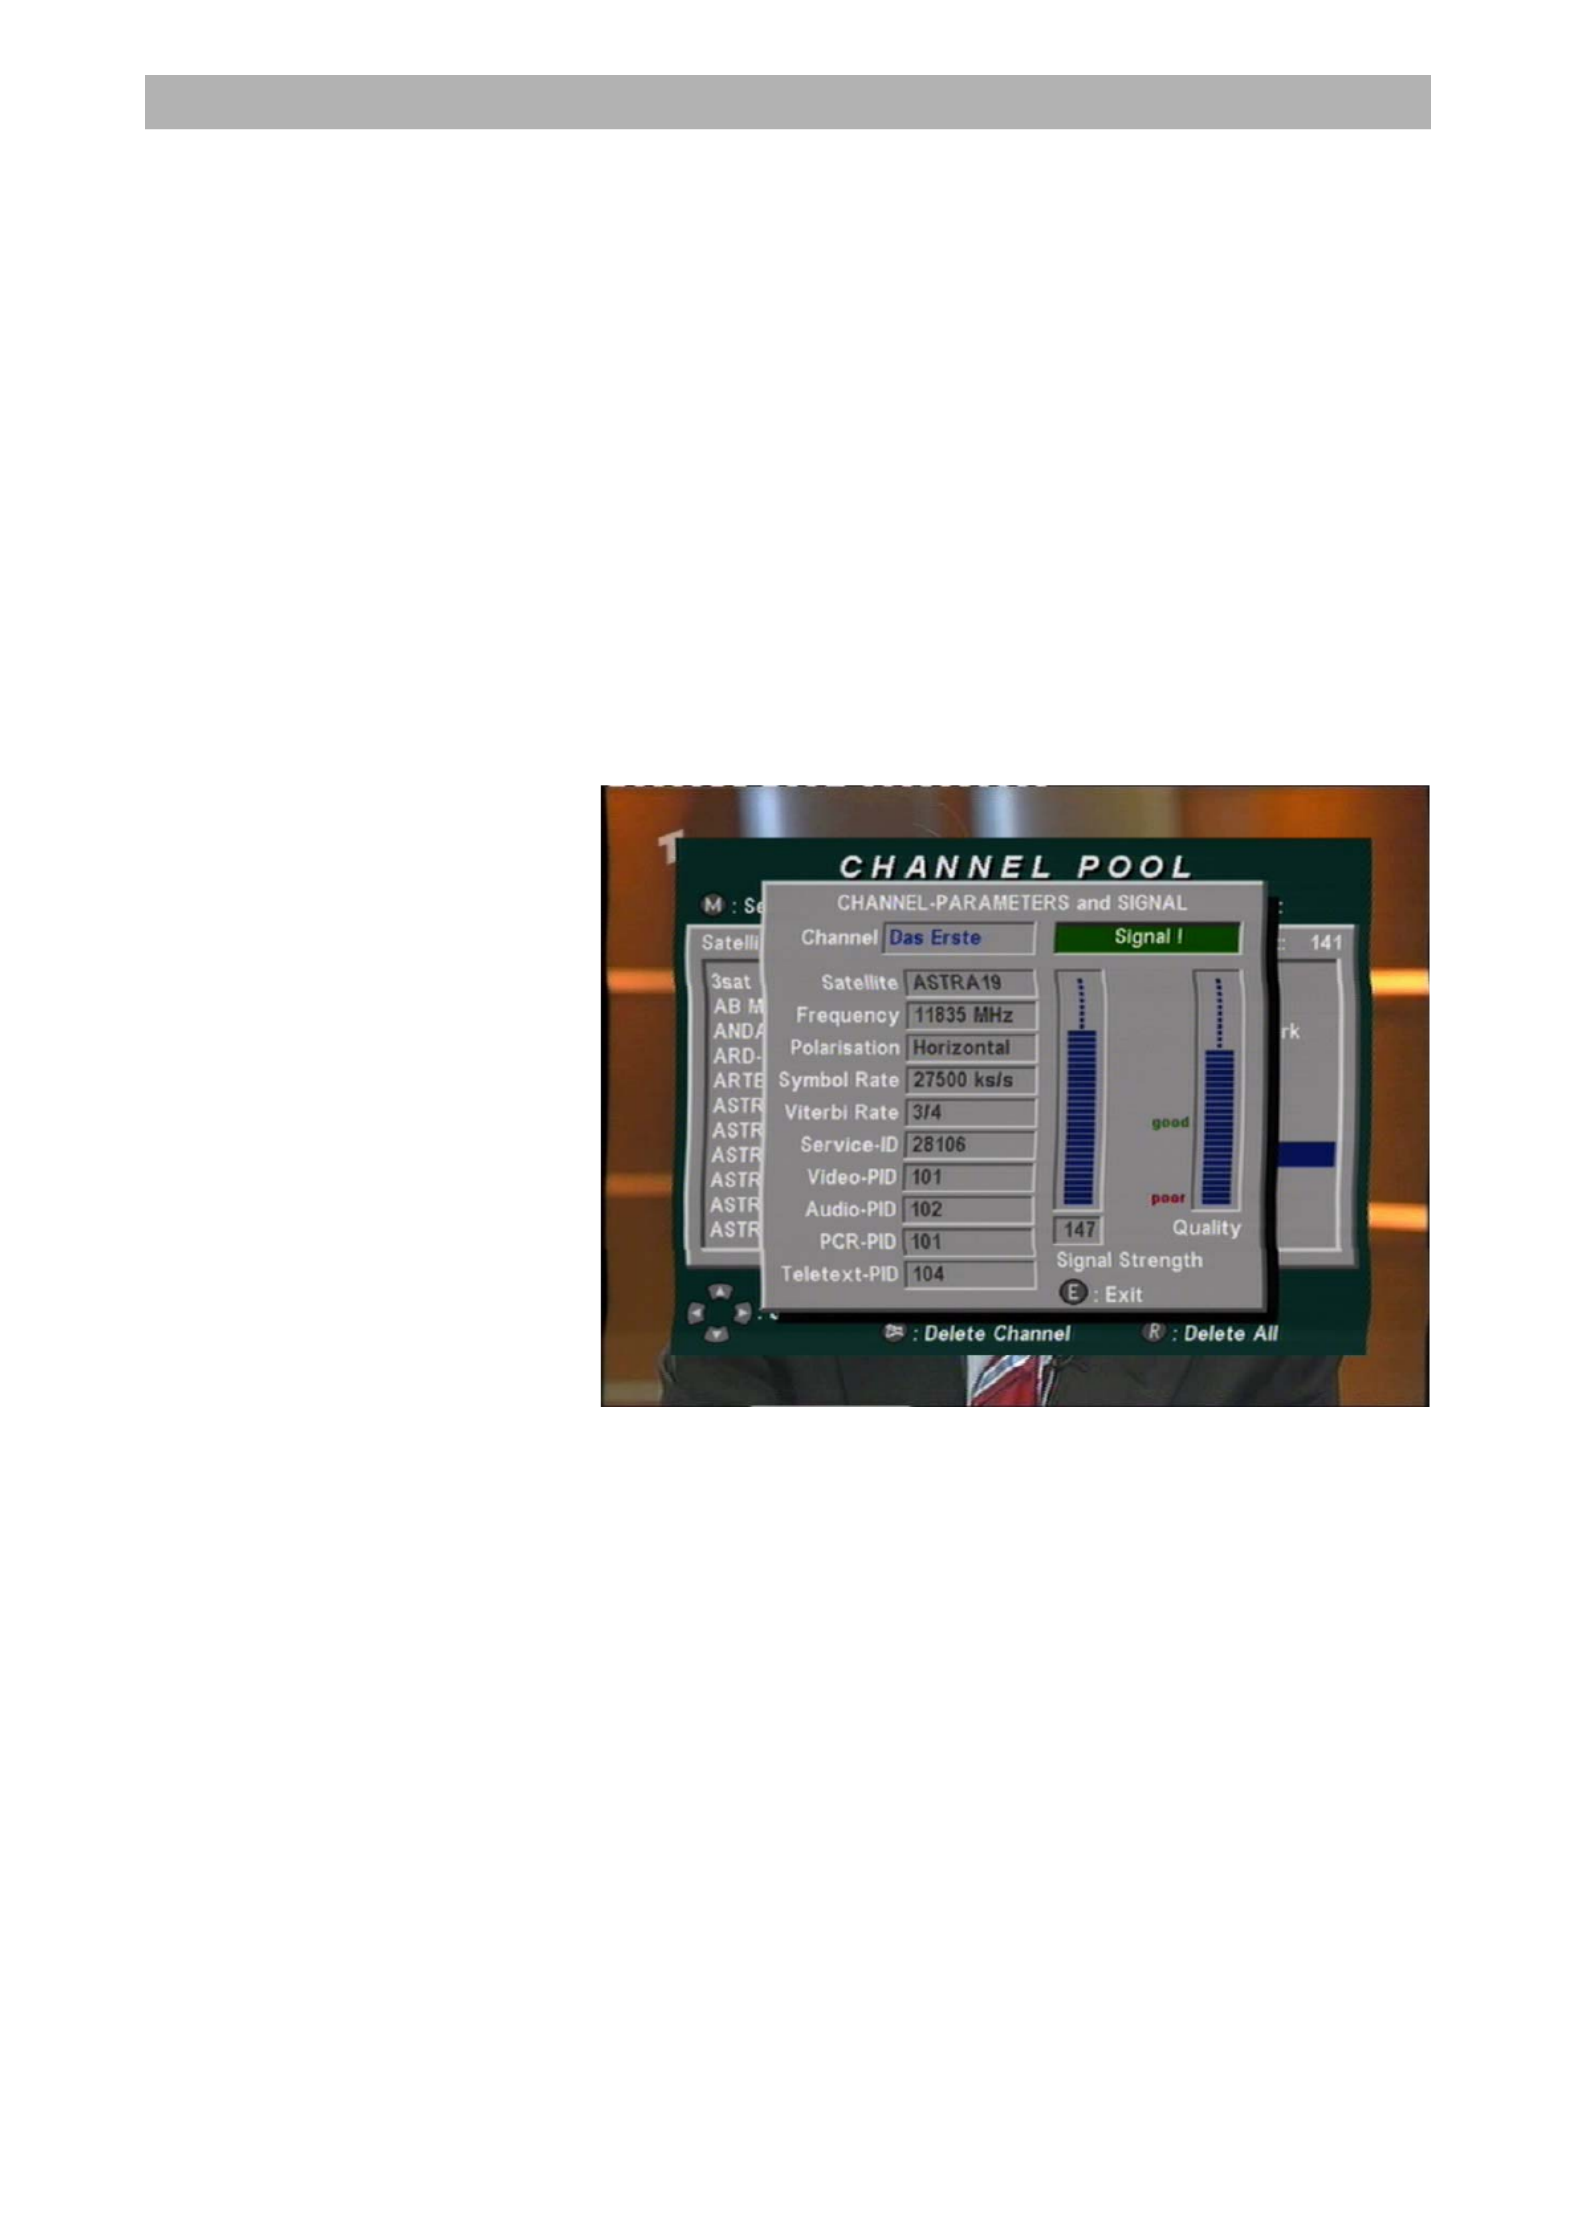
Antenna signal and reception parameters
In the submenu „Antenna signal,“ you can optimally align your para-
bolic antenna if needed. Turn the antenna to optimise the signal
strength and signal quality.
For very weak signals, the signal strength scale can also go to 0.
Optimise the signal with the scale for the signal quality.
If the message „no signal“ appears, and only the signal for the signal
strength is displayed, then the antenna is probably aligned to a
(not receivable) satellite for analogue signals.
Parental lock
The 5-digit password (PIN) is set to 00000 at the factory.
Changing the password (PIN):
Select the „Parental lock“ menu with the [4] button in the main menu
„Programme.“ Select the entry field {PIN} by using the [2] button or the
[▼] button, and activate it by pressing [OK]. Enter the ‚old‘ and your
‚new‘ PIN as follows.
Enter in the current PIN (= 00000 first time).
Please enter in the new PIN.

Menu structure
25
Re-enter the new PIN.
Attention! Do not forget your PIN.
Resetting the unit to the factory setting is only possible at the service
centre ESC.
All the programmes are unlocked at the factory – You can lock each
individual programme against unauthorised setting.
To mark the programmes which are to be locked, press the [RC]
button in the „Favourite list“ menu or the „Channel pool.“
A „?“ is then placed in front of the current programme name. After-
wards, the next programme is called up, so you can continue to mark
several programmes one after another by repeatedly pressing the
[RC] button.
In order to delete a marking, press the [RC] button once more on the
desired programme.
Example: Sky News
? Super Action
? Super Spezial
Südwest BW
Activating the parental lock
In order to activate the lock on the programmes, which are marked
with a „?”, switch the entry field {Lock} to ‘On’ in the “Parental lock“
menu, and confirm it by exiting the menu with [OK].
When calling up the marked programmes, you will be asked to enter
your 5-digit PIN.
Note: Please note that after activating the parental lock, the menus,
„Favourite list,“ „channel pool“ and „search,“ can only be called up by
entering in the 5-digit PIN.
This prevents the parental lock from being bypassed, e.g. by
deleting the marking or setting the locked programmes via the trans-
ponder search (the parental lock cannot be bypassed via the timer).
Note: In order to temporarily deactivate the parental lock, e.g. at night, you
can switch the entry field {Lock } to ‘Off’ in the „Parental lock“ menu.
The „?“ markings will not be changed and remain after activating the
parental lock again, which means when the entry field {Lock} is
switched to ‘On’ again.

Menu structure
26
Search
Satellite search
The satellite search occurs via all frequencies of the selected satellite.
Select the desired settings in the order of the menu:
The selection of individual parameters is carried out after
activation with the [OK] button and then with the [◄] or [►] buttons.
We recommend starting the search from time to time, in order to find
new programmes. Here use the basic settings, which are displayed in
boldface.
If you want to specifically search for an individual programme, you
reduce the searching time by restricting the parameters, e.g.
band (low) and symbol rate (22).
The desired satellites {ASTRA} > {Hotbird} > {Sat 3} > to
{Sat 8}
The band {Low/High} > {Low} > {High}
(3) Choose the symbol rate {22+27.5} > {22} > {27.5} > {FREE}
or a free symbol rate {XXXX}
(Only possible, if symbol rate in point 3 has been changed to {FREE}).
Start the search by pressing [OK],
and select if you want to search for unencrypted or encrypted pro-
grammes or both: Selection: “FREE“ or “CA“ or „FREE+CA.“
Note: Some of the encrypted programmes are free-to-air or partially free-to-
air.
Special note: The encrypted ORF programmes are found under „FREE.“

Menu structure
27
Transponder search
In the transponder search, all programmes of the transponder are
searched for.
If the parameters (Satellite, Band, Symbol Rate, Free S.Rate) of the
searched programme are known, then the transponder search can be
used.
If e.g. a new programme is added to a known programme group, it is
sufficient to set a programme from this programme group before via
the programme selection – the required parameters are taken over by
the transponder search.
If the message „No signal!“ appears in the „START“ line, reception is
not possible. Please check the parameters satellite, frequency,
polarisation and symbol rate once more.
The search can be started, once „Signal!“ is displayed.
Start the search with the [OK] button.
Encrypted programmes are indicated with “$”. Programmes, which
you do not want to include in the programme pool, can be individually
deleted by pressing the [TV] button.
New programmes are indicated with „ “. These programmes are +
added to the programme pool by pressing the [OK] button.
Manual entry (for experts)
If neither the satellite nor the transponder search finds the desired
programme, all important receiving parameters can be manually set in
“Manual Entry”. The manual entry is very helpful, when e.g. the de-
sired programme is known by the receiving data but is not continu-
ously transmitted.
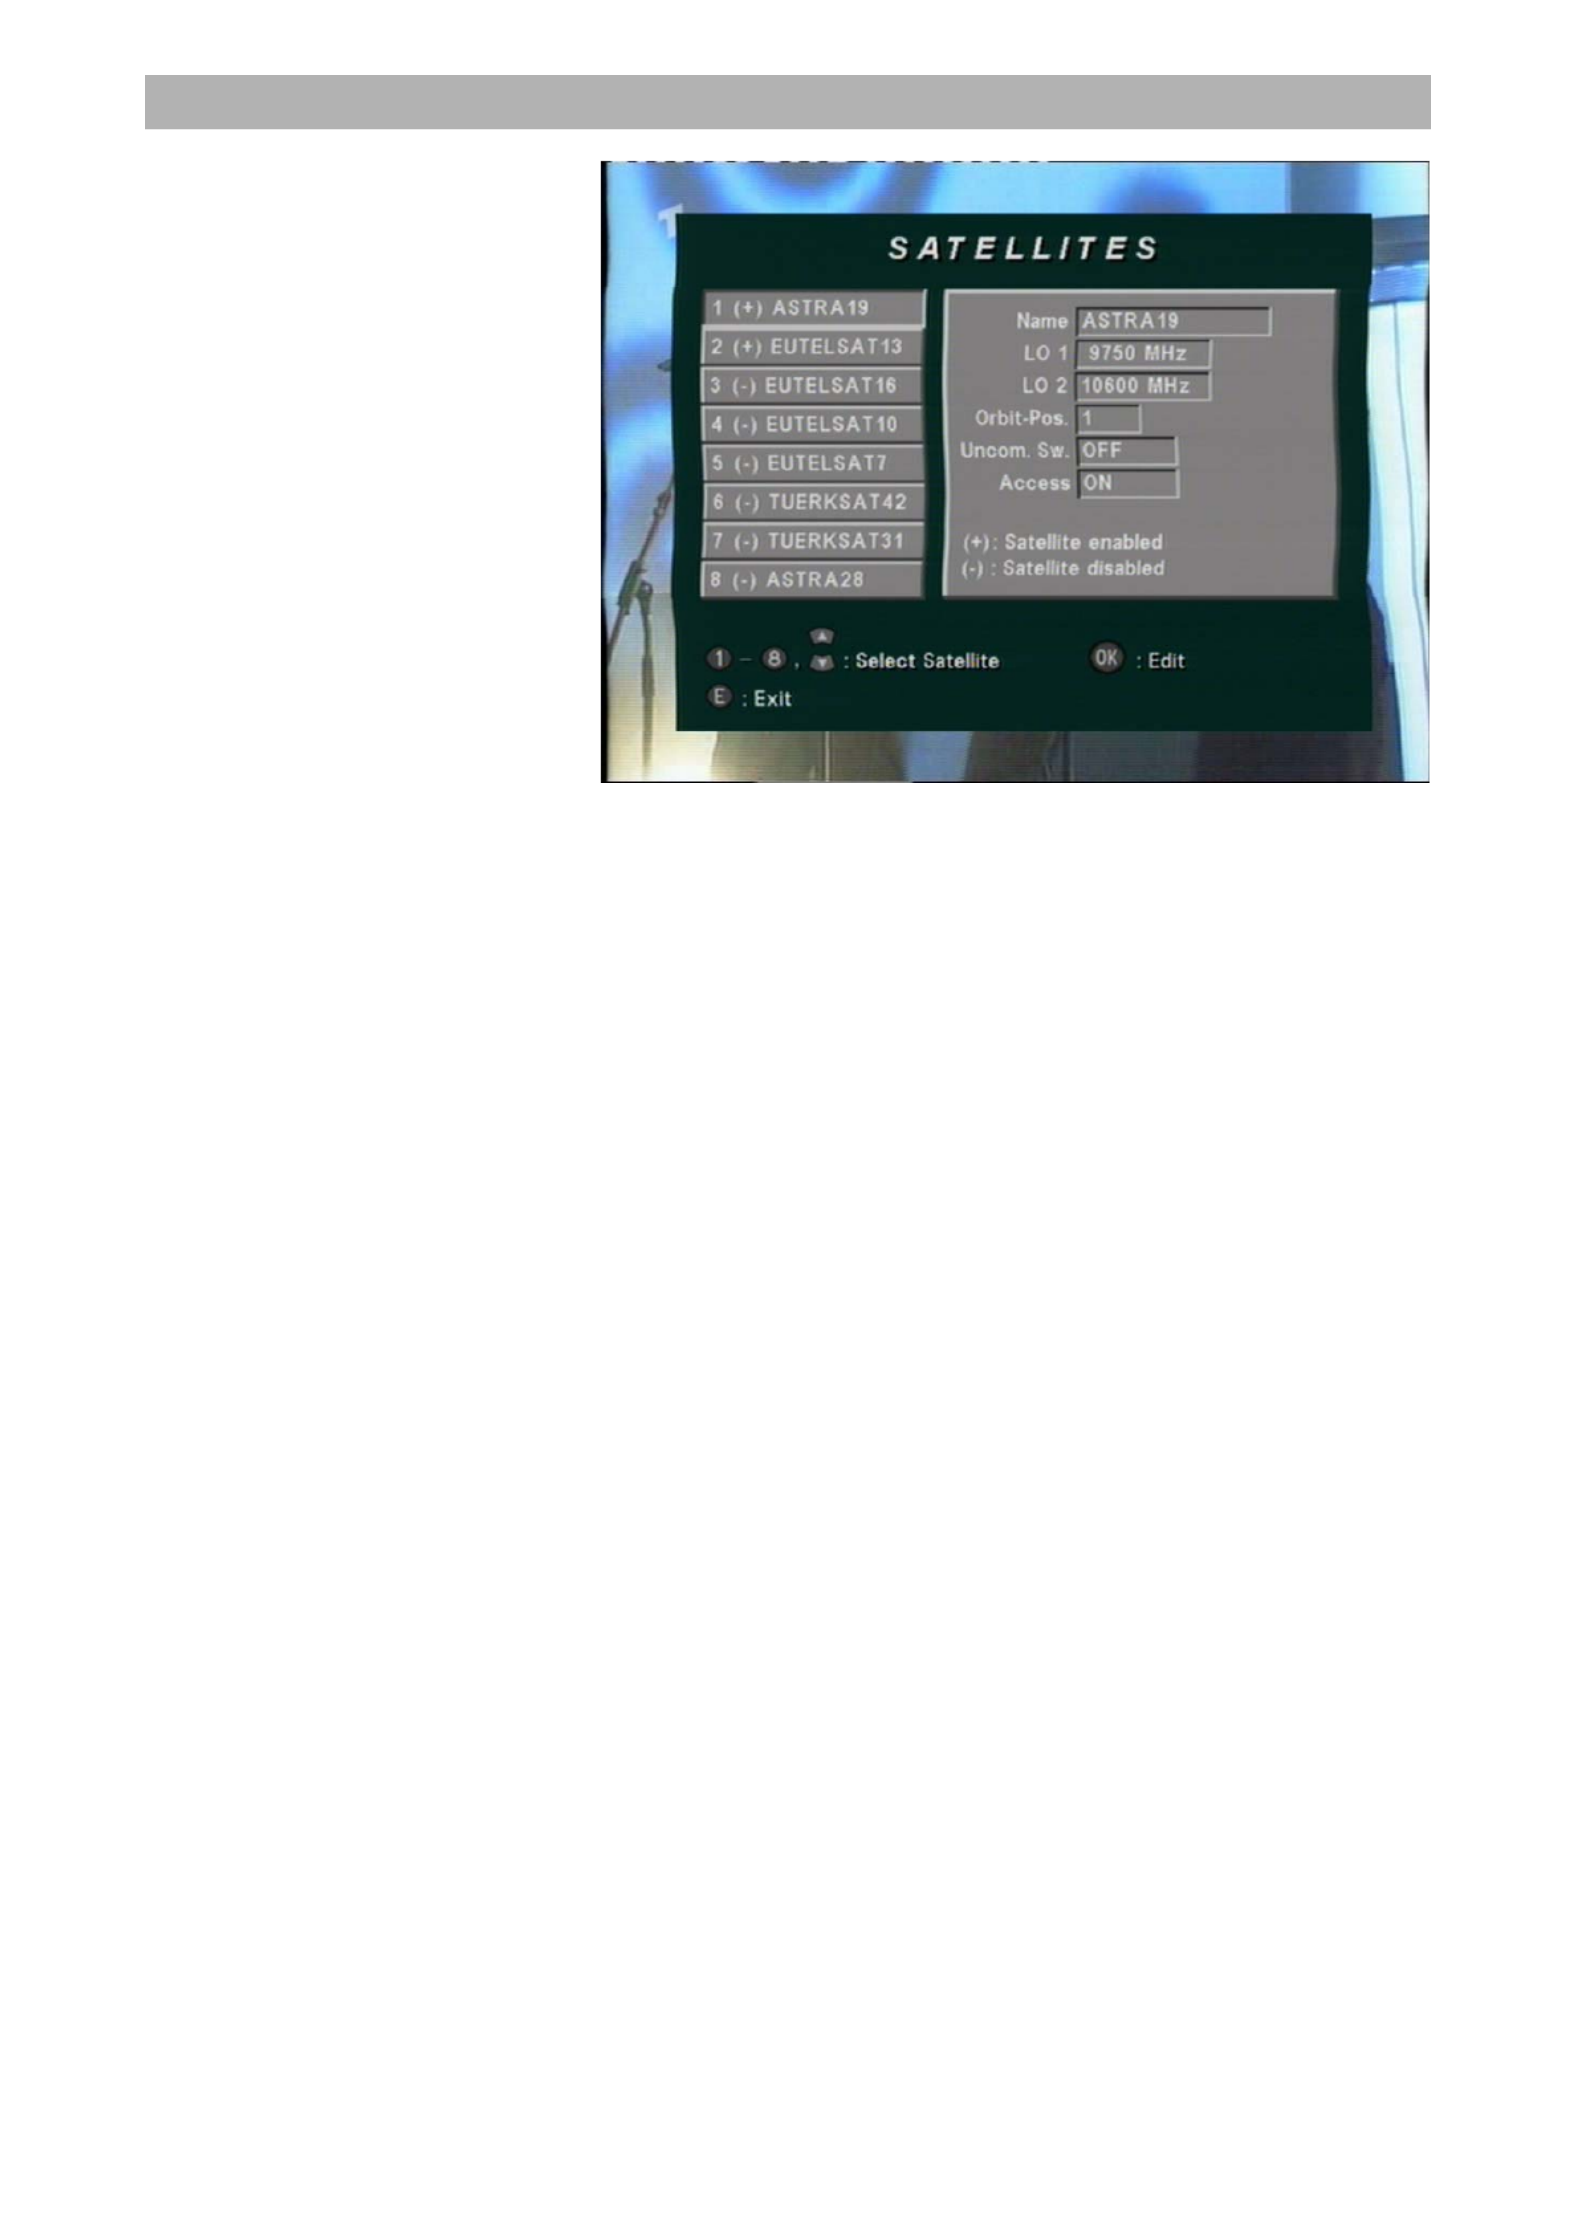
Satellites
The satellite ASTRA is set at the factory. Another 7 satellites, e.g.
EUTELSAT/HOTBIRD, are pre-programmed. For extending your
receiving system, you can make the required settings for the
7 pre-programmed satellites in the ‚Satellite‘ menu.
Menu structure
28
Activate the desired satellite number, e.g. with the numerical buttons
[1]-[8], and call up the entry menu by pressing the [OK] button.
1. Enter or change the name.
Activate the entry field {NAME} by pressing the [1] button and [OK].
With the [▼] or [▲] button, you can select letters (capitalised and
lowercased) or digits.
With the [►] or [◄] button, you can move the entry position to the
right or left.
After entering the desired name, the entry field is deactivated by
pressing [OK].
2. Enter LO1.
3. Enter LO2.
LO1 and LO2 are pre-set to 9,750 MHz and 10,600 MHz at the
factory.
If the LNB LO frequencies deviate from the pre-set values, you must
enter in the appropriate values here. Activate the field with [OK], and
enter in the LO frequencies with the numerical buttons [0]-[9]. Then
end the entry by pressing [OK].
Please make sure, that a digital-compatible LNB is integrated in your
receiving system.
4. Enter orbit position
Note: The parameter “Orbit position”, possible values 1-4, must be given for
control via DiSEqC.
DiSEqC 1.0 4 sat. positions 1-4
DiSEqC 1.1 16 x 4 sat. positions (uncomitted switches) 1-16/off
As the appropriate switches are required to control DiSEqC 1.1, with
which the matrices are controlled, the wiring is very complicated and
should therefore only be fitted by an experienced electrician!
5. Access
{ON} The selected satellite is released for your receiving system.
{OFF} The desired satellites is locked.
Product specificaties
| Merk: | Kathrein |
| Categorie: | Satellietontvanger |
| Model: | UFE 336-S CI |
Heb je hulp nodig?
Als je hulp nodig hebt met Kathrein UFE 336-S CI stel dan hieronder een vraag en andere gebruikers zullen je antwoorden
Handleiding Satellietontvanger Kathrein

24 Juli 2023
24 Juli 2023
24 Juli 2023
24 Juli 2023
24 Juli 2023
24 Juli 2023
24 Juli 2023
24 Juli 2023
24 Juli 2023
24 Juli 2023
Handleiding Satellietontvanger
- Satellietontvanger Sony
- Satellietontvanger Samsung
- Satellietontvanger Grundig
- Satellietontvanger Medion
- Satellietontvanger Nokia
- Satellietontvanger Toshiba
- Satellietontvanger Arcon
- Satellietontvanger Aston
- Satellietontvanger Boca
- Satellietontvanger Denson
- Satellietontvanger Ferguson
- Satellietontvanger GSS
- Satellietontvanger HD PLUS
- Satellietontvanger Helios
- Satellietontvanger Humax
- Satellietontvanger I-Set
- Satellietontvanger Inverto
- Satellietontvanger Konig
- Satellietontvanger M7
- Satellietontvanger Manhattan
- Satellietontvanger Maxview
- Satellietontvanger Megasat
- Satellietontvanger Metronic
- Satellietontvanger Palcom
- Satellietontvanger Pure Acoustics
- Satellietontvanger Rebox
- Satellietontvanger Reflexion
- Satellietontvanger SAB
- Satellietontvanger SetOne
- Satellietontvanger Silvercrest
- Satellietontvanger Skysat
- Satellietontvanger Smart
- Satellietontvanger Strong
- Satellietontvanger Technisat
- Satellietontvanger Technomate
- Satellietontvanger TechnoTrend
- Satellietontvanger Telestar
- Satellietontvanger Thomson
- Satellietontvanger Topfield
- Satellietontvanger Travelsat
- Satellietontvanger Trekstor
- Satellietontvanger Triax
- Satellietontvanger Xoro
- Satellietontvanger Xsarius
- Satellietontvanger Zehnder
- Satellietontvanger Zgemma
- Satellietontvanger Octagon
- Satellietontvanger Oyster
- Satellietontvanger Bang And Olufsen
- Satellietontvanger Schwaiger
- Satellietontvanger Clarke-tech
- Satellietontvanger ALLvision
- Satellietontvanger Axing
Nieuwste handleidingen voor Satellietontvanger
3 Oktober 2024
15 April 2024
15 April 2024
5 April 2024
5 April 2024
17 Januari 2024
16 Oktober 2023
16 Oktober 2023
12 Oktober 2023
12 Oktober 2023