Intermec CK71a Handleiding
Intermec
Barcode lezer
CK71a
Lees hieronder de 📖 handleiding in het Nederlandse voor Intermec CK71a (208 pagina's) in de categorie Barcode lezer . Deze handleiding was nuttig voor 99 personen en werd door 2 gebruikers gemiddeld met 4.5 sterren beoordeeld
Pagina 1/208

70 Series
Mobile Computer
CK70, CK70NI, CK71, CK71NI, CN70, CN70NI, CN70e, CN70eNI
User Manual

ii 70 Series Mobile Computer User Manual
Intermec Technologies Corporation
Worldwide Headquarters
6001 36th Ave.W.
Everett, WA 98203
U.S.A.
www.intermec.com
The information contained herein is provided solely for the purpose of allowing customers to
operate and service Intermec-manufactured equipment and is not to be released, reproduced, or
used for any other purpose without written permission of Intermec Technologies Corporation.
Information and specifications contained in this document are subject to change without prior
notice and do not represent a commitment on the part of Intermec Technologies Corporation.
© 2011 - 2012 by Intermec Technologies Corporation. All rights reserved.
The word Intermec, the Intermec logo, Norand, ArciTech, Beverage Routebook, CrossBar,
dcBrowser, Duratherm, EasyADC, EasyCoder, EasySet, Fingerprint, i-gistics,
INCA (under license),
Intellitag, Intellitag Gen2, JANUS, LabelShop, MobileLAN, Picolink, Ready-to-Work, RoutePower,
Sabre, ScanPlus, ShopScan, Smart Mobile Computing, SmartSystems, TE 2000, Trakker Antares,
and Vista Powered are either trademarks or registered trademarks of Intermec Technologies
Corporation.
There are U.S. and foreign patents as well as U.S. and foreign patents pending.
Wi-Fi is a registered certification mark of the Wi-Fi Alliance.
Microsoft, Windows, and the Windows logo are registered trademarks of Microsoft Corporation
in the United States and/or other countries.
Bluetooth is a trademark of Bluetooth SIG, Inc., U.S.A.

70 Series Mobile Computer User Manual iii
Document Change Record
This page records changes to this document. The document was
originally released as Revision 001.
Version
Number Date Description of Change
005 11/2012 Added information to support firmware version 1.50:
• CloneNGo application
• New camera settings
• SceneEditor application
• EA30 imager extended reading range
004 2/2012 Revised information on ScanNGo bar codes.
003 12/2011 Added information on:
• the flashlight feature.
• the Carrier Selection application.
Revised information on:
• the Intermec Settings menus.
• upgrading the system software and the operating
system.
• GPS procedures.
• ScanNGo bar codes.
002 06/2011 Revised to add information on
non-incendive (NI) versions of the computer,
provisioning the computer, the new ScanDiagnostics
application, and how to use the 70 Series as a USB
mass storage device. Also corrected the cold boot
procedure and removed the compass.

iv 70 Series Mobile Computer User Manual

Contents
70 Series Mobile Computer User Manual v
Contents
Before You Begin. . . . . . . . . . . . . . . . . . . . . . . . . . . . . . . . . . . . . . . . . . . . . . . . . . . . . . . . . . . . . . . . . xi
Safety Information . . . . . . . . . . . . . . . . . . . . . . . . . . . . . . . . . . . . . . . . . . . . . . . . . . . . . . . xi
Global Services and Support . . . . . . . . . . . . . . . . . . . . . . . . . . . . . . . . . . . . . . . . . . . . . . xi
Warranty Information. . . . . . . . . . . . . . . . . . . . . . . . . . . . . . . . . . . . . . . . . . . . xi
Web Support . . . . . . . . . . . . . . . . . . . . . . . . . . . . . . . . . . . . . . . . . . . . . . . . . . . . xi
Send Feedback. . . . . . . . . . . . . . . . . . . . . . . . . . . . . . . . . . . . . . . . . . . . . . . . . . . xii
Telephone Support . . . . . . . . . . . . . . . . . . . . . . . . . . . . . . . . . . . . . . . . . . . . . . xii
Who Should Read This Manual . . . . . . . . . . . . . . . . . . . . . . . . . . . . . . . . . . . . . . . . . . . xii
Related Documents . . . . . . . . . . . . . . . . . . . . . . . . . . . . . . . . . . . . . . . . . . . . . . . . . . . . . . xii
Patent Information . . . . . . . . . . . . . . . . . . . . . . . . . . . . . . . . . . . . . . . . . . . . . . . . . . . . . xiii
1 About the Computer Features . . . . . . . . . . . . . . . . . . . . . . . . . . . . . . . . . . . . . . . . . 1
About the 70 Series Mobile Computers . . . . . . . . . . . . . . . . . . . . . . . . . . . . . . . . . . . . . . . . . . . . . 2
What’s New in This Release . . . . . . . . . . . . . . . . . . . . . . . . . . . . . . . . . . . . . . . . . . . . . . . . 4
Overview of 70 Series Features . . . . . . . . . . . . . . . . . . . . . . . . . . . . . . . . . . . . . . . . . . . . . 5
About the Status LEDs . . . . . . . . . . . . . . . . . . . . . . . . . . . . . . . . . . . . . . . . . . . . . . . . . . . . 6
70 Series Accessories . . . . . . . . . . . . . . . . . . . . . . . . . . . . . . . . . . . . . . . . . . . . . . . . . . . . . . . . . . . . . . 8
About Language Provisioning . . . . . . . . . . . . . . . . . . . . . . . . . . . . . . . . . . . . . . . . . . . . . . . . . . . . .10
About the Battery . . . . . . . . . . . . . . . . . . . . . . . . . . . . . . . . . . . . . . . . . . . . . . . . . . . . . . . . . . . . . . . . 10
Charge the Battery . . . . . . . . . . . . . . . . . . . . . . . . . . . . . . . . . . . . . . . . . . . . . . . . . . . . . . . 11
Change the Battery. . . . . . . . . . . . . . . . . . . . . . . . . . . . . . . . . . . . . . . . . . . . . . . . . . . . . . . 11
About Battery Status . . . . . . . . . . . . . . . . . . . . . . . . . . . . . . . . . . . . . . . . . . . . . . . . . . . . . 13
About Battery Life and Conservation . . . . . . . . . . . . . . . . . . . . . . . . . . . . . . . . . . . . . . 15
About the Keypad. . . . . . . . . . . . . . . . . . . . . . . . . . . . . . . . . . . . . . . . . . . . . . . . . . . . . . . . . . . . . . . . 16
Enter Characters on the QWERTY Keypad . . . . . . . . . . . . . . . . . . . . . . . . . . . . . . . . .23
Enter Characters on the Numeric Keypad . . . . . . . . . . . . . . . . . . . . . . . . . . . . . . . . . . 23
Enter Characters on the CK70 and CK71 Keypads . . . . . . . . . . . . . . . . . . . . . . . . . .24
About the Power Button. . . . . . . . . . . . . . . . . . . . . . . . . . . . . . . . . . . . . . . . . . . . . . . . . . 25
About the Intermec Dashboard Button . . . . . . . . . . . . . . . . . . . . . . . . . . . . . . . . . . . . 26
Configure the Screen Backlight . . . . . . . . . . . . . . . . . . . . . . . . . . . . . . . . . . . . . . . . . . . . . . . . . . . 27
Configure the Screen Brightness . . . . . . . . . . . . . . . . . . . . . . . . . . . . . . . . . . . . . . . . . . . . . . . . . . 27
Adjust the Volume . . . . . . . . . . . . . . . . . . . . . . . . . . . . . . . . . . . . . . . . . . . . . . . . . . . . . . . . . . . . . . . 27
About the Imager . . . . . . . . . . . . . . . . . . . . . . . . . . . . . . . . . . . . . . . . . . . . . . . . . . . . . . . . . . . . . . . . 28

Contents
vi 70 Series Mobile Computer User Manual
Use the Imager as a Flashlight . . . . . . . . . . . . . . . . . . . . . . . . . . . . . . . . . . . . . . . . . . . . . . . . . . . . . 28
Read Bar Codes . . . . . . . . . . . . . . . . . . . . . . . . . . . . . . . . . . . . . . . . . . . . . . . . . . . . . . . . . . . . . . . . . . 29
Insert a MicroSD Card. . . . . . . . . . . . . . . . . . . . . . . . . . . . . . . . . . . . . . . . . . . . . . . . . . . . . . . . . . . . 30
Install a MicroSD Card in a CN70 or CN70e . . . . . . . . . . . . . . . . . . . . . . . . . . . . . . . 30
Install a MicroSD Card in a CK70 or CK71 . . . . . . . . . . . . . . . . . . . . . . . . . . . . . . . . .33
Transfer Files To and From Your PC. . . . . . . . . . . . . . . . . . . . . . . . . . . . . . . . . . . . . . . . . . . . . . .35
Use Microsoft ActiveSync to Transfer Files . . . . . . . . . . . . . . . . . . . . . . . . . . . . . . . . .36
Use the Computer as a Mass Storage Device . . . . . . . . . . . . . . . . . . . . . . . . . . . . . . . . 37
2 About the User Interface and Intermec Applications . . . . . . . . . . . . . . . 39
About the User Interface. . . . . . . . . . . . . . . . . . . . . . . . . . . . . . . . . . . . . . . . . . . . . . . . . . . . . . . . . . 40
About the Home Screen . . . . . . . . . . . . . . . . . . . . . . . . . . . . . . . . . . . . . . . . . . . . . . . . . .40
Interact with the Screen . . . . . . . . . . . . . . . . . . . . . . . . . . . . . . . . . . . . . . . . . . . . . . . . . . 41
Title Bar Status Icons . . . . . . . . . . . . . . . . . . . . . . . . . . . . . . . . . . . . . . . . . . . . . . . . . . . .42
Align the Screen . . . . . . . . . . . . . . . . . . . . . . . . . . . . . . . . . . . . . . . . . . . . . . . . . . . . . . . . . 45
About Intermec Applications. . . . . . . . . . . . . . . . . . . . . . . . . . . . . . . . . . . . . . . . . . . . . . . . . . . . . .45
Applications Available on the Mobile Computer . . . . . . . . . . . . . . . . . . . . . . . . . . . .45
Applications You Can Download to the Mobile Computer . . . . . . . . . . . . . . . . . .47
3Use the Phone . . . . . . . . . . . . . . . . . . . . . . . . . . . . . . . . . . . . . . . . . . . . . . . . . . . . . . . . . . 51
About the Phone . . . . . . . . . . . . . . . . . . . . . . . . . . . . . . . . . . . . . . . . . . . . . . . . . . . . . . . . . . . . . . . . .52
Activate the UMTS Phone . . . . . . . . . . . . . . . . . . . . . . . . . . . . . . . . . . . . . . . . . . . . . . . . 52
Activate the CDMA Phone . . . . . . . . . . . . . . . . . . . . . . . . . . . . . . . . . . . . . . . . . . . . . . . . 54
Start the Activation Wizard . . . . . . . . . . . . . . . . . . . . . . . . . . . . . . . . . . . . . . . . . . . . . . . 56
Turn the Phone On and Off. . . . . . . . . . . . . . . . . . . . . . . . . . . . . . . . . . . . . . . . . . . . . . . . . . . . . . . 56
About Network Carriers . . . . . . . . . . . . . . . . . . . . . . . . . . . . . . . . . . . . . . . . . . . . . . . . . . . . . . . . . .56
Switch Network Carriers. . . . . . . . . . . . . . . . . . . . . . . . . . . . . . . . . . . . . . . . . . . . . . . . . . . . . . . . . .57
Add the WWAN Connection . . . . . . . . . . . . . . . . . . . . . . . . . . . . . . . . . . . . . . . . . . . . . . . . . . . . . .58
About the Network Connection . . . . . . . . . . . . . . . . . . . . . . . . . . . . . . . . . . . . . . . . . . . . . . . . . . . 59

Contents
70 Series Mobile Computer User Manual vii
Make a Phone Call . . . . . . . . . . . . . . . . . . . . . . . . . . . . . . . . . . . . . . . . . . . . . . . . . . . . . . . . . . . . . . . 60
Make an Emergency Phone Call . . . . . . . . . . . . . . . . . . . . . . . . . . . . . . . . . . . . . . . . . . . . . . . . . . .60
4 Use the Camera . . . . . . . . . . . . . . . . . . . . . . . . . . . . . . . . . . . . . . . . . . . . . . . . . . . . . . . . . 61
About the Color Camera. . . . . . . . . . . . . . . . . . . . . . . . . . . . . . . . . . . . . . . . . . . . . . . . . . . . . . . . . .62
About the Camera Settings . . . . . . . . . . . . . . . . . . . . . . . . . . . . . . . . . . . . . . . . . . . . . . .62
Configure the Camera . . . . . . . . . . . . . . . . . . . . . . . . . . . . . . . . . . . . . . . . . . . . . . . . . . . . 65
Configure Camera Scenes. . . . . . . . . . . . . . . . . . . . . . . . . . . . . . . . . . . . . . . . . . . . . . . . . 65
Take a Picture . . . . . . . . . . . . . . . . . . . . . . . . . . . . . . . . . . . . . . . . . . . . . . . . . . . . . . . . . . . . . . . . . . . 66
Record a Video. . . . . . . . . . . . . . . . . . . . . . . . . . . . . . . . . . . . . . . . . . . . . . . . . . . . . . . . . . . . . . . . . . .66
Save Pictures and Videos to a microSD Card. . . . . . . . . . . . . . . . . . . . . . . . . . . . . . . . . . . . . . . .67
5 Use GPS. . . . . . . . . . . . . . . . . . . . . . . . . . . . . . . . . . . . . . . . . . . . . . . . . . . . . . . . . . . . . . . . . . 69
About the Integrated GPS on Your Computer . . . . . . . . . . . . . . . . . . . . . . . . . . . . . . . . . . . . . .70
Use the GPSID Installed on the Computer . . . . . . . . . . . . . . . . . . . . . . . . . . . . . . . . . 70
About the GPS Module Operating Modes . . . . . . . . . . . . . . . . . . . . . . . . . . . . . . . . . . 71
Improve GPS Performance on the Computer . . . . . . . . . . . . . . . . . . . . . . . . . . . . . . .72
6 Configure the Computer . . . . . . . . . . . . . . . . . . . . . . . . . . . . . . . . . . . . . . . . . . . . . . . 73
How to Configure the Computer . . . . . . . . . . . . . . . . . . . . . . . . . . . . . . . . . . . . . . . . . . . . . . . . . . 74
Use Intermec Settings on the Computer. . . . . . . . . . . . . . . . . . . . . . . . . . . . . . . . . . . . . . . . . . . .74
Start Intermec Settings . . . . . . . . . . . . . . . . . . . . . . . . . . . . . . . . . . . . . . . . . . . . . . . . . . .75
About the Structure of Intermec Settings . . . . . . . . . . . . . . . . . . . . . . . . . . . . . . . . . .75
Navigate in Intermec Settings . . . . . . . . . . . . . . . . . . . . . . . . . . . . . . . . . . . . . . . . . . . . .80
Configure Profile Settings with Intermec Settings . . . . . . . . . . . . . . . . . . . . . . . . . .80
Restore Default Settings to a Menu. . . . . . . . . . . . . . . . . . . . . . . . . . . . . . . . . . . . . . . .81
Restore Default Settings for All Parameters . . . . . . . . . . . . . . . . . . . . . . . . . . . . . . . .81
Hide Menu Items in Intermec Settings . . . . . . . . . . . . . . . . . . . . . . . . . . . . . . . . . . . . .81
Use Intermec Settings Remotely with SmartSystems . . . . . . . . . . . . . . . . . . . . . . . . . . . . . . . . 82

Contents
viii 70 Series Mobile Computer User Manual
About Network Communications . . . . . . . . . . . . . . . . . . . . . . . . . . . . . . . . . . . . . . . . . . . . . . . . . 82
Configure 802.11a/b/g/n (Wi-Fi) Radio Communications . . . . . . . . . . . . . . . . . . . 83
Configure Ethernet Communications . . . . . . . . . . . . . . . . . . . . . . . . . . . . . . . . . . . . . 83
Configure Bluetooth Communications . . . . . . . . . . . . . . . . . . . . . . . . . . . . . . . . . . . . 84
About Serial and USB Communications . . . . . . . . . . . . . . . . . . . . . . . . . . . . . . . . . . . 88
Create an ISP Connection. . . . . . . . . . . . . . . . . . . . . . . . . . . . . . . . . . . . . . . . . . . . . . . . . 89
Create a VPN Server Connection . . . . . . . . . . . . . . . . . . . . . . . . . . . . . . . . . . . . . . . . . . 91
About Wireless Security . . . . . . . . . . . . . . . . . . . . . . . . . . . . . . . . . . . . . . . . . . . . . . . . . . . . . . . . . . 92
Choose Between Microsoft and Funk Security . . . . . . . . . . . . . . . . . . . . . . . . . . . . . . 92
Load a Certificate . . . . . . . . . . . . . . . . . . . . . . . . . . . . . . . . . . . . . . . . . . . . . . . . . . . . . . .102
7Manage the Computer . . . . . . . . . . . . . . . . . . . . . . . . . . . . . . . . . . . . . . . . . . . . . . . . 105
Manage the Computer in Your Network . . . . . . . . . . . . . . . . . . . . . . . . . . . . . . . . . . . . . . . . . .106
Manage the Computer Using CloneNGo . . . . . . . . . . . . . . . . . . . . . . . . . . . . . . . . . .106
Manage the Computer Using SmartSystems. . . . . . . . . . . . . . . . . . . . . . . . . . . . . . .106
Manage the Computer Using Third-Party Software . . . . . . . . . . . . . . . . . . . . . . . .108
Develop and Install Applications . . . . . . . . . . . . . . . . . . . . . . . . . . . . . . . . . . . . . . . . . . . . . . . . .108
Package Your Application . . . . . . . . . . . . . . . . . . . . . . . . . . . . . . . . . . . . . . . . . . . . . . .108
Choose a Target Location. . . . . . . . . . . . . . . . . . . . . . . . . . . . . . . . . . . . . . . . . . . . . . . .108
Install Applications Using SmartSystems Foundation Console. . . . . . . . . . . . . .109
Install Applications Using Microsoft ActiveSync . . . . . . . . . . . . . . . . . . . . . . . . . . .109
Install Applications Using a Storage Card . . . . . . . . . . . . . . . . . . . . . . . . . . . . . . . . .110
Launch Applications Automatically . . . . . . . . . . . . . . . . . . . . . . . . . . . . . . . . . . . . . .110
Update the System Software . . . . . . . . . . . . . . . . . . . . . . . . . . . . . . . . . . . . . . . . . . . . . . . . . . . . .110
Update Individual or Multiple Computers Using the SmartSystems Console .111
Update Individual Mobile Computers Using a microSD Card . . . . . . . . . . . . . . .112
8 Troubleshoot and Maintain the Computer. . . . . . . . . . . . . . . . . . . . . . . . . . 113
About the Intermec Dashboard . . . . . . . . . . . . . . . . . . . . . . . . . . . . . . . . . . . . . . . . . . . . . . . . . .114
Troubleshoot Your Mobile Computer . . . . . . . . . . . . . . . . . . . . . . . . . . . . . . . . . . . . . . . . . . . .115
Troubleshoot the Wi-Fi Connection . . . . . . . . . . . . . . . . . . . . . . . . . . . . . . . . . . . . . .115
Troubleshoot 802.1x Security . . . . . . . . . . . . . . . . . . . . . . . . . . . . . . . . . . . . . . . . . . . .116
Check 802.11 Network Status. . . . . . . . . . . . . . . . . . . . . . . . . . . . . . . . . . . . . . . . . . . .117
Troubleshoot Reading Bar Codes. . . . . . . . . . . . . . . . . . . . . . . . . . . . . . . . . . . . . . . . .118
Use ScanDiagnostic to Troubleshoot the Scanner. . . . . . . . . . . . . . . . . . . . . . . . . .120
Troubleshoot Operating the Computer . . . . . . . . . . . . . . . . . . . . . . . . . . . . . . . . . . .120

Contents
70 Series Mobile Computer User Manual ix
Call Product Support. . . . . . . . . . . . . . . . . . . . . . . . . . . . . . . . . . . . . . . . . . . . . . . . . . . . . . . . . . . .122
Find Your Configuration Number. . . . . . . . . . . . . . . . . . . . . . . . . . . . . . . . . . . . . . . .122
Find Your Operating System Version . . . . . . . . . . . . . . . . . . . . . . . . . . . . . . . . . . . . .123
Reset the Computer . . . . . . . . . . . . . . . . . . . . . . . . . . . . . . . . . . . . . . . . . . . . . . . . . . . . . . . . . . . . .123
Reboot the Computer . . . . . . . . . . . . . . . . . . . . . . . . . . . . . . . . . . . . . . . . . . . . . . . . . . .123
Cold Boot the Computer . . . . . . . . . . . . . . . . . . . . . . . . . . . . . . . . . . . . . . . . . . . . . . . .123
Clean Boot the Computer . . . . . . . . . . . . . . . . . . . . . . . . . . . . . . . . . . . . . . . . . . . . . . .125
Clean the Computer. . . . . . . . . . . . . . . . . . . . . . . . . . . . . . . . . . . . . . . . . . . . . . . . . . . . . . . . . . . . .125
A Specifications and Default Settings . . . . . . . . . . . . . . . . . . . . . . . . . . . . . . . . . 127
Physical and Environmental Specifications . . . . . . . . . . . . . . . . . . . . . . . . . . . . . . . . . . . . . . . .128
CN70 Physical Dimensions . . . . . . . . . . . . . . . . . . . . . . . . . . . . . . . . . . . . . . . . . . . . . .128
CN70e Physical Dimensions . . . . . . . . . . . . . . . . . . . . . . . . . . . . . . . . . . . . . . . . . . . . .128
CK70 Physical Dimensions . . . . . . . . . . . . . . . . . . . . . . . . . . . . . . . . . . . . . . . . . . . . . .128
CK71 Physical Dimensions . . . . . . . . . . . . . . . . . . . . . . . . . . . . . . . . . . . . . . . . . . . . . .128
Environmental Specifications . . . . . . . . . . . . . . . . . . . . . . . . . . . . . . . . . . . . . . . . . . . .128
Power and Electrical Specifications . . . . . . . . . . . . . . . . . . . . . . . . . . . . . . . . . . . . . . .129
70 Series Non-Incendive Computer Specifications . . . . . . . . . . . . . . . . . . . . . . . . .129
Operating System . . . . . . . . . . . . . . . . . . . . . . . . . . . . . . . . . . . . . . . . . . . . . . . . . . . . . . .129
Hardware . . . . . . . . . . . . . . . . . . . . . . . . . . . . . . . . . . . . . . . . . . . . . . . . . . . . . . . . . . . . . .130
Back Accessory Interface Pin-outs . . . . . . . . . . . . . . . . . . . . . . . . . . . . . . . . . . . . . . . .130
Touch Screen Specifications . . . . . . . . . . . . . . . . . . . . . . . . . . . . . . . . . . . . . . . . . . . . .130
Standard Communications . . . . . . . . . . . . . . . . . . . . . . . . . . . . . . . . . . . . . . . . . . . . . .131
Wireless LAN . . . . . . . . . . . . . . . . . . . . . . . . . . . . . . . . . . . . . . . . . . . . . . . . . . . . . . . . . . .131
Regulatory Approvals . . . . . . . . . . . . . . . . . . . . . . . . . . . . . . . . . . . . . . . . . . . . . . . . . . .131
Bar Code Symbologies. . . . . . . . . . . . . . . . . . . . . . . . . . . . . . . . . . . . . . . . . . . . . . . . . . .132
Imager Reading Distances . . . . . . . . . . . . . . . . . . . . . . . . . . . . . . . . . . . . . . . . . . . . . . .133
Default Configuration. . . . . . . . . . . . . . . . . . . . . . . . . . . . . . . . . . . . . . . . . . . . . . . . . . . . . . . . . . .142
Data Collection Settings. . . . . . . . . . . . . . . . . . . . . . . . . . . . . . . . . . . . . . . . . . . . . . . . .142
Communications . . . . . . . . . . . . . . . . . . . . . . . . . . . . . . . . . . . . . . . . . . . . . . . . . . . . . . .145
Device Settings . . . . . . . . . . . . . . . . . . . . . . . . . . . . . . . . . . . . . . . . . . . . . . . . . . . . . . . . .146
GPS Settings . . . . . . . . . . . . . . . . . . . . . . . . . . . . . . . . . . . . . . . . . . . . . . . . . . . . . . . . . . .149
Core Messaging Service Settings. . . . . . . . . . . . . . . . . . . . . . . . . . . . . . . . . . . . . . . . . .149
Device Monitor Settings . . . . . . . . . . . . . . . . . . . . . . . . . . . . . . . . . . . . . . . . . . . . . . . . .149
Virtual Wedge Settings . . . . . . . . . . . . . . . . . . . . . . . . . . . . . . . . . . . . . . . . . . . . . . . . . .150

Contents
x 70 Series Mobile Computer User Manual
B Keypads and Keystrokes . . . . . . . . . . . . . . . . . . . . . . . . . . . . . . . . . . . . . . . . . . . . . 151
Standard Characters . . . . . . . . . . . . . . . . . . . . . . . . . . . . . . . . . . . . . . . . . . . . . . . . . . . . . . . . . . . .152
CN70 Keypads and Keystrokes . . . . . . . . . . . . . . . . . . . . . . . . . . . . . . . . . . . . . . . . . . .152
CN70e Keypads and Keystrokes . . . . . . . . . . . . . . . . . . . . . . . . . . . . . . . . . . . . . . . . . .157
CK70 Keypads and Keystrokes . . . . . . . . . . . . . . . . . . . . . . . . . . . . . . . . . . . . . . . . . . .161
CK71 Keypads and Keystrokes . . . . . . . . . . . . . . . . . . . . . . . . . . . . . . . . . . . . . . . . . . .168
C ScanNGo Wi-Fi Configuration Bar Codes. . . . . . . . . . . . . . . . . . . . . . . . . . . . 177
Radio Configuration Bar Codes . . . . . . . . . . . . . . . . . . . . . . . . . . . . . . . . . . . . . . . . . . . . . . . . . .178
2D Configuration Bar Codes. . . . . . . . . . . . . . . . . . . . . . . . . . . . . . . . . . . . . . . . . . . . .178
1D Configuration Bar Codes. . . . . . . . . . . . . . . . . . . . . . . . . . . . . . . . . . . . . . . . . . . . .179
I Index . . . . . . . . . . . . . . . . . . . . . . . . . . . . . . . . . . . . . . . . . . . . . . . . . . . . . . . . . . . . . . . . . . . . 185

Before You Begin
70 Series Mobile Computer User Manual xi
Before You Begin
This section provides you with safety information, technical support
information, and sources for additional product information.
Safety Information
Your safety is extremely important. Read and follow cautions in this
document before handling and operating Intermec equipment. You
can be seriously injured, and equipment and data can be damaged if
you do not follow the safety cautions.
This section explains how to identify and understand cautions and
notes that are in this document.
Global Services and Support
Warranty Information
To understand the warranty for your Intermec product, visit the
Intermec website at www.intermec.com and click Support
>
Returns and Repairs > Warranty.
Disclaimer of warranties: The sample code included in this document
is presented for reference only. The code does not necessarily
represent complete, tested programs. The code is provided “as is with
all faults.” All warranties are expressly disclaimed, including the
implied warranties of merchantability and fitness for a particular
purpose.
Web Support
Visit the Intermec website at www.intermec.com to download our
current manuals (in PDF).
A caution alerts you to an operating procedure, practice,
condition, or statement that must be strictly observed to prevent
equipment damage or destruction, or corruption or loss of data.
Note: Notes either provide extra information about a topic or contain
special instructions for handling a particular condition or set of
circumstances.

Before You Begin
xii 70 Series Mobile Computer User Manual
Visit the Intermec technical knowledge base (Knowledge Central) at
www.intermec.com and click Support > Knowledge Central to
review technical information or to request technical support for your
Intermec product.
Send Feedback
Your feedback is crucial to the continual improvement of our
documentation. To provide feedback about this manual, please
contact the Intermec Technical Communications department directly
at TechnicalCommunications@intermec.com.
Telephone Support
In the U.S.A. and Canada, call 1-800-755-5505.
Outside the U.S.A. and Canada, contact your local Intermec
representative. To search for your local representative, from the
Intermec website, click About Us > Contact Us.
Who Should Read This Manual
This manual is written for the person who is responsible for
installing, configuring, and maintaining the 70 Series Mobile
Computer.
This manual provides you with information about the features of the
70 Series mobile computer, and how to install, configure, operate,
maintain, and troubleshoot it.
Before you work with the 70 Series mobile computer, you should be
familiar with your network and general networking terms, such as IP
address.
Related Documents
This is a list of related Intermec documents.
• Intermec Settings Command Reference Manual
• Intermec Developer Library (IDL) Resource Kit Developer’s Guide
The Intermec website at www.intermec.com contains our documents
(as PDF files) that you can download for free.

Before You Begin
70 Series Mobile Computer User Manual xiii
To download documents
1 Visit the Intermec website at www.intermec.com.
2 Click the Products tab.
3 Using the Products menu, navigate to your product page. For
example, to find the CN70 computer product page, click
Computers > Handheld Computers > CN70.
4 Click the Manuals tab.
If your product does not have its own product page, click Support
>
Manuals. Use the Product Category, the Product Family, and
Product to find your documentation.
Patent Information
Product is covered by one or more of the following patents:
4882476; 4894523; 4953113; 4961043; 4970379; 4988852; 5019699;
5021642; 5038024; 5081343; 5095197; 5144119; 5144121; 5182441;
5187355; 5187356; 5195183; 5216233; 5216550; 5195183; 5195183;
5218191; 5227614; 5233172; 5241488; 5243602; 5258606; 5278487;
5288985; 5308966; 5322991; 5331136; 5331580; 5342210; 5349678;
5359185; 5371858; 5373478; 5389770; 5397885; 5410141; 5414251;
5416463; 5442167; 5464972; 5468947; 5468950; 5477044; 5486689;
5488575; 5500516; 5502297; 5504367; 5508599; 5514858; 5530619;
5534684; 5536924; 5539191; 5541419; 5548108; 5550362; 5550364;
5565669; 5567925; 5568645; 5572007; 5576529; 5592512; 5594230;
5598007; 5608578; 5616909; 5619027; 5627360; 5640001; 5657317;
5659431; 5671436; 5672860; 5684290; 5719678; 5729003; 5742041;
5761219; 5764798; 5777308; 5777309; 5777310; 5786583; 5793604;
5798509; 5798513; 5804805; 5805807; 5811776; 5811777; 5818027;
5821523; 5828052; 5831819; 5834753; 5834749; 5837987; 5841121;
5842070; 5844222; 5854478; 5862267; 5869840; 5873070; 5877486;
5878395; 5883492; 5883493; 5886338; 5889386; 5892971; 5895906;
5898162; 5902987; 5902988; 5912452; 5923022; 5936224; 5949056;
5969321; 5969326; 5969328; 5979768; 5986435; 5987192; 5987499;
5992750; 6003775; 6012640; 6016960; 6018597; 6024289; 6034379;
6036093; 6039252; 6064763; 6075340; 6095422; 6097839; 6102289;
6102295; 6109528; 6119941; 6128414; 6138915; 6149061; 6149063;

Before You Begin
xiv 70 Series Mobile Computer User Manual
6152370; 6155490; 6158661; 6164542; 6164545; 6173893; 6195053;
6234393; 6234395; 6244512; 6249008; 6328214; 6330975; 6345765;
6356949; 6367699; 6375075; 6375076; 6375344; 6431451; 6435411;
6484944; 6488209; 6497368; 6532152; 6538413; 6539422; 6621942;
6641046; 6681994; 6687403; 6688523; 6732930
There may be other U.S. and foreign patents pending.

1
1
About the Computer Features
This chapter introduces the 70 Series Mobile Computers with
Windows® Embedded Handheld operating system. Use this
chapter to learn about the basic features and functions of each
computer, as well as the available accessories for it.

Chapter 1 — About the Computer Features
2 70 Series Mobile Computer User Manual
About the 70 Series Mobile Computers
The ergonomically designed Intermec 70 Series Mobile Computers are
built on the Microsoft Windows Embedded Handheld operating
system. They are lightweight, easy-to-use, and run most software
developed for the Windows Embedded platform, including
standalone, client-server, and browser-based applications.
The 70 Series family of computers consists of four different models:
the CN70, CN70e, CK70 and CK71. The CN70 and CN70e have the
same features except that the CN70e offers a larger keypad for
data-input intensive applications. The CK70 and CK71 have most of
the same features, but the CK71 offers a choice of imager options and
does not offer a WWAN radio option (phone). For hazardous
environments, Intermec offers non-incendive (NI) models of each 70
Series computer. Throughout this manual, all versions of the mobile
computer are referred to as 70 Series unless information is specific to
a particular model of computer.
In most of the user manual, pictures of the CN70 and CK70 represent
the four models of the 70 Series computers.
CN70 Front View
Scan button
On/o button
Microphone
Cell phone speaker
Notification LED
Good read LED
Battery status LED
Chapter 1 — About the Computer Features
70 Series Mobile Computer User Manual 3
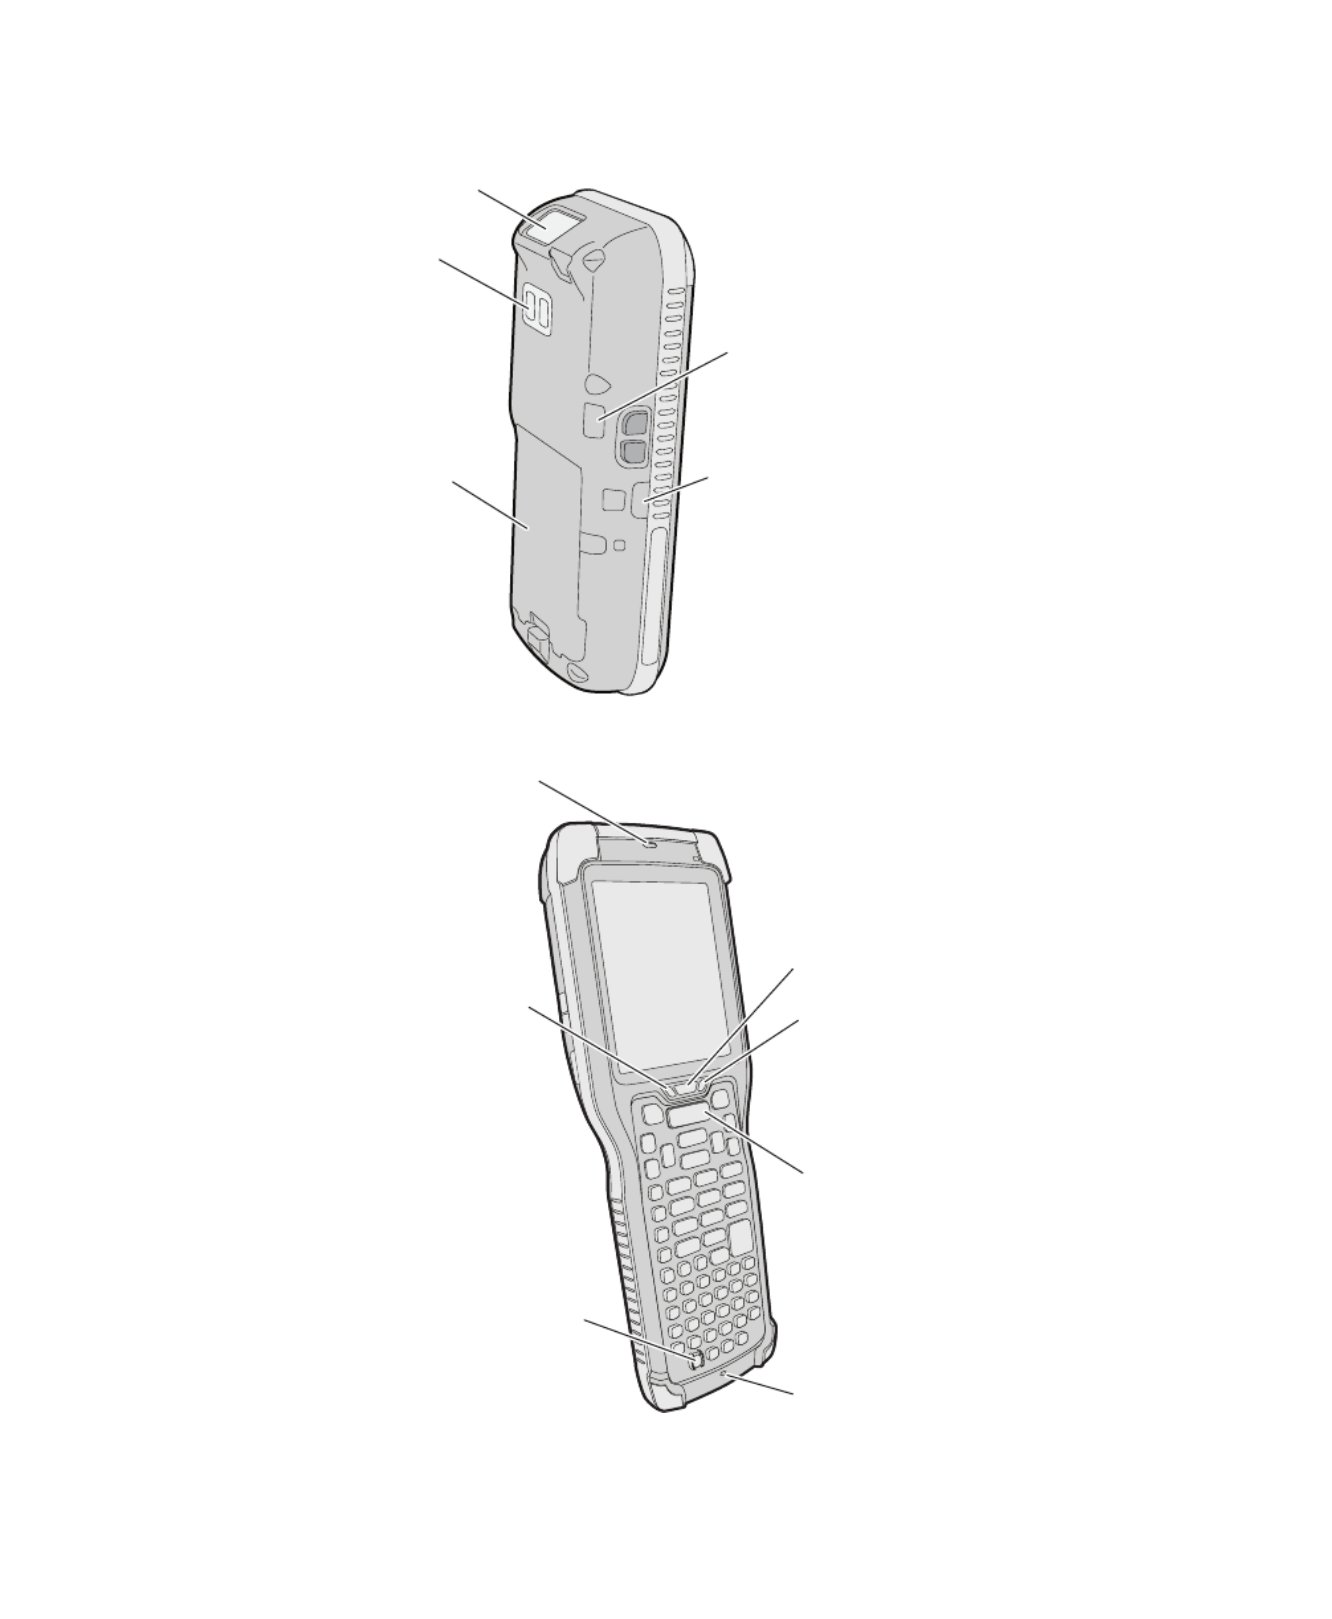
CN70 Back View
CK70 and CK71 Front View
IrDa port
Speaker port
Imager
Camera
Battery
Scan button
Microphone
On/o button
Cell phone speaker
Notification LED
Good read LED
Battery status LED

Chapter 1 — About the Computer Features
4 70 Series Mobile Computer User Manual
CK70 and CK71 Back View
What’s New in This Release
This version of the user manual supports firmware version 1.50 and
includes information about these new features:
• Intermec CloneNGo is a peer-to-peer device management
application that ships on every computer and simplifies the process
of configuring multiple computers. For more information, see
“Manage the Computer Using CloneNGo” on page 106.
• Optimized camera settings make it easier to take good pictures. For
more information, see “About the Camera Settings” on page 62
and “Configure the Camera” on page 65.
• The SceneEditor application lets eate your own you modify or cr
predefined camera scenes.“Configure Camera Scenes” on page
65.
• The EA30 imager provides an extended reading range. For more
information, see “EA30 Typical Reading Distances - Extended
Reading Range” on page 134.
Imager
Camera
IrDA port
Battery
IrDA port
Imager
Camera
Battery
Left speaker
port
Left speaker
port

Chapter 1 — About the Computer Features
70 Series Mobile Computer User Manual 5
Overview of 70 Series Features
The 70 Series includes these standard features:
• EA30 area imager that can read bar codes and capture images
• (CK71 only) Choice of EA30, EX25, or EV12 imagers
• Multi-processor architecture with 512 MB DRAM and 1G Flash
• CDMA, UMTS, or Flexible Network Radio capability (not available
on CK71)
• 802.11a/b/g/n and Bluetooth® radios
• GPS radio on CDMA, UMTS, or Flexible Network Radio
computers (not available on CK71)
• 5-megapixel auto-focus color camera
• Customer-accessible microSD slot for memory cards up to 32 GB
• Customer-accessible SIM card slot
• IrDA port with speeds up to 4 Mbps
The 70 Series Mobile Computer with an IEEE 802.11a/b/g/n
radio installed is Wi-Fi® certified for interoperability with
other 802.11a/b/g/n wireless LAN devices.
Chapter 1 — About the Computer Features
6 70 Series Mobile Computer User Manual
About the Status LEDs
Use the following illustrations and table to understand the status
LEDs on your computer. All six status LEDS are not available on every
70 Series computer. For example, the QWERTY versions of the CN70
and CN70e do not have a Green key status LED.
Location of the CN70 Status LEDs
Green key
status LED
Shift key
status LED
Orange key
status LED
Battery status LED
Good Read and Ready-to-Work
Status LED
Notification LED

Chapter 1 — About the Computer Features
70 Series Mobile Computer User Manual 7
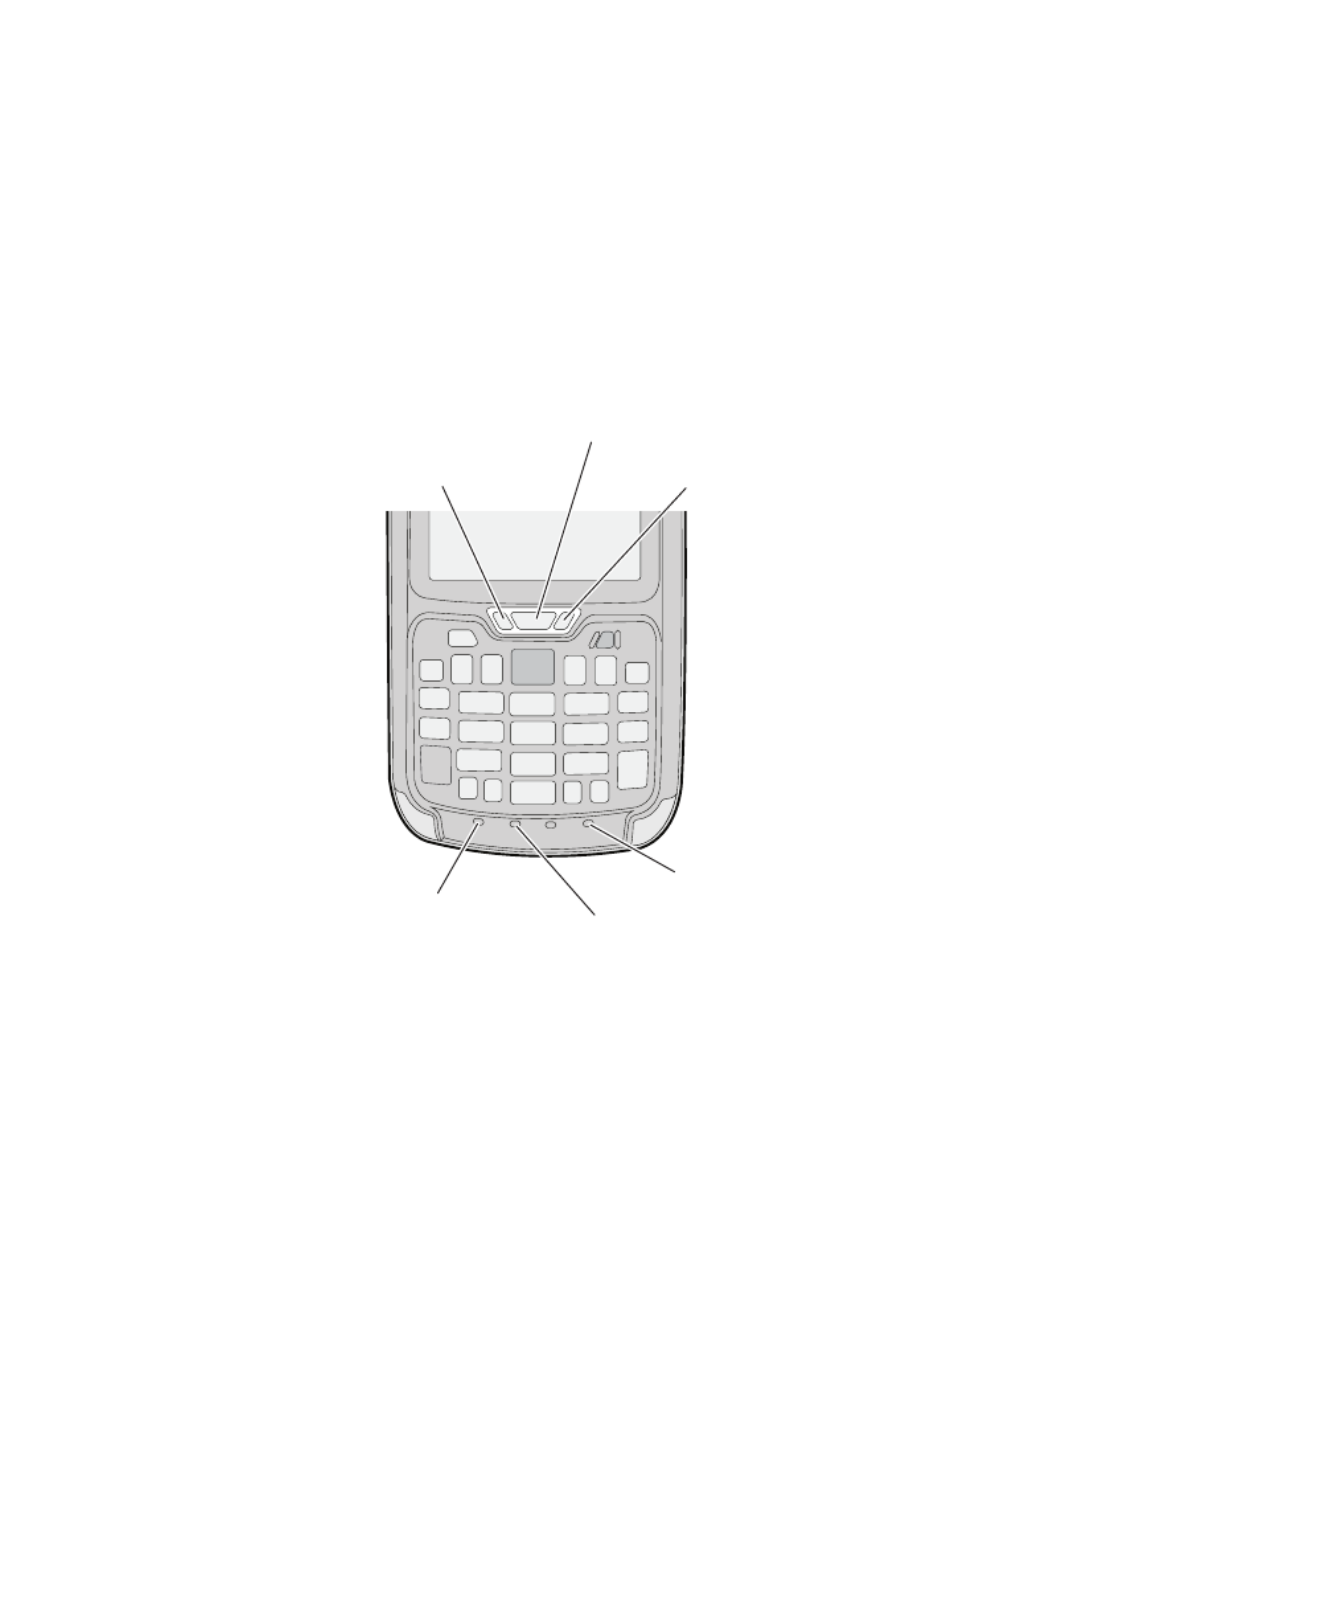
Location of the CK70 and CK71 Status LEDs
Status LED Descriptions
LED Color Description
Notification Amber This LED is user-programmable.
Good Read Green The computer successfully decoded a bar code.
Ready-to-Work Blue If you have Intermec Terminal Emulator (ITE),
the application is running and connected to the
host.
If you do not have ITE, you can configure the
Ready-to-Work indicator to turn on or off to
indicate a healthy state.
Blinking
blue
ITE is running but not connected to the host.
The computer is unhealthy.
Off ITE is not installed or not running.
The computer is healthy.
Battery See “About Battery Status” on page 13.
Green key
status LED
Shift key status LED
(CK70 alphanumeric
and CK71 function numeric)
Shift key status LED
(CK70 numeric and
CK71 alphanumeric)
Orange key
status LED
Notification LED Good Read and Ready-to-Work
status LED
Battery status LED

Chapter 1 — About the Computer Features
8 70 Series Mobile Computer User Manual
70 Series Accessories
The 70 Series computer ships with a battery. All other accessories are
sold and ordered separately. For help, contact your local Intermec sales
representative.
70 Series Accessories
Key Status Green The Green function key is enabled.
Orange The Orange function key is enabled.
Shift Red The Shift key is enabled.
LED Color Description
Accessory Description
Audio Snap-On Adapter Use the audio adapter to connect the
computer to a headset.
Back Accessory Interface Use the back accessory interface to attach
accessories such as the magstripe reader
adapter to the CK70 and CK71.
CK70/CK71 Battery This battery provides main power to the
CK70 and CK71.
CK70/CK71 Magstripe Reader
Adapter
Use the magnetic stripe reader to be able
to read magnetic cards with the CK70 and
CK71 computer.
CN70/CN70e Battery This battery provides main power to the
CN70 and CN70e.
CN70/CN70e Magstripe Reader
Snap-On Adapter
Use the magnetic stripe reader to be able
to read magnetic cards with the CN70
and CN70e computer.
Desktop Stand Use the desktop stand to hold the 70
Series computer on your desk or a stable
surface.
DEX/UCS Snap-On Adapter Use this adapter to receive and send serial
communications through a DEX/UCS
connection.
DX1 Desktop Dock with USB
connectivity
Use the desktop dock with the:
• Computer cup to charge the battery
while it is installed in the computer.
• Battery cup to charge the battery.

Chapter 1 — About the Computer Features
70 Series Mobile Computer User Manual 9
DX2 Dual Dock and DX4 Quad
Dock. The DX2 and DX4 are
available in charge-only and
Ethernet configurations.
Use these charger bases with the:
• Computer cup to charge batteries
while they are installed in the
computer.
• Battery cup to charge two batteries.
Ethernet Snap-On Adapter Use the Ethernet adapter to be able to
connect the computer to an Ethernet
network.
Handstrap Replacement Kit You can order and install a replacement
handstrap for the CN70, CN70e, and
CK70/CK71. Each kit contains 5
handstraps.
Holster Use the holster to store the computer
when you need your hands free.
RS-232 Snap-On Adapter Use the RS-232 adapter to convert the
connector on the bottom of the computer
to a serial connector.
Scan Handle Use the scan handle to provide better
ergonomics to the computer for
high-volume scanning applications.
Tethered Stylus Replacement Kit You can order and install a replacement
stylus.
USB Snap-On Adapter Use this adapter to convert the bottom
connector of the computer to a USB
connector.
Vehicle Dock Use the vehicle dock to provide power and
hold your computer while you are using it
in a vehicle.
Vehicle Holder Use the vehicle holder to hold your
computer while you are using it in a
vehicle.
Vehicle Power Adapter Use the vehicle power adapter to provide
power to the computer from your vehicle.
Vocollect® Snap-On Adapter Use this adapter to be able to use the
Vocollect voice solution in your
warehouse.
Accessory Description

Chapter 1 — About the Computer Features
10 70 Series Mobile Computer User Manual
About Language Provisioning
If your 70 Series computer includes language provisioning, you are
prompted to select a language provision when the computer starts for
the first time. It may take up to 15 minutes to load your language.
These languages are available:
• Chinese Simplified (CHS)
• Chinese Traditional (CHT)
• Spanish (ESN)
• French (FRA)
• German (GER)
• Italian (ITA)
• Japanese (JPN)
• Korean (KOR)
• Russian (RUS)
• World Wide English (WWE)
Make sure you select the correct language before you tap Provision. If
you want to change the language provisioning, you need to send your
computer to an Intermec Global Repair Center.
About the Battery
The computers use these rechargeable Lithium-ion battery pack as the
main power source:
• 3.7 V, 4000 mAH (14.8 Wh) battery for the CN70 and CN70e
• 3.7 V, 5200 mAH (19.2 Wh) battery for the CK70 and CK71
The battery used in this device may present a fire or chemical burn
hazard if it is mistreated. Do not disassemble it, heat it above
100 °C (212 °F) or incinerate it. Dispose of used batteries
promptly. Keep away from children.

Chapter 1 — About the Computer Features
70 Series Mobile Computer User Manual 11
Charge the Battery
You need to fully charge the battery before using your computer for
the first time. Use one of the charging accessories listed in the next
table to charge the battery.
70 Series Charging Accessories
Change the Battery
If your battery power is low, you need to either charge the battery in the
computer, or replace it with a charged battery.
1 Save your files and close any open applications.
2 Press the Power button and choose Hibernate from the menu to
suspend the computer.
3 Detach the handstrap from the computer.
Detach the Handstrap From a CN70 or CN70e
Charging Accessory Charging Time
Snap-on adapters Up to 6 hours
DX1, DX2, or DX4 dock Up to 6 hours
CN70, CN70e, CK70, and CK71 Vehicle Power Adapter Up to 6 hours

Chapter 1 — About the Computer Features
12 70 Series Mobile Computer User Manual
Detach the Handstrap From a CK70 or CK71
4 Make sure the computer is in hibernate mode and the screen is off.
5 Remove the battery.
• On the CN70 or CN70e, push the battery release toward the
bottom of the computer until the battery releases and then lift
it away from the computer.

Chapter 1 — About the Computer Features
70 Series Mobile Computer User Manual 13
• On the CK70 or CK71, push the battery release toward the top
of the computer until the battery releases and then lift it away
from the computer.
6 Insert the top end of a fully charged battery into the computer, and
press down firmly on the bottom of the battery. Make sure that the
battery release is fully engaged.
About Battery Status
Use the battery icon on the Title bar to see the power status of your
battery. If you want more detailed information on your battery such as
usage time or voltage, use the Intermec Dashboard. For more
information on the Dashboard, see “About the Intermec
Dashboard” on page 114.
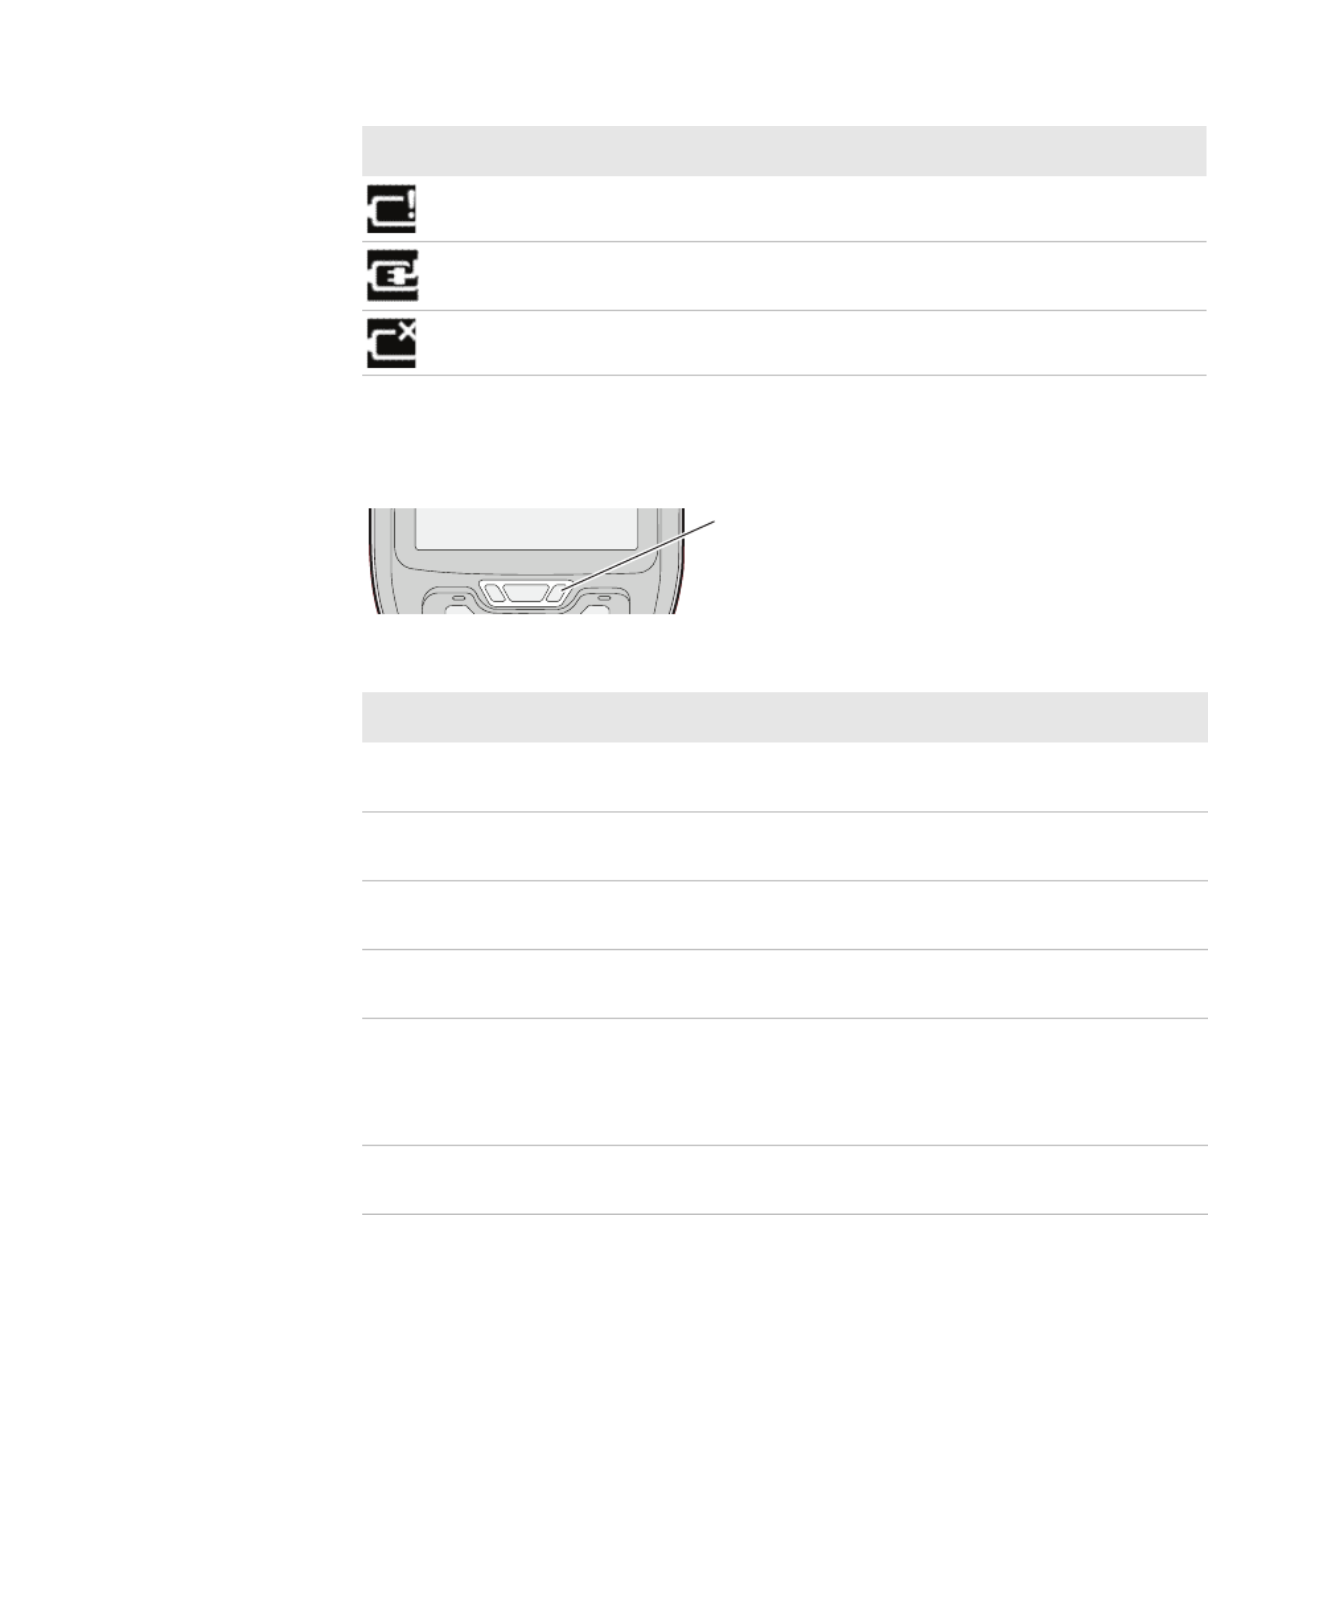
Battery Icon Status Descriptions
Battery Icon Status
Battery is fully charged.
Battery has a high charge.
Battery has a medium charge. You should be able to work for
several more hours before changing batteries.
Battery is low. You need to charge or replace the battery soon.
Chapter 1 — About the Computer Features
14 70 Series Mobile Computer User Manual
You can also use the battery status LED to see the charging status of
your battery.
Battery Status LED Descriptions
Battery is critically low. You need to replace the battery now.
Battery is charging.
The battery is not installed.
LED State Description
Steady green The computer is connected to a charger and the
battery is more than 95% charged.
Blinking red The battery is very low. The computer will soon go
into Suspend mode. Charge or replace the battery.
Steady red The computer is connected to a charger and the
battery is charging.
Blinking red-amber The battery charging system has encountered an
error. The battery is not charging.
Steady amber The battery is outside of the allowable charging
temperature range. Charging will resume when the
battery temperature is back in the acceptable range of
5 °C to 35 °C (41 °F to 95 °F).
Off The computer is not on external power and the
battery is operating normally.
Battery Icon Status
Battery status LED

Chapter 1 — About the Computer Features
70 Series Mobile Computer User Manual 15
About Battery Life and Conservation
Batteries that are stored outside the computer for long periods of time
slowly discharge. Intermec recommends storing the battery in a
charger to maintain battery performance.
Battery Conservation Tips
When You Want To: Do This to Save Battery Power:
Use the computer and the Low
Battery status icon appears or the
Battery light comes on.
• Connect the computer to an external
power source.
• Or, save your data and press the Power
button and select Hibernate. After the
computer turns off, remove the battery
and insert a fully charged battery.
Stop using the computer for 5
minutes or longer.
Make sure that the low battery icon is not
on the screen and the Battery LED is not
on. Press the Power button and choose
Suspend to suspend the computer.
Store the computer for more than
a day.
If you are storing the computer for a few
days, like over the weekend, install a
charged battery or connect the computer
to a power source.
If you are storing the computer for
longer, remove and charge the battery,
and then store both the battery and
computer in a cool location. If you store
the battery for several months, recharge
the battery to keep it at peak
performance.
Store the battery outside the
computer.
Store the batteries in a charger.

Chapter 1 — About the Computer Features
16 70 Series Mobile Computer User Manual
About the Keypad
The CN70 comes with either a QWERTY keypad or a numeric keypad.
The CN70e comes with either a QWERTY numeric keypad, a
phone-style numeric keypad (1-2-3 digits across the top), or a
calculator-style numeric keypad (7-8-9 digits across the top). The
computer has an ambient light sensor that detects low light and turns
on the keypad backlight. By default, the keypad backlight is enabled in
low light conditions. You can disable the keypad backlight to conserve
power. Use Intermec Settings to configure the backlight. For help, see
“Use Intermec Settings on the Computer” on page 74
.
CN70 QWERTY Keypad
Space
F
D
S
A
G H JKL
C
X
ZV B N
M
Esc
Enter
R
E
Q
W
T Y IOP
U
%
&
?
@$
sym
12 3
4 5 6
78
0
9
+
+
+
++
/
/
/
//

Chapter 1 — About the Computer Features
70 Series Mobile Computer User Manual 17
CN70 Numeric Keypad
CN70e QWERTY Numeric Keypad
123
456
78
0
9
Caps
ABC
DEF
GHI
JKL
MNO
PQRS
TUV
Space
WXYZ
Esc Enter

Chapter 1 — About the Computer Features
18 70 Series Mobile Computer User Manual
CN70e Calculator-Style Numeric Keypad
CN70e Numeric Keypad

Chapter 1 — About the Computer Features
70 Series Mobile Computer User Manual 19
The CK70 comes with either a large alpha or an alphanumeric keypad.
The CK71 comes with either a numeric function keypad or an
alphanumeric keypad. The computer has an ambient light sensor that
detects low light and turns on the keypad backlight. By default, the
keypad backlight is enabled in low light conditions. You can disable
the keypad backlight to conserve power. Use Intermec Settings to
configure the backlight. For help, see “Use Intermec Settings on the
Computer” on page 74.
CK70 Large Alpha Keypad
Esc
Ctrl
YZ
Enter
Space
A B C
D
H
L
P R
S T U V
WX
E F
G I
K M
O Q
0
123
456
789
J
N
@
Send End
DeleteInsert
\
[]
+ =
F1 F2 F3
F4
F8
F5 F6
F7 F9
F10
><
%
%
%
%% ()
sym

Chapter 1 — About the Computer Features
20 70 Series Mobile Computer User Manual
CK70 Alphanumeric Keypad
0
5 64
8 97
31 2
F1
F2
F3
F4
F5 Ctrl Space
Enter
Esc
Alt
A E F
GH I J K L
MNOPQR
STU V WX
YZ
B C D
EndSend
F13 F14F11 F12 F15 F16
F19 F20
F17 F18
F23 F24
F21 F22
F6
F7
F8
F9
F10
DeleteInsert

Chapter 1 — About the Computer Features
70 Series Mobile Computer User Manual 21
CK71 Numeric Function Keypad
Ctrl
0
5 64
8 97
31 2
Enter
Enter
F1 F2 F3 F4
F5 F6 F7 F8
F9 F10 F1 1 F1 2
Esc
Fld
Exit
Space
Alt
Delete
F13 F14 F15 F16
F17 F18 F19 F20
F21 F22
Return
Return
NxtScrPrvScr Roll
SysRq
Fld+Fld-
Home
Roll ResetClear
Attn
Insert
A B C
D E F
G H I
M N O
P Q R S
T U
Y
V W
X
J K
L
Z
View
View
F24F23
PA3PA2PA1
Pa
g
e

Chapter 1 — About the Computer Features
22 70 Series Mobile Computer User Manual
CK71 Alphanumeric Keypad
Fld
Exit
0
5 64
8 97
31 2
F1
F2
F3
F4
F5 Ctrl Space
Enter
Esc
A E F
G H I J K L
MNOPQR
STU V WX
YZ
BC D
F13 F14F11 F12 F15 F16
F19 F20F17 F18
F23 F24
F21 F22
Return
NxtScr
Alt
PrvScr Roll
Fld+Fld-
Roll Clear
Reset
Erase FindDupAttn
EEOF
Autolog
Keypd
Hex
HomeFldMk
Remove
Print
Select
Mode
NewLnMenu
?
SysRq
PA1
PA2
PA3
F6
F7
F8
F9
F10
Delete
Hel
p
Insert
View Pa
g
e

Chapter 1 — About the Computer Features
70 Series Mobile Computer User Manual 23
Enter Characters on the QWERTY Keypad
You need to use the orange modifier key b and the Shift key y
to
access all characters and functions on the QWERTY keypad.
To type a character:
• Press the key for that character.
To type a character or access a function on the overlay:
• Press b and then press the key for the character or function.
To only type characters or access functions on the overlay:
• Press b twice to lock the orange modi
fier key to stay on, and then
press the keys for the characters or functions.
To type a single uppercase letter:
• Press y and then the letter key.
To type all uppercase letters:
• Press y y to turn on Caps Lock, and then press the letter keys.
You can still type orange modifier characters by pressing b and then
the key for that character.
To turn off Caps Lock, press y.
Enter Characters on the Numeric Keypad
You need to use the orange modifier key b and the green modifier key
c to access all characters and functions on the Numeric keypad.
To type a character or access a function printed in orange on the
overlay:
• Press b and then press the key for the character or function.
To type a character or access a function printed in green on the overlay:
• Press c and then press the key for the character or function.
To type letters in the upper right corner of a key:
• Press c and then press the key one to three times depending on the
position of the letter.

Chapter 1 — About the Computer Features
24 70 Series Mobile Computer User Manual
For example, in the upper right corner of the 2 key there are the
letters “ABC”:
• To type “c”, press c 2 2 2.
• To type “C,” press c 1 and then press c 2 2 2.
To only type letters:
• Press c c to lock the green modifier key, and then press the key
one to four times depending on the position of the letter.
While the green modifier key is locked, press 1 to toggle between only
uppercase and lowercase letters.
To unlock the green modifier key, press c.
Enter Characters on the CK70 and CK71 Keypads
You need to use the orange modifier key b, the green modifier key c,
and the Shift or Caps Lock key y to access all characters and functions
on the Alpha, Alphanumeric, and Numeric Function keypads.
To type a character or access a function printed in orange on the
overlay or in the upper left corner of a key:
• Press b and then press the key for the character or function.
To type a character or access a function printed in green on the overlay:
• Press c and then press the key for the character or function.
To type a single uppercase letter:
• Press y and then the letter key.
To type all uppercase letters:
• Press y y to turn on Caps Lock, and then press the letter keys.
You can still type orange or green modifier characters by pressing b or
c and then the key for that character.
To turn off Caps Lock, press y.
Note: On the calculator-style keypad, the 2 is replaced by the 8.
Note: If uppercase letters are enabled and you unlock the green
modifier key, you may need to press c 1 to type lowercase letters.

Chapter 1 — About the Computer Features
70 Series Mobile Computer User Manual 25
About the Power Button
When you press the Power button, a dialog box with a list of power
options appears. If you do not select a power options setting, the
currently selected action (the button outlined in bold) occurs after the
timeout.
The Intermec Power Options Default Screen
Intermec Power Options
Note: The Real Time Clock (RTC) persists through all of the power
options as long as it receives power from the Real Time Clock battery.
Option Description
Hibernate
(battery swap)
High power saving mode. Use this setting only for
swapping the battery. The computer saves the current
system state, registry, and file system and then powers off
all radios and internal devices. You can wake the computer
by pressing the Power button or connecting the computer
to external power.

Chapter 1 — About the Computer Features
26 70 Series Mobile Computer User Manual
The Intermec Power Options screen is customizable. You can use
Intermec Settings to determine which options are available to end
users, the timeout until the default choice is selected, the default
action if no option is selected, or to disable the Power Options screen.
For more information on customizing the screen using Intermec
Settings, see “Use Intermec Settings on the Computer” on page 74
or see the Intermec Settings Command Reference Manual.
About the Intermec Dashboard Button
If the Ready-to-Work light blinks, your computer may be experiencing
a problem. Press the Intermec Dashboard button (m) to launch the
Intermec Dashboard application and view troubleshooting and status
information.
You can press the m button at any time to bring up the Intermec
Dashboard. If the computer is not healthy, the current issues are
displayed at the top of the screen. If the device is healthy, you can use
the Dashboard to view device information. For more information, see
“About the Intermec Dashboard” on page 114.
Suspend Medium power saving mode. The computer powers off all
radios and internal devices not involved in saving the
system state, but the phone stays on to receive calls. This
option is the default setting. You can wake the computer
by pressing the Power button, pulling the scanner trigger,
receiving a call, scheduling an event such as an alarm, or by
connecting external power.
Reboot The computer does not save the current system state, but
the registry and file systems are saved. The computer shuts
down all running processes and restarts.
Cancel The Power Options menu is cancelled.
Screen Off Lowest power saving mode. The screen turns off, but the
phone, all radios, and internal devices stay on. Tap the
screen to turn the screen back on.
Shutdown Very high power saving mode. The computer turns off
everything. You must press Power or apply external power
to restart the computer.
Option Description

Chapter 1 — About the Computer Features
70 Series Mobile Computer User Manual 27
Configure the Screen Backlight
The display has an ambient light sensor that automatically adjusts the
backlight intensity to conserve power and ensure the display is
readable.
By default, the screen turns off when there is no activity with the
computer. Press a key or tap the screen to resume activity.
You can configure the screen backlight to turn off.
1 Tap Start > Settings > Power.
2 Tap Advanced on the horizontal scroll bar.
3 Select the screen power off settings for when the computer is on
battery power or external power.
Configure the Screen Brightness
You can configure the screen brightness using Intermec Settings or
from the Start menu.
1 Tap Start > Settings > System > Backlight.
2 Adjust the slider to the desired brightness level.
3 Tap OK.
Adjust the Volume
You can adjust the computer volume for your needs and your
environment. The volume includes sounds you hear when you tap the
screen or read bar codes with the imager. You can set the volume to off,
very low, low, medium, high, very high (default), or vibrate.
You can also use the buttons on the right side of the computer to
adjust the volume:
• The upper button increases the volume.
• The lower button decreases the volume.

Chapter 1 — About the Computer Features
28 70 Series Mobile Computer User Manual
You can adjust the volume settings using Intermec Settings or the
horizontal scroll menu.
1 Tap the Volume icon at the top of the screen, and then tap the
volume icon on the horizontal scroll menu.
2 Use your stylus or the u d and keys to adjust the volume slider to
the volume you want, select Vibrate, or select Off.
About the Imager
The computer ships with an internal imager. You can use the imager as
a flashlight or to read bar codes.
Use the Imager as a Flashlight
You can use the EA30 imager as a flashlight. By default, the imager is
set to read bar codes. To use the imager as a flashlight, you must remap
the Left side lower button.
1 Open Intermec Settings on the mobile computer by tapping
Start > Settings > System > Intermec Settings.
2 From the Intermec Settings main menu, tap Device Settings >
Keypad.
3 From the Keypad menu, tap Button Remapping.
4 From the Left side lower button menu, select Flashlight
.
5 From the Flashlight timeout drop-down menu, select how long to
leave the flashlight on before it automatically turns off.
6 Tap OK.
Note: When the Pictures & Videos application is running, you cannot
use the imager.

Chapter 1 — About the Computer Features
70 Series Mobile Computer User Manual 29
Read Bar Codes
Depending on the imager model in your computer, you can read 1D
and 2D bar code symbologies, composite symbologies, and postal
codes.
You can also connect the computer to cordless scanners (like the SF51
and SR61) through Bluetooth communications or tethered scanners
(like the SR30 and SR61T) through the RS-232 adapter. For help, see
“Connect to a Bluetooth Scanner” on page 85 and “Connect to a
Tethered Scanner” on page 89, respectively.
1 Enable only the bar code symbologies that you need.
2 Use Intermec Settings to select the predefined imager mode that
best suits your environment:
3 Point the imager window at the bar code label, and hold the
computer steady a few inches from the label.
4 Press the Scan button. The laser pointer and illumination beam or
frame appear.
Predefined Mode For Scanning
1D Only 1D labels.
1D and 2D Standard (Default) All types of bar code labels.
1D and 2D Bright Environment In high ambient light, such as
outdoors in the sunshine.
1D and 2D Reflective Surface Glossy labels.
Note: You can also select the imager predefined mode in Profile
Settings by tapping Start > Profile Settings > Scanning.
Chapter 1 — About the Computer Features
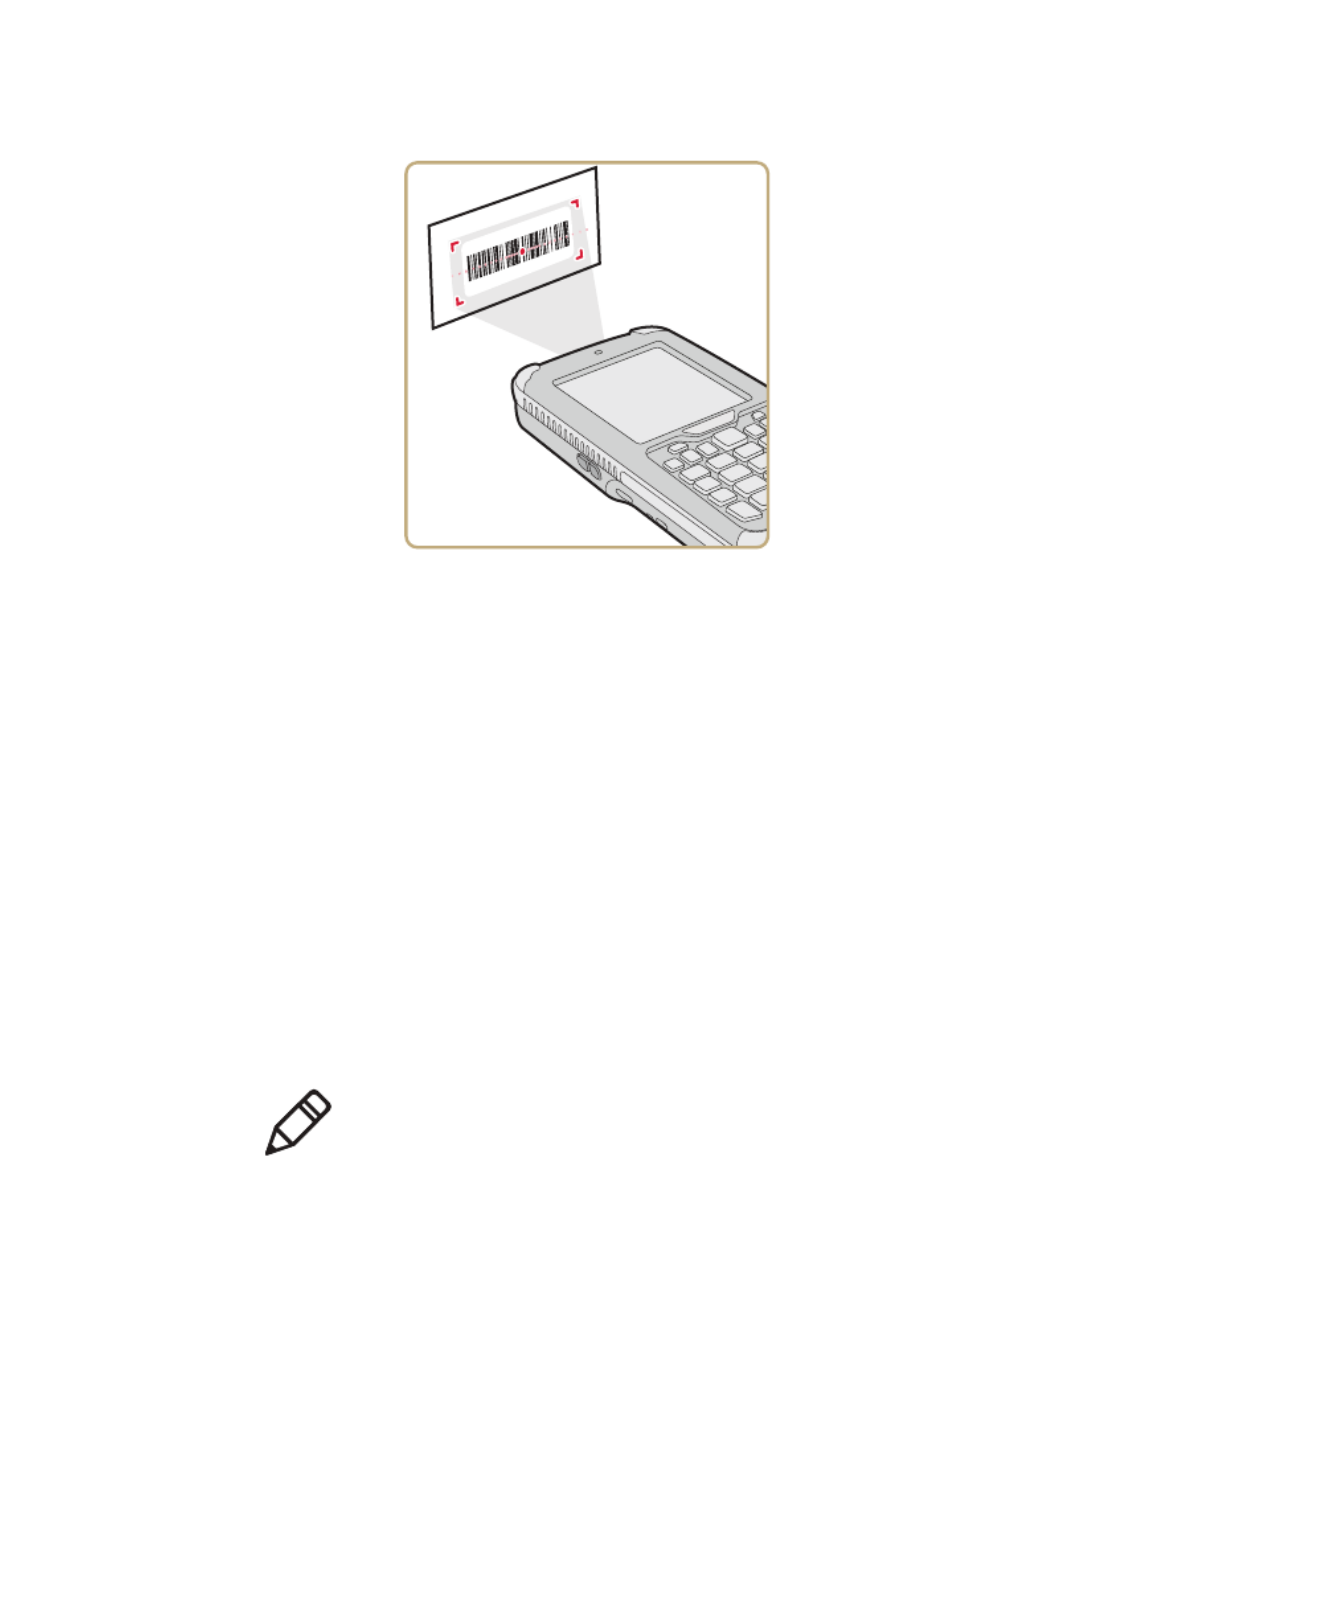
30 70 Series Mobile Computer User Manual
Scanning With the EA30 Imager
5 Use the laser pointer as a guide and aim toward the middle of the
bar code. Make sure that the illumination beam or frame covers the
bar code you are trying to decode.
When the computer successfully reads a bar code label, you hear a
high beep, and the Good Read LED turns on briefly.
6 Release the Scan button.
Insert a MicroSD Card
You can use a microSD™ card to increase file storage and install
software. The computers support an optional 32 GB maximum
capacity microSD card.
Install a MicroSD Card in a CN70 or CN70e
You need a Phillips screwdriver to install the microSD card.
1 Press the Power button to turn off the computer.
2 Remove the handstrap and the battery.
Note: The computer resets when you open the card access door to
insert the microSD card. Make sure you completely close the card
access door before you use your computer.

Chapter 1 — About the Computer Features
70 Series Mobile Computer User Manual 31
3 Remove the two Phillips screws and open the card access door.
4 Slide the SIM card door to the left to unlock it and open the door.

Chapter 1 — About the Computer Features
32 70 Series Mobile Computer User Manual
5 Slide the microSD card door towards the top of the computer to
unlock it and open the door.
6 Slide the microSD card into place.
7 Close the microSD card door and slide it towards the bottom of the
computer to lock it in place.
8 Close the SIM card door and slide it to the right to lock it in place.
9 Close the card access door and replace the two screws.
10 Install the battery. Press down firmly on the bottom of the battery,
and make sure that the battery release tab is fully engaged.
Chapter 1 — About the Computer Features
70 Series Mobile Computer User Manual 33
11 Attach the handstrap.
12 Press the Power button. The computer cold boots.
Install a MicroSD Card in a CK70 or CK71
You need a Phillips screwdriver to install the microSD card.
1 Press the Power button to turn off the computer.
2 Remove the handstrap.
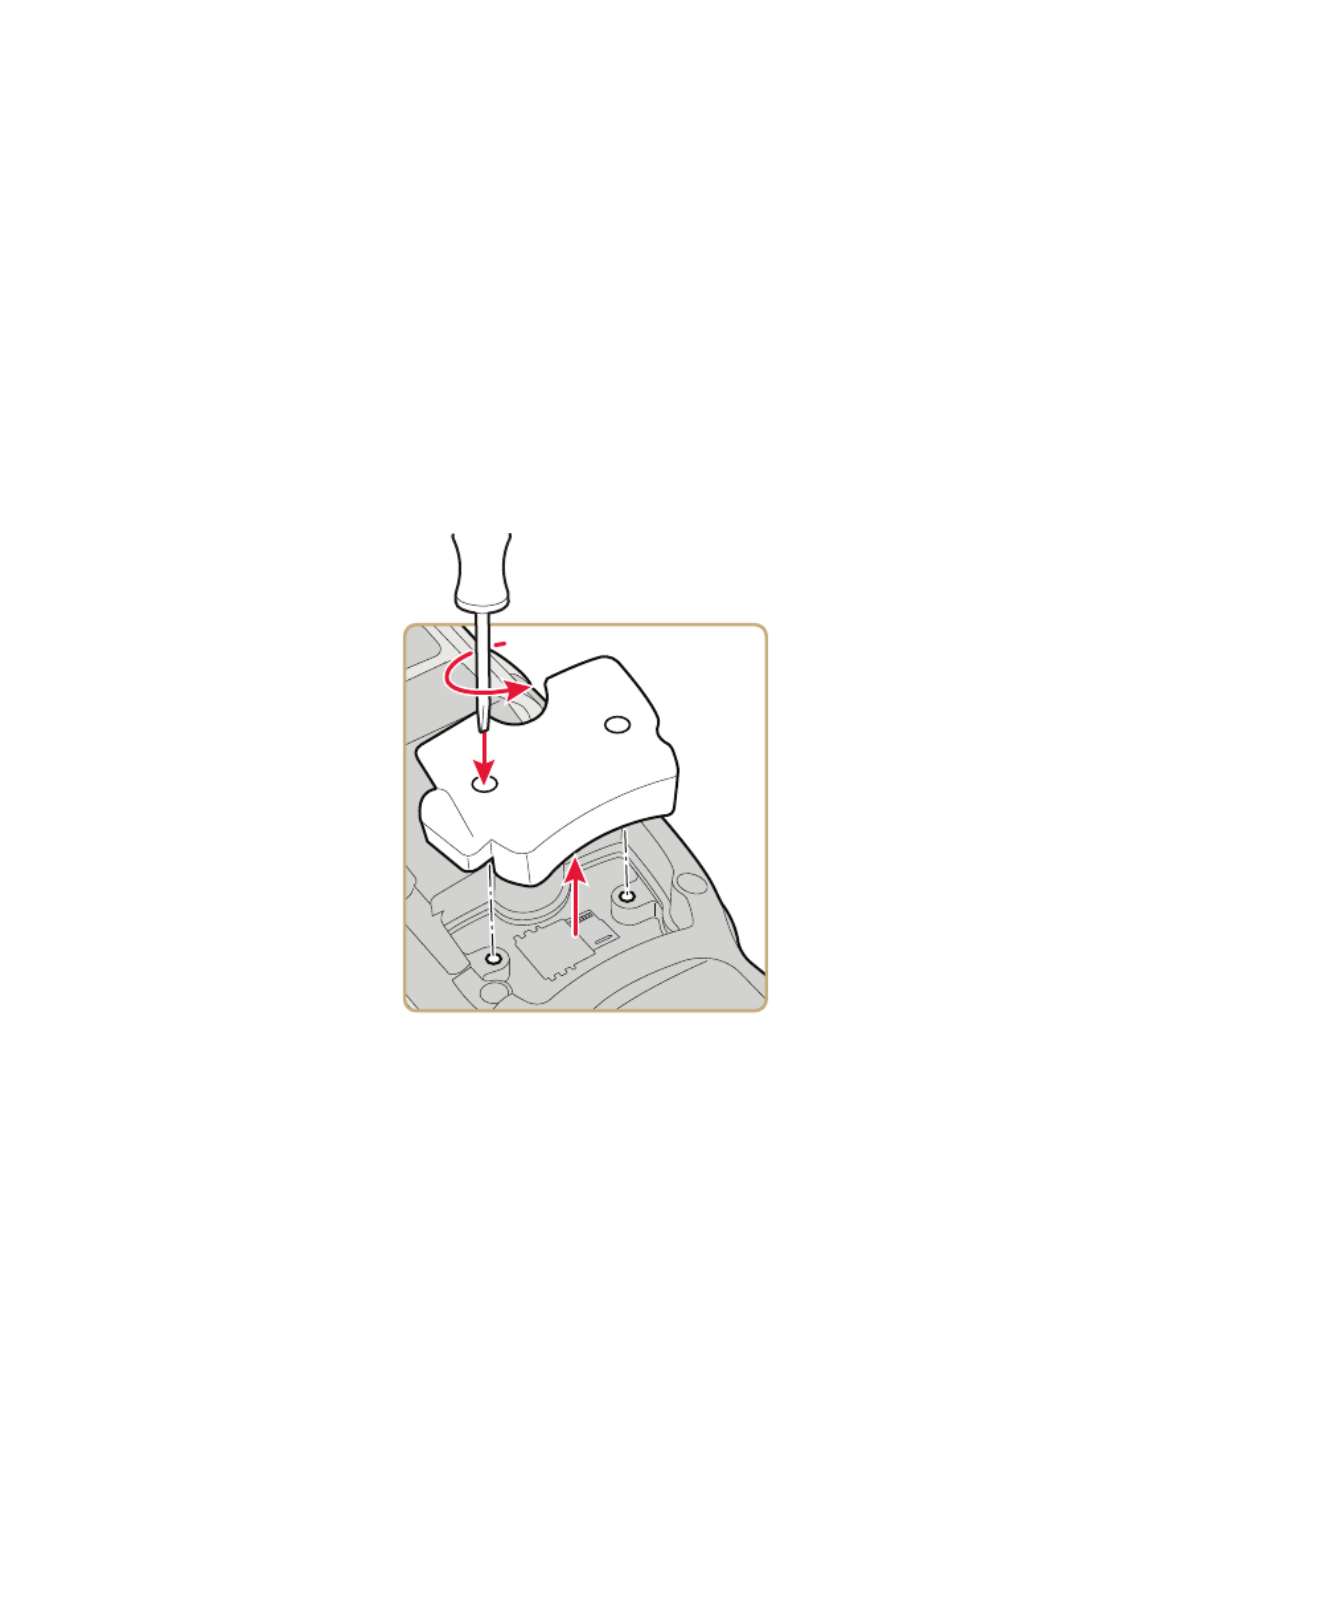
3 Remove the two screws that attach the interface adapter cover to
the back of the computer.

Chapter 1 — About the Computer Features
34 70 Series Mobile Computer User Manual
4 Slide the SIM card door to the left to unlock it and open the door.
5 Slide the microSD card door towards the top of the computer to
unlock it and open the door.

Chapter 1 — About the Computer Features
70 Series Mobile Computer User Manual 35
6 Slide the microSD card into place.
7 Close the microSD card door and slide it towards the bottom of the
computer to lock it in place.
8 Close the SIM card door and slide it to the right to lock it in place.
9 Replace the interface adapter cover and attach with the two screws
removed in Step 2.
10 Install the battery. Press down firmly on the bottom of the battery,
and make sure that the battery release tab is fully engaged.
11 Reattach the handstrap.
12 Press the Power button. The computer cold boots.
Transfer Files To and From Your PC
The 70 Series computer supports these two methods for transferring
files to and from your PC:
• Using Microsoft ActiveSync or Windows Mobile Device Center.
• Using the 70 Series computer as a mass storage device.

Chapter 1 — About the Computer Features
36 70 Series Mobile Computer User Manual
Use Microsoft ActiveSync to Transfer Files
You can use Microsoft ActiveSync (Windows XP or earlier) or Windows
Mobile Device Center (Windows Vista or Windows 7) to establish a
connection between your computer and a PC. After you connect to
your PC, you can transfer files, synchronize files, remotely debug, and
perform other device management activities. ActiveSync and Windows
Mobile Device Center are free applications available from the
Microsoft website at www.windowsmobile.com/getstarted.
To establish a partnership between your computer and a PC, you need
to physically connect your computer to your PC using these
accessories:
• USB snap-on adapter (Model 1000AA07)
• USB cable
Using these accessories, you can transfer files to and from your PC
using ActiveSync.
1 Connect your mobile computer to your desktop PC using the
adapter and USB cable.
2 Download ActiveSync from the Microsoft website and install
ActiveSync on your PC.
3 Follow the onscreen instructions to establish a partnership. When
the partnership is established, the Microsoft ActiveSync screen
appears on your PC.

Chapter 1 — About the Computer Features
70 Series Mobile Computer User Manual 37
Use the Computer as a Mass Storage Device
You can connect the 70 Series computer as a mass storage device to
your desktop PC. When connected as a mass storage device, you can
easily copy files to and from the mobile computer.
1 Go to www.datalight.com and download the Reliance Nitro
Windows Driver (RNWD). You need to login before you can
download the driver.
2 Connect the mobile computer to your desktop PC using a USB
cable.
3 On the mobile computer, tap
Start > Settings > System > Intermec Settings.
4 From the Intermec Settings Main Menu, tap Device Settings >
USB.
5 From the USB function driver menu, select Mass storage - Flash
File Store and tap OK.
6 Copy files to and from your desktop PC to the mobile computer.

Chapter 1 — About the Computer Features
38 70 Series Mobile Computer User Manual

39
2
About the User Interface and Intermec
Applications
Use this chapter to learn about the Windows Embedded
Handheld user interface and how to interact with the screen.
You can also use this chapter to learn about the Intermec
applications on your computer, as well as additional Intermec
applications you can download.

Chapter 2 — About the User Interface and Intermec Applications
40 70 Series Mobile Computer User Manual
About the User Interface
The user interface for the Windows Embedded Handheld 6.5
operating system is different from previous versions of Windows
Mobile. The interface is touch-friendly and easy to navigate. Use the
following sections to understand how to interact with Windows
Embedded Handheld 6.5.
About the Home Screen
When you turn on your mobile computer, the Home screen is the first
screen that appears. The Home screen contains three navigation bars:
the Title bar, the horizontal scroll bar, and the Tile bar.
The Windows Embedded Handheld 6.5 Home Screen
Use the Title bar icons to view the current status of information such
as signal strength and battery power remaining. For more information
on the Title bar icons, see “Title Bar Status Icons” on page 42.
A horizontal scroll bar appears when you tap an icon in the Title bar.
This horizontal scroll bar makes it easy to access the applications
associated with the Tile bar icons. The horizontal scroll bar also
contains a magnifier which improves the touch experience by making
parts of the screen large enough to tap with your finger.
Horizontal scroll bar
Title bar
Tile bar

Chapter 2 — About the User Interface and Intermec Applications
70 Series Mobile Computer User Manual 41
The horizontal scroll bar also replaces tabs within Windows screens
and allows for easier navigation.
Clock & Alarms Screen With Horizontal Scroll Bar
Use the Tile bar to navigate between screens and within applications.
The icons available on the Tile bar change depending on the
application you are using.
Interact with the Screen
The Windows Embedded Handheld 6.5 interface supports the use of
gestures with the finger or stylus to move around the screen. The table
below explains the supported gestures.
Gesture Description
Tap Represents the left click of a mouse.
Double-tap Represents the left double-click of a mouse.
Hold Represents the right click of a mouse when you press and hold
on the screen and a context menu appears.
Flick Initiates scrolling in the direction (horizontal or vertical) the
finger or stylus moves across the screen.
Pan Press and hold on the screen and then drag in any direction.

Chapter 2 — About the User Interface and Intermec Applications
42 70 Series Mobile Computer User Manual
Title Bar Status Icons
Tappable icons in the Title bar immediately show you the status of
your network, your phone, the volume, the battery, and the time. Use
the following table to understand what the icons mean.
Title Bar Status Icon Descriptions
Icon Description
You have a new notification.
You have a new text message.
You have a new email message.
You have a new instant message.
You missed a call.
The speakerphone is on.
The phone is roaming.
An alarm is set.
The microphone is on.
An internet call is in progress.
A Bluetooth headset is detected.
An ActiveSync connection has been established.
There is a problem with the ActiveSync synchronization.
An ActiveSync synchronization is in progress over USB.
A CDMA connection is active.
A CDMA connection is available, but not transferring data.

Chapter 2 — About the User Interface and Intermec Applications
70 Series Mobile Computer User Manual 43
A UMTS network is available.
Connecting to a UMTS network.
A UMTS connection is active.
A 3G+ network is available.
An EDGE network is available.
Connecting to an EDGE network.
An EDGE connection is active.
A GPRS network is available.
Connecting to a GPRS network.
A GPRS connection is active.
An HSDPA network is available.
Connecting to an HSDPA network.
An HSDPA connection is active.
Bluetooth is on.
Wi-Fi is on but not connected, and no networks are detected.
Wi-Fi is not connected to a network, and other networks are
detected.
Other wireless networks are detected.
Connected to a wireless network.
Synchronizing through a Wi-Fi connection.
Icon Description

Chapter 2 — About the User Interface and Intermec Applications
44 70 Series Mobile Computer User Manual
Connected to a wireless network, and other networks are
detected.
Information about a new wireless network is available.
A network connection is active.
A network connection is inactive.
The phone has maximum signal strength.
The phone has no signal.
The phone capability is off.
The phone has no service.
The phone is searching for service.
Data is being transferred.
A voice call is in progress.
A voice call is on hold.
There is no SIM card present in the computer.
The volume is off and the phone is set to vibrate.
The volume is on.
The volume is off.
The battery has a full charge.
The battery has a high charge.
The battery has a medium charge.
Icon Description

Chapter 2 — About the User Interface and Intermec Applications
70 Series Mobile Computer User Manual 45
Align the Screen
You may need to align your screen if you tap on one area and it
registers in a different part of the screen. Make sure you only use the
stylus to complete the alignment process.
1 Tap Start (t
t
t
tt) > Settings > System > Screen.
2 Follow the prompts on the screen to complete the alignment
process.
About Intermec Applications
Intermec provides many useful applications to help you configure,
troubleshoot, and connect your computer to other devices and
networks. You can also download additional applications from the
Intermec website to help you use all of the features of your computer.
Applications Available on the Mobile Computer
Use this table to understand some of the Intermec applications
available on your computer.
The battery has a low charge.
The battery has a very low charge.
The battery is attached to external power and is charging.
No battery is installed in the computer.
Call forwarding is on.
Voice mail is off.
GPS locator is off.
GPS locator is on.
Icon Description
Chapter 2 — About the User Interface and Intermec Applications
46 70 Series Mobile Computer User Manual
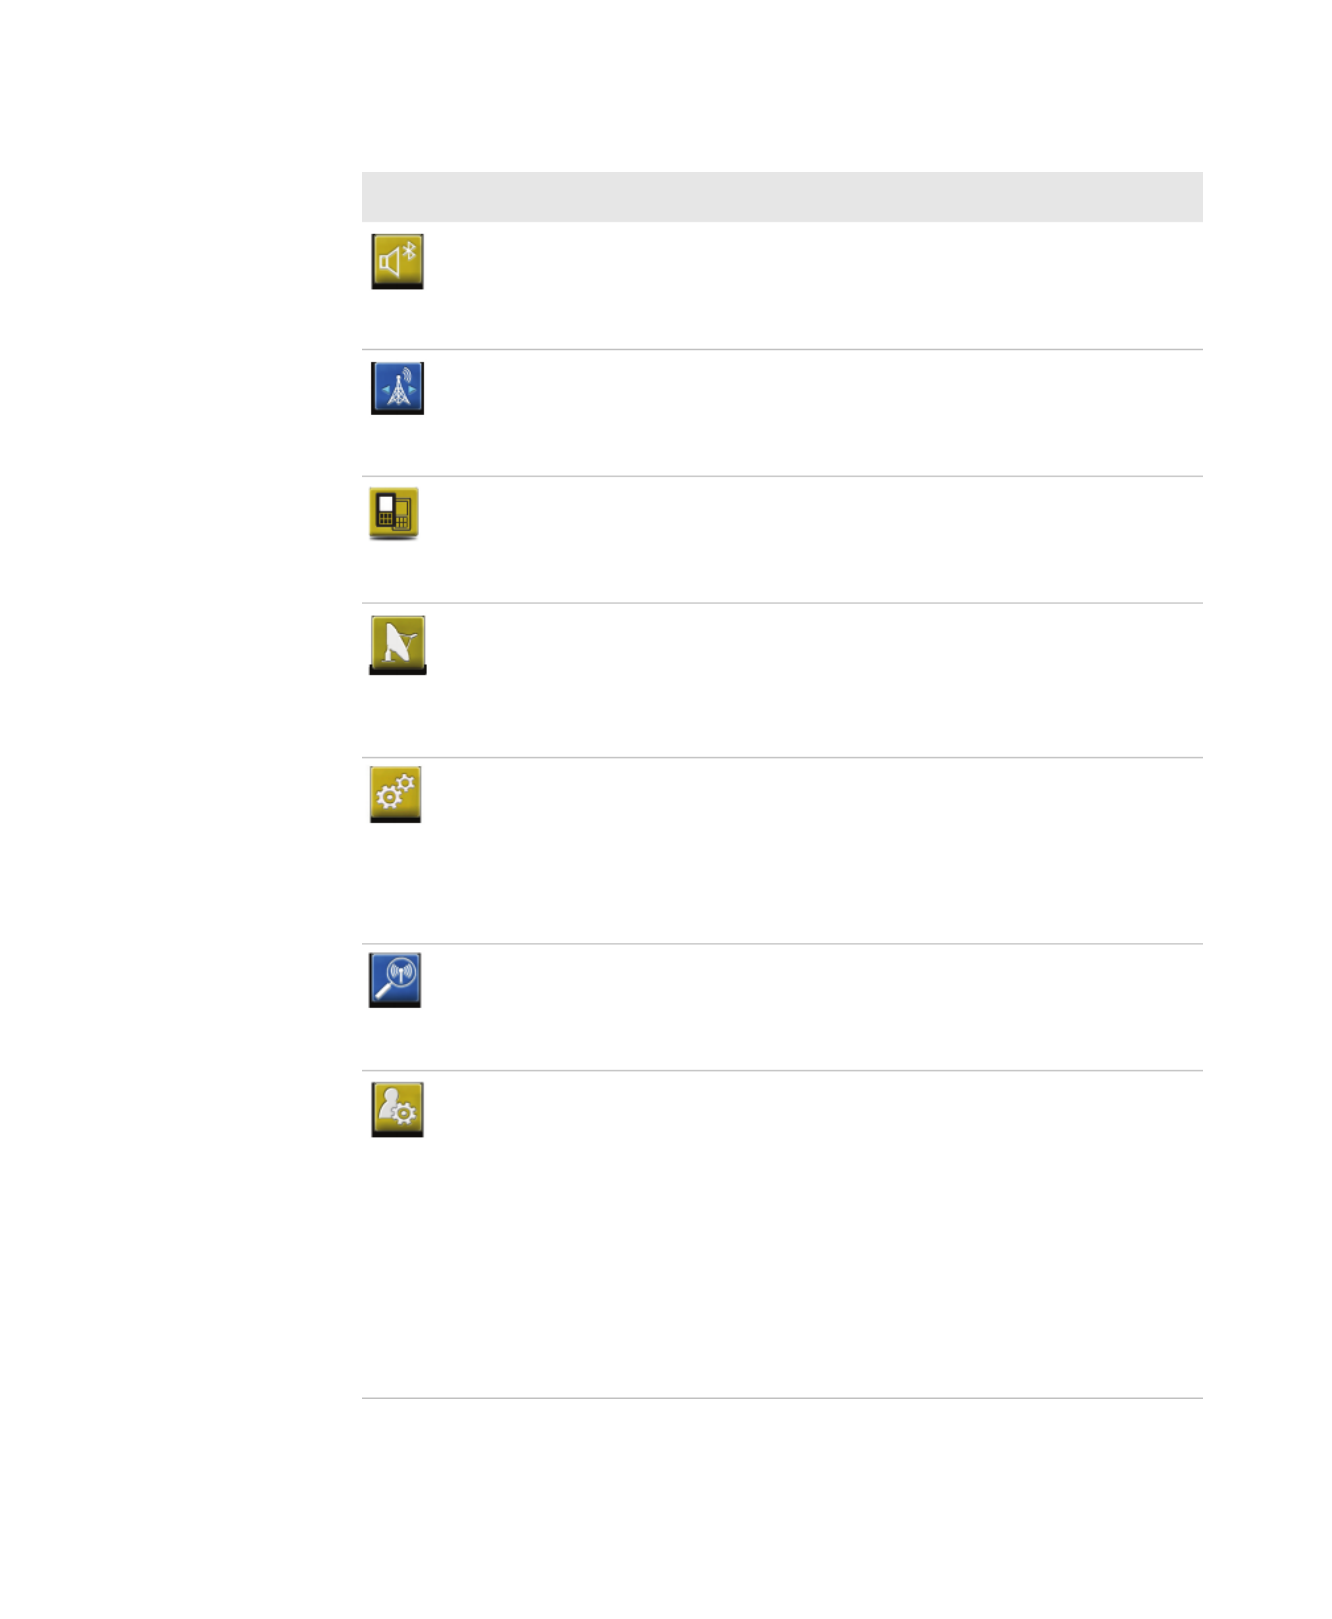
Intermec Applications Available on the Mobile Computer
Icon Application Description
Bluetooth
Audio
Use the Bluetooth Audio application to connect to
a Bluetooth headset or hands-free device. For more
information, see “Connect to a Bluetooth Audio
Device” on page 88.
Carrier
Selection
Use the Carrier Selection application to quickly
change your network carrier. For more
information, see “About Network Carriers” on
page 56.
CloneNGo Use CloneNGo to configure basic device settings
on multiple client computers from one master
computer. For more information, see “Manage the
Computer Using CloneNGo” on page 106.
iGPS Use the iGPS application to improve the
performance of GPS on your computer. For more
information, see “Improve GPS Performance on
the Computer” on page 72. iGPS is only available
on computers with phone capability.
Intermec
Settings
Use Intermec Settings to configure your computer.
You can use Intermec Settings to individually
configure a computer or you can use it through
SmartSystems to configure all of your computers.
For more information, see “Use Intermec Settings
on the Computer” on page 74.
ISpyWiFi Use ISpyWiFi to check your 802.11 status and
diagnose issues with the connection. For more
information, see “Check 802.11 Network Status”
on page 117.
Profile Settings Use Profile Settings to easily configure the
computer for a specific use. You can choose
predefined values for the Camera, Power, and
Scanning.
• Tap the Profile Setting you want to use.
You will see a message that changes are saved and
a check mark appears next to your choice.
For more information on modifying Profile
Settings options, see “Configure Profile Settings
with Intermec Settings” on page 80.

Chapter 2 — About the User Interface and Intermec Applications
70 Series Mobile Computer User Manual 47
Applications You Can Download to the Mobile Computer
You can download several Intermec applications from the website that
extend the capabilities of your 70 Series computer. All of the
applications listed below are available from the Intermec website.
Some of the applications require the purchase of a license to run. To
find the application you want, go to www.intermec.com > Support >
Downloads and then enter the information to find your 70 Series
computer.
About eMDI
Intermec Enhanced Mobile Document Imaging Application (eMDI) is
a professional document capture application that enables you to
capture images of full page documents (8.5 x 11 or A4 paper sizes) with
the camera. You can transfer the images from your mobile computer
to a PC or server. For more information, see the Intermec Enhanced
Mobile Document Imaging User Guide. You can download and use
eMDI for a 30-day evaluation period. After the evaluation period
expires, you will need to purchase a license.
ScanDiagnostic Use the ScanDiagnostic application to
troubleshoot problems with the internal or
external scanner. For more information, see “Use
ScanDiagnostic to Troubleshoot the Scanner”
on page 120.
SceneEditor Use the SceneEditor application to modify
predefined camera scenes or create new scenes. For
more information, see “Configure Camera
Scenes” on page 65.
Wireless Center Use the Wireless Center to turn radios (Wi-Fi,
Bluetooth, phone) on and off and configure
settings for each radio.
Wireless
Printing
Use the Wireless Printing application to connect to
a Bluetooth printer. For more information, see
“Connect to a Bluetooth Printer” on page 87.
Wireless
Scanning
Use the Wireless Scanning application to connect
to a Bluetooth scanner. For more information, see
“Connect to a Bluetooth Scanner” on page 85.
Icon Application Description

Chapter 2 — About the User Interface and Intermec Applications
48 70 Series Mobile Computer User Manual
About Features Demo
Intermec Features Demo provides a simple way to explore the key
features of your mobile computer. You will find applications that
demonstrate scanning, document imaging, image capture, printing,
and GPS functionality. Many of the applications that are part of
Features Demo also have separate full-featured versions that you can
download and license for your computer.
About Image Capture
The Intermec Image Capture application is provided for use on the 70
Series computers with an EA30 imager. Image capture provides a way
for users to capture a high quality grayscale image with a mobile
computer. Image Capture also allows you to change settings to provide
the best image possible for the conditions present. You do not need to
license Image Capture.
About Intermec Browser
Intermec Browser is a locked-down web application for your computer
that is compatible with Internet Explorer 6.0. You can configure
Intermec Browser for your specific application requirements and
design your own web pages. You can download and use Intermec
Browser for a 60-day evaluation period. After the evaluation period
expires, you will need to purchase a license.
About Intermec Connection Manager
Intermec Connection Manager is a software application and API
interface that provides seamless network roaming for Intermec mobile
computers configured with one or more wired or wireless technologies
(Ethernet, 802.11, GPRS, CDMA). Intermec Connection Manager
works in the background to automatically establish and maintain
connections. You can download and use Intermec Connection
Manager for a 60-day evaluation period. the evaluation period expires,
you will need to purchase a license.

Chapter 2 — About the User Interface and Intermec Applications
70 Series Mobile Computer User Manual 49
About Intermec Launcher
Intermec Launcher is a Microsoft Windows application, designed for
Intermec mobile computers, that provides a platform from which
other applications may be launched while attempting to provide a
locked-down environment. You can configure Intermec Launcher for
your specific application requirements. You can download and use
Intermec Launcher for a 60-day evaluation period. After the evaluation
period expires, you will need to purchase a license.
About Intermec Terminal Emulator (ITE)
Intermec Terminal Emulator (ITE), part of Intermec Client Pack (ICP),
is the next generation of Intermec’s popular terminal emulation client
designed for enterprise-level data collection. It provides a consistent
user interface and a common menu structure to simplify the use and
management of applications running on Intermec mobile and wireless
computers.
ITE is packed with enhancements that improve productivity, reduce
errors, and deliver fast return on investment. It supports multiple
emulation protocols in a single client and has new features such as
session persistence, remote management and configuration, and offers
a maintenance plan to keep you up-to-date with the latest releases and
upgrades. You can download and use ITE for a 60-day evaluation
period. After the evaluation period expires, you will need to purchase a
license and maintenance plan.
About SmartSystems
SmartSystems™ is an easy-to-use software platform that provides IT
Administrators and Integrators a single, integrated portal for
hands-free provisioning, deployment, and management of Intermec
devices minimizing the effort spent on software upgrades, equipment
monitoring, maintenance and troubleshooting.
SmartSystems provides a consistent way to manage Intermec devices
including mobile computers, RFID readers, printers and bar code
scanners, located on-site or remote, to make the most of limited IT
resources, and lower the total cost of ownership for Intermec data
collection equipment. SmartSystems can be downloaded at no charge
from the Intermec website. For more information, visit
www.intermec.com/SmartSystems.

Chapter 2 — About the User Interface and Intermec Applications
50 70 Series Mobile Computer User Manual

51
3
Use the Phone
You can use the phone feature to make and receive telephone
calls, as well as transmit data through cellular wide-area
networks (WANs).

Chapter 3 — Use the Phone
52 70 Series Mobile Computer User Manual
About the Phone
The 70 Series mobile computer supports two types of cellular
technology:
• CDMA
• UMTS
Phone features on the computer include a speaker and a microphone.
You can also use a Bluetooth headset or hands-free kit. The phone
feature is enabled by default on WWAN-equipped mobile computers.
After you turn on the phone and activate service with your wireless
carrier, you can customize the phone features and network settings.
For more information, see the online help on your mobile computer.
Activate the UMTS Phone
You use a SIM card to activate the UMTS phone on your computer.
You can purchase the SIM card from your network provider.
1 Press the Power button to turn off the computer.
Note: Your Flexible Network Radio mobile computer supports both
CDMA and UMTS technology. Your Flexible Network Radio does not
support Network Information and Time Zone (NITZ) messages to
automatically set the system time.

Chapter 3 — Use the Phone
70 Series Mobile Computer User Manual 53
2 On the CN70 or CN70e:
a Push the battery release tab forward until the battery releases,
and lift the battery away from the computer.
b Remove the two Phillips screws and open the card access door.
3 On the CK70, remove the two screws and lift the card access door
away from the computer.
4 Slide the SIM card door to the left to unlock it and open the door.

Chapter 3 — Use the Phone
54 70 Series Mobile Computer User Manual
5 Slide the SIM card into the slot in the card access door.
6 Close the SIM card door and slide it to the right to lock it in place.
7 Close the card access door and replace the two screws.
8 Install the battery. Press down firmly on the bottom of the battery,
and make sure that the battery release tab is fully engaged.
9 Press the Power button. The computer cold boots.
Activate the CDMA Phone
To activate the CDMA radio module in your mobile computer, you
need to contact your wireless carrier and set up an account for each
mobile computer. The following table lists the carriers that Intermec
currently supports. If your carrier is not listed in the table, please
contact Intermec product support to see if it is now supported.
Currently Supported Carriers
Country Carriers
United States Sprint, Verizon

Chapter 3 — Use the Phone
70 Series Mobile Computer User Manual 55
The carrier requires the Mobile Equipment Identifier (MEID) to start
the activation process. You can find the MEID:
• on a label located in the upper right corner of the battery
compartment.
• on the outside of the computer shipping box.
• in the Version Information menu. Tap Start > Settings >
Personal > Phone > Version Information tab.
The activation process is slightly different for each CDMA carrier.
Your carrier sales contact and an Intermec representative can guide
you through the process.
After you supply the MEID to your carrier, they will respond with
values that you must enter using the Windows Mobile Activation
Wizard (if required). Some of the supported carriers do not require you
to enter any values. The following table shows the carriers, the correct
activation method to use, and the values that you need to activate your
phone.
Values Required for CDMA Phone
After activation, the settings are permanently stored in the CDMA
module. Changing the OS loads will not affect any of the settings or
activation parameters stored in the WAN modem.
Carrier Activation Method Activation Values You Need
Sprint Activation Wizard • Master Subsidy Lock (MSL) or activation code
• MDN
• MEID
Verizon • Dial *22899
• Activation Wizard
None. All parameters are automatically
transferred wirelessly.

Chapter 3 — Use the Phone
56 70 Series Mobile Computer User Manual
Start the Activation Wizard
Depending on your wireless carrier, you may need to use the Windows
Mobile Activation Wizard to activate your phone.
1 Tap Start > Phone, or tap the Phone button on the Tile bar.
The phone application starts.
2 Tap Menu > Activation Wizard.
Turn the Phone On and Off
Before you can start using your phone, you need to enable it. You can
use Wireless Center to enable and disable your phone, as well as
Bluetooth and Wi-Fi communications.
1 Tap Start > Settings > Connections > Wireless Center.
2 Tap Phone to turn on the Phone
3 (Optional) To configure the phone, tap Menu in the tile bar at the
bottom of the screen.
4 Tap OK when you are done configuring the options.
5 Tap OK to close Wireless Center.
About Network Carriers
Your Flexible Network Radio-enabled CN70, CN70e, or CK70 mobile
computer contains a highly configurable WWAN platform. When you
switch network carriers, or perform a clean boot, the cellular network
connection is automatically configured.
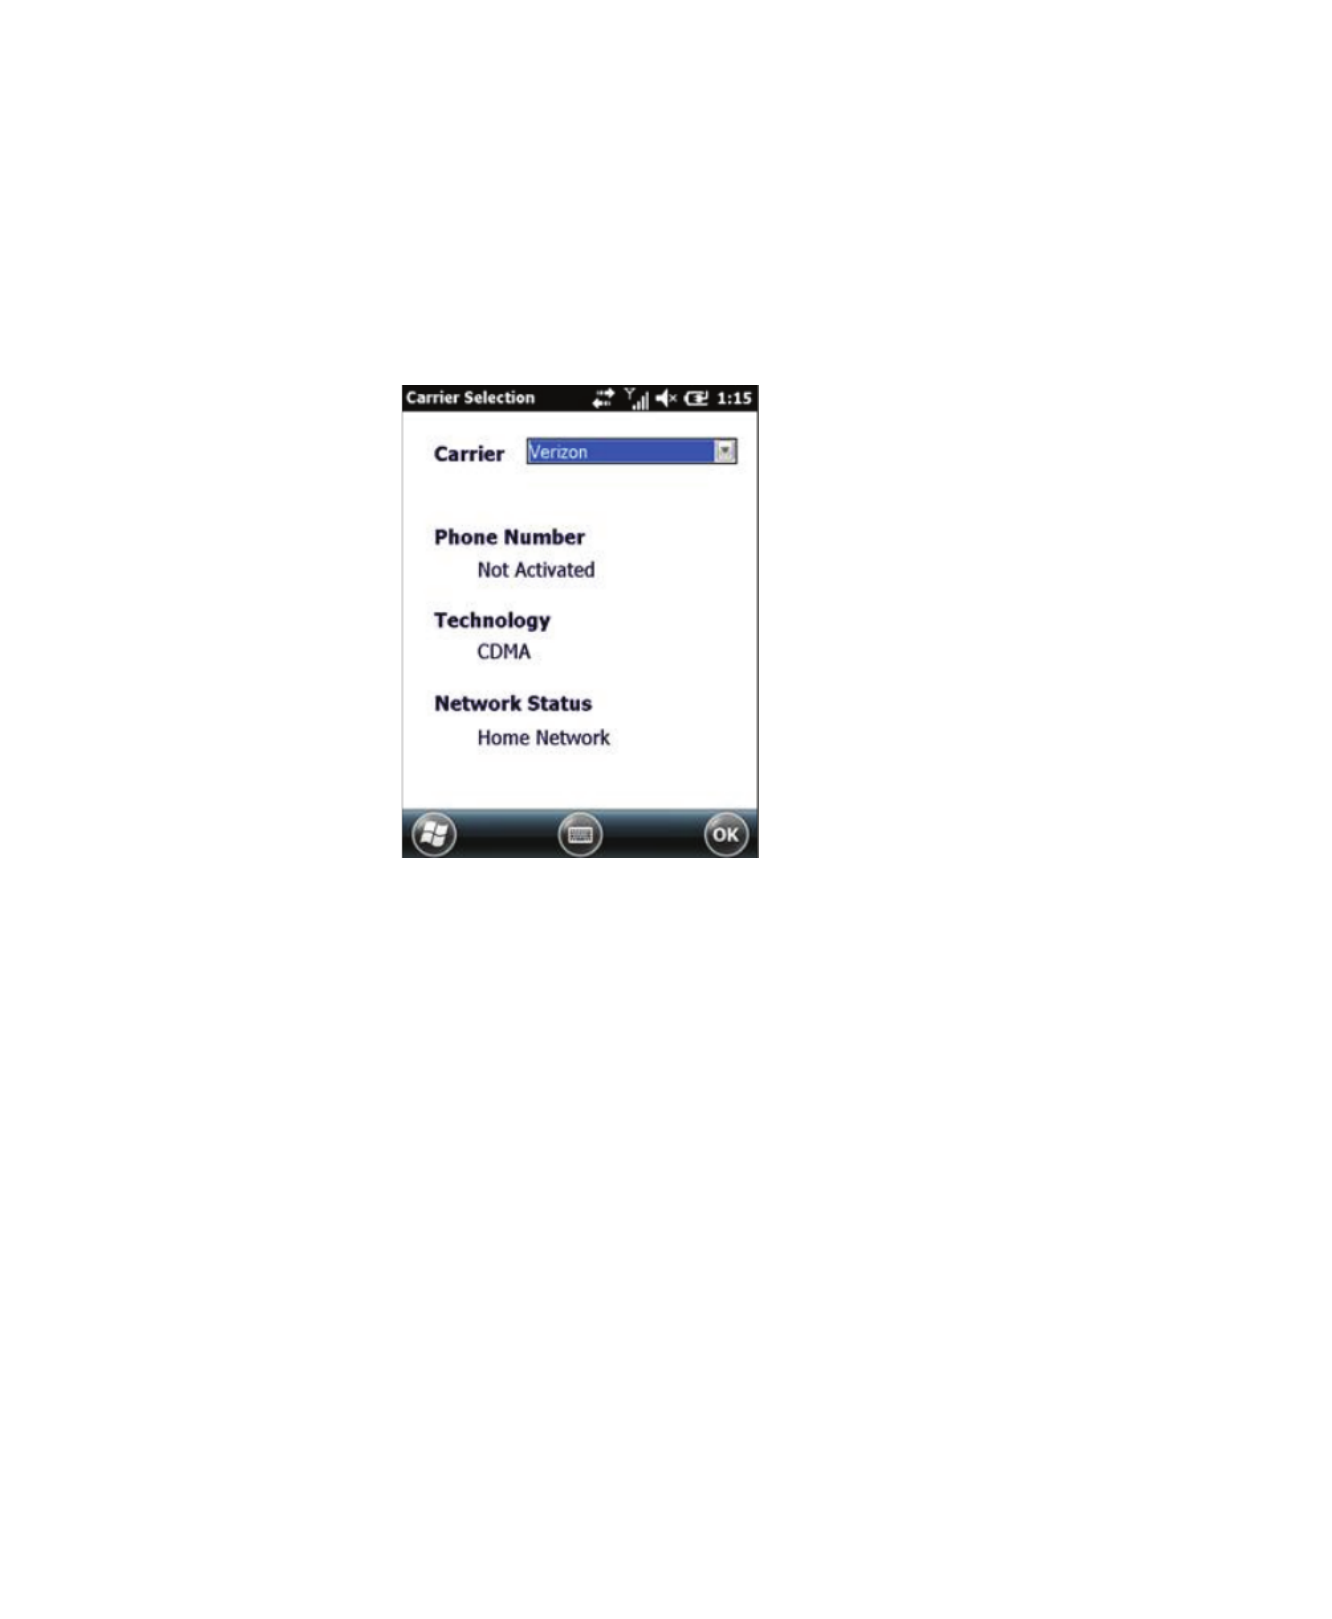
Chapter 3 — Use the Phone
70 Series Mobile Computer User Manual 57
Switch Network Carriers
Use the Carrier Selection application to quickly change your WWAN
radio network carrier on your Flexible Network Radio-enabled CN70,
CN70e, or CK70 mobile computer.
1 Tap Start > Settings > Personal > Carrier Selection.
2 Select a Carrier and tap OK. A dialog box appears asking if you
want to switch carriers.
3 Tap Yes to switch carriers.
If the update is successful, the Carrier Selection screen appears and
displays the updated carrier information.
If the update is unsuccessful, a message box appears. Tap Ok to
return to the Carrier Selection screen.

Chapter 3 — Use the Phone
58 70 Series Mobile Computer User Manual
Add the WWAN Connection
If you are switching to a CDMA network, or switching from a CDMA
network to a UMTS network, you must add the WWAN connection in
Intermec Settings.
1 Tap Start > Settings > System > Intermec Settings >
Communications > WWAN Radio.
2 Select Add New WWAN Connection.
3 Enter a Connection Name. In the Phone Number field, enter #777
and tap OK. The Manage WWAN Radio State screen appears.

Chapter 3 — Use the Phone
70 Series Mobile Computer User Manual 59
4 From Active Connection, select your Connection Name and
Connect Now and tap OK.
About the Network Connection
When you perform a clean boot, all user-created network connection
entries are deleted, and only the generic UMTS remains. After you
perform a clean boot, you can find more information about generic
UMTS by tapping Start > > Settings
Connections > > Connections
Tasks tab > Manage Existing Connections
> Modem tab.
Note: When you perform a clean boot, the selected carrier will default
to generic UMTS.

Chapter 3 — Use the Phone
60 70 Series Mobile Computer User Manual
Make a Phone Call
After you activate your UTMS or CDMA phone, you are ready to start
making phone calls.
1 Press Phone.
2 Tap the keys to enter the telephone number you want to call, and
tap Talk.
Make an Emergency Phone Call
You can use the UMTS phone to make an emergency phone call even
if the SIM card is missing. When the SIM card is not installed, the
phone will show that you have no service. However, if you dial certain
emergency numbers (such as 112, 911, 000, 08, 118, 119, and 999) the
call will go through.
Note: Your Flexible Network Radio mobile computer is data only. You
cannot make phone calls from the Flexible Network Radio.
Note: Your Flexible Network Radio mobile computer is data only. You
cannot make phone calls from the Flexible Network Radio.

61
4
Use the Camera
You can use the color camera to take pictures and record
videos.

Chapter 4 — Use the Camera
62 70 Series Mobile Computer User Manual
About the Color Camera
The camera and flash are located on the back of the computer. You run
the Pictures & Videos application to access the camera features.
In the Pictures & Videos application, you can:
• configure camera settings.
• take, view, and edit pictures.
• switch between Still (camera) mode and Video mode.
• record and launch video clips stored on the computer or a microSD
card.
You can send pictures and video clips to others or save an image as the
background on the Home screen. If you download the eMDI
application, it uses the camera to capture images.
About the Camera Settings
You can configure camera settings to meet the needs of your operating
environment:
• Basic camera settings are available from the main menu of the
Pictures & Videos application.
• Advanced camera settings are available from the Settings menu
option from the main menu of the Pictures & Videos application.
Basic Camera Settings
Note: While the Pictures & Videos application is running, you cannot
use the imager.
Setting Description
Mode Determines the camera operating mode:
• Normal: Takes one picture.
• Burst: Takes a series of three pictures.
• Timer: Waits 10 seconds before taking the picture.
Resolution Determines the resolution of the image. You can select values
for image resolution or screen resolution.
Zoom Determines the amount of zoom: from 1x to 4x.

Chapter 4 — Use the Camera
70 Series Mobile Computer User Manual 63
Advanced Camera Settings
Scenes Predefined scenes that optimize the camera settings for a
specific environment:
• DocCap: Intermec document capture.
• Check: Capture images of paper checks.
• Night: Low light conditions.
• Cloudy: Cloudy or overcast conditions.
• Daylight: Bright sun.
• Van Interior: Dimly lit vehicle interior.
• Warehouse: Warehouse environment.
• Office Store: Office or store environment.
• Manual: Manually configure a specific set of camera settings.
• Auto: The camera automatically configures the settings.
Settings Advanced camera settings that you can configure. See the next
table, “Advanced Camera Settings”.
Torch The state of the camera flash depending on the lighting
conditions: on, off, or automatic.
Flash The state of the camera flash when you take a picture: on, off, or
automatic.
Focus Determines if the focus is continuous, single shot, or manual. If
you select manual focus, you need to set the Focus Distance.
Focus
Distance
The distance at which the camera focuses. Values are 2.5 in,
4.5 in, 7.5 in, 1-3 ft, 3-9 ft, and Infinity (focuses the lens so that
an infinitely distant object would be in focus).
Setting Description
Exposure
Metering
The area of the image the camera uses to determine optimal
exposure:
• Whole Avg.: Uses the image as a whole.
• Whole Center Weight: Uses the entire image but places
emphasis on the center quarter of the image.
• Center 1/4 Avg.: Uses the center quarter of the image.
• Lower 1/4 Avg.: Uses the lower quarter of the image.
• Upper 1/4 Avg.: Uses the upper quarter of the image.
• Lower 1/2 Avg.: Uses the lower half of the image.
• Upper 1/2 Avg.: Uses the upper half of the image.
Default is Center 1/4 Avg.
Setting Description

Chapter 4 — Use the Camera
64 70 Series Mobile Computer User Manual
Exposure Exposure level of the image. Values are from -2.5 (darker,
underexposed) to +2.5 (lighter, overexposed) in increments of
0.5. Default is 0.
Brightness Brightness level of the image. Manual settings are from -4 (very
dark) to +4 (very light) in increments of 1. Default is Auto.
Contrast Amount of contrast in the image. Manual settings are from -4
(least contrast) to +4 (most contrast) in increments of 1. Default
is Auto.
Saturation Color saturation level. Manual settings are from -4 (black and
white) to +4 (maximum color) in increments of 1. Default is
Auto.
Sharpness Sharpness of the image. Manual settings are from -4 (very soft)
to +4 (very sharp) in increments of 1. Default is Auto.
White
Balance
Compensates for specific lighting conditions to produce true
color images:
• Auto: Automatic White Balance (AWB) control.
• Sunny: Outdoors in bright, midday sunny conditions.
• Cloudy: Outdoors with a completely overcast cloudy sky.
• Tungsten: Indoors lit with tungsten light bulbs.
• Office: Indoors lit with fluorescent light bulbs.
Default is Auto.
Flash
Profile
Controls the amount of flash for a specific condition:
• 0: This profile is reserved.
• 1: Document imaging in light to moderately light ambient
conditions.
• 2: Dark, semi-reflective environments, such as a vehicle
interior or dimly lit room.
• 3: Dark, non-reflective large or outdoor environments.
Provides very long flash durations.
• 4: This profile is reserved.
Default is 1.
DeNoise Controls the amount of noise, or graininess, in the image:
• Disabled: Disable noise reduction.
• Normal: Use normal noise reduction.
• Enhanced: Enhance the noise reduction.
Setting Description

Chapter 4 — Use the Camera
66 70 Series Mobile Computer User Manual
Take a Picture
When you take a picture, the image is saved as a .jpg file and stored in
the /My Documents/My Pictures folder.
1 Tap Start > Pictures & Videos.
2 Tap the Camera Camera
icon in the grid or the button on the Tile
bar, or press Enter.
3 Using the screen as a viewfinder, move the camera until you have
the image you want to take a picture of.
4 Hold the camera as still as possible, and press Enter to take and
save the picture.
If you choose to save your pictures to Main memory, they are saved
to permanent storage on your mobile computer.
Record a Video
You need to switch to video mode to record video. When you record
video, the video is saved as an .mp4 file and stored in the /My
Documents/My Pictures folder.
1 Tap Start > Pictures & Videos.
2 Tap the Camera Camera
icon in the grid or the button on the Tile
bar, or press Enter.
3 Tap Menu > Video.
4 Using the screen as a viewfinder, move the video camera until you
see the scene you want to video record.
5 Press Enter to start recording.
6 When you are done, tap Stop or press Enter to stop recording and
save the video.
If you choose to save your videos to Main memory, they are saved
to permanent storage on the computer.

Chapter 4 — Use the Camera
70 Series Mobile Computer User Manual 67
Save Pictures and Videos to a microSD Card
Pictures and videos are automatically saved to the main memory on
your computer. You can save your pictures and video to a microSD
card to easily transport them to another device.
1 Install a microSD card. For help, see “Insert a MicroSD Card” on
page 30.
2 Tap Start >
Pictures & Videos .
3 Tap the camera icon.
4 Tap Menu > Options.
5 From the Save files to list, select SD card, and tap OK.

Chapter 4 — Use the Camera
68 70 Series Mobile Computer User Manual

69
5
Use GPS
The 70 Series computer comes equipped with an integrated
Global Positioning System (GPS) receiver if your computer has
phone capability (WWAN radio). The GPS receiver can deliver
standards-based National Marine Electronics Association
(NMEA) data strings to GPS applications.

Chapter 5 — Use GPS
70 70 Series Mobile Computer User Manual
About the Integrated GPS on Your Computer
Intermec recommends that you use the GPS Intermediate Driver
(GPSID) instead of directly accessing the GPS hardware. The GPSID is
a Microsoft software component that interacts between applications
and the GPS hardware.
As a Microsoft software component, the GPSID:
• allows multiple applications to simultaneously access the GPS data
stream.
• provides access to GPS data without requiring applications to
recognize and parse NMEA syntax.
Use the GPSID Installed on the Computer
To use the GPSID installed on your mobile computer, you need to
configure the GPSID settings.
1 Tap Start > Settings > System > External GPS. The GPS Settings
screen appears with Programs selected.
2 Select the COM port that you want your programs to use to get
GPS data from your computer.

Chapter 5 — Use GPS
70 Series Mobile Computer User Manual 71
3 Tap Access in the horizontal scroll bar and select the Manage GPS
automatically check box.
4 Tap OK.
About the GPS Module Operating Modes
The integrated GPS module has three operating modes:
• Standalone
• MS Assisted (Mobile Station Assisted)
• gpsOneXTRA™ (UMTS computers only)
In Standalone mode, the GPS module relies solely on GPS satellites to
determine position.
In MS Assisted mode, the computer can determine position without
receiving GPS signals directly from satellites; instead, the computer
receives GPS signals and information provided by the cellular network.
Even when the computer can receive a satellite signal, MS Assisted can
improve position accuracy and reduce the time to determine initial
position (Time-To-First-Fix). Check with your cell phone carrier for
availability and pricing for MS Assisted service.

73
6
Configure the Computer
Use this chapter to learn about the available methods for
configuring your mobile computer and how to use Intermec
Settings. You can also use this chapter to learn how to
configure network communications and wireless security.

Chapter 6 — Configure the Computer
74 70 Series Mobile Computer User Manual
How to Configure the Computer
You can configure many parameters on the computer such as the bar
code symbologies it decodes or the network settings. The values you
set for these parameters determine how the computer operates.
There are several ways to configure the computer:
• Directly on the computer. You can use Intermec Settings directly
on the computer to change only the settings on that computer. For
more information, see the next section, “Use Intermec Settings
on the Computer.”
• Remotely using Intermec SmartSystems. When you use
SmartSystems, you can remotely configure all of your 70 Series
mobile computers as well as other SmartSystems-enabled Intermec
computers and peripherals. For more information, see “Use
Intermec Settings Remotely with SmartSystems” on page 82.
• You can use a third-party device management product that
supports the computer and Intermec Settings, such as Soti
MobiControl or Wavelink Avalanche. For more information, visit
the Device Management page on the Intermec website.
You can also configure the computer with configuration bundles that
you create using SmartSystems Foundation. For more information,
see the SmartSystems Foundation Online Help.
Use Intermec Settings on the Computer
Use Intermec Settings to configure parameters for Intermec
applications on the computer as well as some device-specific
parameters like volume. You can configure parameters for important
functions like data collection and communications.

Chapter 6 — Configure the Computer
70 Series Mobile Computer User Manual 75
Start Intermec Settings
Intermec Settings is located on the System screen.
• Tap Start > Settings > System > Intermec Settings. The Intermec
Settings Main Menu appears.
About the Structure of Intermec Settings
Use the tables below to help find the parameters in Intermec Settings
that you want to configure. Each table contains the parameters for one
of the Intermec Settings Main Menu options.
If you see next to a menu option, there are more screens available in >
the next level. If you see ... next to a menu option, there is only one
more screen available.
Most parameters are saved as soon as you tap . Some settings such OK
as the Serial Port Switch require you to reboot the computer for the
changes to take effect.

Chapter 6 — Configure the Computer
76 70 Series Mobile Computer User Manual
Data Collection Menu
Communications Menu
Data Collection Options Parameters You Can Configure
Internal Scanner • Symbologies
• Scanner settings
• Imager settings
• Decode security
Bluetooth Scanner • Symbologies
• Scanner settings
• Imager settings
• Decode security
Dock Tethered Scanner • Symbologies
• Scanner settings
• Scanner port settings
• Imager settings
• Decode security
Camera • Symbologies
• Scanner settings
• Camera settings
• Decode security
BT-Configure on Connect Bluetooth-configure on connect
Magstripe Reader • Enable magstripe reader
• Reader model (read-only)
Communications Options Parameters You Can Configure
Device Name Device name
802.11 Radio • Security choice (supplicant)
• Security settings (includes Wi-Fi
settings such as enable/disable radio)
• IP settings
• Certificates
Ethernet Adapter IP settings
Bluetooth Bluetooth settings (power, discoverable,
connectable, and so on)

Chapter 6 — Configure the Computer
70 Series Mobile Computer User Manual 77
Device Settings Menu
WWAN Radio •Add WWAN connection
• Edit WWAN connections
• Manage WWAN radio
• Carrier Selection
• WWAN information
Serial Port Switch Serial port switch settings (IrDA, docking
connector, and back interface)
Device Settings Options Parameters You Can Configure
Date and Time Date and time settings
Good Read • Internal scanner
• Tethered scanner
• Bluetooth scanner
Sounds • Beeper and voice volume
• Headset beeper volume
• Vibrate mode intensity
• Screen taps
• Key clicks
Backlight Backlight settings (display backlight,
keypad backlight, and light level)
Screen • Screen rotation
• Screen rotation sensor
Keypad Button Remapping (Flashlight timeout,
Left side lower button, Handle trigger,
Center scan button, Left side upper
button, Right side upper button, Right
side lower button)
Power Management • Power button
• Battery power
• External power
• Device off sensor
USB USB function driver
System Component Versions System component versions (read-only)
IDL Runtime Versions ITC50 (read-only)
Communications Options Parameters You Can Configure

Chapter 6 — Configure the Computer
78 70 Series Mobile Computer User Manual
Printer Menu
GPS Menu
SmartSystems Information Menu
Profile Settings Application Whether these parameter options appear
in Profile Settings:
• Camera
• Power
• Scanning
Features Disabled by Policy None (read-only)
Printer Options Parameters You Can Configure
Printer (if connected through
Bluetooth)
Printer settings (Auto detect printer,
memory, display, and so on)
Device Settings Options Parameters You Can Configure
Note: The Printer menu displays settings for Bluetooth connected
printers. The settings that appear in the menu are dependent on the
printer that is paired with the device. The printer needs to be using the
Wireless Printing application.
GPS Options
GPS Bread crumbing settings
SmartSystems Information Options Parameters You Can Configure
Identity Identity information (hardware
version, firmware version, OS version,
and so on) (read-only)
Administrator Administrator settings (name, phone,
and email)
Location Location settings (country, state, city,
campus, and detail)
Information Device Notes (read-only)

Chapter 6 — Configure the Computer
70 Series Mobile Computer User Manual 79
Virtual Wedge Menu
Core Messaging Service Menu
Device Monitor Menu
License Manager Menu
Virtual Wedge Options Parameters You Can Configure
Enable Virtual Wedge Enable virtual wedge
Bar Code Scanner Wedge Bar code scanner wedge settings (bar code
scanner grid and label encoding)
Magstripe Reader Wedge Magstripe Reader Grid
Core Messaging Service Options Parameters You Can Configure
Server IP Server IP (read-only)
Associated Server IP Associated server IP
Broadcast Name Broadcast name
Port Port (read-only)
Keep Alive Ping Interval Keep alive ping interval
Device Monitor Options Parameters You Can Configure
Device Health Controls • Enable Health Data Collection
• Enable Device Health Application
• Enable Blue Light (LED)
• Set Rule File Location
• Collect Abuse History
• Set Data Refresh Periods
Device Health Screen Captures Device health screen capture settings
(directory and screen capture allowed)
Disabled Executables None (read-only)
Device Wipe Device wipe settings (enable wipe and
interval)
License Manager Options Parameters You Can Configure
About About settings (read-only)
License Vault None (displays applications that are
licensed)

Chapter 6 — Configure the Computer
80 70 Series Mobile Computer User Manual
Location Services Menu
For more information on all parameters in Intermec Settings, see the
Intermec Settings Command Reference Manual.
Navigate in Intermec Settings
You can easily navigate through the screens in Intermec Settings to
find the parameter you need to configure.
To move down a level in Intermec Settings:
• Tap the menu item in the list.
To move back a level in Intermec Settings:
• Tap Back or Cancel on the Tile bar.
To save a parameter setting:
• Tap OK.
To exit Intermec Settings:
• Tap Menu > Exit or OK.
Configure Profile Settings with Intermec Settings
A profile is a set of predefined values that you can easily apply to the
computer to ensure optimal performance in a specific scenario. The
end user does not need to figure out the “right” settings because we
have already done that work for you. Profile Settings is available from
the Start menu so you can make it available to the end user for easy
configuration.
Use Intermec Settings to determine the profiles you want the end user
to see in the Profile Settings application.
1 Go to Device Settings > Profile Settings Application.
2 Select Camera, Power, or Scanning.
Location Services Options Parameters You Can Configure
Server Server settings (port and enable server)
Virtual GPS Virtual GPS settings

Chapter 6 — Configure the Computer
70 Series Mobile Computer User Manual 81
3 From the Camera, Power, or Scanning submenu, check or clear the
Display check box for the settings you want to have available to the
end user.
4 Click OK to save your selection.
Restore Default Settings to a Menu
You can restore the items in a single menu to their default settings.
1 Navigate to the menu that you want to restore to defaults.
2 Tap Menu > Restore Menu Defaults.
3 When prompted, tap Yes to restore the menu default settings.
4 If prompted to refresh the computer, tap Yes.
Restore Default Settings for All Parameters
You can restore all Intermec Settings parameters to their default
settings.
1 Tap Menu > Restore All Defaults. The applications asks if you are
sure you want to restore all defaults.
2 Tap Yes.
After several minutes, all of the default settings are restored.
Hide Menu Items in Intermec Settings
You can hide items in the Intermec Settings menus if you do not want
to have them available for other users to access. Hidden items are not
saved when you back up your settings in the SmartSystems console.
On the mobile computer, you can:
• hide menu items by tapping and holding the item, and then
choosing Hide Menu Item from the popup list. When asked if you
want to hide the menu, tap Yes.
• restore all hidden items in all menus, by tapping Menu > Unhide
All Items.

Chapter 6 — Configure the Computer
82 70 Series Mobile Computer User Manual
Use Intermec Settings Remotely with
SmartSystems
Your mobile computer is SmartSystems-enabled, which lets you open
Intermec Settings from the SmartSystems console to remotely
configure all of your mobile computers. For more information about
SmartSystems, see “Manage the Computer Using SmartSystems”
on page 106.
1 In the SmartSystems console, select a mobile computer and
right-click.
2 From the menu, select Intermec Settings.
3 Configure the settings you need to change. As you select
parameters from the tree structure, help for each parameter
appears in the upper right pane of Intermec Settings.
4 When you are done making changes, select File > Save Settings.
For help using Intermec Settings, click Help > Contents. For
information about all of the parameters in Intermec Settings, see
the Intermec Settings Command Reference Manual.
About Network Communications
You can easily add the mobile computer to your wireless or wired data
collection network. You can connect your computer using:
• 802.11a/b/g/n radio communications.
• Ethernet communications.
• Bluetooth communications.
• USB and serial communications.
Note: When you restore default settings in Intermec Settings, only the
settings for visible items are restored to defaults. The settings for
hidden menu items are not affected.

Chapter 6 — Configure the Computer
70 Series Mobile Computer User Manual 83
Configure 802.11a/b/g/n (Wi-Fi) Radio Communications
The mobile computer contains an 802.11 radio to transfer data using
wireless communications and to support the TCP/IP network
protocols. This section of the manual assumes that your wireless
network is set up, including your access points.
By default, the 802.11 radio is disabled. Use the following procedure to
enable the Wi-Fi radio using Intermec Settings. If you would like to use
ScanNGo bar codes to easily enable the radio and set the default
security settings, see Appendix C “ScanNGo Wi-Fi Configuration
Bar Codes” on page 177.
1 Tap Start > Settings > System > Intermec Settings.
2 From the Intermec Settings main menu, tap Communications >
802.11 Radio > Radio Enabled.
3 Select the Radio Enabled check box and tap OK. By default, the
computer uses Funk security and enables DHCP.
4 Use Intermec Settings to configure any other parameters you need
to use for communication with your network.
5 Configure 802.11 security. For help, see “About Wireless
Security” on page 92.
Configure Ethernet Communications
To configure Ethernet communications, connect your mobile
computer to your Ethernet network using the Ethernet Snap-On
Adapter (Model 1000AA01) or an Ethernet dock.
1 Connect the Ethernet snap-on adapter to your mobile computer.
Make sure all components with antennas are at least 30 cm (1 ft)
apart when power is applied. Failure to comply could result in
equipment damage.
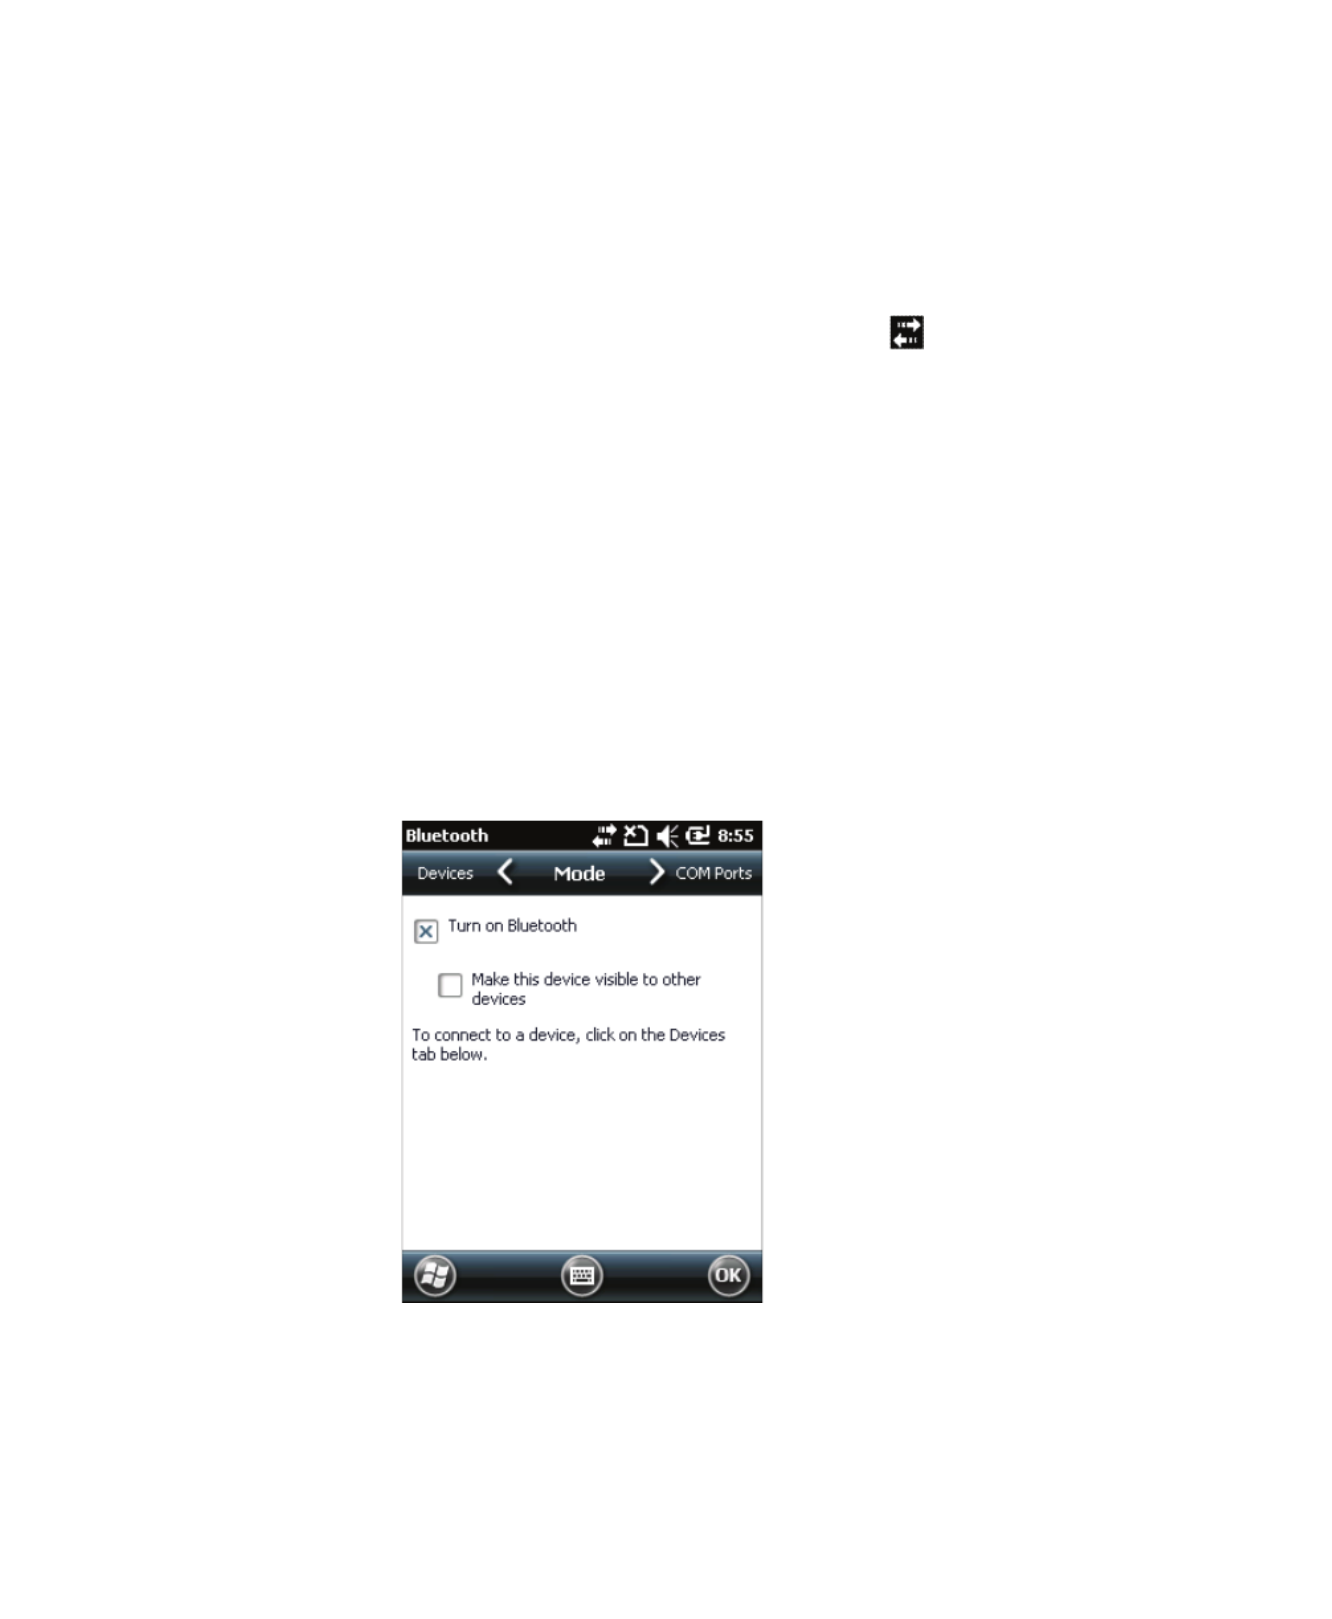
Chapter 6 — Configure the Computer
84 70 Series Mobile Computer User Manual
2 Connect the Ethernet cable from your network to the snap-on
adapter or dock.
Ethernet communications are automatically enabled on your
mobile computer.
3 Make sure that your computer is communicating with the
network. The network connection icon ( ) should appear on the
title bar.
Configure Bluetooth Communications
Your mobile computer is Bluetooth™-enabled, which lets you connect
to other Bluetooth devices, such as scanners, printers, or audio devices.
You need to turn on the Bluetooth radio before you can discover and
connect to other Bluetooth devices. By default, the radio is turned off.
You can configure Bluetooth communications using Intermec
Settings or from the Start menu.
1 Tap Start > Settings > Bluetooth > Mode.
2 Select the Turn on Bluetooth check box.
3 (Optional) If you want your computer to be visible to other
Bluetooth devices, select Make this device visible to other
devices.

Chapter 6 — Configure the Computer
70 Series Mobile Computer User Manual 85
4 Tap OK.
The Bluetooth radio maintains its state through a reboot or cold
boot and maintains virtual COM ports. But, if you clean boot your
computer you need to recreate pairings to devices.
Connect to a Bluetooth Scanner
You can connect the computer to an Intermec Bluetooth scanner, such
as the SF51 or SR61.
1 Tap Start > Settings > System > Wireless Scanning.

Chapter 6 — Configure the Computer
86 70 Series Mobile Computer User Manual
2 Tap Add Device.
3 Select Quick Connect, Search, or Manual. Follow the onscreen
instruction to add a wireless scanner.

Chapter 6 — Configure the Computer
70 Series Mobile Computer User Manual 87
Connect to a Bluetooth Printer
To configure your computer for Bluetooth wireless printing, you need
to:
• create an application that opens the wireless printing COM port on
your computer. For help, see the Bluetooth Resource Kit, which is
part of the Intermec Developer Library (IDL), available from the
Intermec website at www.intermec.com/idl.
• select the current wireless printer on your computer. For help, see
the next procedure.
1 Tap Start > Settings > System > Wireless Printing.
2 Tap Search to find a printer, or tap Manual to enter a device
address. Follow the onscreen instructions to select the current
wireless printer.
3 (Optional) Tap Print Test Page. The printer prints out a test page.
Note: You can also print wirelessly using Microsoft APIs with
Bluetooth extensions for Winsock and Bluetooth virtual COM ports.
For help, see the Bluetooth Resource Kit documentation.

Chapter 6 — Configure the Computer
88 70 Series Mobile Computer User Manual
Connect to a Bluetooth Audio Device
Use the Bluetooth Audio enabler to discover, activate, and connect to
Bluetooth audio devices such as a headset. This enables system sounds
to be monitored through the headset.
1 Tap Start > Settings > System > Bluetooth Audio.
2 Tap Search to find your Bluetooth headset or hands-free device.
3 Select your device from the list and configure any settings.
4 Click OK when you are done.
About Serial and USB Communications
You can use these 70 Series accessories to transmit data to and receive
data from another device through serial or USB communications:
• RS-232 Snap-On Adapter (Model 1000AA03)
• USB Snap-On Adapter (Model 1000AA07)
For more information about these accessories and how to order them,
see “70 Series Accessories” on page 8.

Chapter 6 — Configure the Computer
70 Series Mobile Computer User Manual 89
Connect to a Tethered Scanner
Use this procedure to connect your mobile computer to an SR30,
SR61T, or ASCII tethered scanner and enable RS-232
communications.
1 Tap Start > Settings > System > Intermec Settings >
Communications > Serial Port Switch.
2 Select Standard docking and IrDA and tap OK.
If the serial port switch is set to one of the other options, you need
to select Standard docking and IrDA and then save and reboot
the computer before you proceed.
3 Tap Back to return to the Main Menu.
4 Tap Data Collection > Dock Tethered Scanner > Enable
scanner auto-detect.
5 Select the check box and tap Enable scanner auto-detect OK.
6 Perform one of these items based on the type of scanner you are
connecting:
• For an SR30 or SR61T scanner, tap Scanner Settings, select SR
Intermec Scanner, and then tap OK.
• For an ASCII scanner, tap Scanner Settings, select ASCII, and
then tap OK. Set up the appropriate COM port settings by
selecting Scanner Port Settings.
7 Connect the RS-232 snap-on adapter with the attached scanner to
the bottom of the mobile computer.
Create an ISP Connection
You can create an Internet Service Provider (ISP) connection to send
and receive email messages using Messaging (Outlook Email) and view
web pages using Internet Explorer Mobile. You need to get your ISP
dial-up access telephone number, a user name, and a password from
your ISP.
1 Tap Start > Settings > Connections > Connections.
2 Under My ISP, tap Add a new modem connection.

Chapter 6 — Configure the Computer
90 70 Series Mobile Computer User Manual
3 Enter a name for the connection, such as “ISP Connection.”
4 If you are using an external modem connected to your mobile
computer with a cable, select Hayes Compatible on COM1 from
the Select a modem list.
5 Tap Next.
6 Enter the access phone number and then tap Next.
7 Enter the User name, Password, and Domain (if provided by an
ISP or your network administrator).
8 Tap Finish.
9 On the Connections screen, tap Advanced on the horizontal scroll.
10 Tap Dialing Rules.
11 When the Enable Dialing Rules box appears, tap OK.
12 Tap Edit.
13 In the Name field, enter your phone type (Home, Mobile, or
Work).
14 Tap OK until you exit the Connections screen.

Chapter 6 — Configure the Computer
92 70 Series Mobile Computer User Manual
About Wireless Security
The computer provides five types of security for your wireless network:
• Wi-Fi Protected Access 2 (WPA2™)
• Wi-Fi Protected Access (WPA)
• 802.1x
• LEAP
• WEP
This section explains how to configure wireless security on your
mobile computer. Intermec recommends that you implement WPA2
security using PSK (Personal) or 802.1X (Enterprise) key management
as appropriate.
You must use either Funk or Microsoft security to implement your
security solution. For details, see the next section, “Choose Between
Microsoft and Funk Security.” Intermec recommends that you
always implement WPA2 security using PSK (Personal) or 802.1X
(Enterprise) key management.
If you are using WPA-802.1x, WPA2-802.1x, or 802.1x security, this
section also assumes that your authentication server and
authenticators are properly configured.
Choose Between Microsoft and Funk Security
The computer supports both Funk and Microsoft security, which
dynamically select wireless networks based on your preferences. The
option you choose depends on your network security needs.
• If you are using the computer in a static environment that requires
a high level of security, you should use Funk security, which offers
CCX v4.0 compliance, support for LEAP and TTLS, and
configuration for up to four profiles.
To use Funk security, you need to select a profile. For help, see the
next section, “Select a Funk Security Profile.”
Note: Your security choice does not depend on your authentication
server. For example, you can choose Funk security if you use Microsoft
Active Directory® to issue certificates.

Chapter 6 — Configure the Computer
70 Series Mobile Computer User Manual 93
• If you are primarily using the computer to connect to Wi-Fi
hotspots, you may want to use Microsoft security.
To use Microsoft security, you need to select it as your security
choice. For help, see “Select Microsoft as Your Security Choice”
on page 97.
Select a Funk Security Profile
You can define up to four profiles for Funk security. Different profiles
let your computer communicate in different networks without having
to change all of your security settings. For example, you may want to
set up one profile for the manufacturing floor and one for the
warehouse. By default, the active profile is Profile 1.
Select a Funk Security Profile
Use the following procedure to select a Funk security profile.
1 Start Intermec Settings.
2 Select Communications > 802.11 Radio > Funk Security.
3 Select a profile. A list of configurable settings appears.
4 (Optional) In the Profile Label text box, enter a meaningful name
for your profile.
5 Configure your security settings. For help, see the next sections.
6 Repeat Steps 3 through 5 for each profile you want to define.
7 Set an active profile by choosing it in the Active Profile list.
8 Save your settings.
Configure WPA or WPA2 Enterprise (802.1x) Security with Funk
Use these procedures to set WPA-802.1x or WPA2-802.1x security on
your computer with Funk security.
1 Make sure the communications and radio parameters on your 70
Series are configured.
2 Make sure Funk is selected as your security choice.
3 Start Intermec Settings.
4 Select Communications > 802.11 Radio > Funk Security.

Chapter 6 — Configure the Computer
94 70 Series Mobile Computer User Manual
5 Select the profile you want to configure.
6 For Association, select WPA or WPA2. Encryption automatically
defaults to TKIP or AES
, respectively.
7 For 8021x, select TTLS, , PEAP EAP-FAST, or TLS.
8 If you selected TTLS, EAP-FAST, or PEAP:
a For Prompt for Credentials, select Enter credentials now.
b Enter a User Name and User Password.
c For Validate Server Certificate, select Yes.
9 If you selected TLS:
a Load a user and root certificate on your computer. For help, see
“Load a Certificate” on page 102.
b Enter a User Name and Subject Name.
c For Validate Server Certificate, select Yes.
Configure WPA or WPA2 Personal (PSK) Security with Funk
Use the following procedure to configure WPA-PSK or WPA2-PSK
with Funk security.
1 Make sure the communications and radio parameters on your
computer are configured.
2 Make sure Funk is selected as your security choice.
3 Start Intermec Settings.
4 Select Communications > 802.11 Radio > Funk Security.
5 Select the profile you want to configure.
6 For Association, select WPA or WPA2.
7 For 8021x, select None.
Note: The correct date must be set on your computer when you
enable Validate Server Certificate.

Chapter 6 — Configure the Computer
70 Series Mobile Computer User Manual 95
8 For Pre-Shared Key, enter the pre-shared key or passphrase.
The pre-shared key must be a value of 32 hex pairs preceded by 0x
for a total of 66 characters. The value must match the key value on
the access point. The passphrase must be from 8 to 63 characters.
After you enter a passphrase, the 70 Series internally converts it to
a pre-shared key. This value must match the passphrase on the
authenticator.
9 Save your settings.
Configure 802.1x Security with Funk Security
Use the following procedure to configure 802.1x-WEP security with
Funk security. Intermec recommends that you use WPA2-802.1x
instead of 802.1x-WEP if possible.
1 Make sure the communications and radio parameters on your
computer are configured.
2 Make sure Funk is selected as your security choice.
3 Start Intermec Settings.
4 Select Communications > 802.11 Radio > Funk Security.
5 Select the profile you want to configure.
6 For Association, select Open.
7 For Encryption, select WEP.
8 For 8021x, select TTLS, . PEAP, or TLS
9 If you selected TTLS or PEAP:
a Enter a User Name.
b For Prompt for Credentials, select Enter credentials now.
c Enter a User Password.
d For Validate Server Certificate, select Yes.

Chapter 6 — Configure the Computer
70 Series Mobile Computer User Manual 99
7 If you selected TLS:
a Load a user and root certificate on your computer. For help, see
“Load a Certificate” on page 102.
b Select Properties. The Certificates dialog box appears.
c Select the certificate you want to use from the list. The User
Logon dialog box appears.
d Enter a User Name and Domain and tap OK.
e Tap OK to exit the Certificates dialog box.
f Press OK to save the Microsoft Security settings.
8 If you selected PEAP:
a Load a root certificate of the authentication server on your
computer. For help, see “Load a Certificate” on page 102.
b Press OK to save the security settings and the User Logon dialog
box appears.
c Enter a User Name, Password, and Domain. Select Save
Password if you want to save the password for future
authentication sessions.
d Press OK to save the Microsoft Security settings.
Enable WPA or WPA2 Personal (PSK) Security with Microsoft
Use the following procedure to enable WPA-PSK with Microsoft
Security.
1 Make sure the communications and radio parameters on your
computer are configured.
2 Start Intermec Settings.
3 Select Communications > 802.11 Radio > Microsoft Security.
4 For Infrastructure Mode, select Infrastructure.
5 For Network Authentication, select WPA-PSK. Data Encryption
automatically defaults to TKIP for WPA and AES for WPA2.

Chapter 6 — Configure the Computer
100 70 Series Mobile Computer User Manual
6 For Pre-Shared Key, enter the pre-shared key or the passphrase.
The pre-shared key must be a value of 32 hex pairs preceded by 0x
for a total of 66 characters. The value must match the key value on
the authenticator. The passphrase must be from 8 to 63 characters.
After you enter a passphrase, the computer internally converts it to
a pre-shared key.
7 Save your settings.
Configure 802.1x Security with Microsoft
Use the following procedure to configure 802.1x security with
Microsoft security. Intermec recommends that you use WPA2-802.1x
instead of 802.1x-WEP if possible.
1 Make sure the communications and radio parameters on your
computer are configured.
2 Start Intermec Settings.
3 Select . Communications > 802.11 Radio > Microsoft Security
4 For Infrastructure Mode, select Infrastructure.
5 For Network Authentication, select Open.
6 For Data Encryption, select WEP.
7 For 802.1X Authentication, select TLS or PEAP.
8 If you selected TLS:
a Load a user and root certificate on your computer. For help, see
“Load a Certificate” on page 102.
b Select Properties. The Certificates dialog box appears.
c Select the certificate you want to use from the list. The User
Logon dialog box appears.
d Enter a User Name and Domain and tap OK.
e Tap OK to exit the Certificates dialog box.
f Press OK to save the Microsoft Security settings.

Chapter 8 — Troubleshoot and Maintain the Computer
70 Series Mobile Computer User Manual 115
Troubleshoot Your Mobile Computer
Use the troubleshooting tables in this section to fix problems with the
Wi-Fi connection, 802.1x security, the imager, or general problems
with operating the mobile computer.
If you send the computer in for service, it is your responsibility to save
the computer data and configuration. Intermec is responsible only for
ensuring that the hardware matches the original configuration when
repairing or replacing the computer.
Troubleshoot the Wi-Fi Connection
Use this troubleshooting table to help solve problems with your
802.11 radio connection.
Problems With the Wi-Fi Connection
Problem Solution
When you turn on the computer after it
was suspended for a while (10 to 15
minutes or longer), it can no longer send
or receive messages over the network.
Host may have deactivated or lost current terminal
emulation session. In a TCP/IP direct connect network,
turn off the “Keep Alive” message from host to
maintain the TCP session while the computer is
suspended.
The computer is connected to the network
and you move to a new site to collect data.
Your computer now shows you are not
connected to the network.
Move closer to an access point or to a different location
to reestablish communications until you reconnect
with the network.
The computer appears to be connected to
the network, but you cannot establish a
terminal emulation session with the host
computer.
There may be a problem with the host computer, or
with the connection between the access point and the
host computer. Check with the network administrator
to make sure the host is running and allowing users to
log in to the system.
The computer appears to be connected to
the network, but the host computer is not
receiving any information from the 70
Series computer.
There may be a problem with the connection between
the access point and the host computer. Check with
the network administrator or use your access point
user’s manual.

Appendix B — Keypads and Keystrokes
152 70 Series Mobile Computer User Manual
Standard Characters
Use the following tables to learn how to enter standard and other
available characters and functions with the keypad. If there is no
sequence of keystrokes for a particular character or function, it is only
available through the soft input panel (SIP), which you can access by
tapping the keyboard icon on the touch screen.
CN70 Keypads and Keystrokes
CN70 Alphanumeric Characters
Note: You can only enter “*” and “#” characters in the phone or
contacts applications.
Character Numeric Keypad QWERTY Keypad
a c 2 A
b c 2 2 B
c c 2 2 2 C
d c 3 D
e c 3 3 E
f c 3 3 3 F
g c 4 G
h c 4 4 H
i c 4 4 4 I
j c 5 J
k c 5 5 K
l c 5 5 5 L
m c 6 M

Appendix B — Keypads and Keystrokes
70 Series Mobile Computer User Manual 153
n c 6 6 N
o c 6 6 6 O
p c 7 P
q c 7 7 Q
r c 7 7 7 R
s c 7 7 7 7 S
t c 8 T
u c 8 8 U
v c 8 8 8 V
w c 9 W
x c 9 9 X
y c 9 9 9 Y
z c 9 9 9 9 Z
A c 1 2 y A
B c 1 2 2 y B
C c 1 2 2 2 y C
D c 1 3 y D
E c 1 3 3 y E
F c 1 3 3 3 y F
G c 1 4 y G
H c 1 4 4 y H
Character Numeric Keypad QWERTY Keypad

Appendix B — Keypads and Keystrokes
154 70 Series Mobile Computer User Manual
I c 1 4 4 4 y I
J c 1 5 y J
K c 1 5 5 y K
L c 1 5 5 5 y L
M c 1 6 y M
N c 1 6 6 y N
O c 1 6 6 6 y O
P c 1 7 y P
Q c 1 7 7 y Q
R c 1 7 7 7 y R
S c 1 7 7 7 7 y S
T c 1 8 y T
U c 1 8 8 y U
V c 1 8 8 8 y V
W c 1 9 y W
X c 1 9 9 y X
Y c 1 9 9 9 y Y
Z c 1 9 9 9 9 y Z
00 b ,
11 b Y
22 b U
Character Numeric Keypad QWERTY Keypad
Product specificaties
| Merk: | Intermec |
| Categorie: | Barcode lezer |
| Model: | CK71a |
| Kleur van het product: | Zwart |
| Gewicht: | 584 g |
| Breedte: | 80 mm |
| Diepte: | 50 mm |
| Hoogte: | 237 mm |
| Capaciteit van de accu/batterij: | 5200 mAh |
| Bluetooth: | Ja |
| Beeldscherm: | LCD |
| Beeldschermdiagonaal: | 3.5 " |
| Resolutie: | 480 x 640 Pixels |
| Touchscreen: | Ja |
| Frequentie van processor: | - GHz |
| Processorfamilie: | Instruments OMAP |
| Maximale capaciteit van de geheugenkaart: | 32 GB |
| Wi-Fi-standaarden: | 802.11a,802.11b,802.11g,802.11n |
| Bluetooth-versie: | 2.1+EDR |
| GPS: | Nee |
| Resolutie camera achterzijde (numeriek): | 5 MP |
| Automatisch scherpstellen: | Ja |
| Inclusief besturingssysteem: | Windows Embedded, Handheld 6.5.3 |
| Compatibele geheugenkaarten: | MicroSD (TransFlash) |
| Beeldscherm, aantal kleuren: | 65536 kleuren |
| Ingebouwde flitser: | Ja |
| Interface: | USB 2.0 |
| Intern geheugen: | 0.512 GB |
| Intern geheugentype: | RAM |
| Ingebouwde camera: | Ja |
| Ondersteunde beveiligingsalgoritmen: | 128-bit WEP,64-bit WEP,802.1x RADIUS,CCX v4,TKIP,WPA,WPA2 |
| Temperatuur bij opslag: | -30 - 70 °C |
| Relatieve luchtvochtigheid: | 0 - 95 procent |
| Processorfabrikant: | Texas Instruments |
| Datanetwerk: | Niet ondersteund |
| Flash memory: | 1 GB |
| Bedrijfstemperatuur, bereik: | -4 - 140 °F |
| Infrarood datapoort: | Ja |
| Toetsenbordindeling: | Numerieke |
| Spraakherkenning: | Ja |
| Tweede camera: | Nee |
| Telefoonfunctie: | Nee |
| Barcodelezer: | Ja |
| Wifi: | Ja |
| Bedrijfstemperatuur (T-T): | -20 - 60 °C |
| Batterijtechnologie: | Lithium-Ion (Li-Ion) |
Heb je hulp nodig?
Als je hulp nodig hebt met Intermec CK71a stel dan hieronder een vraag en andere gebruikers zullen je antwoorden
Handleiding Barcode lezer Intermec

18 Mei 2023
16 Mei 2023
4 Mei 2023
29 April 2023
23 April 2023
19 April 2023
19 April 2023
15 April 2023
14 April 2023
10 April 2023
Handleiding Barcode lezer
- Barcode lezer Casio
- Barcode lezer Garmin
- Barcode lezer Honeywell
- Barcode lezer Motorola
- Barcode lezer Bluebird
- Barcode lezer Datalogic
- Barcode lezer DeLock
- Barcode lezer Digitus
- Barcode lezer ID-Tech
- Barcode lezer Konig
- Barcode lezer Manhattan
- Barcode lezer Nedis
- Barcode lezer Palm
- Barcode lezer Renkforce
- Barcode lezer Zebra
- Barcode lezer Olympia
- Barcode lezer Trimble
- Barcode lezer Steren
- Barcode lezer Argox
- Barcode lezer CipherLab
- Barcode lezer Metapace
- Barcode lezer Hamlet
- Barcode lezer Adesso
- Barcode lezer Deltaco
- Barcode lezer Nilox
- Barcode lezer Approx
- Barcode lezer Brady
- Barcode lezer GoDEX
- Barcode lezer EC Line
- Barcode lezer ELO
- Barcode lezer IFM
- Barcode lezer IC Intracom
- Barcode lezer POSline
- Barcode lezer Newland
- Barcode lezer Posiflex
- Barcode lezer Baracoda
- Barcode lezer Datamax-O'neil
- Barcode lezer Cypress
- Barcode lezer DENSO
- Barcode lezer Socket Mobile
- Barcode lezer QUIO
- Barcode lezer Tecno
- Barcode lezer ZBA
- Barcode lezer Code Corporation
- Barcode lezer Qoltec
- Barcode lezer Wasp
- Barcode lezer Vultech
- Barcode lezer Mach Power
- Barcode lezer Psion
- Barcode lezer Koamtac
- Barcode lezer Unitech
- Barcode lezer Opticon
- Barcode lezer Atlantis Land
- Barcode lezer Code
- Barcode lezer Qian
- Barcode lezer Cognex
Nieuwste handleidingen voor Barcode lezer
26 Februari 2025
26 Februari 2025
26 Februari 2025

25 Februari 2025
20 Februari 2025
20 Februari 2025
20 Februari 2025
14 Februari 2025
5 Februari 2025
27 Januari 2025