Iiyama ProLite XUB2294HSU-B1 Handleiding
Lees hieronder de 📖 handleiding in het Nederlandse voor Iiyama ProLite XUB2294HSU-B1 (47 pagina's) in de categorie Monitor. Deze handleiding was nuttig voor 28 personen en werd door 2 gebruikers gemiddeld met 4.5 sterren beoordeeld
Pagina 1/47

ENGLISH
USER MANUAL
Thank you very much for choosing the iiyama
LCD monitor.
We recommend that you take a few minutes
to read this comprehensive manual carefully
before installing and switching on the monitor.
Please keep this manual in a safe
place for your future reference.

ENGLISH
A third-party certification according to ISO 14024
Say hello
to a more sustainable product
IT products are associated with a wide range of sustainability risks
throughout their life cycle. Human rights violations are common in the
factories. Harmful substances are used both in products and their
manufacture. Products can often have a short lifespan because of poor
ergonomics, low quality and when they are not able to be repaired or
upgraded.
This product is a better choice. It meets all the criteria in TCO Certified,
the world’s most comprehensive sustainability certification for IT
products. Thank you for making a responsible product choice, that help
drive progress towards a more sustainable future!
Criteria in TCO Certified have a life-cycle perspective and balance
environmental and social responsibility. Conformity is verified by
independent and approved verifiers that specialize in IT products, social
responsibility or other sustainability issues. Verification is done both
before and after the certificate is issued, covering the entire validity
period. The process also includes ensuring that corrective actions are
implemented in all cases of factory non-conformities. And last but not
least, to make sure that the certification and independent verification is
accurate, both TCO Certified and the verifiers are reviewed regularly.
Want to know more?
Read information about TCO Certified, full criteria documents, news and
updates at tcocertified.com. On the website you’ll also find our Product
Finder, which presents a complete, searchable listing of certified
products.
Toward sustainable IT products

ENGLISH
TABLE OF CONTENTS
FOR YOUR SAFETY ........................................................................................1
SAFETY PRECAUTIONS............................................................................1
SPECIAL NOTES ON LCD MONITORS 3 .....................................................
CUSTOMER SERVICE 3 ...............................................................................
CLEANING 3 ..................................................................................................
BEFORE YOU OPERATE THE MONITOR ......................................................4
FEATURES..................................................................................................4
CHECKING THE CONTENTS OF THE PACKAGE 4 ....................................
INSTALLATION 5 ...........................................................................................
FITTING AND REMOVAL OF BASE :
ProLite XUB2294HSU / ProLite XUB2294HS / ProLite XUB2292HS 7 .........
FITTING AND REMOVAL OF BASE :
ProLite XU2294HSU / ProLite XU2294HS / ProLite XU2292HS 8 .................
CONTROLS AND CONNECTORS :
ProLite XUB2294HSU / ProLite XUB2294HS / ProLite XUB2292HS 9 .........
CONTROLS AND CONNECTORS :
ProLite XU2294HSU / ProLite XU2294HS / ProLite XU2292HS 10 ...............
CONNECTING YOUR MONITOR : ProLite XUB2294HSU ....................... 11
CONNECTING YOUR MONITOR :
ProLite XUB2294HS / ProLite XUB2292HS 12 ..............................................
CONNECTING YOUR MONITOR : ProLite XU2294HSU 13 .........................
CONNECTING YOUR MONITOR :
ProLite XU2294HS / ProLite XU2292HS 14 ...................................................
DISCONNECTING YOUR MONITOR .......................................................15
COMPUTER SETTING 16 .............................................................................
ADJUSTING THE HEIGHT AND THE VIEWING ANGLE :
ProLite XUB2294HSU / ProLite XUB2294HS / ProLite XUB2292HS 16 .......
ADJUSTING THE VIEWING ANGLE :
ProLite XU2294HSU / ProLite XU2294HS / ProLite XU2292HS 17 ...............
OPERATING THE MONITOR .........................................................................18
ADJUSTMENT MENU CONTENTS 19 ..........................................................
SCREEN ADJUSTMENTS ........................................................................29
POWER MANAGEMENT FEATURE 32 .........................................................
TROUBLE SHOOTING 33 ..................................................................................
RECYCLING INFORMATION 34 .........................................................................
APPENDIX 35 ....................................................................................................
SPECIFICATIONS : ProLite XUB2294HSU 35 ..............................................
SPECIFICATIONS : ProLite XUB2294HS 36 .................................................
SPECIFICATIONS : ProLite XUB2292HS 37 .................................................
SPECIFICATIONS : ProLite XU2294HSU 38 .................................................
SPECIFICATIONS : ProLite XU2294HS 39 ...................................................
SPECIFICATIONS : ProLite XU2292HS 40 ...................................................
DIMENSIONS :
ProLite XUB2294HSU / ProLite XUB2294HS / ProLite XUB2292HS 41 .......
DIMENSIONS:
ProLite XU2294HSU / ProLite XU2294HS / ProLite XU2292HS 41 ...............
COMPLIANT TIMING ................................................................................42

ENGLISH
FOR YOUR SAFETY 1
FOR YOUR SAFETY
WARNING
STOP OPERATING THE MONITOR WHEN YOU SENSE TROUBLE
If you notice any abnormal phenomena such as smoke, strange sounds or fumes, unplug the
monitor and contact your dealer or iiyama service center immediately. Further use may be
dangerousandcancausereorelectricshock.
NEVER REMOVE THE CABINET
High voltage circuits are inside the monitor. Removing the cabinet may expose you to the danger of
reorelectricshock.
DO NOT PUT ANY OBJECT INTO THE MONITOR
Do not put any solid objects or liquids such as water into the monitor. In case of an accident, unplug
your monitor immediately and contact your dealer or iiyama service center. Using the monitor with
anyobjectinsidemaycausere,electricshockordamage.
INSTALL THE MONITOR ON A FLAT, STABLE SURFACE
The monitor may cause an injury if it falls or is dropped.
DO NOT USE THE MONITOR NEAR WATER
Donotusewherewatermaybesplashedorspiltontothemonitorasitmaycausereorelectric
shock.
OPERATE UNDER THE SPECIFIED POWER SUPPLY
Besuretooperatethemonitoronlywiththespeciedpowersupply.Useofanincorrectvoltagewill
causemalfunctionandmaycausereorelectricshock.
PROTECT THE CABLES
Do not pull or bend the power cable and signal cable. Do not place the monitor or any other heavy
objectsonthecables.Ifdamaged,thecablesmaycausereorelectricshock.
ADVERSE WEATHER CONDITIONS
It is advisable not to operate the monitor during a heavy thunder storm as the continual breaks in
power may cause malfunction. It is also advised not to touch the plug in these circumstances as it
may cause electric shock.
SAFETY PRECAUTIONS

ENGLISH
2 FOR YOUR SAFETY
CAUTION
INSTALLATION LOCATION
Do not install the monitor where sudden temperature changes may occur, or in humid, dusty or
smokyareasasitmaycausere,electricshockordamage.Youshouldalsoavoidareaswherethe
sun shines directly on the monitor.
DO NOT PLACE THE MONITOR IN A HAZARDOUS POSITION
The monitor may topple and cause injury if not suitably located. Please also ensure that you do not
place any heavy objects on the monitor, and that all cables are routed such that children may not
pull the cables and possibly cause injury.
MAINTAIN GOOD VENTILATION
Ventilation slots are provided to keep the monitor from overheating. Covering the slots may cause
re.Toallowadequateaircirculation,placethemonitoratleast10cm(or4inches)fromanywalls.
When removing the tilt stand, the ventilation slots on the back side of the monitor can be blocked.
This may overheat the monitor and may cause fire or damage. Make sure to allow enough
ventilation when removing the tilt stand. Operating the monitor on its back, side, upside down or on
a carpet or any other soft material may also cause damage.
DISCONNECT THE CABLES WHEN YOU MOVE THE MONITOR
Whenyoumovethemonitor,turnothepowerswitch,unplugthemonitorandbesurethesignal
cableisdisconnected.Ifyoudonotdisconnectthem,itmaycausereorelectricshock.
UNPLUG THE MONITOR
If the monitor is not in use for a long period of time it is recommended that it is left unplugged to avoid accidents.
HOLD THE PLUG WHEN DISCONNECTING
To disconnect the power cable or signal cable, always pull it by the plug. Never pull on the cable
itselfasthismaycausereorelectricshock.
DO NOT TOUCH THE PLUG WITH WET HANDS
Pulling or inserting the plug with wet hands may cause electric shock.
WHEN YOU INSTALL THE MONITOR ON YOUR COMPUTER
Be sure the computer is strong enough to hold the weight of the monitor, otherwise, you may
damage your computer.
CAREFUL! PROTECT YOUR HANDS AND FINGERS
Becarefulnottohurtyourngersorhandswhenyouchangetheheightortheangle.
Injurycanoccurifcareisnottakentoavoidngercontactwiththedisplaysbasewhenadjusting
theheight.(Justforheightadjustablemodel.)
REMARK FOR 24/7 USAGE
Thisproductisnotspecicallydesignedfor24/7usageinallenvironments.
OTHERS
ERGONOMIC RECOMMENDATIONS
To eliminate eye fatigue, do not operate the monitor against a bright background or in a dark room.
Foroptimalviewingcomfort,themonitorshouldbejustbeloweyeleveland40-60cm(16-24inches)
away from your eyes. When using the monitor over a prolonged time, a ten minute break every hour
is recommended as looking at the screen continuously can cause eye strain.

ENGLISH
FOR YOUR SAFETY 3
The following symptoms are normal with LCD monitors and do not indicate a problem.
NOTE
When you first turn on the LCD monitor, the picture may not fit in the display area
because of the type of computer that is used. In this case, adjust the picture position to
the correct position.
You may find slightly uneven brightness on the screen depending on the desktop
pattern you use.
Due to the nature of the LCD screen, an afterimage of the previous screen may remain
after switching the image, when the same image is displayed for hours. In this case, the
screencanberecoveredslowlybychangingtheimageorturningothePowerSwitch
for some hours.
SPECIAL NOTES ON LCD MONITORS
NOTE
If you have to return your unit for service and the original packaging has been
discarded, please contact your dealer or iiyama service center for advice or
replacement packaging.
WARNING
If you drop any materials or liquids such as water into the monitor when cleaning,
unplug the power cable immediately and contact your dealer or iiyama service center.
CAUTION
For safety reasons, turn o the power switch and unplug the monitor before you
clean it.
NOTE
To protect the LCD panel, do not scratch or rub the screen with a hard object.
Never use any of the following strong solvents. These will damage the cabinet and
the LCD screen.
Touching the cabinet with any product made from rubber or plastic for a long time
may cause degeneration or loss of paint on the cabinet.
Thinner
Benzine
Abrasive cleaner
Spray-type cleaner
Wax
Acid or Alkaline solvent
CABINET Stains can be removed with a cloth lightly moistened with a mild detergent solvent.
Then wipe the cabinet with a soft dry cloth.
LCD
SCREEN
Periodic cleaning with a soft dry cloth is recommended.
Don't use tissue paper etc. because these will damage the LCD screen.
CUSTOMER SERVICE
CLEANING

ENGLISH
4 BEFORE YOU OPERATE THE MONITOR
The following accessories are included in your package. Check to see if they are enclosed with
the monitor. If anything is missing or damaged, please contact your local iiyama dealer or regional
iiyamaoce.
*1 The rating of the Power Cable enclosed in 120V area is 10A/125V. If you are using
a power supply higher than this rating, then a power cable with a rating of 10A/
250V must be used. However, all guarantees and warranties are void for any
problems or damage caused by a power cable not supplied by iiyama.
An approved power cable greater or equal to H05VVF, 3G, 0.75mm
2 must be used.
*2 Accessory for ProLite XUB2294HSU.
*3 Accessory for ProLite XU2294HS / ProLite XU2292HS.
*4 Accessory for ProLite XUB2294HS / ProLite XUB2292HS.
*5 Accessory for ProLite XU2294HSU.
Power Cable*1 HDMI Cable USB Cable*2,5
Stand-Base*3,5 Stand-Neck*3,5 Stand-Base with a screw*2,4
Cable Holder*3,5 Safety Guide Quick Start Guide
BEFORE YOU OPERATE THE MONITOR
CHECKING THE CONTENTS OF THE PACKAGE
CAUTION
FEATURES
Supports Resolutions up to 1920 × 1080
High Contrast 3000:1 (Typical), Adv. Contrast Function Available / Brightness
250cd/m2
(Typical) : ProLite XUB2294HSU / ProLite XU2294HSU / ProLite
XUB2294HS / ProLite XU2294HS
High Contrast 1000:1 (Typical), Adv. Contrast Function Available / Brightness
250cd/m
2 (Typical) : ProLite XUB2292HS / ProLite XU2292HS
Quick Response Time 4ms (Gray to Gray)
Blue Light Reducer
Digital Character Smoothing
Automatic Set-up
Stereo Speakers
2 × 1W Stereo Speakers
Plug & Play VESA DDC2B Compliant
Windows® 7/8.1/10 Compliant
Power Management (VESA DPMS Compliant)
VESA Mounting Standard (100mm×100mm) Compliant
Keyhole for Security Lock

ENGLISH
BEFORE YOU OPERATE THE MONITOR 5
When you use with the wall mounting, in consideration of thickness of the mounting
stage,tightentheM4Screws(4pcs)withwasherwhich“L”lengthis7mmtofasten
the monitor. Using the screw longer than this may cause electric shock or damage
because it may contact with the electrical parts inside the monitor.
WARNING
Screw
Chassis
Mounting Stage
L
INSTALLATION
< WALL MOUNTING >
WARNING
Before installation, make sure the wall, ceiling or desktop arm is strong enough to
hold the necessary weight of the display and the mount.
ENGLISH
6 BEFORE YOU OPERATE THE MONITOR
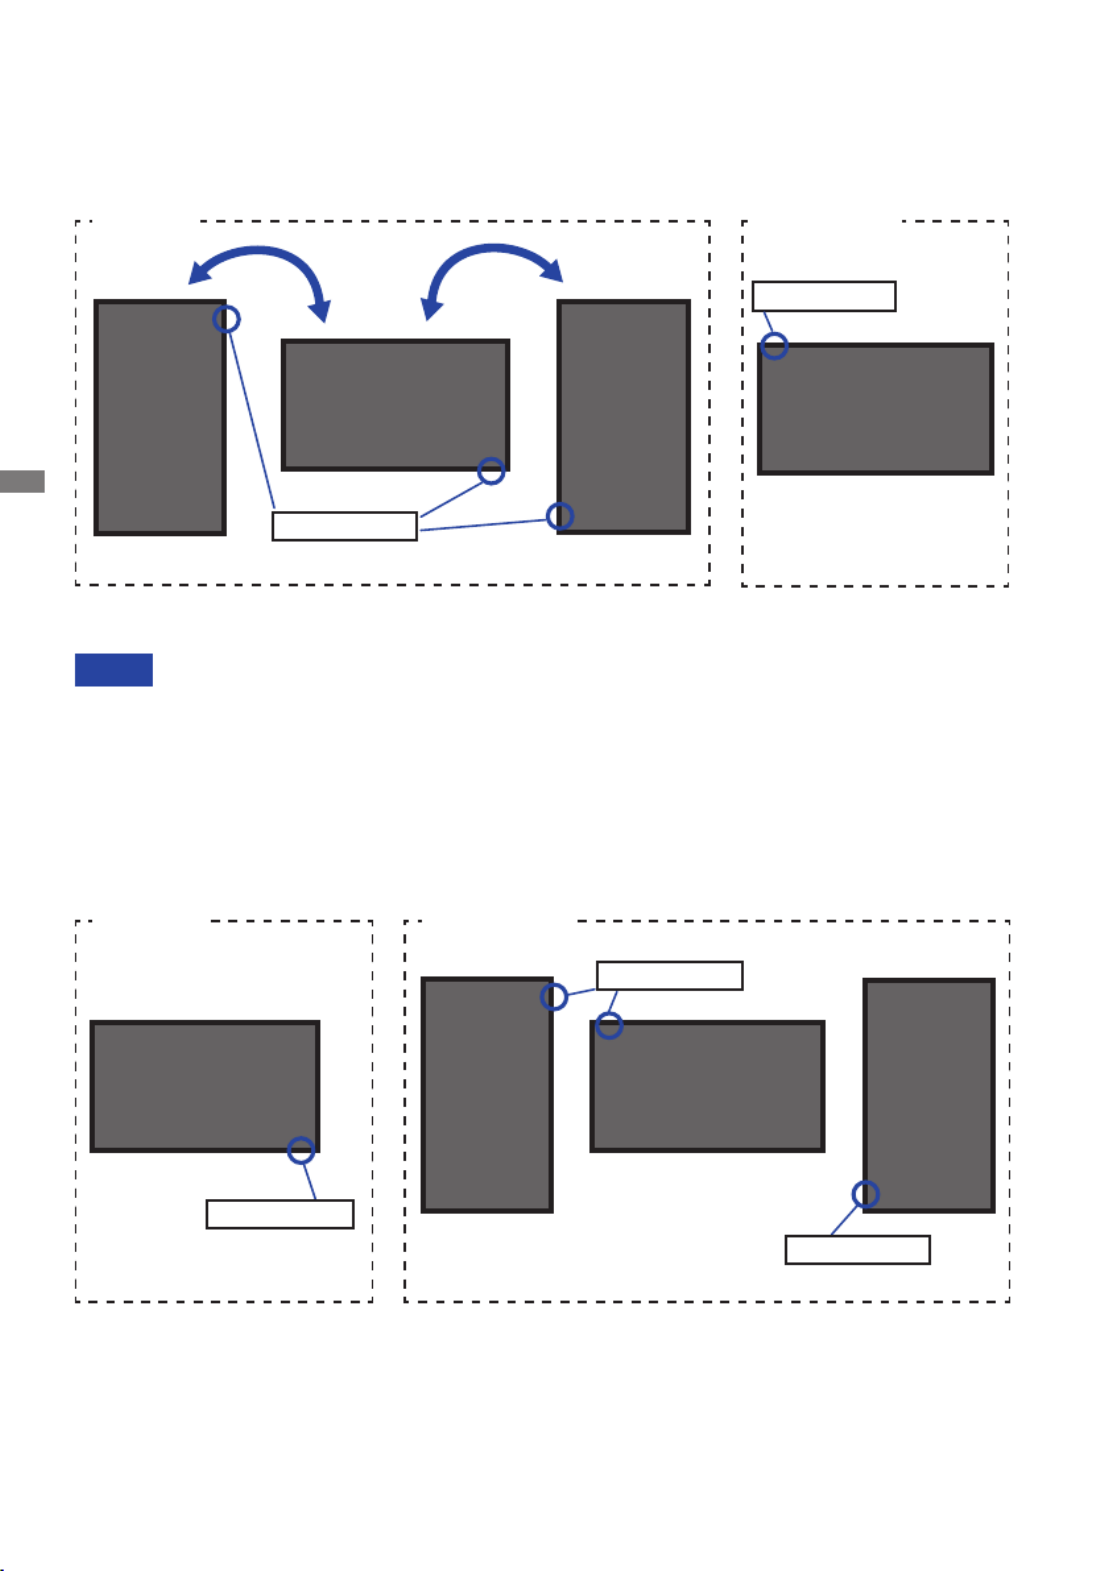
< ROTATING THE DISPLAY >
NOTE
Adjust the monitor’s height before panel rotation.
Attempting to rotate the panel forcibly without adjusting the stand height may cause
damage to the panel or the stand.
The monitor is designed to be compatible with both landscape and portrait modes.
Video card for portrait display will be required for rotating the image on the screen.
With Stand:
A
Not Available
Power Indicator
●ProLite XUB2294HSU / ProLite XUB2294HS / ProLite XUB2292HS
●ProLite XU2294HSU / ProLite XU2294HS / ProLite XU2292HS
It is designed to be compatible in landscape mode.
Landscape
A
Available
Power Indicator
Portrait
A
A
Not Available
A
Power Indicator
Power Indicator
A
A
Portrait
Available
Power Indicator
Landscape
A
Portrait
ENGLISH
BEFORE YOU OPERATE THE MONITOR 7
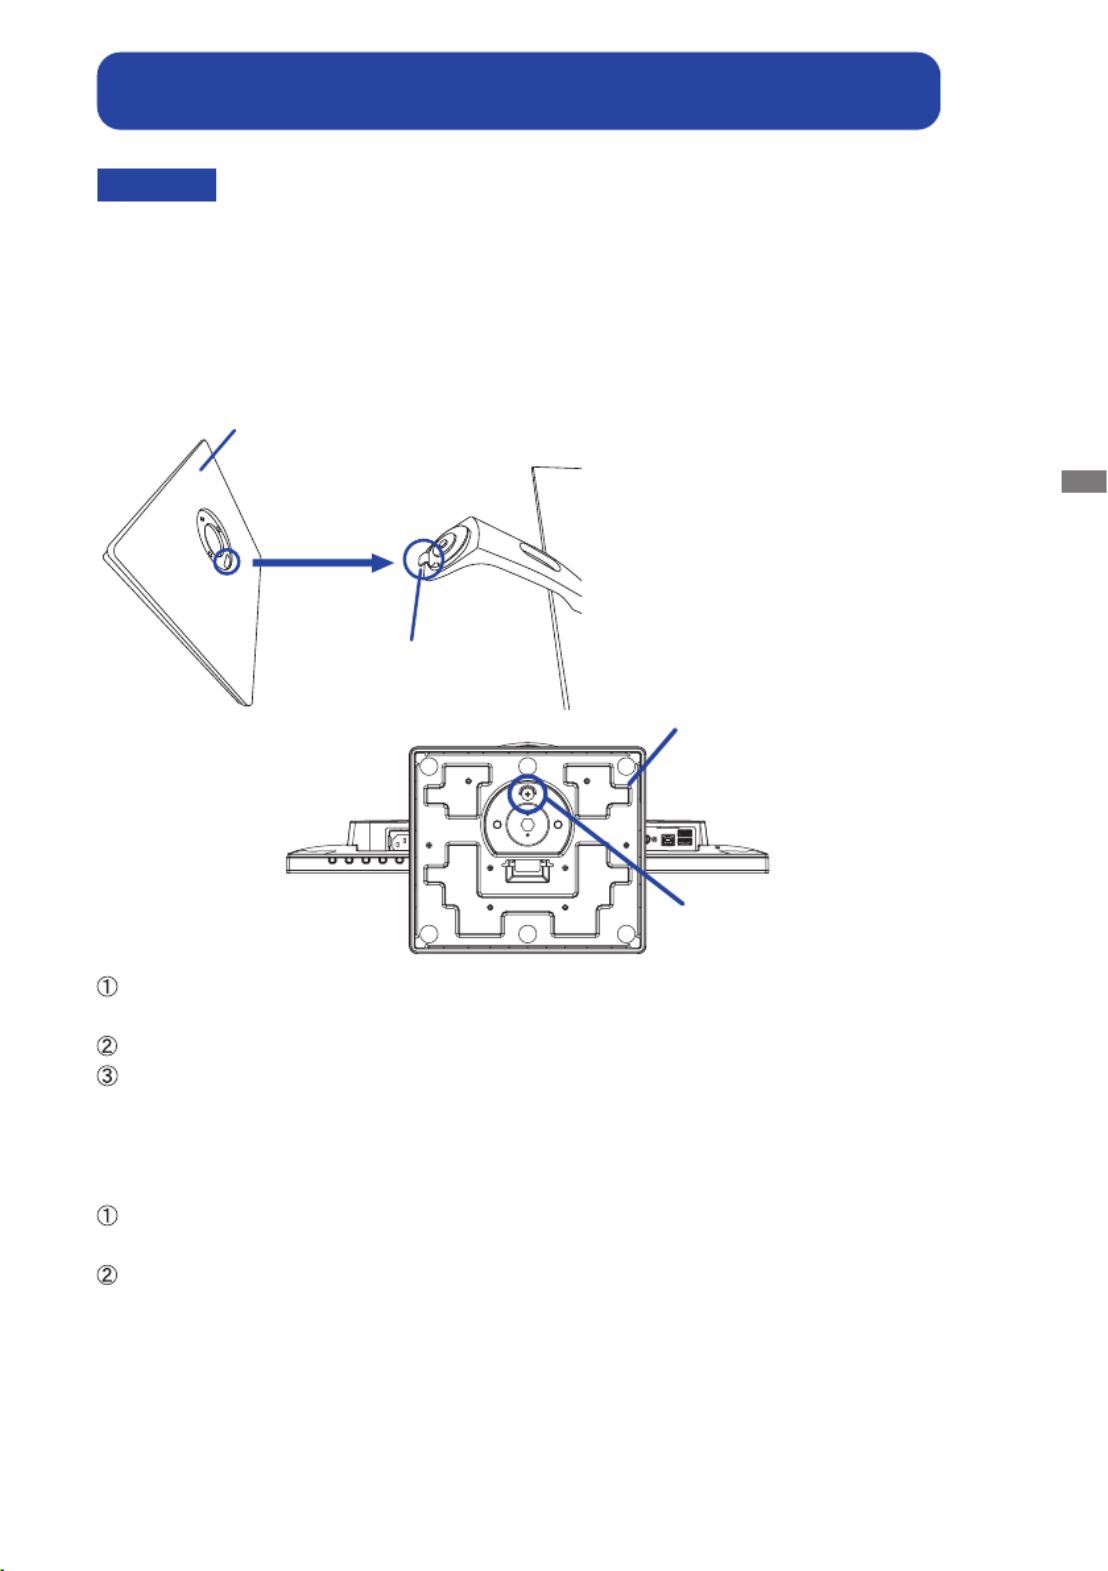
FITTING AND REMOVAL OF BASE :
ProLite XUB2294HSU / ProLite XUB2294HS / ProLite XUB2292HS
CAUTION Put the monitor on a stable surface. The monitor may cause injury or damage if it
falls or is dropped.
Do not give a strong impact to the monitor. It may cause damage.
Unplug the monitor before removal or installation to avoid an electric shock or a
damage.
<Removal>
Put a piece of soft cloth on the table beforehand to prevent the monitor from being scratched.
Laythemonitoratonatablewithfrontfacedown.
Loosen the ‘thumb screw’ to remove the Stand-Base from the monitor.
<Installation>
Put a piece of soft cloth on the table beforehand to prevent the monitor from being scratched.
Laythemonitoratonatablewithfrontfacedown.
Install the stand-base as shown on above picture.
Use the ‘thumb screw’ provided to secure the base to the monitor.
Stand-Base
Hook
ThumbscrewforStand-Basexing
Stand-Base

ENGLISH
BEFORE YOU OPERATE THE MONITOR 9
Power Indicator
Blue: Normal operation
Orange: Power Management
PowerSwitch()
Menu/SelectButton(ENTER)
ScrollUp/VolumeButton( ) /
ScrollDown/ECOModeButton( ) /
ExitButton(EXIT)
InputSelectButton(INPUT)
Speakers
USBDownstreamConnector( 5V,500mA)*
USBUpstreamConnector( )*
Keyhole for Security Lock
You can fasten a security lock and cable to prevent the monitor from being removed
without your permission.
VGAConnector(D-SUB)
HDMIConnector(HDMI)
DisplayPortConnector(DP)
Cable Hole
HeadphoneConnector( )
AudioConnector(LINEIN)
ACConnector( :Alternatingcurrent)( )
* Available for ProLite XUB2294HSU only.
NOTE
NOTE
CONTROLS AND CONNECTORS :
ProLite XUB2294HSU / ProLite XUB2294HS / ProLite XUB2292HS
<Front> <Back>

ENGLISH
10 BEFORE YOU OPERATE THE MONITOR
CONTROLS AND CONNECTORS :
ProLite XU2294HSU / ProLite XU2294HS / ProLite XU2292HS
<Front> <Back>
Power Indicator
Blue: Normal operation
Orange: Power Management
PowerSwitch()
Menu/SelectButton(ENTER)
ScrollUp/VolumeButton( ) /
ScrollDown/ECOModeButton( ) /
ExitButton(EXIT)
InputSelectButton(INPUT)
Speakers
USBDownstreamConnector( 5V,500mA)*
USBUpstreamConnector( )*
Keyhole for Security Lock
You can fasten a security lock and cable to prevent the monitor from being removed
without your permission.
VGAConnector(D-SUB)
HDMIConnector(HDMI)
DisplayPortConnector(DP)
HeadphoneConnector( )
AudioConnector(LINEIN)
ACConnector( :Alternatingcurrent)( )
* Available for ProLite XU2294HSU only.
NOTE
NOTE

ENGLISH
BEFORE YOU OPERATE THE MONITOR 11
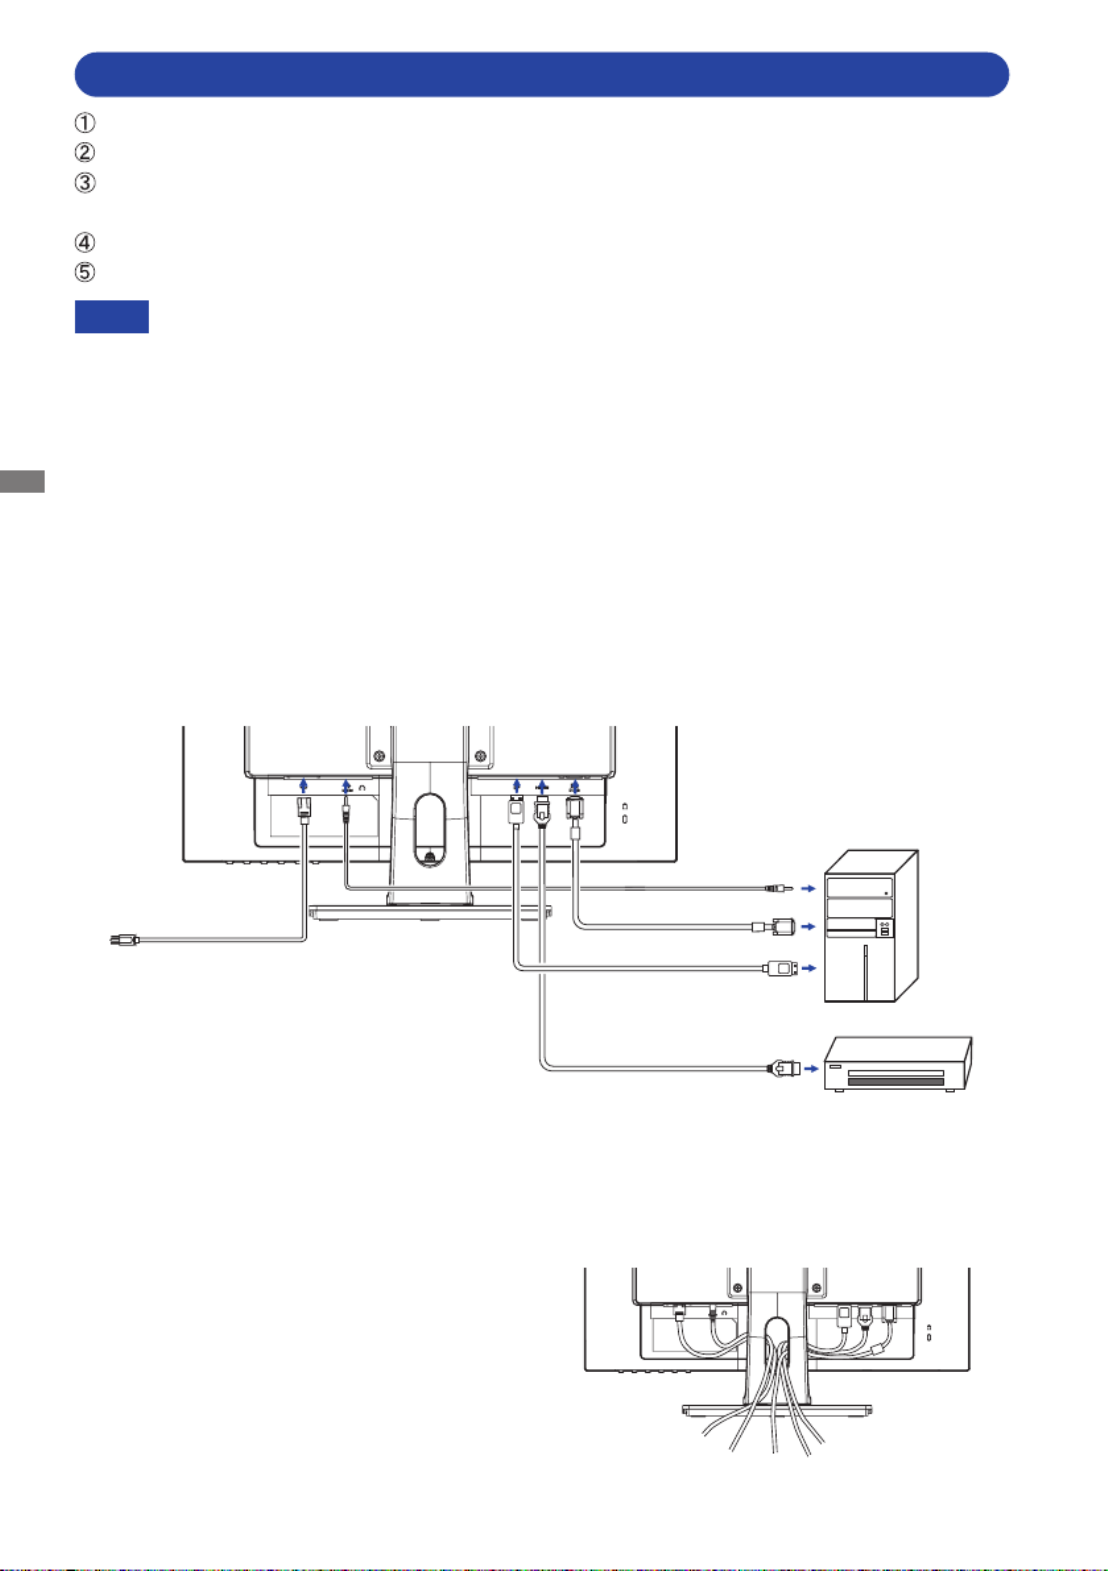
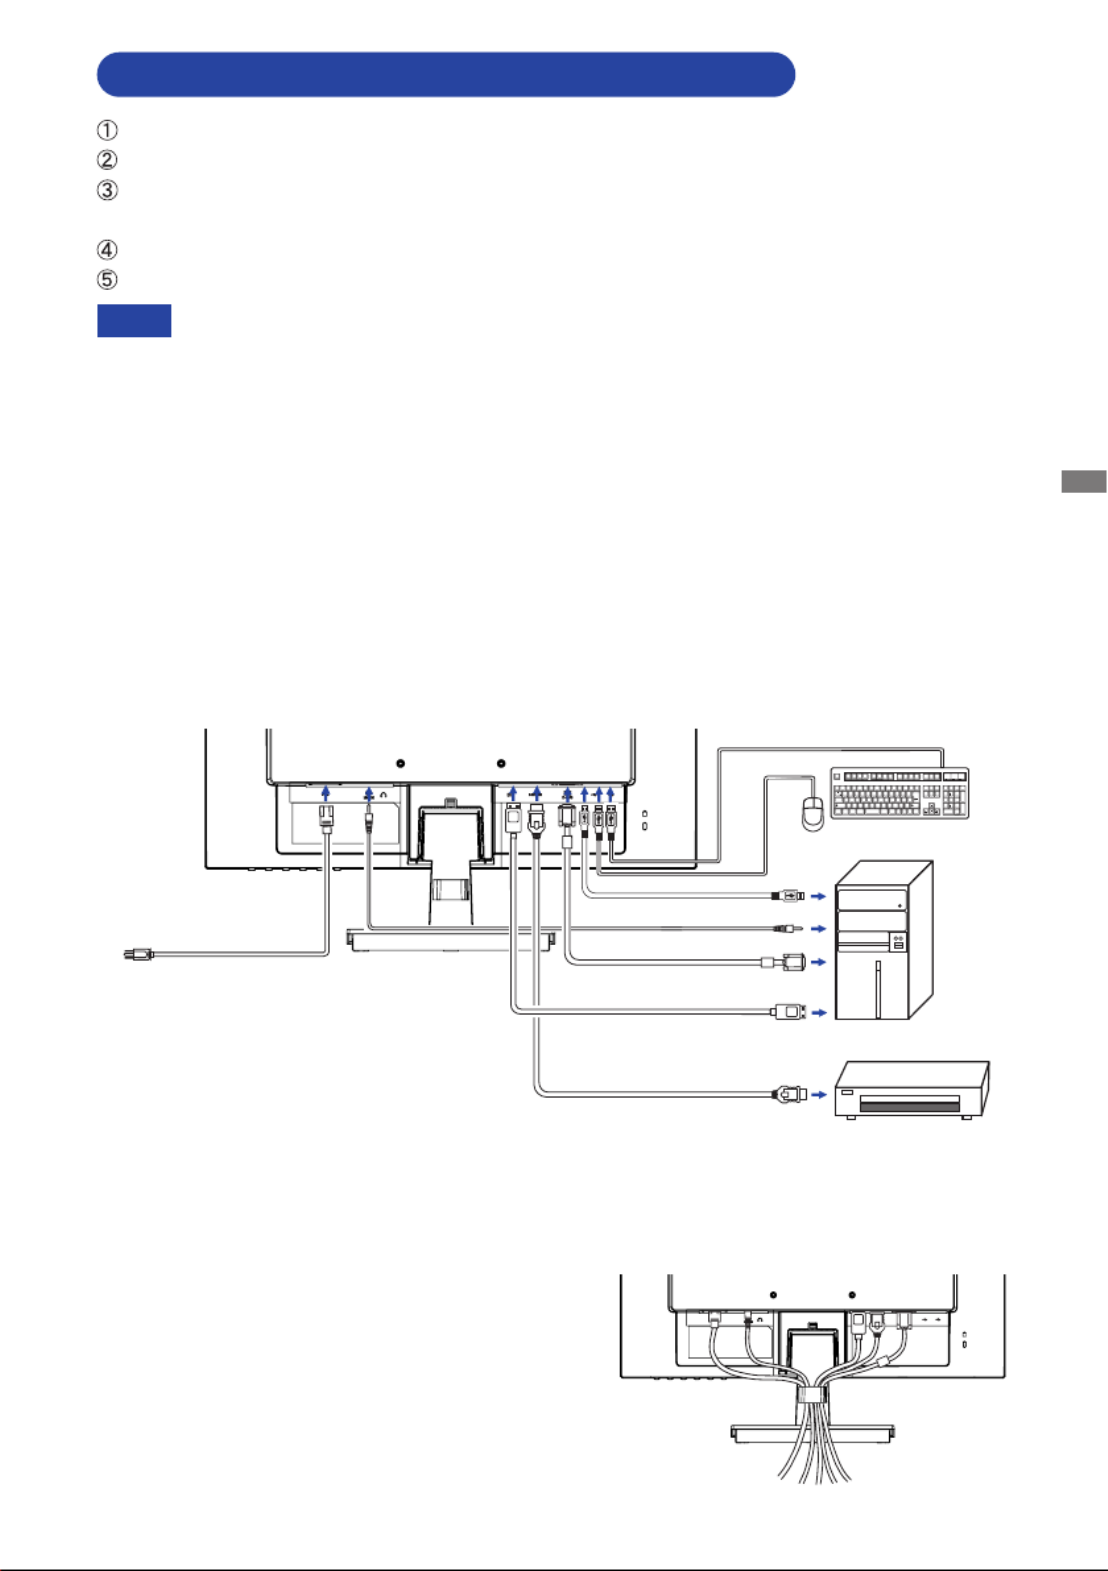
CONNECTING YOUR MONITOR : ProLite XUB2294HSU
Ensurethatboththecomputerandthemonitorareswitchedo.
Connect the computer to the monitor with the signal cable.
Connect the monitor to the audio equipment with the Audio Cable for computer when using the
audio features.
ConnectthePowerCabletothemonitorrstandthentothepowersource.
Turn on your monitor and computer.
[Example of Connection]
<Back>
NOTE The signal cables used for connecting the computer and monitor may vary with the
type of computer used. An incorrect connection may cause serious damage to both
the monitor and the computer. The cable supplied with the monitor is for a standard
connector. If a special cable is required please contact your local iiyama dealer or
regionaliiyamaoce.
For connection to Macintosh computers, contact your local iiyama dealer or regional
iiyamaoceforasuitableadaptor.
Makesureyoutightenthengerscrewsateachendofthesignalcable.
The Class I pluggable equipment Type A must be connected to protective earth.
The socket-outlet shall be installed near the equipment and shall be easily accessible.
Excessive sound pressure from ear-/headphones can cause hearing damage/hearing loss.
[ Collect Cables ]
Put the cables through the cable hole to bundle
them.
* VGA cable is not supplied with the monitor. If you use low quality VGA cable, it may cause a result
of electro-magnetic interference. Please contact the iiyama Support Centre in your country if you
wish to connect the monitor via the VGA input.
AV Equipment etc.
Audio Cable (Not included)
Computer
VGA Cable (Not included)*
DisplayPort Cable (Not included)
HDMI Cable (Accessory)
Power Cable (Accessory)
USB Cable (Accessory)
Mouse Keyboard
ENGLISH
12 BEFORE YOU OPERATE THE MONITOR
CONNECTING YOUR MONITOR : ProLite XUB2294HS / ProLite XUB2292HS
Ensurethatboththecomputerandthemonitorareswitchedo.
Connect the computer to the monitor with the signal cable.
Connect the monitor to the audio equipment with the Audio Cable for computer when using the
audio features.
ConnectthePowerCabletothemonitorrstandthentothepowersource.
Turn on your monitor and computer.
[Example of Connection]
<Back>
NOTE The signal cables used for connecting the computer and monitor may vary with the
type of computer used. An incorrect connection may cause serious damage to both
the monitor and the computer. The cable supplied with the monitor is for a standard
connector. If a special cable is required please contact your local iiyama dealer or
regionaliiyamaoce.
For connection to Macintosh computers, contact your local iiyama dealer or regional
iiyamaoceforasuitableadaptor.
Makesureyoutightenthengerscrewsateachendofthesignalcable.
The Class I pluggable equipment Type A must be connected to protective earth.
The socket-outlet shall be installed near the equipment and shall be easily accessible.
Excessive sound pressure from ear-/headphones can cause hearing damage/hearing loss.
[ Collect Cables ]
Put the cables through the cable hole to bundle
them.
* VGA cable is not supplied with the monitor. If you use low quality VGA cable, it may cause a result
of electro-magnetic interference. Please contact the iiyama Support Centre in your country if you
wish to connect the monitor via the VGA input.
AV Equipment etc.
Audio Cable (Not included)
Computer
VGA Cable (Not included)*
DisplayPort Cable (Not included)
HDMI Cable (Accessory)
Power Cable (Accessory)
ENGLISH
BEFORE YOU OPERATE THE MONITOR 13
CONNECTING YOUR MONITOR : ProLite XU2294HSU
Ensurethatboththecomputerandthemonitorareswitchedo.
Connect the computer to the monitor with the signal cable.
Connect the monitor to the audio equipment with the Audio Cable for computer when using the
audio features.
ConnectthePowerCabletothemonitorrstandthentothepowersource.
Turn on your monitor and computer.
[Example of Connection]
<Back>
NOTE The signal cables used for connecting the computer and monitor may vary with the
type of computer used. An incorrect connection may cause serious damage to both
the monitor and the computer. The cable supplied with the monitor is for a standard
connector. If a special cable is required please contact your local iiyama dealer or
regionaliiyamaoce.
For connection to Macintosh computers, contact your local iiyama dealer or regional
iiyamaoceforasuitableadaptor.
Makesureyoutightenthengerscrewsateachendofthesignalcable.
The Class I pluggable equipment Type A must be connected to protective earth.
The socket-outlet shall be installed near the equipment and shall be easily accessible.
Excessive sound pressure from ear-/headphones can cause hearing damage/hearing loss.
* VGA cable is not supplied with the monitor. If you use low quality VGA cable, it may cause a result
of electro-magnetic interference. Please contact the iiyama Support Centre in your country if you
wish to connect the monitor via the VGA input.
AV Equipment etc.
Audio Cable (Not included)
Computer
VGA Cable (Not included)*
DisplayPort Cable (Not included)
HDMI Cable (Accessory)
Power Cable (Accessory)
USB Cable (Accessory)
Mouse Keyboard
[ Collect Cables ]
Put the cables through the cable holder to bundle
them.

ENGLISH
14 BEFORE YOU OPERATE THE MONITOR
CONNECTING YOUR MONITOR : ProLite XU2294HS / ProLite XU2292HS
Ensurethatboththecomputerandthemonitorareswitchedo.
Connect the computer to the monitor with the signal cable.
Connect the monitor to the audio equipment with the Audio Cable for computer when using the
audio features.
ConnectthePowerCabletothemonitorrstandthentothepowersource.
Turn on your monitor and computer.
[Example of Connection]
<Back>
NOTE The signal cables used for connecting the computer and monitor may vary with the
type of computer used. An incorrect connection may cause serious damage to both
the monitor and the computer. The cable supplied with the monitor is for a standard
connector. If a special cable is required please contact your local iiyama dealer or
regionaliiyamaoce.
For connection to Macintosh computers, contact your local iiyama dealer or regional
iiyamaoceforasuitableadaptor.
Makesureyoutightenthengerscrewsateachendofthesignalcable.
The Class I pluggable equipment Type A must be connected to protective earth.
The socket-outlet shall be installed near the equipment and shall be easily accessible.
Excessive sound pressure from ear-/headphones can cause hearing damage/hearing loss.
* VGA cable is not supplied with the monitor. If you use low quality VGA cable, it may cause a result
of electro-magnetic interference. Please contact the iiyama Support Centre in your country if you
wish to connect the monitor via the VGA input.
[ Collect Cables ]
Put the cables through the cable holder to bundle
them.
AV Equipment etc.
Audio Cable (Not included)
Computer
VGA Cable (Not included)*
DisplayPort Cable (Not included)
HDMI Cable (Accessory)
Power Cable (Accessory)

ENGLISH
BEFORE YOU OPERATE THE MONITOR 15
DISCONNECTING YOUR MONITOR
Ensurethatboththecomputerandthemonitorareswitchedo.
DisconnectthepowersourcerstandthenthePowerCablefromthemonitor.
Disconnect the signal cable from the computer and the monitor.
Disconnect the audio cable from the computer and the monitor.

ENGLISH
16 BEFORE YOU OPERATE THE MONITOR
Signal Timing
Change to the desired signal timing listed on page 42: COMPLIANT TIMING.
COMPUTER SETTING
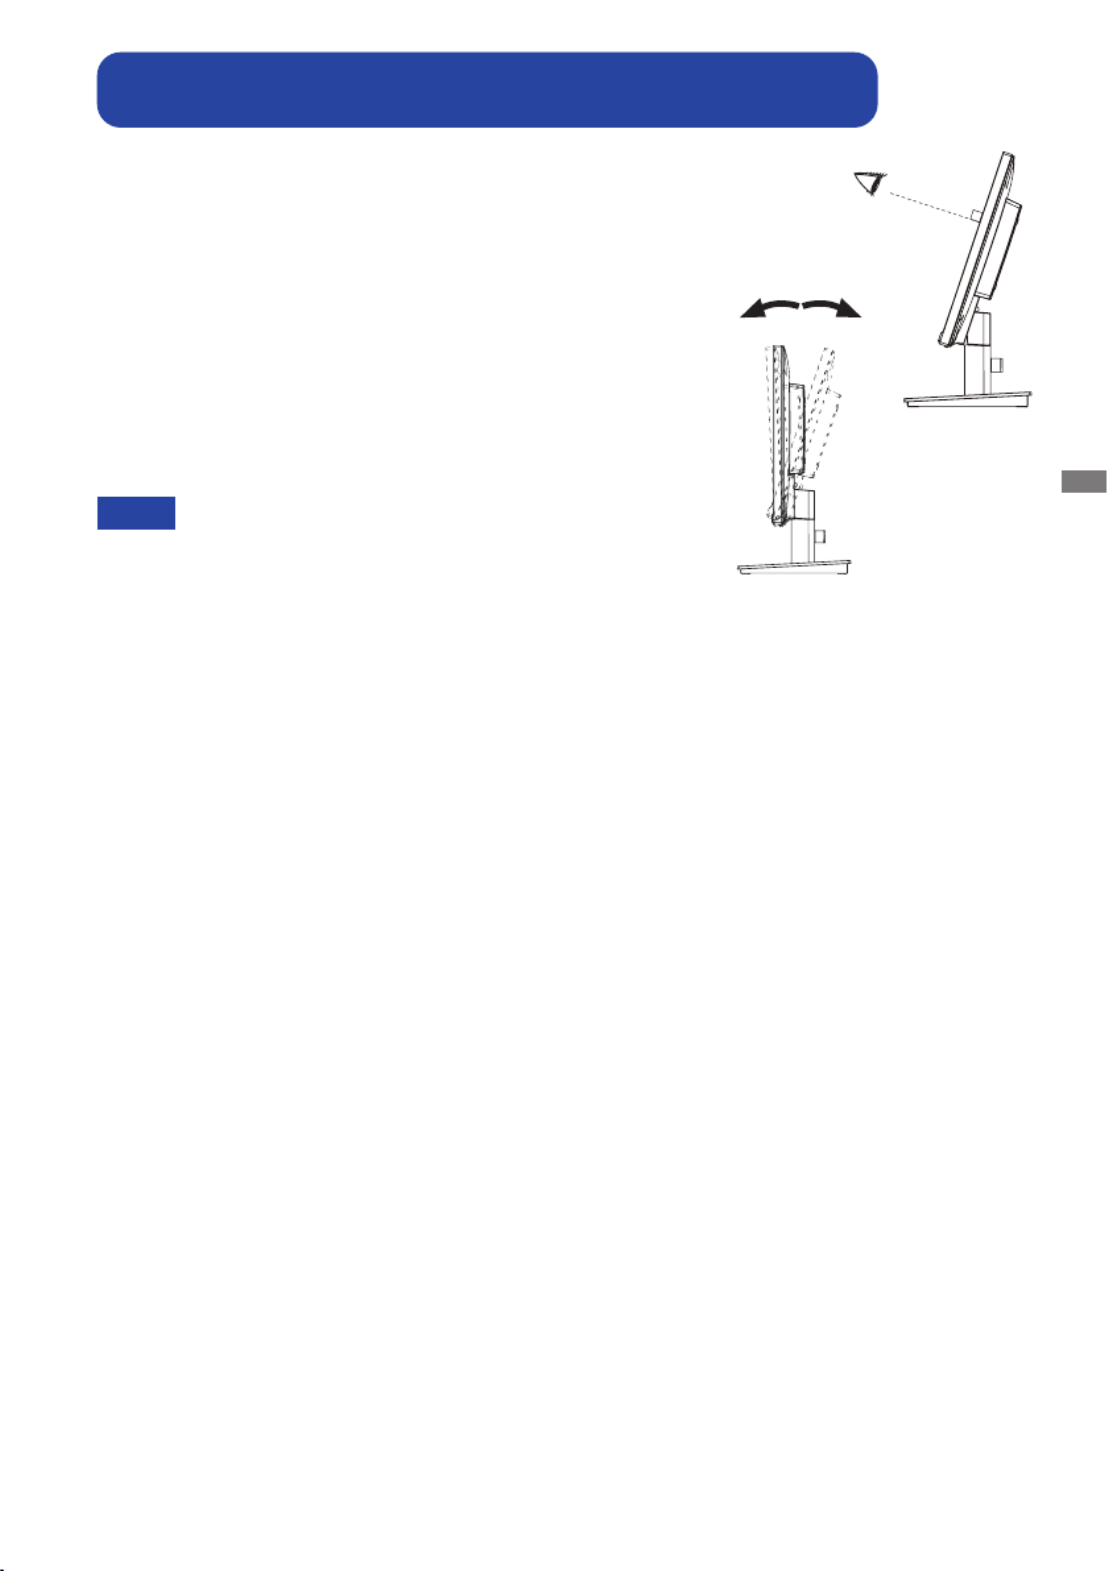
ADJUSTING THE HEIGHT AND THE VIEWING ANGLE :
ProLite XUB2294HSU / ProLite XUB2294HS / ProLite XUB2292HS
For optimal viewing it is rec ommended to
position yourself directly opposite to the full face
of the monitor, then adjust the monitor’s height
and angle to your own preference.
Hold the panel so that the monitor does not topple
when you change the monitor’s height or angle.
You are able to adjust the monitor's height up to
130mm, angle up to 45 degrees right and left, 22
degrees upward and 5 degrees downward.
Do not touch the LCD screen when you
chan ge the height o r the angle. It
may cause damage or break the LCD
screen.
Careful attention is required not to pinch
your fingers or hands into the moving
part of the stand when you change the
height or the angle.
Injury can occur if care is not taken to
avoidngercontactwiththedisplays
base when adjusting the height.
NOTE
Monitor
Stand
130m
m
45° 45°
ENGLISH
BEFORE YOU OPERATE THE MONITOR 17
For optimal viewing it is recommended to look at the full face
of the monitor.
Hold the stand so that the monitor does not topple when you
change the monitor’s angle.
You are able to adjust the monitor’s angle up to ° upward, 22
5° downward.
In order to ensure a healthy and relaxed body position
when using the monitor at visual display workstations, it
is recommended that the adjusted tilt angle should not
exceed 10 degrees. Adjust the monitor’s angle to your own
preference.
ADJUSTING THE VIEWING ANGLE :
ProLite XU2294HSU / ProLite XU2294HS / ProLite XU2292HS
NOTE Do not touch the LCD screen when you change
the angle. It may cause damage or break the LCD
screen.
Careful attention is required not to pinch your
ngersor hands into themovingpart ofthe stand
when you change the angle.
5° 22°
ENGLISH
18 OPERATING THE MONITOR
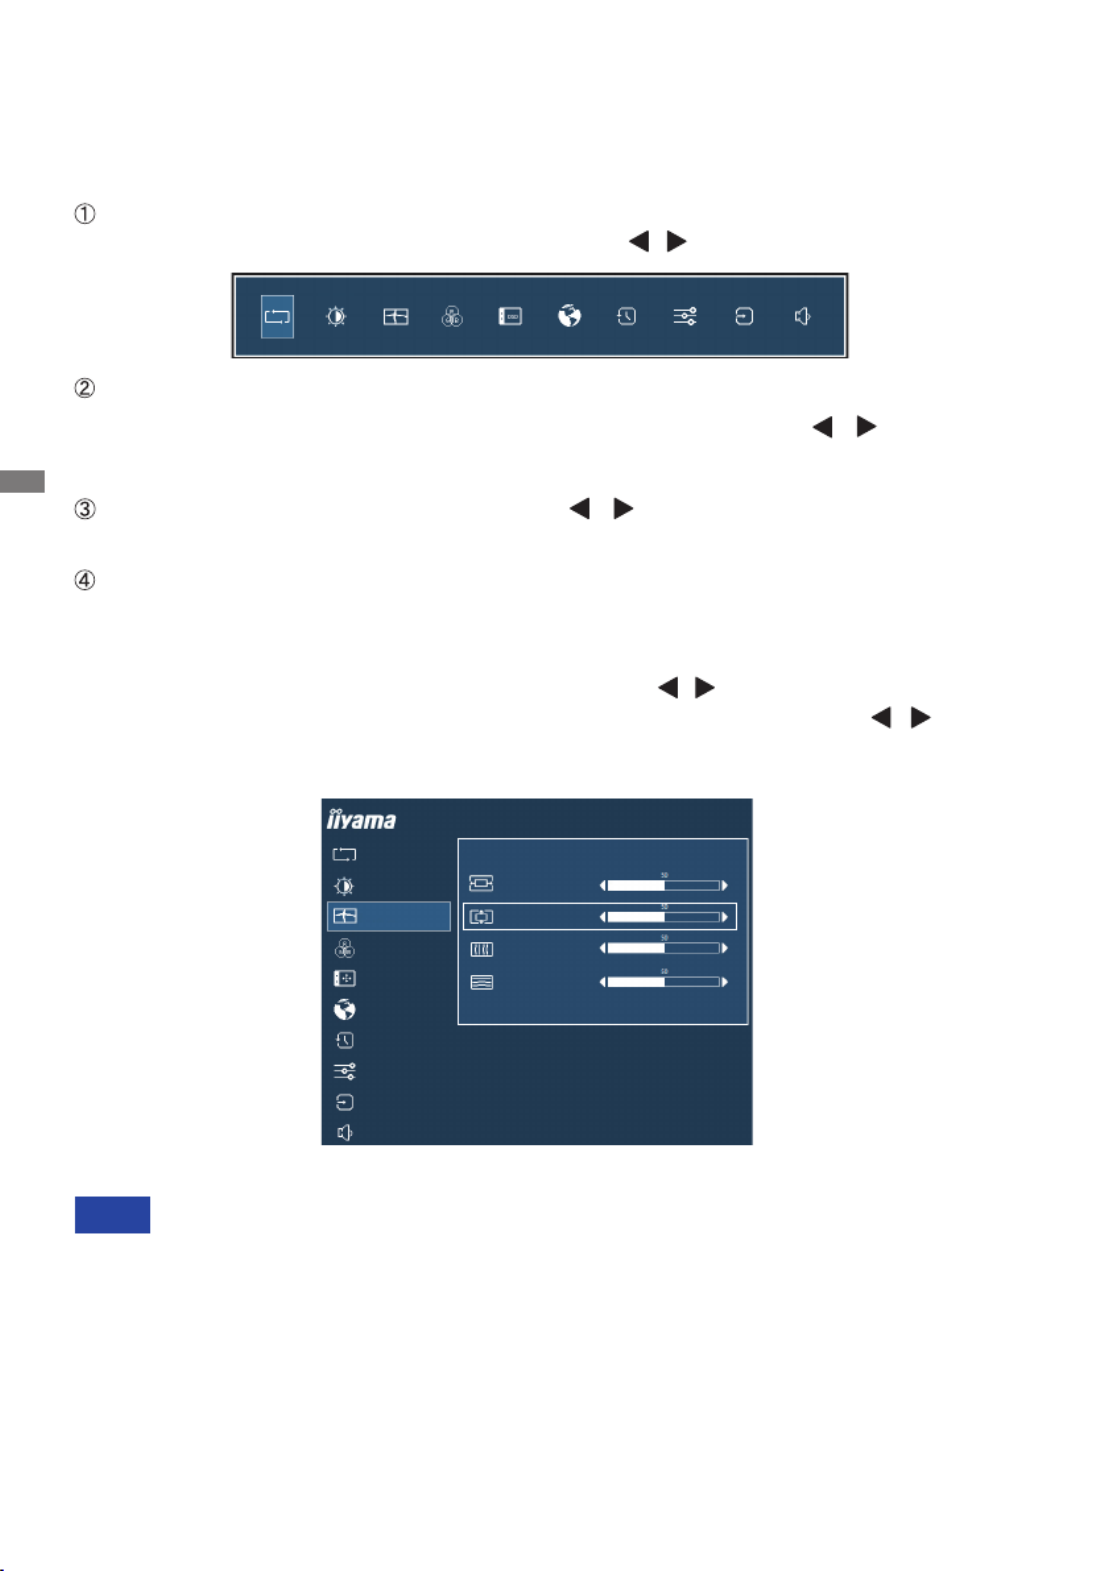
OPERATING THE MONITOR
To create the best picture, your iiyama LCD monitor has been preset at the factory with the COMPLIANT
TIMING shown on page 42. You are also able to adjust the picture by following the button operation
shown below. For more detailed adjustments, see page 29 for SCREEN ADJUSTMENTS.
When button operations are aborted during adjustment, On-Screen Display disappears when the
timesetfortheOSDTimeouthaspassed.Also,presstheEXITbuttontoquicklyturnotheOn-
Screen Display.
Any changes are automatically saved in the memory when the On Screen Display
disappears.
TurningothepowershouldbeavoidedwhileusingtheMenu.
Adjustments for Horizontal / Vertical Position, Pixel Clock and Phase are saved for each signal
timing. Except for these adjustments, all other adjustments have only one setting which applies to
all signal timings.
NOTE
For example, to correct for vertical position, select Menu item of Geometry and then press the
ENTER Button. Then, select Vertical Position by using the / Buttons.
An adjustment page appears after you press the Button. Then, use the ENTER / Buttons
to change the vertical position settings. The vertical position of the overall display should be
changing accordingly while you are doing this.
Press the EXIT Button lastly, it ends, all changes are saved in the memory.
Press the ENTER Button to start the On Screen Display feature. There are additional
Menu items which can be switched by using the / Buttons.
Select the Menu item which contains the adjustment icon relating to the adjustment
you want to make. Press the ENTER Button. Then, use the / Buttons to
highlight the desired adjustment icon.
Press the ENTER Button again. Use the Buttons to make the appropriate /
adjustment or setting.
Press the EXIT Button to leave the menu, and the settings you just made would be
automatically saved.
AUTO ADJUST
PICTURE ADJUST
GEOMETRY
COLOR SETTINGS
LANGUAGE
RECALL
MISCELLANEOUS
INPUT SELECT
AUDIO SETTINGS
ProLite XUB2294HSU
OSD
HORIZONTAL POSITION
GEOMETRY
VERTICAL POSITION
PIXEL CLOCK
PHASE

ENGLISH
OPERATING THE MONITOR 19
ADJUSTMENT MENU CONTENTS
Adjustment Item Problem / Option Button to Press
Auto Adjust
Auto Adjust * Adjust H. / V. Position, Clock and Phase automatically.
ProLite XUB2294HSU
AUTO ADJUST
PICTURE ADJUST
GEOMETRY
COLOR SETTINGS
OSD
LANGUAGE
RECALL
MISCELLANEOUS
INPUT SELECT
AUDIO SETTINGS
CLICK ENTER AGAIN TO AUTO ADJUST
AUTO ADJUST
* Only Analog Input.
For best results, use the Auto Adjust in conjunction with the adjustment pattern. See page 29 for
SCREEN ADJUSTMENTS.

ENGLISH
20 OPERATING THE MONITOR
Adjustment Item Problem / Option Button to Press
Picture Adjust *1
Too dull
Too intense
Brightness *2,3,4
Contrast *3
Too dark
Too bright
*1 Picture Adjust is disabled when i-Style Color is activated.
*2
Adjust the Brightness when you are using the monitor in a dark room and feel the screen is too bright.
*3 Contrast, Brightness and ECO adjustments are disabled when Adv. Contrast is activated.
*4 Brightness and Adv. Contrast adjustment are disabled when ECO is activated.
Adv. Contrast *4
Typical Contrast Ratio
O
On Increased Contrast Ratio
Overdrive
O/1/ 2 / 3
It will improve the gray level response time of the LCD panel.
A higher level results in a faster response time.
You can skip the Menu items and directly display an option settting screen by using the following
button operations.
ECO : Press the Button when the Menu is not displayed.
Direct
Brightness of back-light is reduced.
O Normal
ECO *3Mode1
Brightness of back-light is reduced more than Mode1.
Mode2
Brightness of back-light is reduced more than Mode2.
Mode3
Direct
Blue Light Reducer
O Typical
Mode1 Blue light is reduced.
Mode2 Blue light is reduced more than Mode1.
Mode3 Blue light is reduced more than Mode2.
ProLite XUB2294HSU
AUTO ADJUST
PICTURE ADJUST
GEOMETRY
COLOR SETTINGS
LANGUAGE
RECALL
MISCELLANEOUS
INPUT SELECT
AUDIO SETTINGS
BRIGHTNESS
OSD
CONTRAST
ECO
BLUE LIGHT REDUCER
ADV. CONTRAST
OVERDRIVE
OFF
OFF
OFF
ON OFF

ENGLISH
OPERATING THE MONITOR 21
Adjustment Item Problem / Option Button to Press
Geometry *
AUTO ADJUST
PICTURE ADJUST
GEOMETRY
COLOR SETTINGS
LANGUAGE
RECALL
MISCELLANEOUS
INPUT SELECT
AUDIO SETTINGS
ProLite XUB2294HSU
OSD
HORIZONTAL POSITION
GEOMETRY
VERTICAL POSITION
PIXEL CLOCK
PHASE
Phase
Pixel Clock
Too left
Too right
Too low
Too high
Horizontal Position
Vertical Position
Too narrow
Too wide
Tocorrectickeringtextorlines
* Only Analog Input.
See page 29 for SCREEN ADJUSTMENTS.
Product specificaties
| Merk: | Iiyama |
| Categorie: | Monitor |
| Model: | ProLite XUB2294HSU-B1 |
| Kleur van het product: | Zwart |
| Aan/uitschakelaar: | Ja |
| In hoogte verstelbaar: | Ja |
| Beeldschermdiagonaal: | 21.5 " |
| Resolutie: | 1920 x 1080 Pixels |
| Touchscreen: | Nee |
| Oorspronkelijke beeldverhouding: | 16:9 |
| Kijkhoek, horizontaal: | 178 ° |
| Kijkhoek, verticaal: | 178 ° |
| Meegeleverde kabels: | AC, HDMI, USB |
| Beeldscherm vorm: | Flat |
| Typische contrastverhouding: | 3000:1 |
| Snelstartgids: | Ja |
| Frequentiebereik horizontaal: | 30 - 83 kHz |
| Frequentiebereik verticaal: | 55 - 75 Hz |
| VGA (D-Sub)poort(en): | 1 |
| Aantal HDMI-poorten: | 1 |
| DVI-poort: | Nee |
| Bevestigingsmogelijkheid voor kabelslot: | Ja |
| Kabelslot sleuf type: | Kensington |
| Ingebouwde luidsprekers: | Ja |
| Gemiddeld vermogen: | 2 W |
| Stroomverbruik (in standby): | 0.5 W |
| Aantal luidsprekers: | 2 |
| Certificering: | CE, TÜV-GS, VCCI-B, PSE, CU |
| Beeldscherm, aantal kleuren: | 16.78 miljoen kleuren |
| HDCP: | Ja |
| Stroomverbruik (indien uit): | 0.26 W |
| Maximale refresh snelheid: | 75 Hz |
| HD type: | Full HD |
| 3D: | Nee |
| HDMI: | Ja |
| Display technologie: | LED |
| Responstijd: | 4 ms |
| Pixel pitch: | 0.248 x 0.248 mm |
| Ondersteunde grafische resoluties: | 1920 x 1080 (HD 1080) |
| VESA-montage: | Ja |
| Paneelmontage-interface: | 100 x 100 mm |
| Helderheid (typisch): | 250 cd/m² |
| Beeldverhouding: | 16:9 |
| RGB-kleurruimte: | sRGB |
| Contrast ratio (dynamisch): | 80000000:1 |
| Geïntegreerde TV Tuner: | Nee |
| Ingebouwde camera: | Nee |
| Aantal DisplayPorts: | 1 |
| Energie-efficiëntieklasse (SDR): | E |
| Energieverbruik (SDR) per 1000 uur: | 17 kWu |
| Breedte apparaat (met standaard): | 488.5 mm |
| Diepte apparaat (met standaard): | 210 mm |
| Hoogte apparaat (met standaard): | 352 mm |
| Gewicht (met standaard): | 4700 g |
| On Screen Display (OSD): | Ja |
| Aantal USB Type-A downstream-poorten: | 2 |
| Versie USB-hub: | 2.0 |
| Temperatuur bij opslag: | -20 - 60 °C |
| Soort paneel: | VA |
| Draaibaar: | Ja |
| Horizontaal draaibaar: | 90 - 45 ° |
| Hoofdtelefoon uit: | Ja |
| Ingebouwde USB-hub: | Ja |
| Grootte beeld (horizontaal): | 476 mm |
| Grootte beeld (verticaal): | 267.8 mm |
| sRGB-dekking (gemiddeld): | 99 procent |
| Knippervrije technologie: | Ja |
| Scharnier: | Ja |
| AC-ingangsspanning: | 100 - 240 V |
| AC-ingangsfrequentie: | 50 Hz |
| Stroomverbruik (typisch): | 19 W |
| Bedrijfstemperatuur (T-T): | 5 - 35 °C |
| Bereik kantelhoek: | -5 - 22 ° |
| Energie-efficiëntieschaal: | A tot G |
| Code geharmoniseerd systeem (HS): | 85285210 |
| Anti-blauw-licht-technologie: | Ja |
| kantel aanpassingen: | Ja |
Heb je hulp nodig?
Als je hulp nodig hebt met Iiyama ProLite XUB2294HSU-B1 stel dan hieronder een vraag en andere gebruikers zullen je antwoorden
Handleiding Monitor Iiyama

11 Februari 2025
10 Februari 2025
5 Februari 2025
18 December 2024
15 December 2024
30 November 2024
16 November 2024
16 November 2024
16 November 2024
16 November 2024
Handleiding Monitor
- Monitor Bosch
- Monitor Philips
- Monitor HP
- Monitor Sony
- Monitor Samsung
- Monitor Xiaomi
- Monitor Panasonic
- Monitor Epson
- Monitor LG
- Monitor Huawei
- Monitor Asus
- Monitor Canon
- Monitor Daewoo
- Monitor Garmin
- Monitor Honeywell
- Monitor JVC
- Monitor JBL
- Monitor Medion
- Monitor Olympus
- Monitor Pioneer
- Monitor Toshiba
- Monitor Xerox
- Monitor Yamaha
- Monitor Yealink
- Monitor Abus
- Monitor Acer
- Monitor Acti
- Monitor Ag Neovo
- Monitor Alesis
- Monitor Alienware
- Monitor Alpine
- Monitor AOC
- Monitor AOpen
- Monitor Apc
- Monitor Apple
- Monitor Archos
- Monitor Asrock
- Monitor Barco
- Monitor Behringer
- Monitor Belinea
- Monitor BenQ
- Monitor Blaupunkt
- Monitor BlueBuilt
- Monitor Boss
- Monitor Brandson
- Monitor Danfoss
- Monitor Dell
- Monitor Denver
- Monitor Eizo
- Monitor Emachines
- Monitor EverFocus
- Monitor Faytech
- Monitor Focal
- Monitor Fujitsu
- Monitor Ganz
- Monitor GeoVision
- Monitor Gigabyte
- Monitor GlobalTronics
- Monitor Godox
- Monitor Haier
- Monitor Hannspree
- Monitor Hercules
- Monitor Hikvision
- Monitor Hisense
- Monitor Hitachi
- Monitor HKC
- Monitor Hyundai
- Monitor Ibm
- Monitor IHealth
- Monitor InFocus
- Monitor Insignia
- Monitor Interlogix
- Monitor Kogan
- Monitor Konig
- Monitor LaCie
- Monitor Legamaster
- Monitor Lenovo
- Monitor LightZone
- Monitor M-Audio
- Monitor Mackie
- Monitor Mad Catz
- Monitor Marquant
- Monitor Marshall
- Monitor Maxdata
- Monitor Maxell
- Monitor Midas
- Monitor Mirai
- Monitor Mitsubishi
- Monitor Monacor
- Monitor MSI
- Monitor Nec
- Monitor Newstar
- Monitor Packard Bell
- Monitor Peaq
- Monitor Peerless
- Monitor Plantronics
- Monitor Prestigio
- Monitor Provision ISR
- Monitor Pyle
- Monitor Razer
- Monitor RCF
- Monitor Renkforce
- Monitor Ricoh
- Monitor Ring
- Monitor Salora
- Monitor Samson
- Monitor Sanyo
- Monitor Schneider
- Monitor Sharp
- Monitor Silvercrest
- Monitor Simrad
- Monitor Skytronic
- Monitor Smart
- Monitor Soundstream
- Monitor Sunny
- Monitor Sunstech
- Monitor Tannoy
- Monitor TCL
- Monitor Terra
- Monitor Tesla
- Monitor Thomson
- Monitor Triton
- Monitor Velleman
- Monitor Viessmann
- Monitor Viewsonic
- Monitor Vitek
- Monitor Vivitek
- Monitor Waeco
- Monitor Westinghouse
- Monitor Wyse - Dell
- Monitor Xoro
- Monitor Zalman
- Monitor Jay-tech
- Monitor Jensen
- Monitor Joy-it
- Monitor Jung
- Monitor Odys
- Monitor Omron
- Monitor ONYX
- Monitor Optoma
- Monitor Orion
- Monitor 3M
- Monitor Continental Edison
- Monitor Caliber
- Monitor CSL
- Monitor Monoprice
- Monitor Shure
- Monitor Voxicon
- Monitor EMOS
- Monitor Festo
- Monitor Newline
- Monitor Atlona
- Monitor Hamlet
- Monitor Cooler Master
- Monitor NZXT
- Monitor Thermaltake
- Monitor Citizen
- Monitor Kubo
- Monitor Eurolite
- Monitor Corsair
- Monitor Deltaco
- Monitor KeepOut
- Monitor Ozone
- Monitor Tripp Lite
- Monitor Chauvet
- Monitor Approx
- Monitor Cisco
- Monitor KTC
- Monitor ARRI
- Monitor Bauhn
- Monitor LC-Power
- Monitor HyperX
- Monitor Atomos
- Monitor Yorkville
- Monitor Jupiter
- Monitor Adam
- Monitor Genelec
- Monitor AORUS
- Monitor Avocor
- Monitor DoubleSight
- Monitor Planar
- Monitor SEIKI
- Monitor EC Line
- Monitor MicroTouch
- Monitor HoverCam
- Monitor ELO
- Monitor IFM
- Monitor DataVideo
- Monitor Kindermann
- Monitor ART
- Monitor Da-Lite
- Monitor Allen & Heath
- Monitor ProXtend
- Monitor AJA
- Monitor Adj
- Monitor Ikan
- Monitor Element
- Monitor Dahua Technology
- Monitor Neumann
- Monitor Peerless-AV
- Monitor PreSonus
- Monitor IK Multimedia
- Monitor Swissonic
- Monitor QSC
- Monitor ESI
- Monitor Marshall Electronics
- Monitor RGBlink
- Monitor POSline
- Monitor Dynaudio
- Monitor Krom
- Monitor Vorago
- Monitor Extron
- Monitor Promethean
- Monitor Fostex
- Monitor Prowise
- Monitor Neets
- Monitor AMX
- Monitor Stairville
- Monitor Crestron
- Monitor I3-Technologies
- Monitor CTOUCH
- Monitor SMART Technologies
- Monitor BOOX
- Monitor SPL
- Monitor Aputure
- Monitor Drawmer
- Monitor Blue Sky
- Monitor Advantech
- Monitor Iadea
- Monitor Sonifex
- Monitor Kali Audio
- Monitor Kramer
- Monitor Avantone Pro
- Monitor AVer
- Monitor ITek
- Monitor Posiflex
- Monitor Vimar
- Monitor Speco Technologies
- Monitor Akuvox
- Monitor Antelope Audio
- Monitor X-Rite
- Monitor EKO
- Monitor IBoardTouch
- Monitor PeakTech
- Monitor Elite Screens
- Monitor Hollyland
- Monitor Mitsai
- Monitor V7
- Monitor Palmer
- Monitor TV One
- Monitor Christie
- Monitor Hanwha
- Monitor Phoenix Contact
- Monitor COMMBOX
- Monitor Yiynova
- Monitor Pelco
- Monitor Lilliput
- Monitor KRK
- Monitor Ernitec
- Monitor Planet Audio
- Monitor Datacolor
- Monitor Fluid
- Monitor Postium
- Monitor HELGI
- Monitor Desview
- Monitor Syscom
- Monitor Allsee
- Monitor Alogic
- Monitor Night Owl
- Monitor ProDVX
- Monitor Varad
- Monitor PureTools
- Monitor CTL
- Monitor Game Factor
- Monitor Nixeus
- Monitor Chimei
- Monitor Blue Sea
- Monitor AMCV
- Monitor SWIT
- Monitor TVLogic
- Monitor Feelworld
- Monitor GeChic
- Monitor Oecolux
- Monitor ADS-TEC
- Monitor Satco
- Monitor SideTrak
- Monitor TRIUMPH BOARD
- Monitor Casalux
- Monitor Positivo
- Monitor Transvideo
- Monitor Innocn
- Monitor Shimbol
- Monitor Raysgem
- Monitor Motrona
- Monitor Ikegami
- Monitor Wohler
- Monitor Elvid
- Monitor Portkeys
- Monitor Neat
- Monitor Mimo Monitors
- Monitor Gamber-Johnson
- Monitor Enttec
- Monitor American Dynamics
- Monitor AIS
- Monitor Eve Audio
- Monitor Wortmann AG
- Monitor Viotek
- Monitor Vidi-Touch
- Monitor CoolerMaster
- Monitor Mobile Pixels
- Monitor Atlantis Land
- Monitor HEDD
- Monitor Colormetrics
- Monitor Monkey Banana
- Monitor SmallHD
- Monitor IStarUSA
- Monitor Qian
- Monitor UPERFECT
- Monitor Freedom Scientific
- Monitor OSEE
- Monitor GVision
- Monitor Mybeo
- Monitor Bearware
- Monitor IOIO
- Monitor DTEN
- Monitor Cocopar
- Monitor Titan Army
- Monitor BookIT
- Monitor Wimaxit
- Monitor Delvcam
- Monitor Xenarc
- Monitor Japannext
Nieuwste handleidingen voor Monitor

8 April 2025

8 April 2025

7 April 2025
7 April 2025

4 April 2025

4 April 2025
2 April 2025
1 April 2025
30 Maart 2025
30 Maart 2025