HP iPAQ h5100 Handleiding
Lees hieronder de 📖 handleiding in het Nederlandse voor HP iPAQ h5100 (169 pagina's) in de categorie PDA. Deze handleiding was nuttig voor 35 personen en werd door 2 gebruikers gemiddeld met 4.5 sterren beoordeeld
Pagina 1/169

User’s Guide
hp iPAQ Pocket PC h5100 and h5500
series
Document Part Number: 304926-001
May 2003
Note: Model shown in illustrations is
iPAQ Pocket PC h5500 Series

© 2003 Hewlett-Packard Development Company, L.P.
HP, Hewlett Packard, and the Hewlett-Packard logo are trademarks of
Hewlett-Packard Company in the U.S. and other countries.
iPAQ is a trademark of Hewlett-Packard Development Company, L.P. in
the U.S. and other countries.
Microsoft, Windows, the Windows logo, Outlook, and ActiveSync are
trademarks of Microsoft Corporation in the U.S. and other countries.
hp iPAQ Pocket PC is Powered by Microsoft® Windows®.
SD Logo is a trademark of Secure Digital in the U.S. and
other countries.
XScale is a registered trademark of Intel Corporation in the U.S. and other
countries.
All other product names mentioned herein may be trademarks of their
respective companies.
Hewlett-Packard Company shall not be liable for technical or editorial errors
or omissions contained herein or for incidental or consequential damages in
connection with the furnishing, performance, or use of this material. The
information in this document is provided “as is” without warranty of any
kind, including, but not limited to, the implied warranties of merchantability
and fitness for a particular purpose, and is subject to change without notice.
The warranties for HP products are set forth in the express limited warranty
statements accompanying such products. Nothing herein should be construed
as constituting an additional warranty.
This document contains proprietary information that is protected by
copyright. No part of this document may be photocopied, reproduced, or
translated to another language without the prior written consent of
Hewlett-Packard Company.
ÅWARNING: Text set off in this manner indicates that failure to
follow directions could result in bodily harm or loss of life.
ÄCAUTION: Text set off in this manner indicates that failure to follow
directions could result in damage to equipment or loss of information.
User’s Guide
hp iPAQ Pocket PC h5100 and h5500 series
First Edition (May 2003)
Document Part Number: 304926-001

User’s Guide 1
Contents
1 Getting to Know Your iPAQ Pocket PC
Using the Stylus . . . . . . . . . . . . . . . . . . . . . . . . . . . . . . . . 1–5
Setting the Date and Time . . . . . . . . . . . . . . . . . . . . . . . . 1–6
Setting the Time for Home and Visiting
Locations . . . . . . . . . . . . . . . . . . . . . . . . . . . . . . . . . . 1–6
Setting the Date . . . . . . . . . . . . . . . . . . . . . . . . . . . . . 1–7
Entering Owner Information . . . . . . . . . . . . . . . . . . . . . . 1–7
Resetting the Unit. . . . . . . . . . . . . . . . . . . . . . . . . . . . . . . 1–8
Performing a Normal Reset . . . . . . . . . . . . . . . . . . . . 1–8
Performing a Full Reset. . . . . . . . . . . . . . . . . . . . . . . 1–9
Aligning the Screen . . . . . . . . . . . . . . . . . . . . . . . . . . . . 1–10
Routine Care. . . . . . . . . . . . . . . . . . . . . . . . . . . . . . . . . . 1–11
2 Using ActiveSync
Connecting to a Computer . . . . . . . . . . . . . . . . . . . . . . . . 2–2
Synchronizing with Your Computer . . . . . . . . . . . . . 2–2
Using the Serial Infrared (IR) Connection . . . . . 2–3
Changing Synchronization Settings. . . . . . . . . . . . . . 2–4
Copying Files . . . . . . . . . . . . . . . . . . . . . . . . . . . . . . . . . . 2–5
Installing Applications . . . . . . . . . . . . . . . . . . . . . . . . . . . 2–6
Backing up and Restoring . . . . . . . . . . . . . . . . . . . . . . . . 2–6
Synchronizing Links . . . . . . . . . . . . . . . . . . . . . . . . . . . . 2–7
Sending and Receiving E-mail. . . . . . . . . . . . . . . . . . . . . 2–7
Requesting Meetings . . . . . . . . . . . . . . . . . . . . . . . . . . . . 2–7

Contents
User’s Guide 2
3 Managing the Battery
Installing the Battery . . . . . . . . . . . . . . . . . . . . . . . . . . . . 3–1
Removing the Battery . . . . . . . . . . . . . . . . . . . . . . . . . . . 3–3
Charging. . . . . . . . . . . . . . . . . . . . . . . . . . . . . . . . . . . . . . 3–3
Charging with the AC Adapter and
Charger Adapter . . . . . . . . . . . . . . . . . . . . . . . . . . . . 3–4
Charging with the Universal Desktop
Cradle and AC Adapter . . . . . . . . . . . . . . . . . . . . . . . 3–5
Charging with the Optional USB
Autosync Cable . . . . . . . . . . . . . . . . . . . . . . . . . . . . . 3–7
Charging a Low Battery . . . . . . . . . . . . . . . . . . . . . . 3–7
Preserving Battery Time . . . . . . . . . . . . . . . . . . . . . . . . . 3–8
Adjusting the Standby Setting . . . . . . . . . . . . . . . . . . 3–8
Changing the Backlight Settings . . . . . . . . . . . . . . . 3–10
Disabling the Application and Record Buttons . . . . 3–10
Manually Monitoring the Battery . . . . . . . . . . . . . . 3–11
4 Learning the Basics
Using the Today Screen . . . . . . . . . . . . . . . . . . . . . . . . . . 4–1
Navigation Bar and Command Bar . . . . . . . . . . . . . . 4–2
Status Icons . . . . . . . . . . . . . . . . . . . . . . . . . . . . . . . . 4–3
Pop-Up Menus. . . . . . . . . . . . . . . . . . . . . . . . . . . . . . 4–4
Creating information . . . . . . . . . . . . . . . . . . . . . . . . . 4–5
Customizing the Today Screen . . . . . . . . . . . . . . . . . 4–6
Using Applications. . . . . . . . . . . . . . . . . . . . . . . . . . . . . . 4–8
Opening Applications . . . . . . . . . . . . . . . . . . . . . . . . 4–8
Minimizing Applications. . . . . . . . . . . . . . . . . . . . . . 4–8
Closing Applications . . . . . . . . . . . . . . . . . . . . . . . . . 4–9
Closing with iTask . . . . . . . . . . . . . . . . . . . . . . . 4–9
Closing Manually . . . . . . . . . . . . . . . . . . . . . . . . 4–9
Installing Applications. . . . . . . . . . . . . . . . . . . . . . . . 4–9

Contents
User’s Guide 3
Using iPAQ Image Viewer . . . . . . . . . . . . . . . . . . . 4–10
Locating an Image. . . . . . . . . . . . . . . . . . . . . . . 4–11
Viewing Image Information . . . . . . . . . . . . . . . 4–11
Changing the View . . . . . . . . . . . . . . . . . . . . . . 4–12
Creating a Slide Show. . . . . . . . . . . . . . . . . . . . 4–13
Saving a Slide Show . . . . . . . . . . . . . . . . . . . . . 4–14
Opening a Slide Show. . . . . . . . . . . . . . . . . . . . 4–15
Sorting Image Files . . . . . . . . . . . . . . . . . . . . . . 4–15
Viewing a Slide Show. . . . . . . . . . . . . . . . . . . . 4–16
Backing Up Information . . . . . . . . . . . . . . . . . . . . . 4–17
Backup/Restore using iPAQ Backup . . . . . . . . 4–17
Backup/Restore Using ActiveSync. . . . . . . . . . 4–18
Using iPAQ File Store Folder . . . . . . . . . . . . . . . . . 4–19
5 Learning Input Methods
Changing Word Suggestion Options . . . . . . . . . . . . . . . . 5–1
Using the On-Screen Keyboard . . . . . . . . . . . . . . . . . . . . 5–4
Writing with the Stylus and the Letter Recognizer . . . . . 5–5
Writing with the Stylus and Microsoft Transcriber . . . . . 5–7
Writing with the Stylus and Block Recognizer . . . . . . . . 5–8
Drawing and Writing on the Screen. . . . . . . . . . . . . . . . . 5–9
Converting Writing to Text . . . . . . . . . . . . . . . . . . . . 5–9

Contents
User’s Guide 5
Understanding Profiles . . . . . . . . . . . . . . . . . . . . . . 8–12
Creating a Profile . . . . . . . . . . . . . . . . . . . . . . . 8–12
Activating a Profile . . . . . . . . . . . . . . . . . . . . . . 8–13
Saving Bluetooth Configuration Settings
in a Profile. . . . . . . . . . . . . . . . . . . . . . . . . . . . . 8–14
Renaming a Profile . . . . . . . . . . . . . . . . . . . . . . 8–14
Deleting a Profile . . . . . . . . . . . . . . . . . . . . . . . 8–15
Working with Bluetooth Manager . . . . . . . . . . . . . . . . . 8–15
Opening Bluetooth Manager . . . . . . . . . . . . . . . . . . 8–16
Locating and Selecting a Device . . . . . . . . . . . . . . . 8–16
Pairing Devices . . . . . . . . . . . . . . . . . . . . . . . . . 8–16
Unpairing Devices. . . . . . . . . . . . . . . . . . . . . . . 8–18
Connecting to Other Devices . . . . . . . . . . . . . . . . . . . . . 8–18
Identifying the Communications Port . . . . . . . . . . . 8–18
Establishing an ActiveSync Connection . . . . . . . . . 8–19
Establishing a Serial Connection. . . . . . . . . . . . . . . 8–20
Dial-Up Networking . . . . . . . . . . . . . . . . . . . . . . . . 8–20
Using Dial-Up Networking. . . . . . . . . . . . . . . . 8–20
Join a Personal Area Network . . . . . . . . . . . . . . . . . 8–22
Establishing a Cell Phone Partnership. . . . . . . . . . . 8–22
Establishing a Headset Connection . . . . . . . . . . . . . 8–22
Working with Files. . . . . . . . . . . . . . . . . . . . . . . . . . . . . 8–23
Creating a File Transfer Connection . . . . . . . . . . . . 8–23
Sending Files . . . . . . . . . . . . . . . . . . . . . . . . . . . . . . 8–23
Creating a Folder on a Remote Device . . . . . . . . . . 8–24
Receiving a File from a Remote Device . . . . . . . . . 8–24
Deleting a File from a Remote Device . . . . . . . . . . 8–24
Using Business Card Exchange . . . . . . . . . . . . . . . . . . . 8–25
Setting Up Your Business Card Information . . . . . 8–25
Sending Business Cards. . . . . . . . . . . . . . . . . . . . . . 8–27
Requesting Business Cards . . . . . . . . . . . . . . . . 8–28
Exchanging Business Cards . . . . . . . . . . . . . . . 8–28
Opening a Connection . . . . . . . . . . . . . . . . . . . . . . . . . . 8–28
Viewing Connection Status . . . . . . . . . . . . . . . . . . . 8–29
Closing a Connection. . . . . . . . . . . . . . . . . . . . . . . . 8–29
Viewing Connection Information . . . . . . . . . . . . . . 8–29

Contents
User’s Guide 6
Working with Connections . . . . . . . . . . . . . . . . . . . 8–30
Creating a Shortcut . . . . . . . . . . . . . . . . . . . . . . 8–30
Deleting a Shortcut . . . . . . . . . . . . . . . . . . . . . . 8–30
Viewing Shortcuts. . . . . . . . . . . . . . . . . . . . . . . 8–30
9 Using the Wireless LAN
(h5500 only)
Getting Acquainted . . . . . . . . . . . . . . . . . . . . . . . . . . . . . 9–1
Learning the Terms . . . . . . . . . . . . . . . . . . . . . . . . . . . . . 9–2
Getting Started with the Wireless LAN . . . . . . . . . . . . . . 9–3
Powering the WLAN On or Off . . . . . . . . . . . . . . . . 9–3
Automatically Connecting to a Network . . . . . . . . . . 9–4
Manually Entering New Network Settings . . . . . . . . 9–4
Searching for Networks to Access. . . . . . . . . . . . . . . 9–6
Managing Wireless Network Settings . . . . . . . . . . . . . . . 9–7
Viewing or Editing a Wireless Network . . . . . . . . . . 9–7
Deleting a Wireless Network. . . . . . . . . . . . . . . . . . . 9–7
Monitoring Signal Strength and Status . . . . . . . . . . . . . . 9–8
Working with Network Settings. . . . . . . . . . . . . . . . . . . . 9–9
Looking Up an IP Address . . . . . . . . . . . . . . . . . . . . 9–9
Changing TCP/IP Settings. . . . . . . . . . . . . . . . . . . . 9–10
Changing DNS and WINS Settings. . . . . . . . . . . . . 9–12
Setting Up VPN Server Connections. . . . . . . . . . . . 9–14
Changing VPN Server Connections . . . . . . . . . . . . 9–15
Starting VPN Server Connections . . . . . . . . . . . . . . 9–16
Setting Up Proxy Server Settings . . . . . . . . . . . . . . 9–16

User’s Guide 1–1
1
Getting to Know Your
iPAQ Pocket PC
✎Model shown in illustrations is iPAQ Pocket PC h5500 Series.
Congratulations on purchasing an HP iPAQ Pocket PC h5100
or h5500 Series. Use this guide to find out about setting up your
Pocket PC and to learn about how it works.
The software applications described below are preinstalled on
your iPAQ Pocket PC. These preinstalled applications are not
deleted if your Pocket PC loses power.
You can find detailed information for using these applications
in the Help files on your iPAQ Pocket PC. To access these Help
files, from the and select an application. Start menu, tap Help
For Help on applications not listed in the table below, open the
application, then tap > Help.

User’s Guide 1–2
Getting to Know Your iPAQ Pocket PC
In addition, Microsoft Pocket PC Basics provides basic
instructions on operating the Pocket PC. To locate Pocket PC
Basics, go to the Today screen and tap Start > Help.
hp iPAQ Software Functions
Bluetooth Allows short-range wireless communications
technology capable of exchanging information
up to a distance of about 30 feet (10 meters).
iPAQ Backup Back up your data to protect it from loss due
to hardware failure, battery power failure,
or accidental deletion.
iPAQ Image Viewer Display individual images and run slide shows.
Also display images from a digital camera
storage card.
iTask Manage tasks that are running, and functions
as a shortcut to launch or close programs.
Assigned, by default, to the fourth Application
Button on the Pocket PC.

Getting to Know Your iPAQ Pocket PC
User’s Guide 1–5
Using the Stylus
Your iPAQ Pocket PC comes with a stylus that you should use to
tap or write on your screen.
ÄCAUTION: To prevent damage to your iPAQ Pocket PC screen,
never use any device other than the stylus that comes with the
Pocket PC or an approved replacement to tap or write on the
screen. If you lose or break your stylus, you can order extras at
www.hp.com/products/pocketpc/options.
You can perform three basic actions using the stylus:
Tap—Lightly touch the screen to select or open an item. Lift the
stylus after you tap an item. Tapping is equivalent to clicking an
item with the mouse on your personal computer.
Drag—Place the point of the stylus on the screen and drag an
item across the screen without lifting the stylus until you have
completed the selection. Dragging is equivalent to dragging with
the left mouse button pressed on your personal computer mouse.
Tap and hold—Hold the stylus pointer on an item for a short
time until a menu displays. Tapping and holding is equivalent to
right-clicking your personal computer mouse button. When you
tap and hold, a circle of red dots appears around the stylus to
indicate that the menu will soon pop up.

User’s Guide 1–6
Getting to Know Your iPAQ Pocket PC
Setting the Date and Time
When you turn on your iPAQ Pocket PC for the first time, you are
requested to select your time zone. After setting the time zone,
you still need to set the time and date on your unit. All three
settings are located in the Clock Settings screen and can be set
at the same time.
✎By default, the time on the iPAQ Pocket PC is synchronized with
your personal computer each time the two devices connect using
ActiveSync.
Setting the Time for Home and Visiting
Locations
1. From the Start menu, tap Settings > System tab > Clock
icon.
SHORTCUT: From the Today screen, tap the Clock icon to set
the time.
2. Tap either Home or Visiting.
3. Tap the time-zone down arrow, then select the appropriate
time zone.
4. Tap the hour, minutes, or seconds, then use the up and down
arrows to adjust the time.
SHORTCUT: You can also adjust the time by moving the hands
of the clock with the stylus.
5. Tap AM or PM.
6. Tap OK.
7. Tap Ye s to save the time.

Getting to Know Your iPAQ Pocket PC
User’s Guide 1–7
Setting the Date
1. From the Start menu, tap Settings > System tab > Clock
icon.
SHORTCUT: From the Today screen, tap the Clock icon to set
the date.
2. Tap the down arrow by the date.
3. Tap the left or right arrow to select a month and year.
4. Tap a day.
5. Tap OK.
6. Tap Ye s to save the date settings.
You need to reset your time zone, time, and date if:
■The location time (Home or Visiting) needs to be changed.
■All power to the iPAQ Pocket PC is lost, which removes all
saved settings.
■You perform a full reset of your iPAQ Pocket PC.
SHORTCUT: From the Today screen, tap the Clock icon to set
the time zone, time, and date.
Entering Owner Information
You can personalize your iPAQ Pocket PC by entering owner
information. To enter owner information:
1. From the Today screen, tap Start > Settings > Owner
Information.
SHORTCUT: From the Today screen, tap Tap here to set
owner information.
2. Tap in the Name field. A keyboard appears at the bottom of
the screen. Tap on the characters to enter your name.

User’s Guide 1–8
Getting to Know Your iPAQ Pocket PC
3. Tap the Tab key on the keyboard to move the cursor to the
next field.
4. Continue entering whatever information you want to include.
5. To display owner information at startup, tap in the Show
information when device is turned on checkbox.
6. Tap on the Notes tab to enter any notes.
7. Tap OK to save the information and return to the Today
screen.
Resetting the Unit
Performing a Normal Reset
A normal reset is sometimes referred to as a “soft reset.” A
normal reset stops all running applications but does not erase any
programs or saved data.
ÄCAUTION: Be sure to save any unsaved data before performing a
normal reset since normal reset erases all unsaved data.
To perform a normal reset:
1. Locate the Reset button on the bottom of your iPAQ
Pocket PC.
2. Use the stylus to lightly press the Reset button. The Pocket
PC restarts and displays the Today screen.

Getting to Know Your iPAQ Pocket PC
User’s Guide 1–9
Performing a Full Reset
A full reset is sometimes referred to as a “hard reset.” Perform a
full reset when you want to clear all settings, programs, and data
from RAM.
A full reset deactivates the battery. The power button does not
function until the battery is reactivated.
ÄCAUTION: If you perform a full reset, your iPAQ Pocket PC returns
to its default settings and loses all information that is not recorded
in ROM.
To perform a full reset:
1. Press and hold Application Buttons 1 (Calendar) and 4
(iTask) on the front of the unit and, at the same time, use the
stylus to press the Reset button on the bottom of your iPAQ
Pocket PC.
2. Hold all buttons until the displayed image begins to fade
(approximately four seconds).

User’s Guide 1–10
Getting to Know Your iPAQ Pocket PC
3. Release the Application Buttons and stylus.
✎To verify a full reset, press the Power button. If the iPAQ Pocket
PC has been fully reset, it does not power on.
4. Reactivate the battery by:
❏Connecting the iPAQ Pocket PC to AC power
or
❏Pressing the Reset button with the stylus
Aligning the Screen
When the iPAQ Pocket PC is turned on for the first time, you are
guided through a screen alignment process. You must realign
your screen if:
■The Pocket PC does not respond accurately to your taps.
■You perform a full reset of your Pocket PC.
To realign the iPAQ Pocket PC screen:
1. From the Start menu, tap Settings > System tab > Screen
icon.
2. Tap the Align Screen button.
✎To use an alternate path to the same destination without tapping
on the screen, press and release all four Application Buttons at
the same time.
3. Tap the cross-hair object at each location. Be precise when
tapping the cross-hair object.
4. Tap OK.

Getting to Know Your iPAQ Pocket PC
User’s Guide 1–11
Routine Care
To keep your iPAQ Pocket PC in good condition and working
properly, follow these guidelines:
■Keep your Pocket PC away from excessive moisture and
temperature extremes.
■Do not expose your Pocket PC to liquids or precipitation.
■Do not place anything on top of your Pocket PC to prevent
damage to the screen.
■Store your Pocket PC in a protective case when not in use.
■Clean your Pocket PC by wiping the screen and the exterior
with a soft, damp cloth moistened only with water.
■Avoid exposing your Pocket PC to direct sunlight or strong
ultraviolet light for extended periods of time.
■Avoid scratching the surface of the screen and banging it
against hard objects.
■Use only the stylus that comes with your Pocket PC or an
approved replacement on the screen to prevent scratching it.
ÄCAUTION: To reduce the risk of electrical shock or damage to the
internal components, do not spray liquid directly on the screen or
allow excess liquid to drip inside your iPAQ Pocket PC. Using soap or
other cleaning products on the screen may discolor the finish and
damage it.

User’s Guide 2–1
2
Using ActiveSync
You can use Microsoft ActiveSync to:
■Synchronize information between your iPAQ Pocket PC and
your personal computer or server so that you have the latest
information in all locations.
■Change synchronization settings and the synchronization
schedule.
■Copy files between your device and personal computer.
■Install applications on your iPAQ Pocket PC.
■Back up and restore device information.
■Synchronize links.
■Send and receive e-mail.
■Request meetings.

User’s Guide 2–2
Using ActiveSync
Connecting to a Computer
Connect your iPAQ Pocket PC to your personal computer using
Microsoft ActiveSync and the Universal Desktop Cradle, a
wireless infrared connection, or Bluetooth. For more information
on using ActiveSync with Bluetooth, refer to Chapter 8, “Using
Bluetooth.”
✎When using Microsoft ActiveSync to synchronize e-mail on
your personal computer with your iPAQ Pocket PC, you must
have Microsoft Outlook 98 or later installed on your personal
computer. Outlook 2002 is included on the Companion CD. If
you do not have Outlook, install the Microsoft Outlook 2002
software from the CD. Microsoft Outlook Express will not work
with the iPAQ Pocket PC and ActiveSync.
Synchronizing with Your Computer
ÄCAUTION: For synchronization to work properly, install Microsoft
ActiveSync on your personal computer before you connect your
iPAQ Pocket PC to your computer.
During ActiveSync installation, you can:
■Create partnerships that enable you to synchronize
information with multiple computers.
■Select information to be synchronized with your iPAQ Pocket
PC (for example, Contacts, Calendar, Inbox, Tasks, Favorites,
Files, Notes, and AvantGo).

Using ActiveSync
User’s Guide 2–3
✎When you synchronize files, you can drag and drop the selected
files from your personal computer to the synchronized folder on
your iPAQ Pocket PC. If you named your device “PC1” when you
created your partnership, then the synchronized folder is named
“PC1.” When you synchronize, the files move to your iPAQ
Pocket PC.
To install Microsoft ActiveSync on your personal computer:
1. Insert the Companion CD into the CD tray or slot on your
personal computer.
2. Select the link to install Microsoft ActiveSync.
3. Follow the instructions in the installation wizard. For more
help, click the ActiveSync Help button during installation.
The information you select automatically synchronizes when
your installation is complete.
4. After installing ActiveSync on your personal computer,
connect the iPAQ Pocket PC to the personal computer using
the Universal Desktop Cradle.
Using the Serial Infrared (IR) Connection
After setting up a connection with the USB connector on the
Universal Desktop Cradle, you can synchronize your iPAQ
Pocket PC and your personal computer using an infrared
connection if you have an infrared port or an infrared USB
adapter installed on your computer. The infrared connection
option works only on computers that have Microsoft Windows
98SE, Me, 2000, or XP operating systems installed.

User’s Guide 2–4
Using ActiveSync
To set up an infrared connection to a computer:
1. Synchronize your iPAQ Pocket PC with your computer using
the Universal Desktop Cradle.
2. Follow your computer manufacturer’s instructions to install
and set up an infrared port.
3. Remove the iPAQ Pocket PC from the cradle and line up the
infrared port with the computer infrared port so they are
unobstructed and within 12 inches (30.5 cm) of each other.
4. Initiate a connection by tapping Start > ActiveSync >
Tools > Connect via IR. Synchronization begins on your
device.
5. To disconnect, move the devices away from each other or
tap x to turn off.
Changing Synchronization Settings
You can modify your synchronization settings for Microsoft
ActiveSync to:
■Change when your iPAQ Pocket PC synchronizes with your
personal computer or server.
■Change the type of connection from your iPAQ Pocket PC
to your computer (for example, serial, USB, infrared
connections).
■Select the files and information to synchronize with your
computer.
■Select the files and information you do not want to
synchronize with your computer (for example, e-mail
attachments).
■Determine how conflicts between information on your
iPAQ Pocket PC and information on your computer are
handled.

Using ActiveSync
User’s Guide 2–5
To change synchronization settings:
1. From the Start menu on your personal computer, click
Programs > Microsoft ActiveSync > Tools > Options.
a. On the tab, select the files and information Sync Options
to synchronize with your computer.
b. On the Schedule tab, select when your iPAQ Pocket PC
synchronizes with your computer.
c. On the Rules tab, determine how conflicts between
information on your iPAQ Pocket PC and information on
your computer are handled.
2. Tap OK when you are finished.
3. From the File menu, click Connection Settings. Select the
type of connection to be allowed between the iPAQ Pocket
PC and the computer.
Copying Files
You can copy files to and from your personal computer using
Explore in ActiveSync and Windows Explorer.
To copy files:
1. Insert your iPAQ Pocket PC into the Universal Desktop
Cradle.
2. From the Start menu on your computer, click Programs >
Microsoft ActiveSync.
3. Click Explore.
4. Double-click the My Pocket PC icon.
5. On your personal computer, right-click the Start menu, then
select Explore.

User’s Guide 2–6
Using ActiveSync
6. Locate the file to be moved.
7. Drag and drop your files between your iPAQ Pocket PC and
your computer. ActiveSync converts the files so that they can
be used by the Pocket Office applications, if necessary.
✎Move your files directly into My Documents on your iPAQ
Pocket PC or into a folder inside My Documents, so the
applications on your iPAQ Pocket PC can locate them.
Installing Applications
To install applications on your iPAQ Pocket PC from your
computer using ActiveSync:
1. Connect your iPAQ Pocket PC to your personal computer
using the Universal Desktop Cradle.
2. Follow the instructions provided with the application and by
the installation wizard.
3. Check the screen of your iPAQ Pocket PC to see if any
further steps are necessary to complete the application
installation.
Backing up and Restoring
To help reduce the chance of losing information, you should back
up information to your computer regularly. For more information
on backing up and restoring information using Microsoft
ActiveSync, refer to “Backing Up Information” in Chapter 4.

Using ActiveSync
User’s Guide 2–7
Synchronizing Links
You can synchronize links to Web sites from your Favorites
list on your computer to view them offline with Pocket Internet
Explorer.
1. From the Start menu on your computer, click the Internet
Explorer icon.
2. Click Favorites to see the list of links to your favorite
Web sites.
3. To save a Web site link to Mobile Favorites, open the Web
site, then click Create Mobile Favorite.
4. Open ActiveSync on your computer and click Options. Be
sure Favorites is checked.
5. Click Sync to manually synchronize your iPAQ Pocket PC
with your computer and add your Mobile Favorites list to
your iPAQ Pocket PC.
Sending and Receiving E-mail
You can send and receive e-mail messages by synchronizing your
iPAQ Pocket PC with your personal computer using ActiveSync.
If you are using ActiveSync to send and receive e-mail messages,
the name of the folder you are using is displayed at the bottom of
the screen. For more information on sending and receiving e-mail
using ActiveSync, from the Today screen, tap Start > Help >
Inbox.
Requesting Meetings
You can schedule a meeting and send a meeting request through
ActiveSync. Refer to “Calendar” in the Help files on your iPAQ
Pocket PC. For more information, from the Today screen, tap
Start > Help > Calendar.

User’s Guide 3–1
3
Managing the Battery
✎Model shown in illustrations is iPAQ Pocket PC h5500 Series.
Installing the Battery
If you remove the main battery from your iPAQ Pocket PC,
your device does not operate even if you try to use AC power.
However, the Pocket PC has a small internal backup battery that
allows you to change the main battery without losing RAM data
(user-installed programs and data) as long as it is replaced within
10 minutes. If the battery is removed from the unit for longer
than 10 minutes, you will lose unsaved RAM data and need to
reset the unit.
It is recommended that you fully charge the iPAQ Pocket PC
battery before setting up the unit, and recharge regularly. Your
Pocket PC uses some power to maintain files in RAM and the
clock. While working at your desk, keep the Pocket PC connected
to the Universal Desktop Cradle. When you travel, it is
recommended that you carry the AC Adapter, Charger Adapter
plug, or an optional spare battery with you.
Your iPAQ Pocket PC is shipped with the battery partially
charged.

Managing the Battery
User’s Guide 3–3
Removing the Battery
To remove the battery from the iPAQ Pocket PC:
1. Push up on the latch at the top of the battery 1.
2. Pull the top of the battery away from the device 2.
3. Lift the battery up and out of the device 3.
ÄCAUTION: Because most of the applications and data you install on
your iPAQ Pocket PC are held in memory (RAM), you need to reinstall
them if the battery completely discharges or if the battery is removed
from the unit for extended periods of time.
You do not need to reinstall applications and data installed in the
iPAQ File Store folder because they are saved in ROM.
Charging
To recharge the battery, use one of the following methods:
■AC Adapter with the Charger Adapter
■Universal Desktop Cradle with the AC Adapter
■Optional USB Autosync Cable
User’s Guide 3–4
Managing the Battery
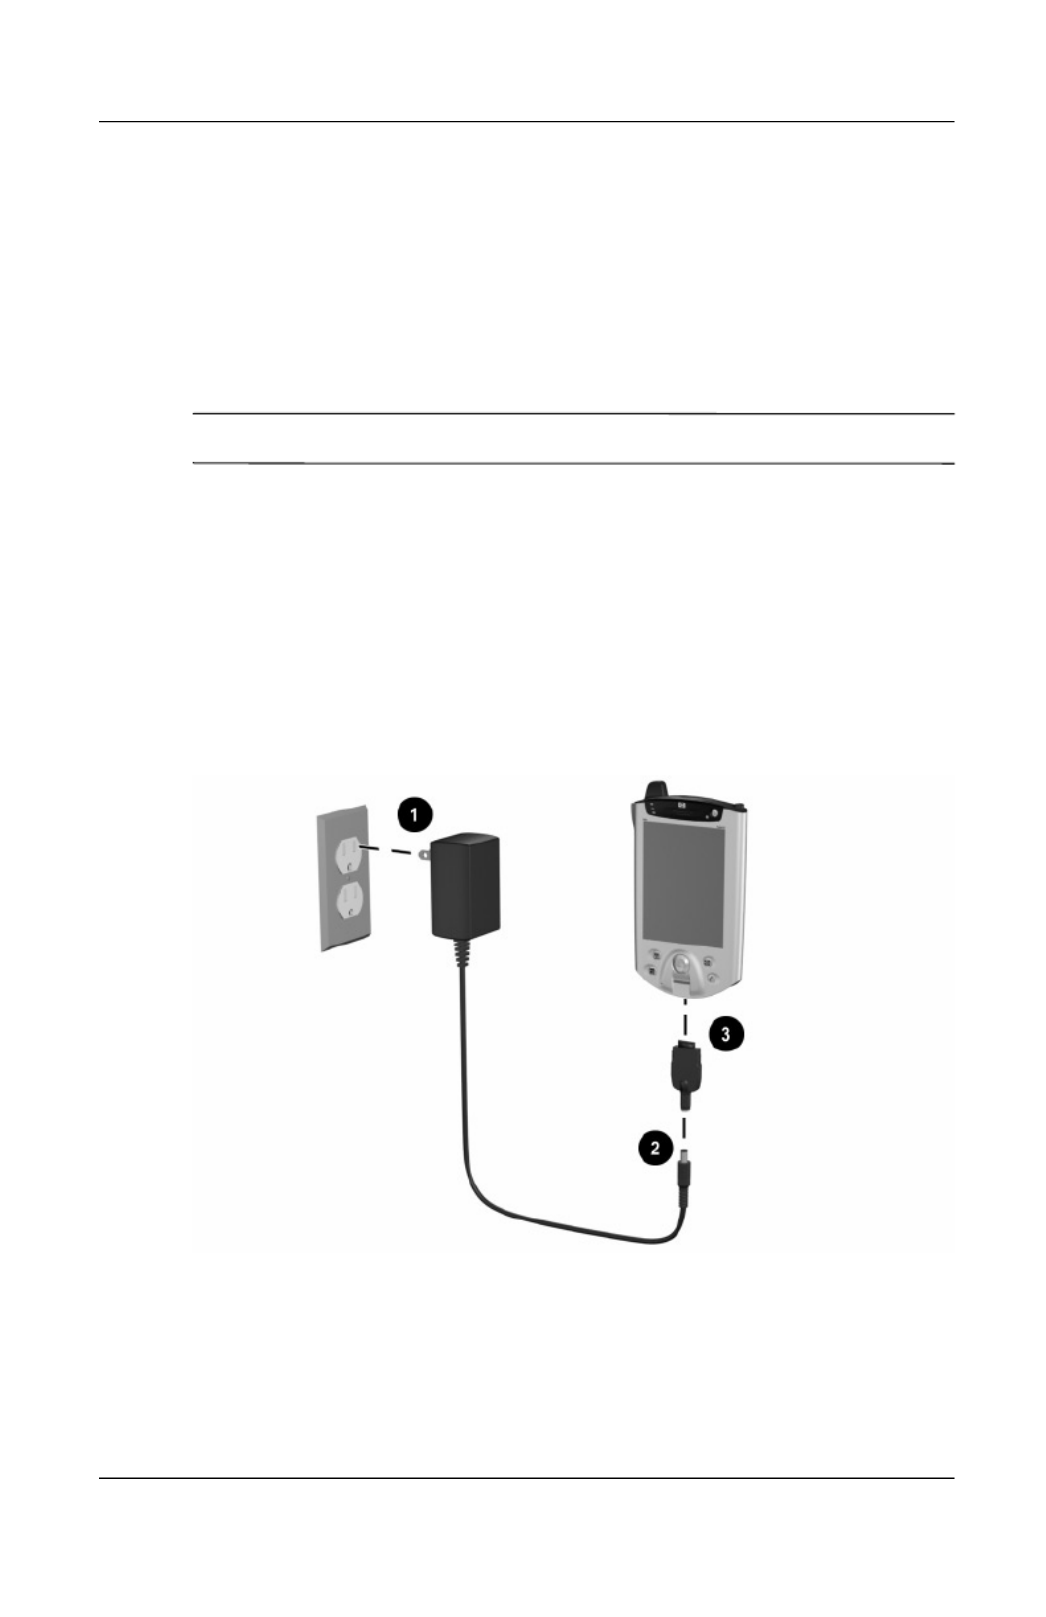
Charging with the AC Adapter and Charger
Adapter
The standard AC Adapter works in any household outlet. You can
also purchase one that works in your vehicle’s cigarette lighter or
a 12-volt power outlet.
ÄCAUTION: Use only HP recommended AC adapters.
To charge the iPAQ Pocket PC using the AC Adapter:
1. Plug one end of the AC Adapter into an electrical outlet 1.
2. Plug the other end of the AC Adapter into the bottom of the
Charger Adapter 2.
3. Plug the Charger Adapter 3 into the charging port on the
bottom of the iPAQ Pocket PC.

Managing the Battery
User’s Guide 3–5
4. When the power indicator on the top of the iPAQ Pocket PC
turns solid amber, the unit is fully charged and you can
disconnect the AC Adapter. The approximate time to fully
charge a unit is four hours.
✎The amber charge light blinks while the battery is recharging and
turns solid (nonblinking) when the battery is fully charged.
If you receive a low backup battery warning, charge your unit
immediately before removing the main battery to avoid data loss.
To view the amount of charge left in the backup battery, tap
Start > Settings > System tab > Power.
Charging with the Universal Desktop Cradle
and AC Adapter
Use the Universal Desktop Cradle to:
■Charge the iPAQ Pocket PC.
■Synchronize the Pocket PC with your computer. (For
information on synchronizing, refer to Chapter 2, “Using
ActiveSync.”)

User’s Guide 3–6
Managing the Battery
To charge the iPAQ Pocket PC using the Universal Desktop
Cradle:
1. Plug the AC Adapter into an electrical outlet 1 and connect
the other end of the AC Adapter to the AC connector on the
Universal Desktop Cradle 2.
2. Slide the bottom of your iPAQ Pocket PC into the cradle 3
and push firmly to seat it.
ÄCAUTION: To avoid damaging your iPAQ Pocket PC or the cradle,
check to be sure the pins are aligned before pushing the Pocket PC
into the cradle.
✎The amber charge light blinks while the battery is recharging and
turns solid (nonblinking) when the battery is fully charged.
There are stabilizers located in the Universal Desktop Cradle.
These stabilizers assist in aligning the unit when there is no
expansion pack attached. When you place your iPAQ Pocket PC
with an expansion pack attached into the Universal Desktop

Managing the Battery
User’s Guide 3–7
Cradle, the stabilizers will be pushed down by the expansion
pack. To release the stabilizers for use without an expansion pack,
press the button on the back of the cradle.
Charging with the Optional USB Autosync
Cable
You can charge your iPAQ Pocket PC using the optional USB
Autosync Cable. Connect the Autosync Cable to the Pocket PC
and your personal computer. The Pocket PC will be charged using
power from the personal computer.
For more information on charging your Pocket PC using the
optional USB Autosync Cable, from the Today screen, tap
Start > Settings > System tab > Power > USB Charging tab >
Settings Help. >
Charging a Low Battery
Your iPAQ Pocket PC will not power on if the battery has a low
charge (less than 3.2 Volts). It is recommended that you fully
charge the battery prior to using the Pocket PC.
If the charge on the battery goes below the 3.2 Volts as a result of
not being connected to the Universal Desktop Cradle or the AC
Adapter, no damage will occur to the battery. However, the iPAQ
Pocket PC charge indicator light will not flash until the battery
reaches the minimum charge of 3.2 Volts and you perform a
normal reset.
To charge and reset the iPAQ Pocket PC:
1. Connect the iPAQ Pocket PC to an A/C power supply.
2. Charge the battery to the minimum level of 3.2 Volts. This
will take 5 to 30 minutes depending on the current charge
level.

User’s Guide 3–8
Managing the Battery
3. Perform a normal reset (refer to “Performing a Normal
Reset” in Chapter 1).
4. Power on the iPAQ Pocket PC.
It is recommended that you keep the iPAQ Pocket PC connected
to the Universal Desktop Cradle or AC Adapter when it is not
in use.
Preserving Battery Time
Adjusting the Standby Setting
Adjusting the Standby setting can preserve battery time. During
Standby, the unit turns off so very little power is being consumed.
This helps to preserve programs and data stored in RAM.
■Lower Standby Period—Increases the usable battery time.
If you use the iPAQ Pocket PC for extended periods of time,
you can choose to select a lower Standby Period.
■Higher Standby Period—Decreases the usable battery
time and allocates it for standby usage. If you leave your
iPAQ Pocket PC off for extended periods of time without
recharging it, you can choose to select a higher Standby
Period.
For more information on using the Standby setting, tap
Start Standby> Settings > System tab > Power icon > tab >
Settings Help. >

Managing the Battery
User’s Guide 3–9
To adjust the Standby setting:
1. From the Start menu, tap Settings > System tab >
Power icon.
2. Tap the Standby tab.
3. Drag the pointer to adjust the standby period.

User’s Guide 3–10
Managing the Battery
Changing the Backlight Settings
To change the backlight settings in order to conserve more battery
power:
1. From the Start menu, tap Settings > System tab >
Backlight.
Shortcut: Press Application Button 4 (iTask), then tap the
Light bulb icon.
2. Select the following backlight settings:
■Battery Power
■External Power
■Brightness
Disabling the Application and Record
Buttons
Pressing the Application Buttons or the Record Button on your
iPAQ Pocket PC will turn your device on by default. To preserve
power and extend the life of your battery if you accidentally press
one of these buttons, you can disable either of these functions.
To disable the Auto Power On function of the Application
Buttons:
1. Tap Start > Settings > Buttons > Lock tab.
2. Tap in the Disable the application buttons checkbox.
3. Tap OK.

Managing the Battery
User’s Guide 3–11
To disable the Auto Power On function of the Record Button:
1. Tap Start > Settings > Buttons > Lock tab.
2. Tap in the Disable the record button checkbox.
3. Tap OK.
✎If you disable the Auto Power On feature for the Application
Buttons and the Record Button, the Power Button still turns the
unit on. Once the unit is turned on, all buttons will function
according to their programmed functions.
Manually Monitoring the Battery
To manually monitor the battery power:
1. From the Start menu, tap Settings > System tab >
Power icon.
2. Tap OK.

User’s Guide 4–1
4
Learning the Basics
Using the Today Screen
When you first turn on your iPAQ Pocket PC, the Today screen
displays. You can also display it by tapping Start, then Today.
Use the Today screen to view:
■Owner information
■Upcoming appointments
■Unread and unsent messages
■Tasks that need to be completed
Tap to switch
to a program. Tap to change volume or mute all sounds.
Tap to set ISP or Work connections.
Tap to change date and time.
Tap to set appointment or
view existing appointment.
Tap to read e-mail.
Tap to create a new item.
Tap to power Bluetooth on/off
Learning the Basics
User’s Guide 4–3
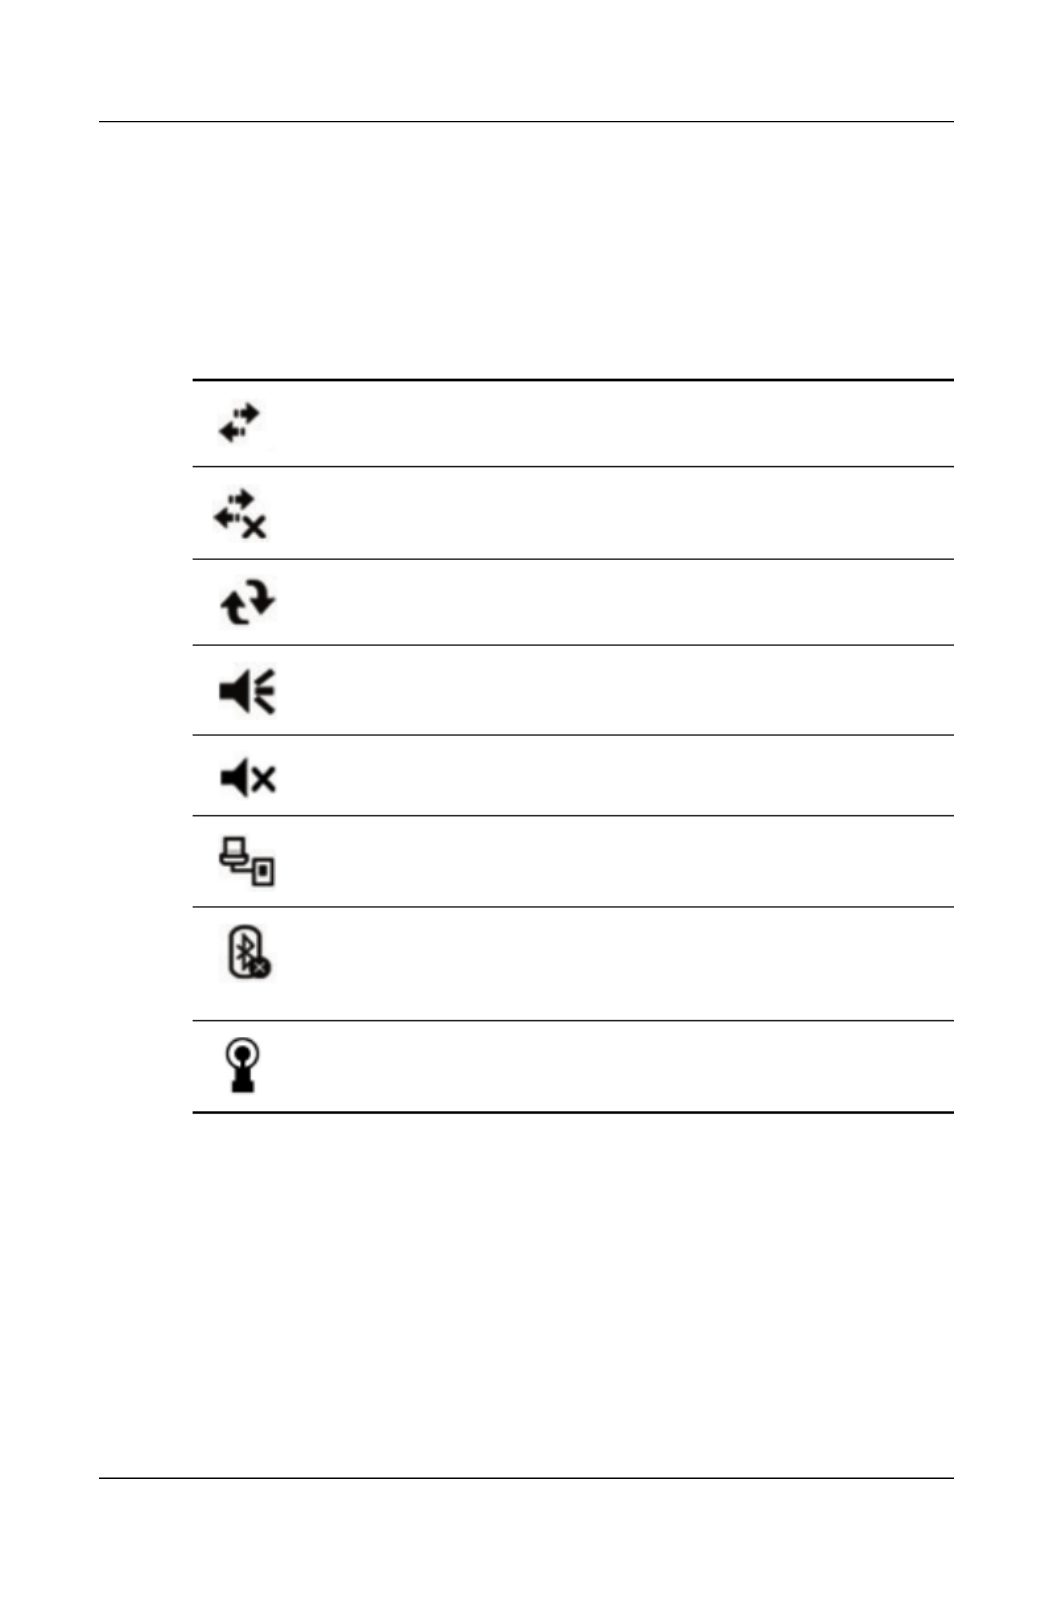
Status Icons
You may see the following status icons displayed on the
Navigation bar or Command bar. Tap the icon on the screen
to view more information related to the item.
Active connection to wireless network.
Inactive connection to wireless network.
Microsoft ActiveSync is synchronizing.
Speaker is on.
Speaker is off.
iPAQ Pocket PC is connected to the USB Desktop Cradle.
This icon appears only when there is an active connection.
Bluetooth power-on/off icon. When the Bluetooth icon is
blue, Bluetooth is active. When the Bluetooth icon is grayed
with a red X, Bluetooth is inactive.
Wireless LAN network connection detected. (h5500 only)

User’s Guide 4–4
Learning the Basics
Pop-Up Menus
Pop-up menus allow you to quickly perform an action. Use the
pop-up menu to cut, copy, rename, and delete an item, also send
an e-mail or beam a file to another device.
To access a pop-up menu, tap and hold the stylus on the name
of the item on which you want to perform the action. When the
menu appears, tap the desired action, or tap anywhere outside the
menu to close it without performing an action.
Tap and hold to display
the pop-up menu.
Tap the action you want.
Tap outside the menu to close
it without performing an action.

Learning the Basics
User’s Guide 4–5
Creating information
From the Today screen, you can create new information,
including:
■Appointments
■Contacts
■E-mail
■Excel Workbook Information
■Notes
■Tasks
■Word documents
1. From the Today screen, tap New.
2. Tap an option to create a new item.
3. Tap OK after you finished creating a new item.

User’s Guide 4–6
Learning the Basics
Customizing the Today Screen
From the Settings Today screen, you can:
■Add a picture as the background.
■Select the information you see.
■Set the order of the information.
■Set when to see the Today screen.
1. From the Today screen, tap Start > Settings > Today.
2. Select the Use this picture as the background checkbox.
3. Tap Browse to select a picture from File Explorer.

Learning the Basics
User’s Guide 4–7
4. Tap the Items tab to select or reorder the information on the
Today screen.
5. Tap an item to highlight it.
6. Tap Move Up or Move Down to change the order of items on
the Today screen.
✎You cannot change the placement of the Date on the Today
screen.
7. Tap the down arrow next to the Display Today screen if
device is not used for...hours checkbox to determine how
many hours must pass before the Today screen displays.
8. Tap OK.

User’s Guide 4–8
Learning the Basics
Using Applications
Opening Applications
Open any application on your iPAQ Pocket PC from the Start
menu.
✎You can also open an application by assigning it to an Application
Button. To assign Application Buttons, from the Today screen,
tap Start > Settings > Buttons.
To open an application:
1. Tap Start > Programs.
2. Tap the desired application title or logo.
Minimizing Applications
To minimize an open application, tap the x at the top right of the
screen.

Learning the Basics
User’s Guide 4–9
Closing Applications
Applications automatically close based on available memory.
However, if your iPAQ Pocket PC is running slowly, you can
close applications using iTask or by manually closing them.
Closing with iTask
1. Press the iTask button (Application Button 4 on the lower
right side of your unit).
2. Tap and hold the program to be closed.
3. From the pop-up menu, tap Close This Task.
Closing Manually
1. From the Start menu, tap Settings > System tab >
Memory > Running Programs tab.
2. Tap Stop All or select a particular application, then tap Stop.
✎To bring a currently running program to the foreground, tap
Activate.
Installing Applications
Install applications on your iPAQ Pocket PC from your:
■Personal computer by using Microsoft ActiveSync.
■iPAQ Pocket PC if the application file has a .cab extension.
■ iPAQ Pocket PC or your computer by copying an application
file that has an .exe or .cef extension.
Learning the Basics
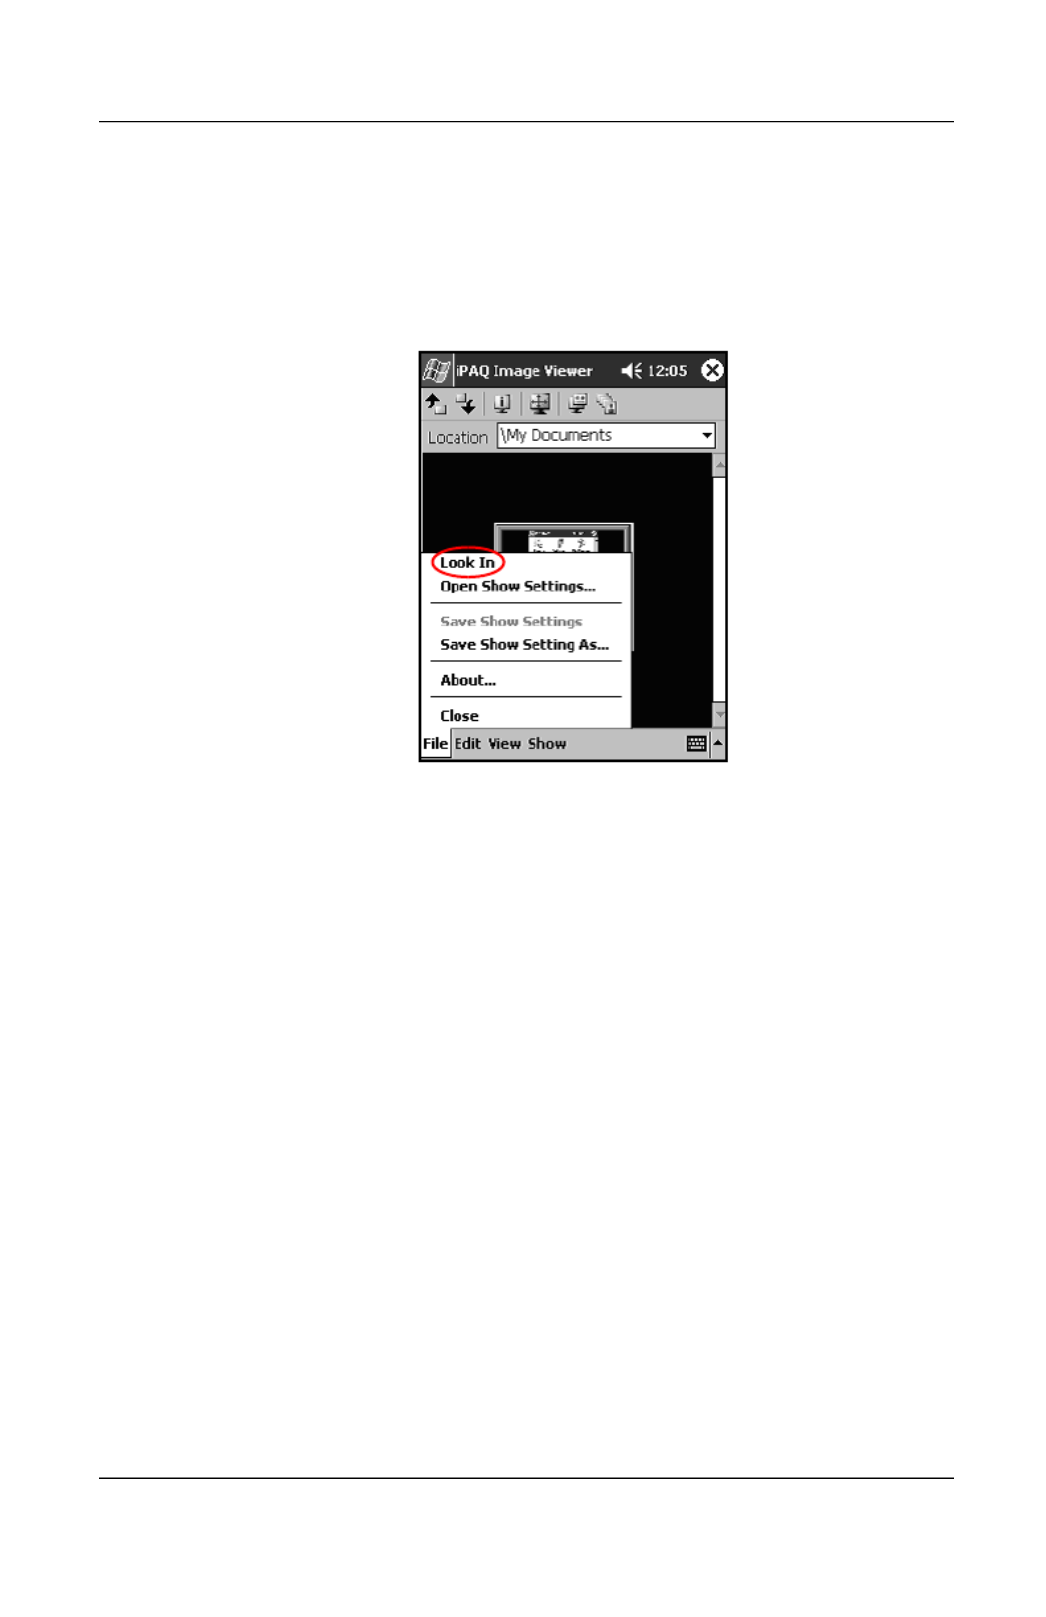
User’s Guide 4–11
Locating an Image
1. From the Start menu, tap Programs > iPAQ Image Viewer.
2. Tap the File tab > Look In.
3. Select a file, then tap OK.
Viewing Image Information
You can view the image size and type, date taken and modified,
color, and file size of an image.
To view image information:
1. Locate an image and tap it to select it.
2. Tap View > Information Window.

User’s Guide 4–12
Learning the Basics
Changing the View
By default. the Image Viewer opens displaying the images in the
Thumbnail View. You can change the view to full screen by:
■Double-tapping a thumbnail.
■Tapping View > Full Screen.
■Tapping the View Full Screen icon.

Learning the Basics
User’s Guide 4–17
Backing Up Information
Use iPAQ Backup or Microsoft ActiveSync Backup to back up
and restore information on your iPAQ Pocket PC.
✎iPAQ Backup is already installed on the iPAQ Pocket PC. You
must install ActiveSync on your personal computer before using
ActiveSync Backup.
To help reduce the chance of losing information, you should back
up information on a regular schedule.
Backup/Restore using iPAQ Backup
iPAQ Backup saves your data in a backup file. You may designate
a file name and a location for the file to be saved. iPAQ Backup
backs up to a memory card, main memory, or the iPAQ File Store
folder.
Close all applications on your iPAQ Pocket PC before backing
up or restoring your information.
ÄCAUTION: Restoring your information replaces the current
information on your iPAQ Pocket PC with the information saved
in your backup.
To backup/restore using iPAQ Backup:
1. From the Today screen, tap Start > Programs > iPAQ
Backup.
2. Tap the Backup tab or the Restore tab.
3. Select the files and folders to be backed up or restored.
4. Select file location for backed-up data.
5. Set backup or restore options.

Learning Input Methods
User’s Guide 5–5
Writing with the Stylus and the Letter
Recognizer
Use the stylus and Letter Recognizer to write letters, numbers,
and symbols on the screen. Create words and sentences by
writing in uppercase (ABC), lowercase (abc), and symbols (123)
as instructed here.
To write with the stylus and Letter Recognizer:
1. From any application, tap the up arrow next to the Input
Panel icon.
2. Tap Letter Recognizer.
3. Write a letter or symbol between the dashed line and
baseline.
a. To display in uppercase, write a letter between the hatch
marks labeled ABC.
b. To display in lowercase, write a letter between the hatch
marks labeled abc.
c. To display a number or symbol, write the number or
symbol between the hatch marks labeled 123.
What you write will be converted to text.
Product specificaties
| Merk: | HP |
| Categorie: | PDA |
| Model: | iPAQ h5100 |
Heb je hulp nodig?
Als je hulp nodig hebt met HP iPAQ h5100 stel dan hieronder een vraag en andere gebruikers zullen je antwoorden
Handleiding PDA HP

15 Augustus 2022
16 Augustus 2022
16 Augustus 2022
16 Augustus 2022
16 Augustus 2022
16 Augustus 2022
12 Juli 2021
12 Juli 2021
12 Juli 2021
12 Juli 2021
Handleiding PDA
- PDA Sony
- PDA Casio
- PDA Asus
- PDA Canon
- PDA Garmin
- PDA Toshiba
- PDA Acer
- PDA Ecom
- PDA Fujitsu
- PDA HTC
- PDA Intermec
- PDA Mio
- PDA Navman
- PDA Palm
- PDA Qtek
- PDA Sharp
- PDA Yakumo
- PDA Ockel
- PDA Oregon Scientific
- PDA Getac
- PDA Pharos
Nieuwste handleidingen voor PDA

14 Februari 2024

7 Oktober 2023
1 September 2023
1 September 2023
13 Juli 2023
13 Juli 2023
13 Juli 2023
13 Juli 2023
13 Juli 2023
13 Juli 2023