Denon DN-700H Handleiding
Denon
Hifi systeem
DN-700H
Lees hieronder de 📖 handleiding in het Nederlandse voor Denon DN-700H (128 pagina's) in de categorie Hifi systeem. Deze handleiding was nuttig voor 144 personen en werd door 2 gebruikers gemiddeld met 4.5 sterren beoordeeld
Pagina 1/128

NETWORK AUDIO PLAYER
DN-700H
Owner’s Manual


I
CAUTION
RISK OF ELECTRIC SHOCK
DO NOT OPEN
CAUTION:
TO REDUCE THE RISK OF ELECTRIC SHOCK, DO NOT REMOVE COVER (OR BACK).
NO USER-SERVICEABLE PARTS INSIDE. REFER SERVICING TO QUALIFIED SERVICE
PERSONNEL.
The lightning flash with arrowhead symbol, within an equilateral triangle, is intended to
alert the user to the presence of uninsulated “dangerous voltage” within the product’s
enclosure that may be of sufficient magnitude to constitute a risk of electric shock to
persons.
The exclamation point within an equilateral triangle is intended to alert the user to
the presence of important operating and maintenance (servicing) instructions in the
literature accompanying the appliance.
CAUTION:
USE OF CONTROLS OR ADJUSTMENTS OR REFOR-MANCE OF PROCEDURES OTHER
THAN THOSE SPECIFIED HEREIN MAY RESULT IN HAZARDOUS RADIATION EXPOSURE.
IMPORTANT TO SAFETY
WARNING:
To reduce the risk of fire and electric shock, this apparatus should not be exposed
to rain or moisture and objects filled with liquids, such as vases, should not be
placed on this apparatus.
CAUTION
1. Handle the power supply cord carefully
Do not damage or deform the power supply cord. If it is damaged or deformed, it may cause electric
shock or malfunction when used. When removing from wall outlet, be sure to remove by holding the
plug attachment and not by pulling the cord.
2. Do not open the rear cover
In order to prevent electric shock, do not open the top cover.
If problems occur, contact your DENON DEALER.
3. Do not place anything inside
Do not place metal objects or spill liquid inside the system.
Electric shock or malfunction may result.
Please, record and retain the Model name and serial number of your set shown on the rating label.
Model No. DN-700H
Serial No.
FCC INFORMATION
(For US customers)
1. COMPLIANCE INFORMATION
Product Name: Network Audio Player
Model Number: DN-700H
This product complies with Part 15 of the FCC Rules. Operation is subject to the following two
conditions: (1) this product may not cause harmful interference, and (2) this product must accept
any interference received, including interference that may cause undesired operation.
Denon Professional div. D&M Professional
1100 Maplewood Drive Itasca, IL 60143
Tel. 630-741-0330
2. IMPORTANT NOTICE: DO NOT MODIFY THIS PRODUCT
This product, when installed as indicated in the instructions contained in this manual, meets FCC
requirements. Modification not expressly approved by DENON may void your authority, granted by
the FCC, to use the product.
3. IMPORTANT
When connecting this product to network hub or router, use only a shielded STP or ScTP LAN
cable which is available at retailer.
Follow all installation instructions. Failure to follow instructions could void your authority, granted by
the FCC, to use the product.
4. NOTE
This product has been tested and found to comply with the limits for a Class B digital device,
pursuant to Part 15 of the FCC Rules. These limits are designed to provide reasonable protection
against harmful interference in a residential installation.
This product generates, uses and can radiate radio frequency energy and, if not installed and used
in accordance with the instructions, may cause harmful interference to radio communications.
However, there is no guarantee that interference will not occur in a particular installation. If this
product does cause harmful interference to radio or television reception, which can be determined
by turning the product OFF and ON, the user is encouraged to try to correct the interference by
one or more of the following measures:
• Reorientorrelocatethereceivingantenna.
• Increasetheseparationbetweentheequipmentandreceiver.
• Connect the product into an outlet on a circuit different from that to which the receiver is
connected.
• Consult the local retailer authorized to distribute this type of product or an experienced radio/TV
technician for help.
For Canadian customers:
This Class B apparatus complies with Canadian ICES-003.
Cet appareil numérique de la classe B est conforme à la norme NMB-003 du Canada.


II
1. Read these instructions.
2. Keep these instructions.
3. Heed all warnings.
4. Follow all instructions.
5. Do not use this apparatus near water.
6. Clean only with dry cloth.
7. Do not block any ventilation openings. Install in accordance with the manufacturer’s
instructions.
8. Do not install near any heat sources such as radiators, heat registers, stoves, or other apparatus
(including amplifiers) that produce heat.
9. Donotdefeatthesafetypurposeofthepolarizedorgrounding-typeplug.Apolarizedplughastwo
blades with one wider than the other. A grounding type plug has two blades and a third grounding
prong. The wide blade or the third prong are provided for your safety. If the provided plug does
not fit into your outlet, consult an electrician for replacement of the obsolete outlet.
10. Protect the power cord from being walked on or pinched particularly at plugs, convenience
receptacles, and the point where they exit from the apparatus.
11.
Onlyuseattachments/accessoriesspecifiedbythemanufacturer.
12.
Use only with the cart, stand, tripod, bracket, or table specified by the
manufacturer, or sold with the apparatus. When a cart is used, use caution
whenmovingthecart/apparatuscombinationtoavoidinjuryfromtip-over.
13. Unplug this apparatus during lightning storms or when unused for long
periods of time.
14. Refer all servicing to qualified service personnel. Servicing is required
when the apparatus has been damaged in any way, such as power-supply
cord or plug is damaged, liquid has been spilled or objects have fallen into
the apparatus, the apparatus has been exposed to rain or moisture, does not operate normally, or
has been dropped.
15. Batteries shall not be exposed to excessive heat such as sunshine, fire or the like.
Additional Safety Information!
16. This product is equipped with a three-wire grounding type plug, a plug having a third (grounding)
pin.
This plug will only fit into a grounding-type power outlet.
If you are unable to insert the plug into the outlet, contact your electrician to replace your obsolete
outlet. Do not defeat the safety purpose of the grounding-type plug.
IMPORTANT SAFETY INSTRUCTIONS
READ BEFORE OPERATING EQUIPMENT
This product was designed and manufactured to meet strict quality and safety standards. There
are, however, some installation and operation precautions which you should be particularly aware
of.
CAUTION: (English)
To completely disconnect this product from the mains, disconnect the plug from the wall
socket outlet.
The mains plug is used to completely interrupt the power supply to the unit and must be
within easy access by the user.
Do not expose batteries to excessive heat such as sunshine, fire or the like.
VORSICHT: (Deutsch)
Um dieses Gerät vollständig von der Stromversorgung abzutrennen, trennen Sie bitte den
NetzsteckervonderWandsteckdoseab.
Die Hauptstecker werden verwendet, um die Stromversorgung zum Gerät völlig zu
unterbrechen;ermussfürdenBenutzergutundeinfachzuerreichensein.
Setzen Sie Batterien nicht übermäßiger Wärme aus, z. B. Sonnenstrahlung, Feuer oder
dergleichen.
PRECAUTION: (Français)
Pour déconnecter complètement ce produit du courant secteur, débranchez la prise de la
prise murale.
La prise secteur est utilisée pour couper complètement l’alimentation de l’appareil et
l’utilisateur doit pouvoir y accéder facilement.
N’exposezpaslesbatteriesàunechaleurexcessivetellequelesoleil,lefeuouautre.
ATTENZIONE: (Italiano)
Per scollegare definitivamentequesto prodotto dalla rete dialimentazione elettrica, togliere
la spina dalla relativa presa.
La spina direte viene utilizzata per interromperecompletamente l’alimentazione all’unità e
deve essere facilmente accessibile all’utente.
Non esporre le batterie a un calore eccessivo, per esempio al sole, al fuoco o altre fonti.
PRECAUCIÓN: (Español)
Para desconectar completamente este producto de la alimentación eléctrica, desconecte el
enchufe del enchufe de la pared.
El enchufe de la alimentación se utiliza para interrumpir por completo el suministro de
alimentación a la unidad y debe de encontrarse en un lugar al que el usuario tenga fácil
acceso.
Noexpongalaspilasacalorexcesivo,comoalaluzsolar,elfuego,etc.
VOORZICHTIGHEID: (Nederlands)
Om de voeding van dit product volledig te onderbreken moet de stekker uit het stopcontact
worden getrokken.
De netstekker wordt gebruikt om de stroomtoevoer naar het toestel volledig te onderbreken
enmoetvoordegebruikergemakkelijkbereikbaarzijn.
Steldebatterijennietblootaanfellezonneschijn,brand,enzovoorts.
FÖRSIKTIHETSMÅTT: (Svenska)
Kopplalossstickproppenfråneluttagetförattheltskiljaproduktenfrånnätet.
Stickproppenanvändsförattheltbrytaströmförsörjningentillapparaten,ochdenmåstevara
lättillgängligföranvändaren.
Utsättintebatteriernaförstarkhettasåsomsolsken,eldellerliknande.
ATENÇÃO (Português):
Para desligar completamente este produto da corrente, desligue a ficha da tomada eléctrica.
A ficha eléctrica é utilizada para interromper completamente a alimentação da unidade e
deveestarnumlocalondeoutilizadorlhepossaacederfacilmente.
Nãoexponhaaspilhasafontesdecalorexcessivo,comoluzsolar,fogoousemelhantes.


III
WARNINGS WARNHINWEISE AVERTISSEMENTS AVVERTENZE ADVERTENCIAS WAARSCHUWINGEN VARNINGAR AVISOS
•Avoid high temperatures.
Allow for sufficient heat
dispersion when installed
in a rack.
•Handle the power cord
carefully.
Hold the plug when
unplugging the cord.
•Keep the unit free from
moisture, water, and
dust.
•Unplug the power cord
when not using the unit
for long periods of time.
•Do not obstruct the
ventilation holes.
•Do not let foreign
objects into the unit.
•Do not let insecticides,
benzene,andthinner
come in contact with
the unit.
•Never disassemble or
modify the unit in any
way.
•Ventilationshouldnot
be impeded by covering
the ventilation openings
with items, such as
newspapers, tablecloths
or curtains.
•Naked flame sources
such as lighted candles
should not be placed on
the unit.
•Observe and follow local
regulations regarding
battery disposal.
•Do not expose the unit
to dripping or splashing
fluids.
•Do not place objects
filled with liquids, such
as vases, on the unit.
•Do not handle the mains
cord with wet hands.
•When the switch is in
the OFF (STANDBY)
position, the equipment
is not completely
switched off from
MAINS.
•The equipment shall
be installed near the
power supply so that the
power supply is easily
accessible.
•VermeidenSiehoheTemperaturen.
Beachten Sie, dass eine
ausreichende Belüftung
gewährleistet wird, wenn das Gerät
auf ein Regal gestellt wird.
•Gehen Sie vorsichtig mit dem
Netzkabelum.
Halten Sie das Kabel am
Stecker, wenn Sie den Stecker
herausziehen.
•Halten Sie das Gerät von
Feuchtigkeit, Wasser und Staub
fern.
•Wenn das Gerät längere Zeit
nicht verwendet werden soll,
trennenSiedasNetzkabelvom
Netzstecker.
•Decken Sie den Lüftungsbereich
nicht ab.
•Lassen Sie keine fremden
Gegenstände in das Gerät
kommen.
•Lassen Sie das Gerät nicht
mitInsektiziden,Benzinoder
VerdünnungsmittelninBerührung
kommen.
•VersuchenSieniemalsdasGerät
auseinanderzunehmenoderzu
verändern.
•Die Belüftung sollte auf keinen
Fall durch das Abdecken der
Belüftungsöffnungendurch
Gegenstände wie beispielsweise
Zeitungen,Tischtücher,Vorhänge
o. Ä. behindert werden.
•Auf dem Gerät sollten keinerlei
direkte Feuerquellen wie
beispielsweiseangezündete
Kerzenaufgestelltwerden.
•Bitte beachten Sie bei der
Entsorgung der Batterien
dieörtlichgeltenden
Umweltbestimmungen.
•Das Gerät sollte keiner tropfenden
oderspritzendenFlüssigkeit
ausgesetztwerden.
•Auf dem Gerät sollten keine mit
Flüssigkeit gefüllten Behälter wie
beispielsweiseVasenaufgestellt
werden.
•DasNetzkabelnichtmitfeuchten
oder nassen Händen anfassen.
•Wenn der Schalter ausgeschaltet
ist (OFF (STANDBY)-Position), ist
das Gerät nicht vollständig vom
Stromnetz(MAINS)abgetrennt.
•Das Gerät sollte in der Nähe einer
Netzsteckdoseaufgestelltwerden,
damitesleichtandasStromnetz
angeschlossen werden kann.
•Eviter des températures
élevées.
Tenir compte d’une
dispersion de chaleur
suffisante lors de
l’installation sur une étagère.
•Manipuler le cordon
d’alimentation avec
précaution.
Tenir la prise lors du
débranchement du cordon.
•Protéger l’appareil contre
l’humidité, l’eau et la
poussière.
•Débrancher le cordon
d’alimentation lorsque
l’appareil n’est pas utilisé
pendant de longues
périodes.
•Ne pas obstruer les trous
d’aération.
•Ne pas laisser des objets
étrangers dans l’appareil.
•Ne pas mettre en contact
desinsecticides,dubenzène
et un diluant avec l’appareil.
•Ne jamais démonter ou
modifier l’appareil d’une
manière ou d’une autre.
•Ne pas recouvrir les orifices
de ventilation avec des
objets tels que des journaux,
nappes ou rideaux. Cela
entraverait la ventilation.
•Ne jamais placer de flamme
nue sur l'appareil, notamment
des bougies allumées.
•Veillezàrespecterlesloisen
vigueurlorsquevousjetez
les piles usagées.
•L’appareil ne doit pas
être exposé à l’eau ou à
l’humidité.
•Ne pas poser d’objet
contenant du liquide, par
exemple un vase, sur
l’appareil.
•Ne pas manipuler le cordon
d’alimentation avec les
mains mouillées.
•Lorsque l’interrupteur
est sur la position OFF
(STANDBY), l’appareil
n’est pas complètement
déconnecté du SECTEUR
(MAINS).
•L’appareil sera installé près
de la source d’alimentation,
de sorte que cette dernière
soit facilement accessible.
•Evitate di esporre l’unità a
temperature elevate.
Assicuratevi che vi sia
un’adeguata dispersione del
calore quando installate l’unità
in un mobile per componenti
audio.
•Manneggiate il cavo di
alimentazioneconattenzione.
Tenete ferma la spina quando
scollegate il cavo dalla presa.
•Tenete l’unità lontana
dall’umidità, dall’acqua e dalla
polvere.
•Scollegate il cavo di
alimentazionequando
prevedetedinonutilizzare
l’unità per un lungo periodo di
tempo.
•Non coprite i fori di
ventilazione.
•Non inserite corpi estranei
all’interno dell’unità.
•Assicuratevi che l’unità non
entri in contatto con insetticidi,
benzoloosolventi.
•Non smontate né modificate
l’unità in alcun modo.
•Leaperturediventilazione
non devono essere ostruite
coprendole con oggetti, quali
giornali, tovaglie, tende e
così via.
•Nonposizionatesull’unità
fiamme libere, come ad
esempio candele accese.
•Prestateattenzioneagliaspetti
legati alla tutela dell’ambiente
nello smaltimento delle
batterie.
•L’apparecchiatura non deve
essere esposta a gocciolii o
spruzzi.
•Nonposizionatesull’unità
alcun oggetto contenente
liquidi, come ad esempio i
vasi.
•Non toccare il cavo di
alimentazioneconlemani
bagnate.
•Quando l’interruttore è nella
posizioneOFF(STANDBY),
l’apparecchiatura non è
completamente scollegata da
MAINS.
•L’apparecchio va installato
in prossimità della fonte di
alimentazione,inmodoche
quest’ultima sia facilmente
accessibile.
•Evite altas temperaturas.
Permite la suficiente
dispersión del calor cuando
está instalado en la consola.
•Maneje el cordón de
energía con cuidado.
Sostenga el enchufe
cuando desconecte el
cordón de energía.
•Mantenga el equipo libre
de humedad, agua y
polvo.
•Desconecte el cordón de
energía cuando no utilice
el equipo por mucho
tiempo.
•No obstruya los orificios
de ventilación.
•No deje objetos extraños
dentro del equipo.
•No permita el contacto
de insecticidas, gasolina y
diluyentes con el equipo.
•Nunca desarme o
modifique el equipo de
ninguna manera.
•La ventilación no debe
quedar obstruida por
haberse cubierto las
aperturas con objetos
como periódicos,
manteles o cortinas.
•No deberán colocarse
sobre el aparato
fuentes inflamables sin
protección, como velas
encendidas.
•A la hora de deshacerse
de las pilas, respete la
normativa para el cuidado
del medio ambiente.
•No exponer el aparato
al goteo o salpicaduras
cuando se utilice.
•No colocar sobre el
aparato objetos llenos de
líquido, como jarros.
•No maneje el cable de
alimentación con las
manos mojadas.
•Cuando el interruptor
está en la posición OFF
(STANDBY), el equipo
no está completamente
desconectado de la
alimentación MAINS.
•El equipo se instalará cerca
de la fuente de alimentación
de manera que resulte fácil
acceder a ella.
•Vermijdhogetemperaturen.
Zorg er bij installatie in een
audiorack voor, dat de door
het toestel geproduceerde
warmte goed kan worden
afgevoerd.
•Hanteer het netsnoer
voorzichtig.
Houd het snoer bij de stekker
vastwanneerdezemoet
worden aan- of losgekoppeld.
•Laat geen vochtigheid,
water of stof in het apparaat
binnendringen.
•Neem altijd het netsnoer uit
het stopkontakt wanneer het
apparaat gedurende een lange
periode niet wordt gebruikt.
•De ventilatieopeningen
mogen niet worden
beblokkeerd.
•Laat geen vreemde
voorwerpen in dit apparaat
vallen.
•Voorkomdatinsecticiden,
benzeenofverfverdunnermet
dit toestel in contact komen.
•Dit toestel mag niet
gedemonteerd of aangepast
worden.
•De ventilatie mag niet
worden belemmerd door
de ventilatieopeningen af
te dekken met bijvoorbeeld
kranten, een tafelkleed of
gordijnen.
•Plaats geen open vlammen,
bijvoorbeeld een brandende
kaars, op het apparaat.
•Houd u steeds aan de
milieuvoorschriften wanneer
u gebruikte batterijen
wegdoet.
•Stel het apparaat niet bloot
aan druppels of spatten.
•Plaats geen voorwerpen
gevuld met water,
bijvoorbeeld een vaas, op het
apparaat.
•Raak het netsnoer niet met
natte handen aan.
•Als de schakelaar op OFF
(STANDBY) staat, is het
apparaat niet volledig
losgekoppeld van de
netspanning (MAINS).
•De apparatuur wordt in de
buurt van het stopcontact
geïnstalleerd,zodatditaltijd
gemakkelijk toegankelijk is.
•Undvikhöga
temperaturer.
Se till att det finns
möjlighettillgod
värmeavledning vid
montering i ett rack.
•Hantera nätkabeln
varsamt.
Håll i kabeln när den
kopplas från el-uttaget.
•Utsättinteapparatenför
fukt, vatten och damm.
•Koppla loss nätkabeln
om apparaten inte
kommer att användas i
lång tid.
•Täpp inte till
ventilationsöppningarna.
•Se till att främmande
föremålinteträngerini
apparaten.
•Se till att inte
insektsmedel på
spraybruk, bensen och
thinner kommer i kontakt
medapparatenshölje.
•Ta inte isär apparaten
ochförsökintebygga
om den.
•Ventilationenbör
inteförhindras
genomatttäckaför
ventilationsöppningarna
medföremålsåsom
tidningar, bordsdukar
eller gardiner.
•Placerainteöppen
eld, t.ex. tända ljus, på
apparaten.
•Tänkpåmiljöaspekterna
när du bortskaffar
batterier.
•Apparaten får inte
utsättasförvätska.
•Placerainteföremål
fyllda med vätska, t.ex.
vaser, på apparaten.
•Hantera inte nätsladden
med våta händer.
•Ävenomströmbrytaren
står i det avstängda läget
OFF (STANDBY), så är
utrustningen inte helt
bortkopplad från det
elektriska nätet (MAINS).
•Utrustningen ska
vara installerad nära
strömuttagetsåatt
strömförsörjningenär
lätt att tillgå.
•Evite temperaturas altas.
Assegure uma suficiente
dispersãodocalorquandoa
unidade forinstalada numa
prateleira.
•Manuseie o cabo de
alimentaçãocomcuidado.
Puxe pela ficha quando
desligar ocabo de
alimentação.
•Mantenha a unidade
afastada dahumidade, da
água e do pó.
•Desligue o cabo de
alimentaçãoquandonão
estiverautilizaraunidadepor
longos períodos detempo.
•Nãoobstruaosorifícios
deventilação.
•Nãodeixeobjectos
estranhos dentro da
unidade.
•Nãopermitaque
insecticidas,benzina
e diluente entrem em
contacto com a unidade.
•Nunca desmonte ou
modifique dealguma forma
a unidade.
•Aventilaçãonãodeve
ser obstruída, tapando as
aberturasdeventilação
com objectos, como
jornais, toalhas ou cortinas.
•Nãodevemsercolocadas
junto à unidade fontes de
chama aberta, como velas
acesas.
•Respeite as
regulamentaçõeslocais
relativasàeliminaçãode
pilhas.
•Nãoexponhaaunidadea
gotejamento ou salpicos
de líquidos.
•Nãocoloqueobjectoscom
líquidos, como jarras, em
cima da unidade.
•Nãomanuseieocabode
alimentaçãocomasmãos
molhadas.
•Quando o interruptor
seencontranaposição
OFF (STANDBY), o
equipamentonãoestá
completamente desligado
da REDE ELÉCTRICA.
•O equipamento deve ser
instalado junto da fonte de
alimentação,paraquea
fontedealimentaçãoesteja
facilmente acessível.
nNOTE ON USE / HINWEISE ZUM GEBRAUCH / OBSERVATIONS RELATIVES A L’UTILISATION / NOTE SULL’USO / NOTAS SOBRE EL USO /
ALVORENS TE GEBRUIKEN / OBSERVERA / NOTA SOBRE UTILIZAÇÃO


IV
•DECLARATION OF CONFORMITY (English)
We declare under our sole responsibility that this product, to which this declaration relates, is
in conformity with the following standards:
EN60065, EN55013, EN55020, EN61000-3-2 and EN61000-3-3.
Following the provisions of LowVoltage Directive 2006/95/EC and EMC Directive 2004/108/
EC,theECregulation1275/2008anditsframeworkDirective2009/125/ECforEnergy-related
Products (ErP).
•ÜBEREINSTIMMUNGSERKLÄRUNG (Deutsch)
Wir erklären unter unsererVerantwortung, daß dieses Produkt, auf das sich diese Erklärung
bezieht,denfolgendenStandardsentspricht:
EN60065, EN55013, EN55020, EN61000-3-2 und EN61000-3-3.
Gemäß den Bestimmungen der Niederspannungsrichtlinie 2006/95/EG und EMV Richtlinie
2004/108/EG,derVerordnung(EG)Nr.1275/2008derKommissionundderenRahmenrichtlinie
2009/125/EGzuenergieverbrauchsrelevantenProdukten(ErP).
•DECLARATION DE CONFORMITE (Français)
Nous déclarons sous notre seule responsabilité que l’appareil, auquel se réfère cette
déclaration, est conforme aux standards suivants:
EN60065, EN55013, EN55020, EN61000-3-2 et EN61000-3-3.
Selon la directive 2006/95/EC concernant labassetensionet la directiveCEM 2004/108/EC,
laréglementationeuropéenne1275/2008etladirective2009/125/ECétablissantuncadrede
travail applicable aux produits liés à l’énergie (ErP).
•DICHIARAZIONE DI CONFORMITÀ (Italiano)
Dichiariamo con piena responsabilità che questo prodotto,al quale la nostra dichiarazione si
riferisce, è conforme alle seguenti normative:
EN60065, EN55013, EN55020, EN61000-3-2 e EN61000-3-3.
Facendo seguito alle disposizioni della direttiva sul basso voltaggio 2006/95/EC alla direttiva
EMC 2004/108/EC, alla norma EC 1275/2008 e alla relativa legge quadro 2009/125/EC in
materia di prodotti alimentati ad energia (ErP).
QUESTO PRODOTTO E’ CONFORME
ALD.M.28/08/95N.548
•DECLARACIÓN DE CONFORMIDAD (Español)
Declaramos bajo nuestra exclusiva responsabilidad que este producto al que hace referencia
esta declaración, está conforme con los siguientes estándares:
EN60065, EN55013, EN55020, EN61000-3-2 y EN61000-3-3.
Deacuerdoconladirectivasobrebajatensión2006/95/CEyladirectivasobreCEM2004/108/
CE,lanormativaCE1275/2008ysudirectivamarco2009/125/ECparaproductosrelacionados
con la energía (ErP).
•EENVORMIGHEIDSVERKLARING (Nederlands)
Wijverklarenuitsluitendoponzeverantwoordelijkheiddatditprodukt,waaropdezeverklaring
betrekking heeft, in overeenstemming is met de volgende normen:
EN60065, EN55013, EN55020, EN61000-3-2 en EN61000-3-3.
Volgens de voorzieningen van lage spanningsrichtlijn 2006/95/EC en EMC-richtlijn 2004/108/
EC, de EU-richtlijn 1275/2008 en de kaderrichtlijn 2009/125/EC voor energieverbruikende
producten (ErP).
•ÖVERENSSTÄMMELSESINTYG (Svenska)
Härmed intygas helt på eget ansvar att denna produkt, vilken detta intyg avser, uppfyller
följandestandarder:
EN60065, EN55013, EN55020, EN61000-3-2 och EN61000-3-3.
Uppfyller reglerna i lågspänningsdirektivet 2006/95/EC och EMC-direktivet 2004/108/
EC, EU-förordningen 1275/2008 och ramverksdirektivet 2009/125/EC för energirelaterade
produkter (ErP).
•DECLARAÇÃO DE CONFORMIDADE (Português)
Declaramos sob nossa exclusiva responsabilidade que este produto, ao qual se refere esta
declaração,seencontraemconformidadecomasseguintesnormas:
EN60065, EN55013, EN55020, EN61000-3-2 e EN61000-3-3.
DeacordocomasprovisõesdaDirectivadeBaixaTensão2006/95/CEeaDirectivaCEM
2004/108/CE,oRegulamento(CE)1275/2008earespectivaDirectiva-Quadro2009/125/CE
para produtos relacionados com o consumo de energia (ErP).
D&M Professional Europe
A division of D&M Europe B.V.
Beemdstraat 11
5653 MA Eindhoven
The Netherlands


V
A NOTE ABOUT RECYCLING:
This product’s packaging materials are recyclable and can be reused. Please dispose of any
materials in accordance with the local recycling regulations.
When discarding the unit, comply with local rules or regulations.
Batteries should never be thrown away or incinerated but disposed of in accordance with the
local regulations concerning battery disposal.
This product and the supplied accessories, excluding the batteries, constitute the applicable
product according to the WEEE directive.
HINWEIS ZUM RECYCLING:
Das Verpackungsmaterial dieses Produktes ist zum Recyceln geeignet und kann wieder
verwendet werden. Bitte entsorgen Sie alle Materialien entsprechend der örtlichen Recycling-
Vorschriften.
Beachten Sie bei der Entsorgung des Gerätes die örtlichen Vorschriften und Bestimmungen.
Die Batterien dürfen nicht in den Hausmüll geworfen oder verbrannt werden; bitte entsorgen Sie
die Batterien gemäß der örtlichen Vorschriften.
Dieses Produkt und das im Lieferumfang enthaltene Zubehör (mit Ausnahme der Batterien!)
entsprechen der WEEE-Direktive.
UNE REMARQUE CONCERNANT LE RECYCLAGE:
Les matériaux d’emballage de ce produit sont recyclables et peuvent être réutilisés. Veuillez disposer
des matériaux conformément aux lois sur le recyclage en vigueur.
Lorsque vous mettez cet appareil au rebut, respectez les lois ou réglementations en vigueur.
Les piles ne doivent jamais être jetées ou incinérées, mais mises au rebut conformément aux lois en vigueur sur la
mise au rebut des piles.
Ce produit et les accessoires inclus, à l’exception des piles, sont des produits conformes à la directive DEEE.
NOTA RELATIVA AL RICICLAGGIO:
I materiali di imballaggio di questo prodotto sono riutilizzabili e riciclabili. Smaltire i materiali conformemente alle
normative locali sul riciclaggio.
Per lo smaltimento dell’unità, osservare le normative o le leggi locali in vigore.
Non gettare le batterie, né incenerirle, ma smaltirle conformemente alla normativa locale sui rifiuti chimici.
Questo prodotto e gli accessori inclusi nell’imballaggio sono applicabili alla direttiva RAEE, ad eccezione delle batterie.
ACERCA DEL RECICLAJE:
Los materiales de embalaje de este producto son reciclables y se pueden volver a utilizar. Disponga de estos
materiales siguiendo los reglamentos de reciclaje de su localidad.
Cuando se deshaga de la unidad, cumpla con las reglas o reglamentos locales.
Las pilas nunca deberán tirarse ni incinerarse. Deberá disponer de ellas siguiendo los reglamentos de su localidad
relacionados con los desperdicios químicos.
Este producto junto con los accesorios empaquetados es el producto aplicable a la directiva RAEE excepto pilas.
EEN AANTEKENING MET BETREKKING TOT DE RECYCLING:
Het inpakmateriaal van dit product is recycleerbaar en kan opnieuw gebruikt worden. Er wordt verzocht om zich van
elk afvalmateriaal te ontdoen volgens de plaatselijke voorschriften.
Volg voor het wegdoen van de speler de voorschriften voor de verwijdering van wit- en bruingoed op.
Batterijen mogen nooit worden weggegooid of verbrand, maar moeten volgens de plaatselijke voorschriften
betreffende chemisch afval worden verwijderd.
Op dit product en de meegeleverde accessoires, m.u.v. de batterijen is de richtlijn voor afgedankte elektrische en
elektronische apparaten (WEEE) van toepassing.
OBSERVERA ANGÅENDE ÅTERVINNING:
Produktens emballage är återvinningsbart och kan återanvändas. Kassera det enligt lokala återvinningsbestämmelser.
När du kasserar enheten ska du göra det i överensstämmelse med lokala regler och bestämmelser.
Batterier får absolut inte kastas i soporna eller brännas. Kassera dem enligt lokala bestämmelser för kemiskt avfall.
Denna apparat och de tillbehör som levereras med den uppfyller gällande WEEE-direktiv, med undantag av batterierna.
UMA NOTA SOBRE A RECICLAGEM:
Os materiais de embalagem deste produto são recicláveis e podem ser reutilizados. Elimine quaisquer materiais de
acordo com as normas de reciclagem locais.
Quando eliminar a unidade, obedeça às regras ou normas locais.
As pilhas nunca devem ser deitadas fora ou incineradas, mas sim eliminadas de acordo com as normais locais
relativas aos resíduos químicos.
Este produto e os respectivos acessórios embalados em conjunto constituem o produto aplicável de acordo com a
directiva WEEE, excepto as pilhas.
n CAUTIONS ON INSTALLATION
VORSICHTSHINWEISE ZUR AUFSTELLUNG
PRÉCAUTIONS D’INSTALLATION
PRECAUZIONI SULL’INSTALLAZIONE
EMPLAZAMIENTO DE LA INSTALACIÓN
VOORZORGSMAATREGELEN BIJ DE INSTALLATIE
FÖRSIKTIGHET VID INSTALLATIONEN
PRECAUÇÕES DE INSTALAÇÃO
z
z z
z
Wall
Wand
Paroi
Parete
Pared
Muur
Vägg
Parede
zFor proper heat dispersal, do not install this unit in a confined space, such as a bookcase or similar enclosure.
•More than 0.1 m (4 in.) is recommended.
•Do not place any other equipment on this unit.
zStellen Sie das Gerät nicht an einem geschlossenen Ort, wie in einem Bücherregal oder einer ähnlichen
Einrichtung auf, da dies eine ausreichende Belüftung des Geräts behindern könnte.
•Empfohlen wird über 0,1 m.
•Keine anderen Gegenstände auf das Gerät stellen.
zPour permettre la dissipation de chaleur requise, n’installez pas cette unité dans un espace confiné tel qu’une
bibliothèque ou un endroit similaire.
•Une distance de plus de 0,1 m (4 po.) est recommandée.
•Ne placez aucun matériel sur cet appareil.
zPer una dispersione adeguata del calore, non installare questa apparecchiatura in uno spazio ristretto, come ad
esempio una libreria o simili.
•Si raccomanda una distanza superiore ai 0,1 m.
•Non posizionare alcun altro oggetto o dispositivo su questo dispositivo.
zPara la dispersión del calor adecuadamente, no instale este equipo en un lugar confinado tal como una librería
o unidad similar.
•Se recomienda dejar más de 0,1 m (4 pulg.) alrededor.
•No coloque ningún otro equipo sobre la unidad.
zPlaats dit toestel niet in een kleine afgesloten ruimte, zoals een boekenkast e.d., omdat anders de warmte niet
op gepaste wijze kan worden afgevoerd.
•Meer dan 0,1 m is aanbevolen.
•Plaats geen andere apparatuur op het toestel.
zFör att tillförsäkra god värmeavledning får utrustningen inte installeras i instängda utrymmen, som t.ex. en
bokhylla eller liknande.
•Mer än 0,1 m rekommenderas.
•Placera ingen annan utrustning ovanpå den här enheten.
zPara uma correcta dispersão do calor, não instale esta unidade num espaço confi nado, como uma estante de
livros ou uma estrutura semelhante.
•São recomendados mais de 0,1 m.
•Não coloque qualquer outro equipamento sobre est unidade.


Getting StartedGetting started Connections
Basic operations Advanced operations TroubleshootingGlossary of termsInformation Specifications Index
1
Contents
Getting started ·······································································1
Accessories ····················································································2
Main features ·················································································2
Caution ··························································································· 2
Cautions on handling ····································································3
About this manual ········································································3
Remote operation ········································································ 3
About the remote control unit 3 ······················································
Connections ·············································································4
Audio connections ········································································ 4
Analog connections 4 ······································································
Digital connections 5 ·······································································
Connecting headphones ·······························································5
Connecting an External control device ·······································5
Connecting an antenna ································································6
Connecting to a network (LAN) ··················································· 7
Required system···········································································7
Connecting the power cord··························································8
Basic operations·····································································8
Preparations ··················································································8
Turning the power on 8 ···································································
Turning the power to standby mode 8 ············································
Operations possible during playback ··········································9
Selecting the input source 9 ····························································
Switching the display’s brightness 9 ···············································
Network First Setup ···································································10
q Preparation (connection) 10 ························································
w Connecting to the access point 10 ··············································
e Setting the network standby 11 ··················································
To perform “Network First Setup” again 11 ···································
Network audio playback ····························································12
Listening to internet radio 12 ··························································
Registering and receiving private radio stations 14 ·························
Music Server ··············································································16
Listening to Pandora® internet radio
(U.S.A. and Canada models only)················································17
Listening to Rhapsody (U.S.A. and Canada models only) 19 ···········
Tuning in radio stations ·····························································20
ListeningtoFM/AMbroadcasts ·················································20
Automatically presetting FM stations (Auto Preset) 20 ···················
PresettingFM/AMstationsmanually ·········································21
Listening to preset stations 21 ························································
Calling stations registered in Preset List 21 ····································
Deleting stations registered in Preset List 21 ··································
Favorite function ········································································22
Registering stations or files to the favorites list 22 ·························
Calling stations or files from the favorites list 22 ·····························
Calling the most recently played station or
file from the favorites list 22 ···························································
Deleting stations or files from the favorite list 22 ····························
iPod® playback ············································································23
Playing an iPod············································································23
Disconnecting the iPod 25 ·······························································
USB memory device playback ···················································25
Playing files stored on USB memory devices 25 ·····························
Removing the USB memory device 25 ··········································
Playing repeatedly (Repeat playback) 26 ········································
Playing random order (Random playback) 26 ··································
AirPlay function ··········································································· 27
Streaming music stored in iPhone or
iPod touch directly to the unit 27 ·····················································
Playing iTunes music on this unit 27 ···············································
Remote operations 27 ·····································································
Advanced operations·························································28
Menu map ···················································································· 28
Network Setup [Network] ··························································29
Connecting wired LAN································································29
Other network settings 30 ·······························································
Update Notification 31 ·····································································
Upgrade Notification 31 ···································································
Other Setup [Other] ···································································· 32
Auto Standby 32 ··············································································
Power on Play 32 ·············································································
IR Remote···················································································33
Key Lock 33 ·····················································································
Screen Saver···············································································33
Firmware Update 34 ········································································
Add New Feature········································································34
Language 35 ····················································································
Information ·············································································46
Part names and functions···························································46
Front panel 46 ··················································································
Rear panel 46 ···················································································
Remote control 47 ···········································································
iPod® ···························································································· 49
USB memory device ···································································49
Important information 49 ·································································
Network audio ·············································································50
Important information 50 ·································································
Glossary of terms ································································51
Troubleshooting···································································52
Specifications ········································································55
Index ··························································································56
Getting started
Thank you for purchasing this DENON Professional product. To ensure proper operation, please read these owner’s manual carefully before using the product.
After reading them, be sure to keep them for future reference.
Tuning in radio stations (Europe model only) ··························36
RDS (Radio Data System) 36 ···························································
PTY (Program Type) 36 ····································································
TP (Traffic Program) 37 ····································································
RT (Radio Text) 37 ···········································································
Other functions ···········································································38
Inputting characters 38 ····································································
Last function memory·································································39
Locking operation buttons on the unit 39 ········································
Cancelling the operation button lock on the unit 39 ·······················
Restart 39 ························································································
Resetting the microprocessor 39 ····················································
Serial remote control function ···················································40
RS-232C control 40 ·········································································
IP Control (Ethernet) 40 ···································································
Communication protocol····························································· 40


Getting StartedGetting started Connections
Basic operations Advanced operations TroubleshootingGlossary of termsInformation Specifications Index
2
Main features
Equipped with the AirPlay® function in addition
to network functions such as Internet Radio
( page27)v
Equipped with a USB port that is compatible
with playback from iPhone® and iPod®
( page23)v
Equipped with an Audio output switch that
switches off audio output to a connected external
device whenever required, such as when setting
the Tuner frequency etc.
Equipped with built-in speakers in the front panel
for audio monitoring
Equipped with an LED navigation function that
indicates the next operation with the button
LEDs
3 lines OLED (organic LED display)
Large, easy-to-read OLED display
Accessories
Check that the following parts are supplied with the product.
q Owner’s manual (This manual) 1 ................................................
w CD-ROM (Owner’s manual) 1 ....................................................
e Warranty (for North America model only) 1 ................................
r Power cord 1 ..............................................................................
t Remote control unit (RC-1159) 1 ................................................
yR03/AAAbatteries ................................................................... 2
u Audio cable 1 ..............................................................................
i AM loop antenna 1 .....................................................................
o FM indoor antenna 1 ..................................................................
r t
u i o
U.S.A. and Canada
models
European,U.K and
Asia/Pacicmodels
or
Caution
This DN-700H incorporates the ability to play digitally streamed audio
signals from all sources using internet radio formats, and is intended
for use with your own internet radio stations and with third party
publicdomainandauthorizedsignalsources.
Certain audio streams, such as Online Music Services (Rhapsody,
Pandora) may only be used if licensed and subject to restrictions
preventing commercial retransmission or public performance of
streamed signals.
You are required to ensure your compliance with any applicable terms
or restrictions before using restricted third party signals of any type.
You are also responsible for complying with any rules or laws governing
your use of Internet Radio, including copyright laws.
Information about registering and connecting to Private Radio Stations
via this device is included on “Registering and receiving private radio
stations” ( page14) of this owner’s manual.v

Getting StartedGetting started Connections
Basic operations Advanced operations TroubleshootingGlossary of termsInformation Specifications Index
3
Cautions on handling
•Before turning the power switch on
Check once again that all connections are correct and that there are
no problems with the connection cables.
•Power is supplied to some of the circuitry even when the unit is
set to the standby mode. When going on vacation or leaving home
for long periods of time, be sure to unplug the power cord from the
power outlet.
•About condensation
If there is a major difference in temperature between the inside of
the unit and its surroundings, condensation may form on parts inside
the unit, causing it to fail to operate properly.
If this happens, let the unit sit for an hour or two with the power
turned off and wait until there is little difference in temperature
before using the unit.
•Cautions on using mobile phones
Using a mobile phone near this unit may result in noise. If that
occurs, move the mobile phone away from the unit when it is in use.
•Moving the unit
Turn off the power and unplug the power cord from the power
outlet. Next, disconnect the cables connected to other system units
before moving the unit.
•Operable time for continuous use
This unit can be used continually for up to 24 hours. Continuing
to use this unit for longer than 24 hours may result in operations
failing to function correctly. To continue use for longer than 24 hours,
restart the unit every 24 hours.
•Rack mount cautions (Required rack specifications for mounting
the DN-700H on a rack)
•EIA Standard 19 inch rack
•1USizeinstallationcompatiblerack
•Rack that has a guide rail or shelf board that can support this device
About this manual
nSymbols
vThis symbol indicates a reference page on which
related information is described.
This symbol indicates a supplementary information
and tips for operations.
NOTE This symbol indicates points to remember operations
or function limitations.
nIllustrations
Note that the illustrations in this manual may differ from the actual
unit for explanation purposes.
About the remote control unit
nInserting the batteries
q Remove the rear cover of the
remote control unit.
w Load the two batteries properly
as indicated by the marks in the
battery compartment.
R03/AAA
e Put the rear cover back on.
NOTE
•Insert the specified batteries in the remote control unit.
•Replace the batteries with new ones if the set does not operate
even when the remote control unit is operated close to the unit. (The
supplied batteries are only for verifying operation.)
•When inserting the batteries, be sure to do so in the proper direction,
following the and marks in the battery compartment.q w
•To prevent damage or leakage of battery fluid:
•Do not use a new battery together with an old one.
•Do not use two different types of batteries.
•Do not attempt to charge dry batteries.
•Do not short-circuit, disassemble, heat or dispose of batteries in
flames.
•Do not keep the battery in a place exposed to direct sunlight or in
places with extremely high temperatures, such as near a heater.
•If the battery fluid should leak, carefully wipe the fluid off the inside
of the battery compartment and insert new batteries.
•Remove the batteries from the remote control unit if it will not be in
use for long periods.
•Used batteries should be disposed of in accordance with the local
regulations regarding battery disposal.
•The remote control unit may function improperly if rechargeable
batteries are used.
nOperating range of the remote control
Point the remote control unit at the remote sensor when operating it.
Approx.23ft/7m
30° 30°
NOTE
The set may function improperly or the remote control unit may not
operate if the remote control sensor is exposed to direct sunlight, strong
artificial light from an inverter type fluorescent lamp or infrared light.
Remote operation


Getting started ConnectionsConnections
Basic operations Advanced operations TroubleshootingGlossary of termsInformation Specifications Index
4
This section explains how to make connections for all of the
supported audio signals.
NOTE
•Do not plug in the power cord until all connections have been
completed.
•When making connections, also refer to the owner’s manual of the
other components.
•Be sure to connect the left and right channels properly (left with left,
right with right).
•Do not bundle power supply cords together with connection cables.
Doing so can result in humming or noise.
Connections
Analog connections
nUnbalanced connection (RCA)
Cables used for connections
Audio cable (supplied)
Audio cable
R
L
R
L
(White)
(Red)
RL
RL
AUDIO
RL
IN
AUDIO
Amplifier/
Mixer/
Pre amplifier
NOTE
To output sound from the front speakers of this unit, turn the speaker
output switch on the front panel “ON”. To output sound from an
external device connected to this unit, turn the OUTPUT switch on
the front panel “ON”. Audio is not output when the Speaker output
switch or OUTPUT switch are “OFF”.
nBalanced connection (XLR)
Cables used for connections
Audio cable (sold separately)
Balanced cable
AUDIO
RL
IN
Amplifier/
Mixer/
Pre amplifier
The volume level for balanced connection can be adjusted using the
LEVELknobontherearpanel.
NOTE
To output sound from the front speakers of this unit, turn the speaker
output switch on the front panel “ON”. To output sound from an
external device connected to this unit, turn the OUTPUT switch on
the front panel “ON”. Audio is not output when the Speaker output
switch or OUTPUT switch are “OFF”.
Audio connections


Getting started ConnectionsConnections
Basic operations Advanced operations TroubleshootingGlossary of termsInformation Specifications Index
5
Digital connections
You can listen to digital audio output from the unit by connecting a
digitaldevicesuchasAVreceiversorD/Aconverterstotheunit.
When connecting, use a commercially available optical cable.
Cables used for connections
Audio cable (sold separately)
Optical cable
OPTICAL
IN
AV receivers /
D/A converters
NOTE
When the input source is “FM” or “AM”, audio is not output from the
digital out connector.
When connecting the optical digital output connector
with an optical transmission cable (sold separately)
Match the shapes
Match the shapes then insert firmly.
Connecting headphones
Connect the headphones to the headphone jack (PHONES).
When you press the headphone/front speaker volume adjustment
switch(LEVEL),theswitchwillspringout.Afteradjustingthevolume,
press the switch back in again.
NOTE
To prevent hearing loss, do not raise the volume level excessively
when using headphones.
Audio connections Connecting an External control
device
Connect an external control device or other device for servicing.
(Use a RS-232C straight cable with a 9-pin D-sub connector for the
connection.)
RS-232C control allows you to perform external control from the host.
For details on RS-232C control, see “RS-232C control” ( page40).v
External control device


Getting started ConnectionsConnections
Basic operations Advanced operations TroubleshootingGlossary of termsInformation Specifications Index
7
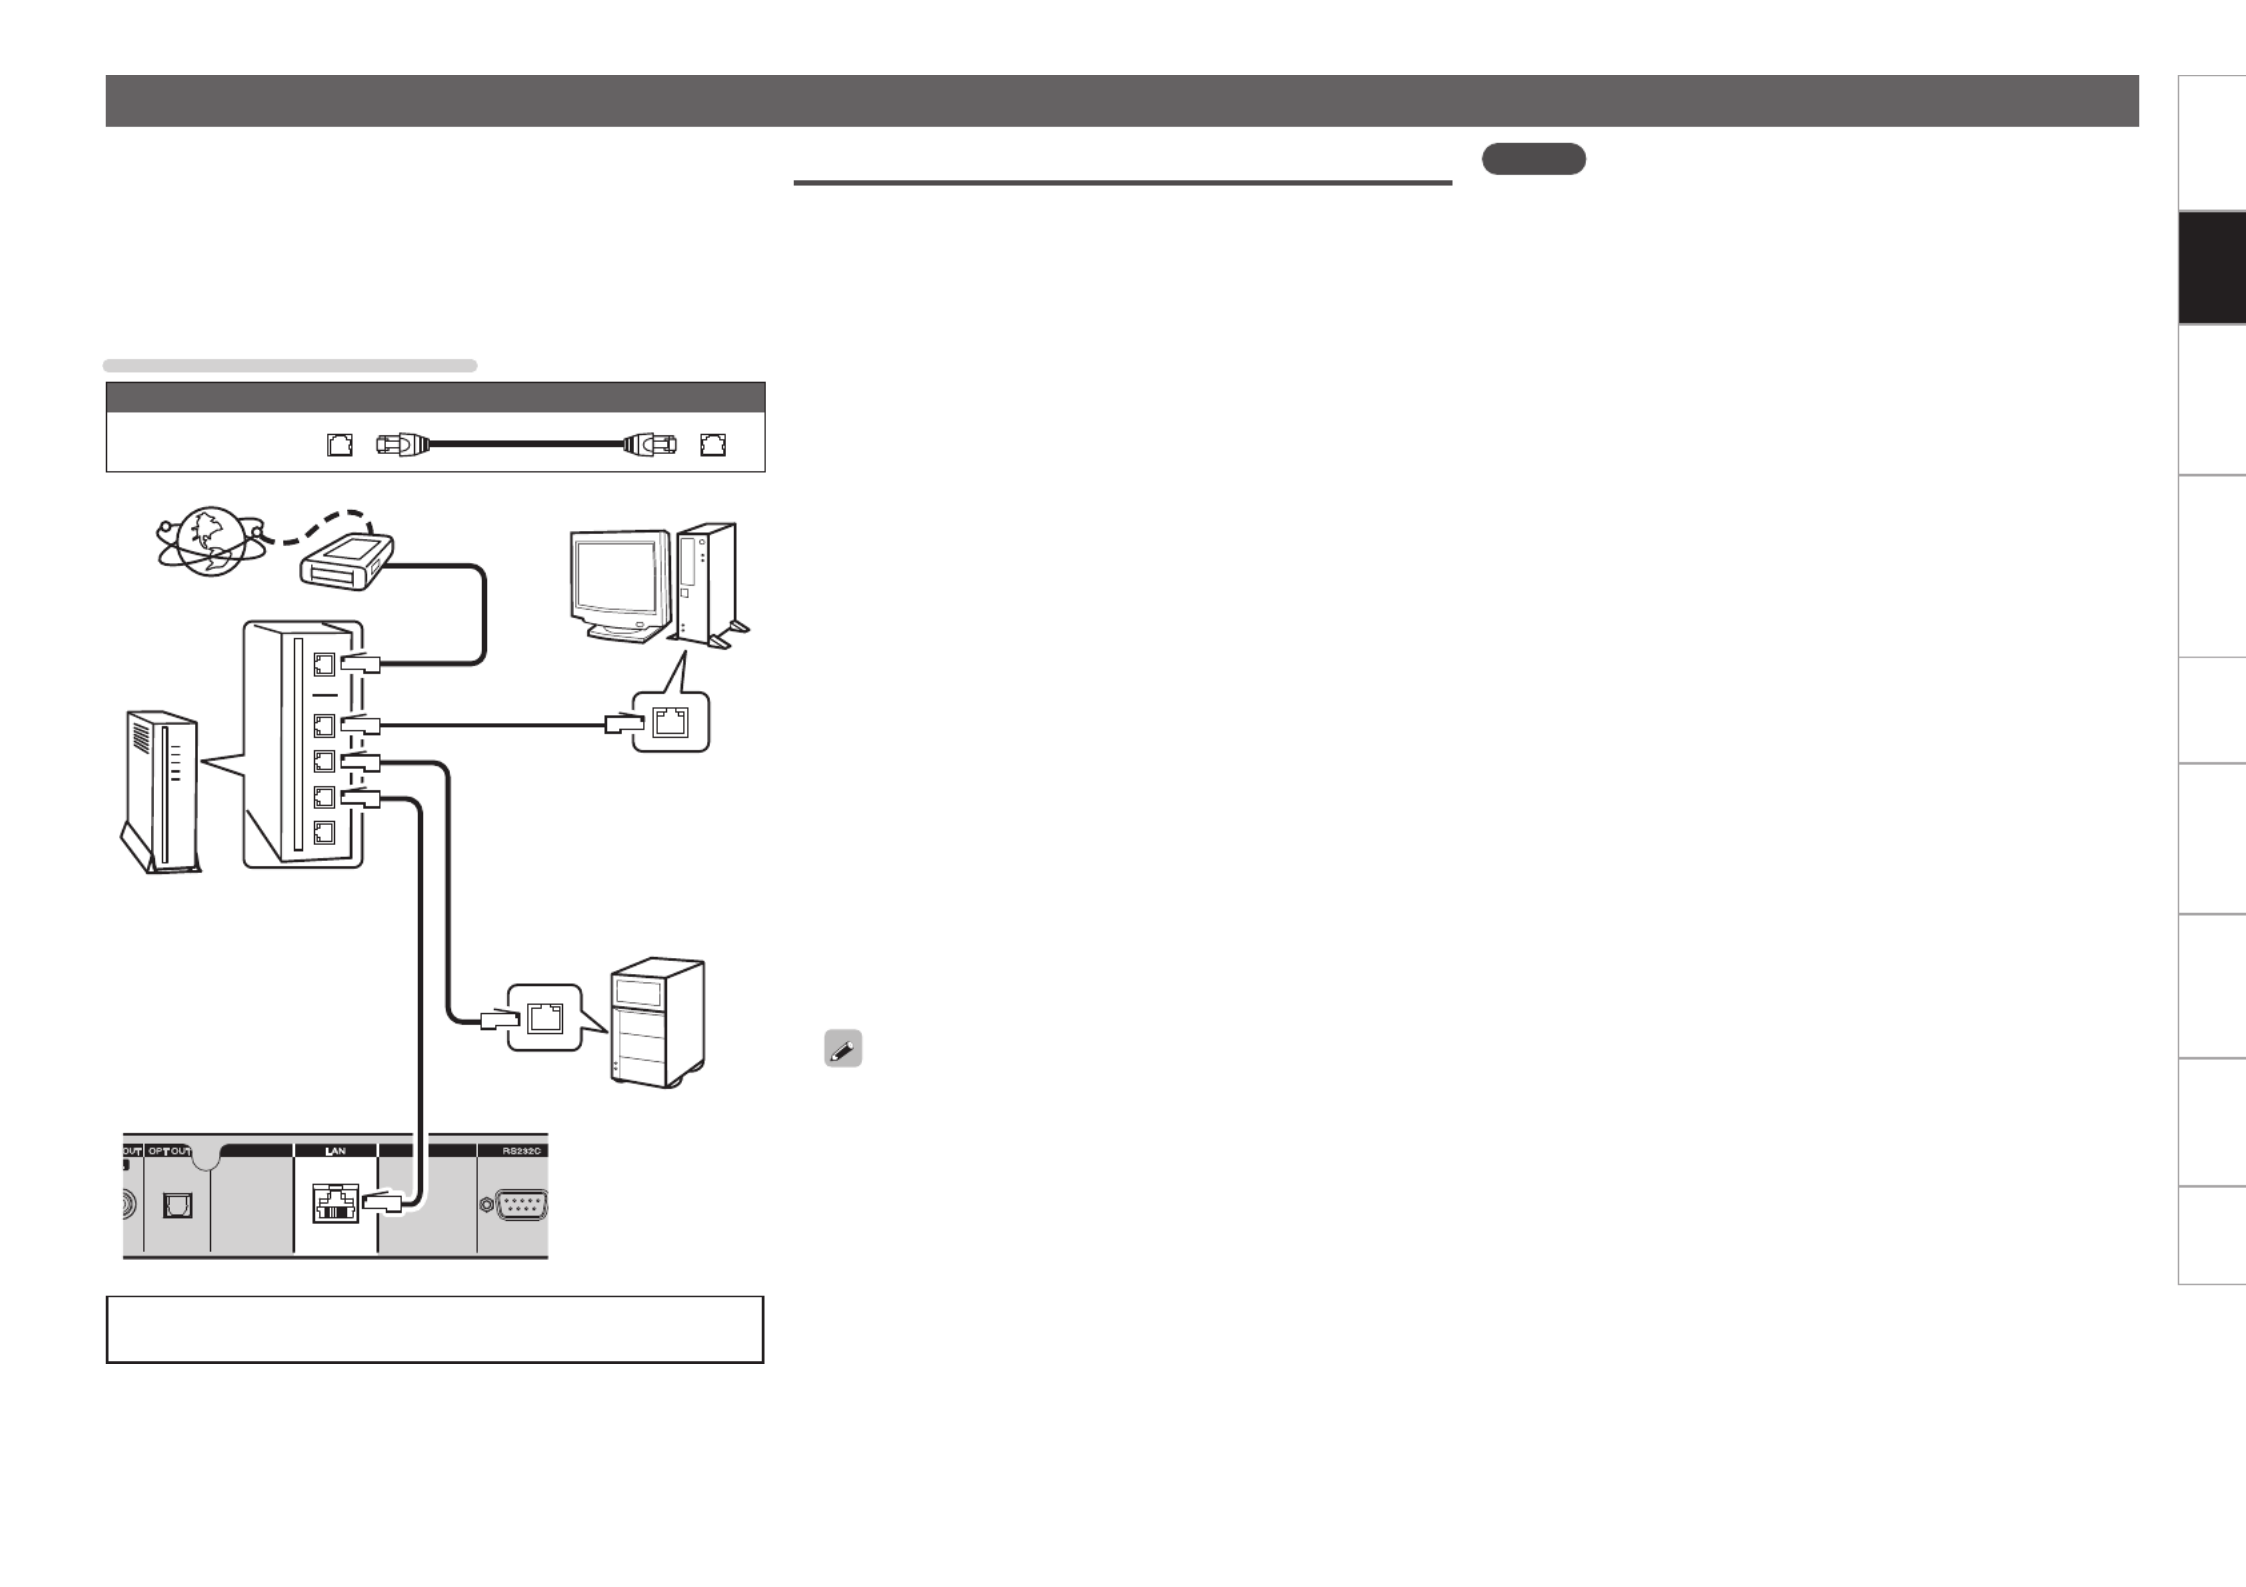
Connecting to a network (LAN)
•This unit lets you play via your network (LAN) music files stored on a
computer and music content such as that from Internet radio.
•You can update by downloading the latest firmware from the D&M
Professional website.
For more information, see “Firmware Update” ( page34).v
•See “Network Setup [Network]” ( page 29) for more v
information on network setting.
Cables used for connections
Cable (sold separately)
Ethernet cable
Internet
To WAN side
Router
To LAN port
To LAN port
LAN port/
Ethernet
connector
PC
Modem
LAN port/
Ethernet
connector
To LAN port
NAS
(Network Attached
Storage)
For connections to the Internet, contact an ISP (Internet
Service Provider) or a computer shop.
Required system
nBroadband internet connection
nModem
Device that connects to the broadband circuit and conducts
communications on the Internet.
A type that is integrated with a router is also available.
nRouter
When using this unit, we recommend you use a router equipped
with the following functions:
•Built-in DHCP server
This function automatically assigns IP addresses on the LAN.
•Built-in 100BASE-TX switch
When connecting multiple devices, we recommend a switching
hub with a speed of 100 Mbps or greater.
nPC
•Windows XP Service Pack2
•WindowsVista
•Windows 7
•1GHzprocessororhigher
(32 bit or 64 bit Intel or AMD processor etc.)
•Mac OS X (10.6 or later)
nNAS
•DLNA Server
n
Ethernet cable (CAT-5 or greater recommended)
•Use only a shielded STP or ScTP LAN cable which is available at
retailer.
•Some flat type Ethernet cables are easily affected by noise.
We recommend using a normal type cable.
•If you have an Internet provider contract for a line on which
network settings are made manually, make the settings at
“Network connecting (when “DHCP” settings are “Off”)”
( page29).v
•With this unit, it is possible to use the DHCP and Auto IP functions
to make the network settings automatically.
•When using this unit with the broadband router’s DHCP function
enabled, this unit automatically performs the IP address setting
and other settings.
When using this unit connected to a network with no DHCP
function, make the settings for the IP address, etc., at “Network
connecting (when “DHCP” settings are “Off”)” ( page29).v
•When setting manually, check the setting contents with the
network administrator.
NOTE
•A contract with an ISP is required to connect to the Internet.
•No additional contract is needed if you already have a broadband
connection to the Internet.
•The types of routers that can be used depend on the ISP. Contact an
ISP or a computer shop for details.
•Depending on the condition of your Internet connection, the sound
may cut out during playback, or operations may become unstable.
•D&M Professional assumes no responsibility whatsoever for any
communication errors or troubles resulting from customer’s network
environment or connected devices.
•This unit is not compatible with PPPoE. A PPPoE-compatible router
is required if you have a contract for a type of line set by PPPoE.
•DonotconnectanLANconnectordirectlytotheLANport/Ethernet
connector on your computer.
•To listen to audio streaming, use a router that supports audio
streaming.
•If you cannot connect to Internet radio or a music server, your
Internet connection may have network security restrictions. Contact
your network administrator.

Getting started ConnectionsConnections
Basic OperationsBasic operations Advanced operations TroubleshootingGlossary of termsInformation Specifications Index
8
Button located on both the main unit and the remote control
BUTTON
Button only on the main unit <BUTTON>
Button only on the remote control
[BUTTON]
Symbols used to indicate buttons in this manual
Basic operations
This section provides information on basic operations such as
settings and playback procedures.
For other operations, see the sections below.
n vOther Setup [Other] (page32)
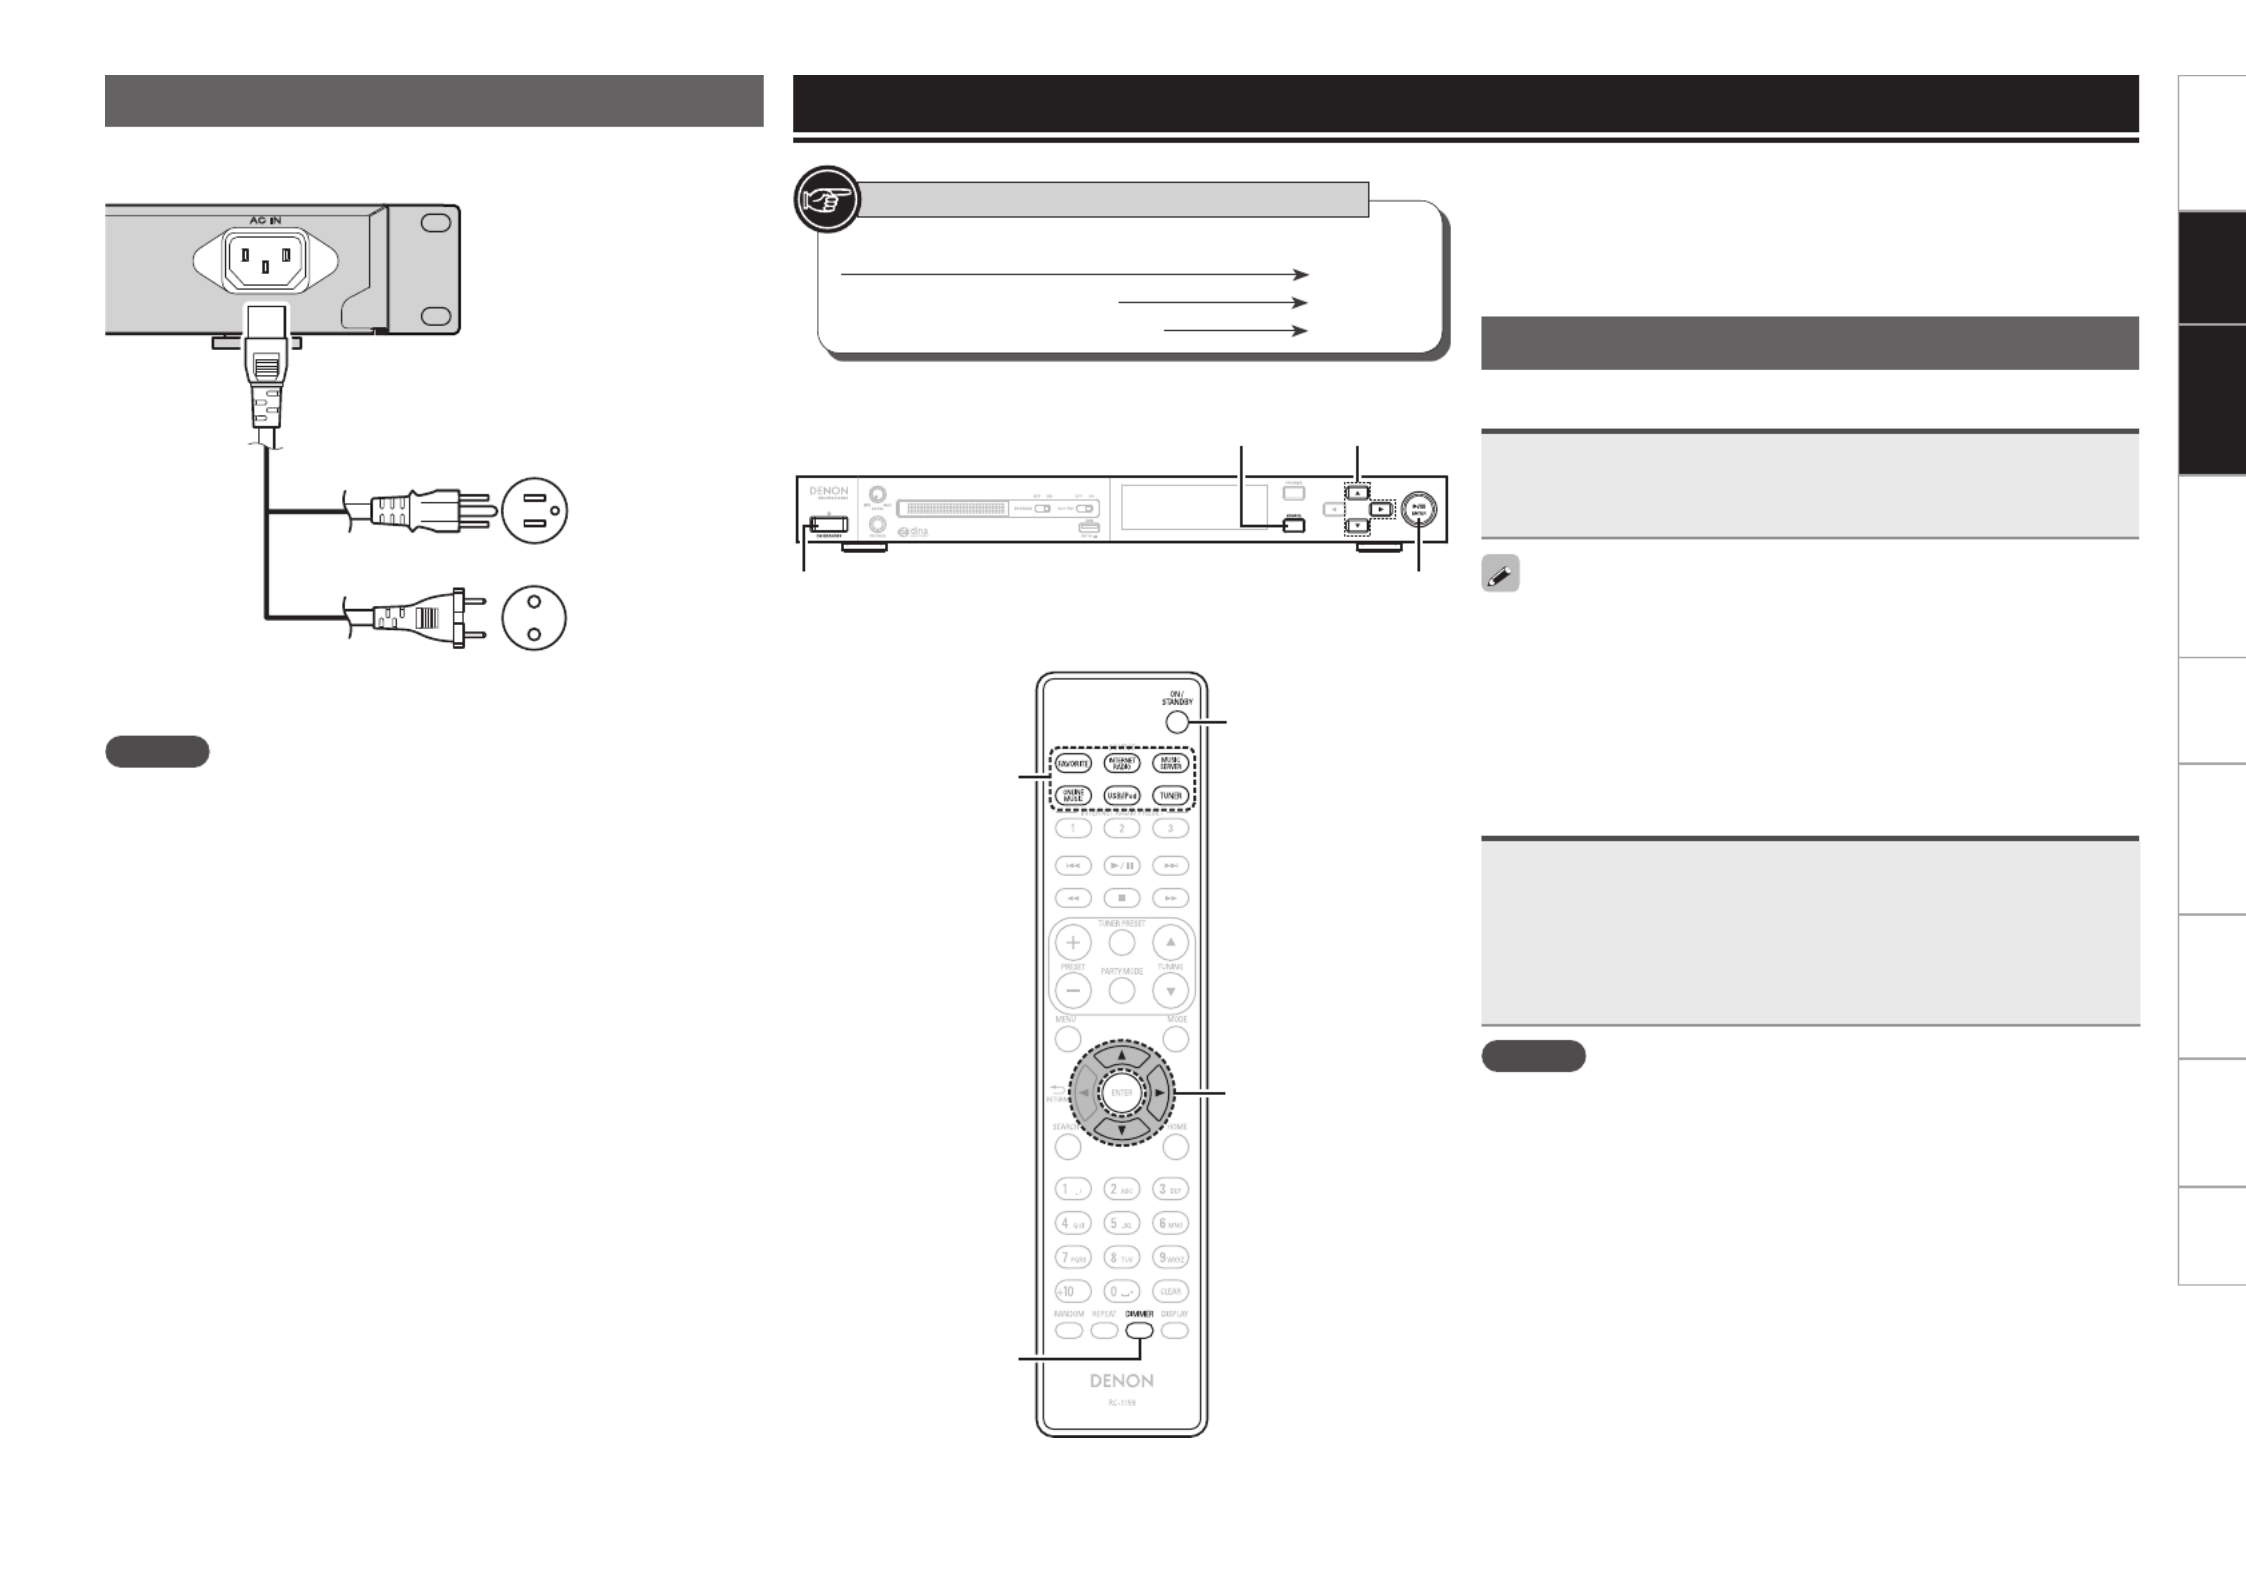
Preparations
Turning the power on
Press .ON/STANDBY
The DENON PROFESSIONAL logo on the front panel lights blue and
the power turns on.
•When you turn on the power of this unit for the first time after
purchasing it, the “Network First Setup” menu starts up. For details
on “Network First Setup” operations, see page10. v
•If you cancelled “Network First Setup” menu or changed the
network environment, perform “Menu” – “Network” – “Network
First Setup”.
Turning the power to standby mode
Press .ON/STANDBY
The unit enters standby mode.
•Power indicator
Standby Red ...................................
Network standby Orange .....................
Auto standby Off ...........................
NOTE
Power continues to be supplied to some of the circuitry even when the
power is in the standby mode. When leaving home for long periods of
time, either press to turn off the power, or unplug the ON/STANDBY
power cord from the power outlet.
ui
p
< / ENTER>1 3
<SOURCE>
ON/STANDBY
Connecting the power cord
When all of the connections are completed, insert the power plug into
the power outlet.
Power cord
(Supplied)
Tohouseholdpoweroutlet(AC120V,60Hz)
(U.S.A and Canada models)
Tohouseholdpoweroutlet(AC230V,50/60Hz)
(European,U.KandAsia/Pacicmodels)
or
NOTE
•Only use the supplied power cord.
•Be sure the power cord is unplugged from the power outlet before
connecting or disconnecting it to the AC inlet.
[DIMMER]
ON/STANDBY
ui p
Input source
select buttons


Getting started ConnectionsConnections
Basic OperationsBasic operations Advanced operations TroubleshootingGlossary of termsInformation Specifications Index
9
nCompletely turning off the power
Unplug the power cord from the wall outlet.
NOTE
The settings made for the various functions may be cleared if the
power cord is left unplugged from a power outlet for an extended
period of time.
Operations possible during playback
Selecting the input source
nSelecting the input source using unit operations
1Press .<SOURCE>
The display changes to the input source selection screen.
2Press to select the input source, then press ui
< / 1 3
ENTER
> or .p
The input source is switched each time the button is pressed.
Internet
Radio
Music
Server FM AM
Menu Favorite
USB/iPod
Rhapsody
Pandora®
zz
z U.S.A. and Canada models only.
With the unit, you can playback musicles stored on your iPhone/
iPod touch and music from iTunes ( page27 “AirPlay function”).v
nSelecting the input source using the remote
control
Press the input source select button ( , [FAVORITE]
[INTERNET RADIO] [MUSIC SERVER] [ONLINE , ,
MUSIC], or ).[USB/iPod] [TUNER]
The desired input source can be selected directly.
Preparations
Switching the display’s brightness
Press .[DIMMER]
•The display brightness is adjusted each time is pressed [DIMMER]
as shown below.
100% 75%
50%25%Off
•Each time the display brightness is switched, the brightness of
the DENON PROFESSIONAL logo on the front panel and of the
operating buttons are also switched.
The DENON PROFESSIONAL logo and operating buttons are bright
when this setting is 100 % or 75 %, and become darker when it is
set to 50 %, 25 % or Off.
If you operate the buttons when the display’s brightness is set to
“Off”, the display temporarily lights at “25%” brightness level.
See the illustration on the previous page for details of the buttons used for
the operations on this page.

Getting started ConnectionsConnections
Basic OperationsBasic operations Advanced operations TroubleshootingGlossary of termsInformation Specifications Index
10
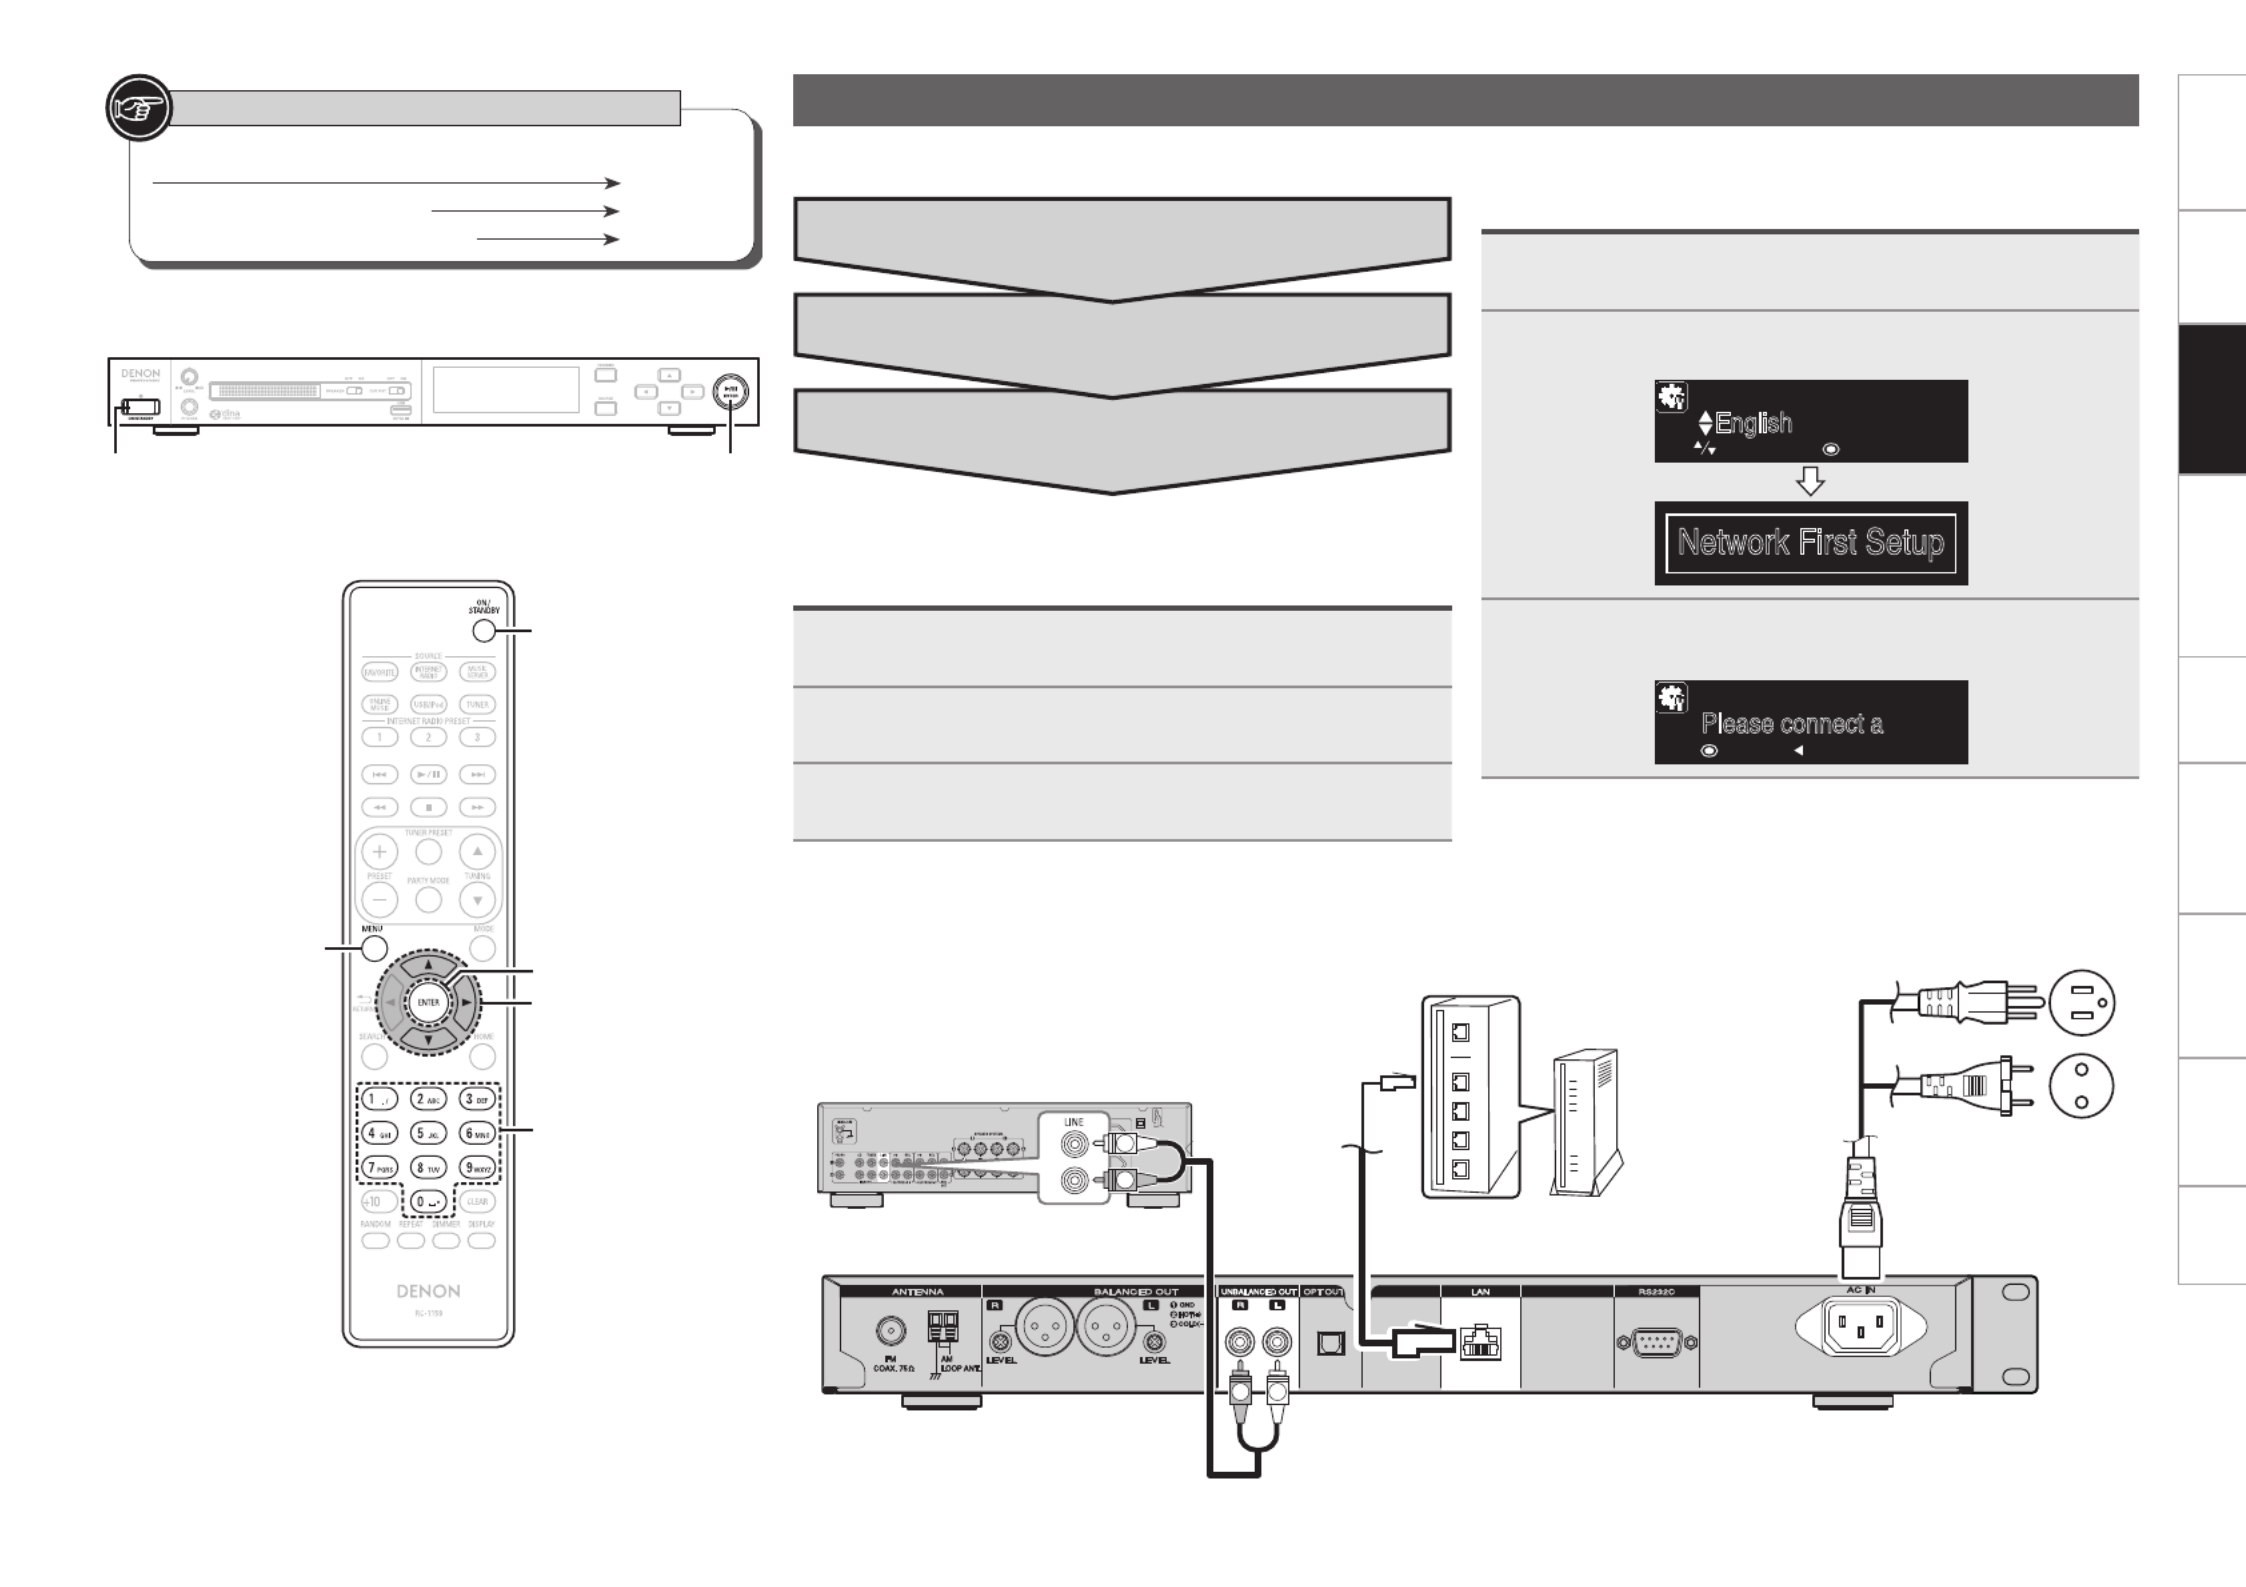
Network First Setup
When you turn on the power of this unit for the first time after purchasing it, the “Network First Setup” menu starts up.
Button located on both the main unit and the remote control
BUTTON
Button only on the main unit <BUTTON>
Button only on the remote control
[BUTTON]
Symbols used to indicate buttons in this manual
ON/STANDBY < / ENTER>1 3
ON/STANDBY
ui p
[ENTER]
[MENU]
[NUMBER]
(0 – 9)
q Preparation (connection)
1Connecting the audio device.
2Connecting to a network (LAN).
3Connecting the power cord.
e Setting the network standby
w Connecting to the access point
q Preparation (connection)
RL
R
L
L
Amplifier
Network (LAN)
Power cord
U.S.A and Canada models
or
European,U.K and
Asia/Pacicmodels
w Connecting to the access point
1Press to turn the power on.ON/STANDBY
2Select the menu language.
English
[Select Language] 1/5
:enter:select
Network First Setup
3Check the connection to the network device, and
press or [ENTER] <1 3/
ENTER
>.
Please connect a
[Start First Setup]
:next :cancel


Getting started ConnectionsConnections
Basic OperationsBasic operations Advanced operations TroubleshootingGlossary of termsInformation Specifications Index
12
Network audio playback
Follow this procedure to play Internet radio stations or music les
stored on a computer.
n vAbout the internet radio function ( page50)
n vAbout the Music server ( page50)
nAbout Pandora ® (vpage50)
n vAbout Rhapsody ( page50)
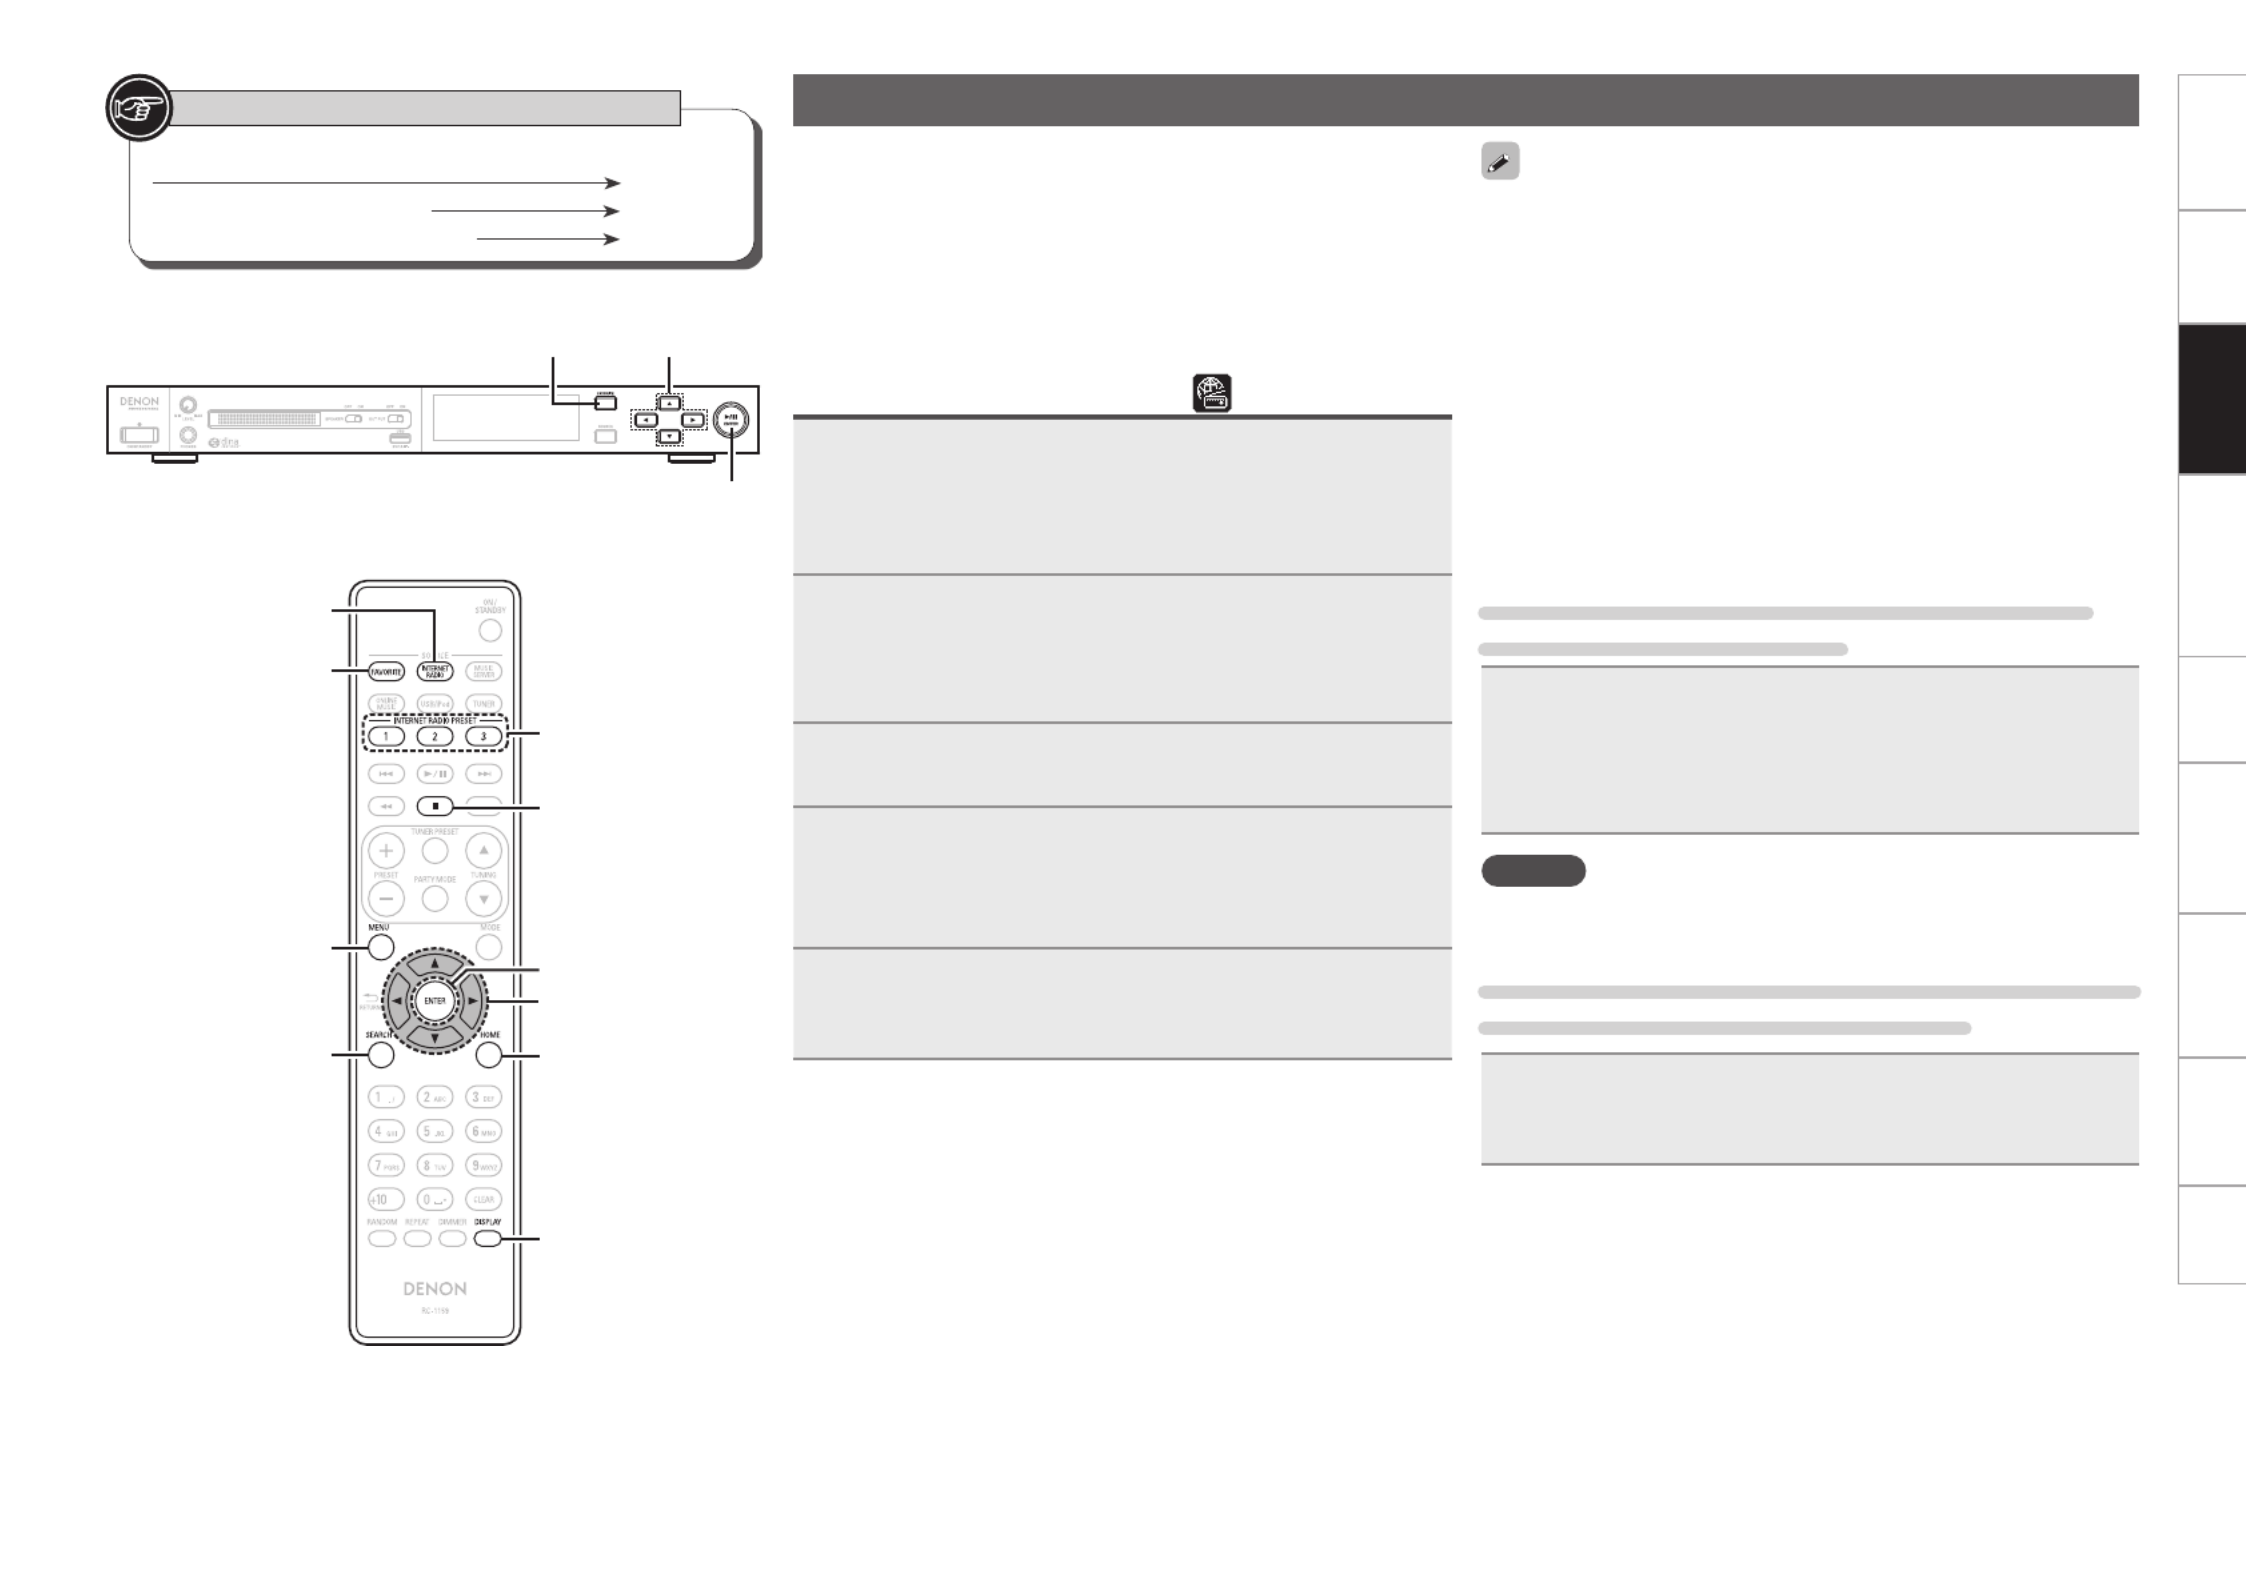
Listening to internet radio
1Prepare for playback.
q Check the network environment, then turn on this unit’s
power ( page8 “Turning the power on”).v
w If settings are required, make the “Network Setup
[Network]” ( page29).v
2Press to switch the input source [INTERNET RADIO]
to “Internet Radio”.
•For details on selecting the input source using the unit buttons, see
“Selecting the input source using unit operations” ( page9). v
3Press ui to select the item you want to play, then
press , [ENTER] <1 3/
ENTER
> or p.
4Repeat step 3 until the station list is displayed.
The station list is displayed.
•Any characters that cannot be displayed are replaced with “.”
(period) or “ ” (space).
5Press , ui to select the station, then press [ENTER]
< / 1 3
ENTER
> or p.
Playback starts once buffering reaches “100%”.
•There are many Internet radio stations on the Internet, and the
quality of the programs they broadcast as well as the bit rate of the
tracks varies widely.
Generally, the higher the bit rate, the higher the sound quality, but
depending on the communication lines and server trafc, the music
or audio signals being streamed may be interrupted. Inversely, lower
bit rates mean a lower sound quality but less tendency for the sound
to be interrupted.
•“Server Full” or “Connection Down” is displayed if the station is
busy or not broadcasting.
nListening to preset internet radio stations
You can register your favorite radio stations to [INTERNET RADIO
PRESET 1 – 3] to call them up easily.
Registering Internet radio stations to INTERNET
RADIO PRESET 1 – 3 buttons
While playing back the internet radio station that you
want to register, press and hold one of the [INTERNET
RADIO PRESET 1 – 3].
The internet radio station is registered to the button that you held
down.
NOTE
If the internet radio station is registered to a number that has previously
been registered, the previous registration details are deleted.
Listening to an Internet radio station registered to a
INTERNET RADIO PRESET 1 – 3 button
Press one of the registered [INTERNET RADIO PRESET
1 – 3].
Playback starts.
Button located on both the main unit and the remote control
BUTTON
Button only on the main unit <BUTTON>
Button only on the remote control
[BUTTON]
Symbols used to indicate buttons in this manual
ui
pi
< / ENTER>1 3
<FAVORITE>
[ENTER]
[MENU]
[FAVORITE]
[SEARCH] [HOME]
[INTERNET RADIO
PRESET 1
-
3]
[DISPLAY]
[ ]2
uio p
[INTERNET RADIO]


Getting started ConnectionsConnections
Basic OperationsBasic operations Advanced operations TroubleshootingGlossary of termsInformation Specications Index
13
n Switching the display
Press during Internet radio reception.[DISPLAY]
The broadcast station information and signal format bit rate are
displayed.
n Recently played internet radio stations
Recently played internet radio stations can be selected from
“Recently Played”.
Up to 20 stations stored in “Recently Played”.
1Press ui to select “Recently Played”, then press
[ENTER] < / , 1 3
ENTER
> or p.
2Press ui to select the item you want to play, then
press , [ENTER] <1 3/
ENTER
> or p.
n Searching stations by keyword
(Alphabetic strings)
1Press ui to select “Search by Keyword”, then press
[ENTER] < / , 1 3
ENTER
> or p.
2Input the characters, then press or [ENTER]
< / 1 3
ENTER
>.
•For character input, see page 38.
n Registering internet radio stations as your
favorites
You can register your favorite broadcast stations in Favorite List
( page22).v
n Internet radio operation
Operation buttons Function
[FAVORITE] Calls the Favorite function
<FAVORITE>
(Press and release)
Plays back the radio station or
file at the top of the Favorite List
<FAVORITE>
(Press and hold)
Registers the radio station currently being played back
to the Favorite List
[ ]2 Stop
[MENU] Menu
uio p Cursor operation Up/Down/Left/Right ( )
ENTER Enter
[SEARCH] Character search
z
[HOME] Return to top page
z Press [SEARCH], then input station name you want to listen.
If the list is not in alphabetical order, you may not be able to perform
a character search.
NOTE
•The internet radio function on this unit uses the vTuner
(comprehensive directory site of internet radio stations) public
stations.
D&M cannot be responsible for any problems, damages, or losses
that occur from the commercial use of these stations.
•If you want to use internet radio for commercial use, register a radio
station you have created yourself, or register a radio station that is
approved for commercial use.
For details on how to register and receive such radio stations, see
“Registering and receiving private radio stations” ( page14). v
Network audio playback
See the illustration on the previous page for details of the buttons used for
the operations on this page.

Getting started ConnectionsConnections
Basic OperationsBasic operations Advanced operations TroubleshootingGlossary of termsInformation Specications Index
14
Button located on both the main unit and the remote control
BUTTON
Button only on the main unit <BUTTON>
Button only on the remote control
[BUTTON]
Symbols used to indicate buttons in this manual Network audio playback
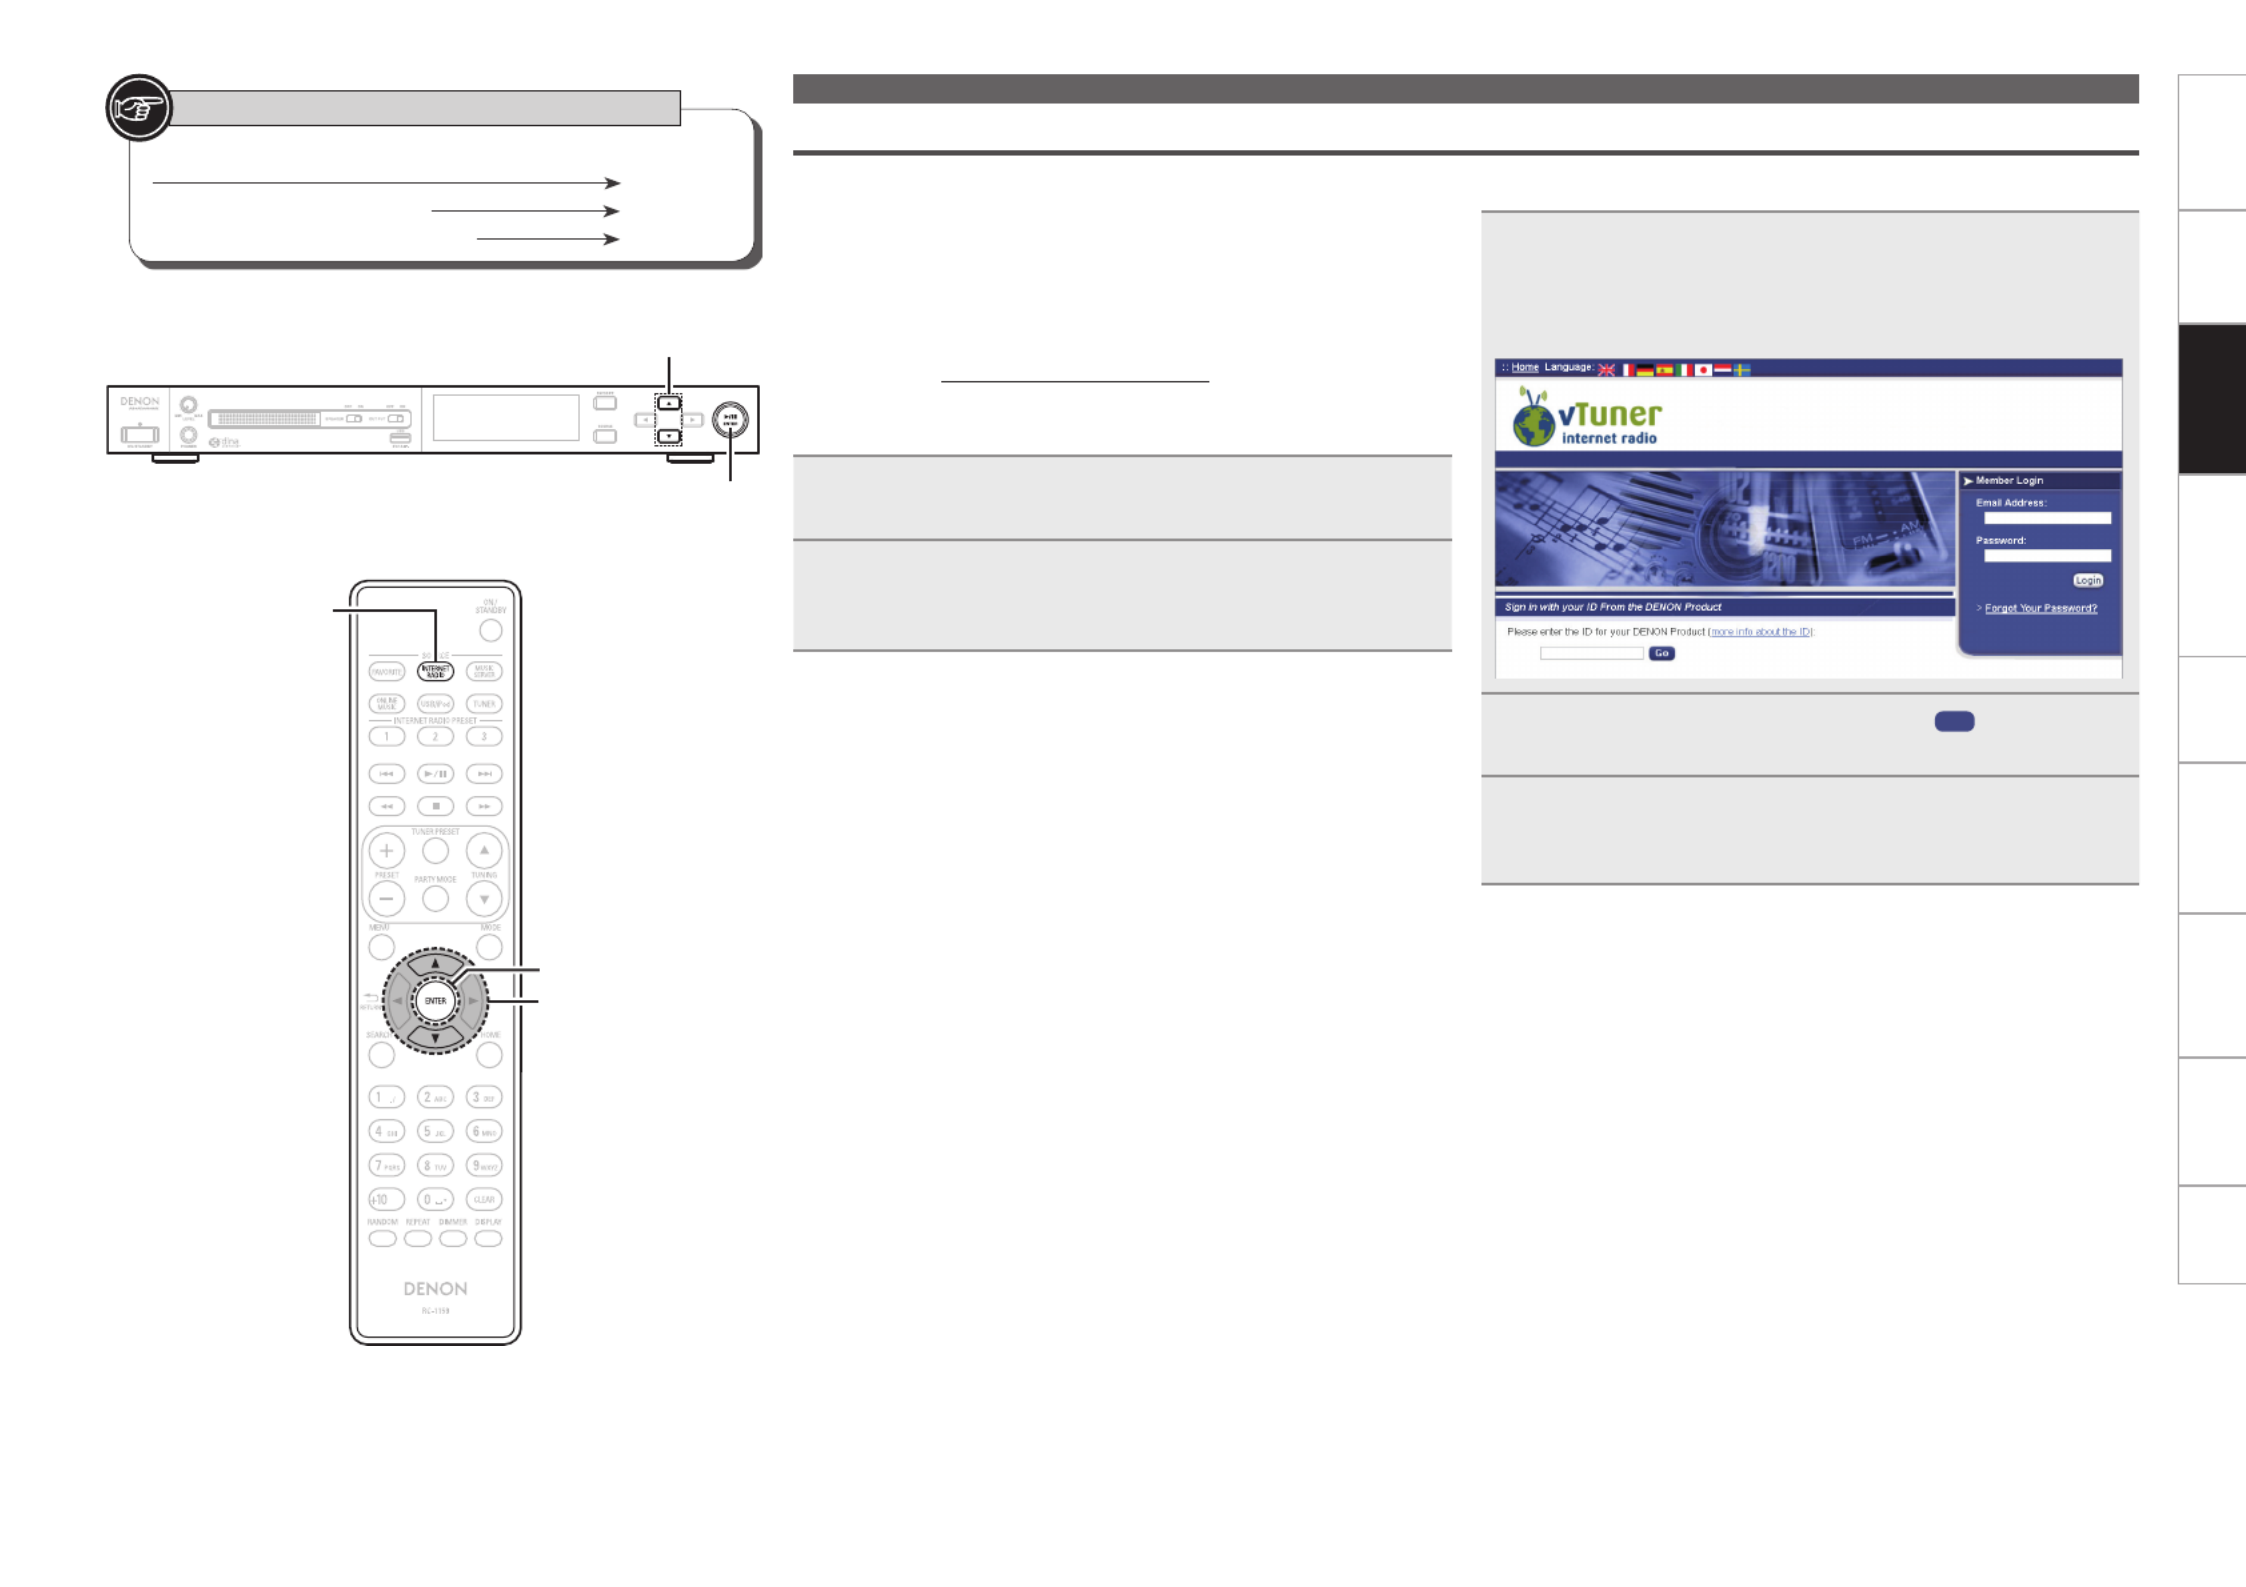
n Preparation
1Use your computer Web browser to access the
exclusive DENON internet radio URL (http://www.
radiodenon.com).
The following screen is displayed:
2Enter the ID of this unit, and click Go .
The E-mail address and password input screen is displayed.
3Enter your E-mail address and a password, and click
“Register”.
Registration is complete.
Registering and receiving private radio stations
You can receive radio stations on this unit that are not registered in
vTuner or a private radio station that you have established yourself
by accessing the DENON internet radio URL from a computer Web
browser.
In order to register and receive a private radio station, you need to
register your customer ID (MAC address) and E-mail address.
Exclusive URL: http://www.radiodenon.com
n Check the ID (MAC address) of this unit
1Press to switch the input source [INTERNET RADIO]
to “Internet Radio”.
2Press ui to select “radiodenon.com”, then press
[ENTER] < / or 1 3
ENTER
>.
A 12-digit ID is displayed.
ui
< / ENTER>1 3
[ENTER]
ui
[INTERNET RADIO]

Getting started ConnectionsConnections
Basic OperationsBasic operations Advanced operations TroubleshootingGlossary of termsInformation Specifications Index
15
Network audio playback
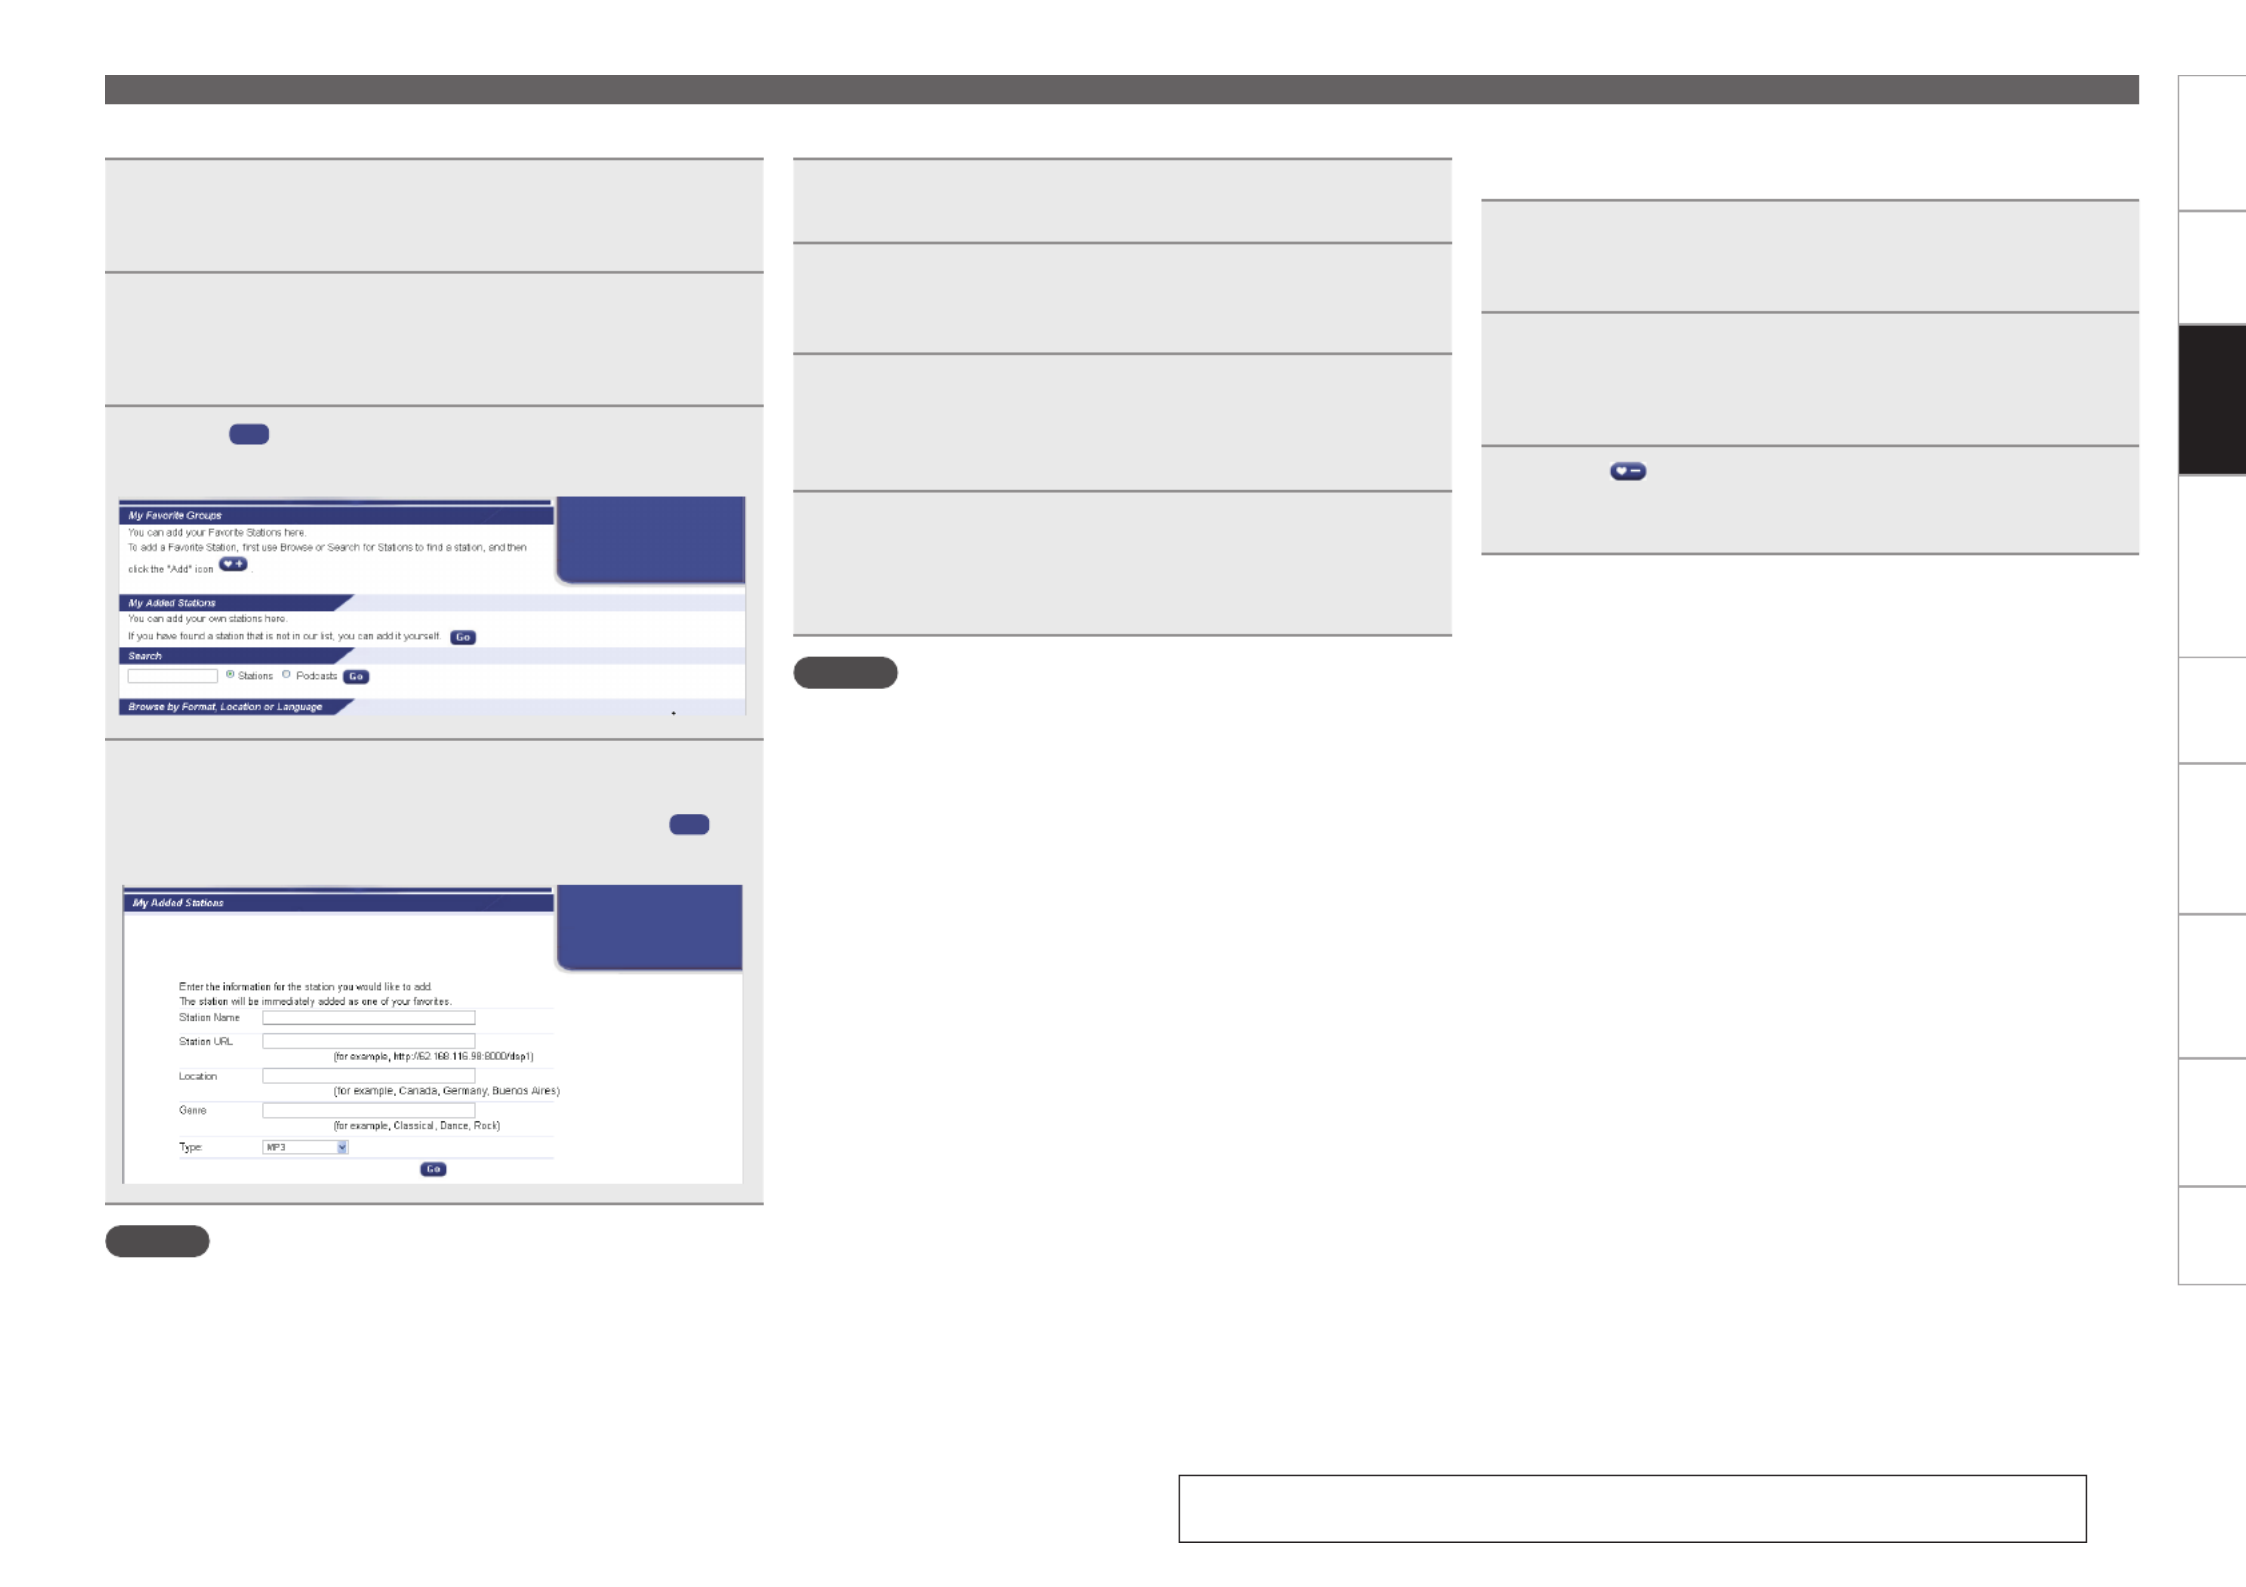
nRegistering a private radio station
1Use your computer Web browser to access the
exclusive DENON internet radio URL (http://www.
radiodenon.com).
2Enter your E-mail address and a password, and click
“Login”.
Private radio stations registered to “My Added Stations” are
displayed.
3Click Go in the “My Added Stations” screen.
The private radio station registration screen is displayed.
4Enter the “Station Name” (optional), “Station URL”
(required), “Location” (country name), “Genre” and
“Type” (le compression method), and click Go .
Registration is complete.
NOTE
The private radio station is only displayed on registered devices. The
registered radio station cannot be found on other devices.
nReceiving private radio stations
1Press to switch the input source [INTERNET RADIO]
to “Internet Radio”.
2Press ui to select “radiodenon.com”, then press
[ENTER] < / or 1 3
ENTER
>.
“Added stations” is displayed on the display of this unit.
3Press ui to select “Added stations”, then press
[ENTER] < / or 1 3
ENTER
>.
Private radio stations that are registered are displayed in the
display of this unit.
4Press ui to select the private radio station that
you want to receive, then press or [ENTER] < /1 3
ENTER>.
The selected radio station is received.
NOTE
The private radio station is only displayed on registered devices. The
registered radio station cannot be received on other devices.
nDeleting stations registered as private radio
stations
1Use your computer Web browser to access the
exclusive DENON internet radio URL (http://www.
radiodenon.com).
2Enter your E-mail address and a password, and click
“Login”.
Private radio stations registered to “My Added Stations” are
displayed.
3Click at the side of the station name that you
want to delete.
The selected radio station is deleted.
See the illustration on the previous page for details of the buttons used for
the operations on this page.


Getting started ConnectionsConnections
Basic OperationsBasic operations Advanced operations TroubleshootingGlossary of termsInformation Specications Index
16
Button located on both the main unit and the remote control
BUTTON
Button only on the main unit <BUTTON>
Button only on the remote control
[BUTTON]
Symbols used to indicate buttons in this manual
Music Server
n Playing les stored on network server or
network attached storage (NAS)
Use this procedure to play music les or playlists.
1Prepare for playback.
q Check the network environment, then turn on this unit’s
power ( page8 “Turning the power on”).v
w If settings are required, make the “Network Setup
[Network]” ( page29).v
e Prepare the computer ( page50 “About the Music v
server”).
2Press to switch the input source [MUSIC SERVER]
to “Music Server”.
•For details on selecting the input source using the unit buttons, see
“Selecting the input source using unit operations” ( page9). v
3Press ui to select the server including the le to be
played, then press , [ENTER] <1 3/
ENTER
> or p.
4Press ui to select the search item or folder, then
press , [ENTER] <1 3/
ENTER
> or p.
5Repeat step 4 until the le is displayed.
6Press , ui to select the le, then press [ENTER]
< / 1 3
ENTER
> or p.
Playback starts once buffering reaches “100%”.
•Connections to the required system and specic settings must be
made in order to play music les ( page7).v
•Before starting, you must launch the computer’s server software
and set the les as server contents. For details, see the operating
instructions of your server software.
•The order in which the tracks/les are displayed depends on
the server specications. If the tracks/les are not displayed in
alphabetical order due to the server specications, searching by the
rst letter may not work properly.
n Playing les registered in Windows Media
Player
Music les registered in Windows Media Player on your computer can
be played back on this unit.
For details on the le formats that can be played on Windows Media
Player, see “About the Music server” ( page50).v
q
Conguring the shared settings between
Windows Media Player on the computer and this unit
1
Install Windows Media Player 11 or later on a
computer connected to the same network as this unit.
2Turn this unit ON.
At the bottom right of the desktop screen, a popup message
appears indicating that this unit is detected.
•Depending on your computer settings, the popup message may
not appear.
3Start Windows Media Player on the computer, and
select “Options-Library-Congure Sharing”, or
“Stream-More Streaming Options”.
An icon representing this unit is displayed in the shared list.
4Click this unit’s icon, and approve the shared
settings.
Shared settings between this unit and Windows Media Player
are enabled, and the music les registered in Windows Media
Player can be played back on this unit.
w Playing les registered in Windows Media
Player
1Prepare for playback.
q Check the network environment, then turn on this unit’s
power ( page8 “Turning the power on”).v
w If settings are required, make the “Network Setup
[Network]” ( page29).v
e Prepare the computer ( page50 “About the Music v
server”).
2Press to switch the input source [MUSIC SERVER]
to “Music Server”.
•For details on selecting the input source using the unit buttons, see
“Selecting the input source using unit operations” ( page9). v
Network audio playback
ui
pi
< / ENTER>1 3
[ENTER]
[HOME]
[DISPLAY]
[REPEAT]
[RANDOM]
[ ]2
[ / ]1 3
uio p
[ONLINE MUSIC]
[MUSIC SERVER]
[MENU]
[SEARCH]
[ ]8 9


Getting started ConnectionsConnections
Basic OperationsBasic operations Advanced operations TroubleshootingGlossary of termsInformation Specications Index
17
Network audio playback
3Press ui to select the computer to be used, and
press , [ENTER] <1 3/
ENTER
> or p.
4Press ui to select the search item or folder, then
press , [ENTER] <1 3/
ENTER
> or p.
5Repeat step 4 until the le that you want to play back
is displayed.
6Press , ui to select the le, then press [ENTER]
< / 1 3
ENTER
> or p.
Playback starts once buffering reaches “100%”.
n Switching the display
During playback, Press .[DISPLAY]
•The display switches each time is pressed.[DISPLAY]
Artist name
Filetype/Bitrate
Album name
n Music server operation
Operation buttons Function
[ ]8 9 Auto search (cue)
1 3/ Playback / Pause
[ ]2 Stop
[MENU] Menu
uio p Cursor operation ( ) / uio p
Auto search (cue, )ui
ENTER Enter
[SEARCH] Character search
z1
[HOME] Return to top page
[REPEAT] Repeat playback page26(v )
[RANDOM] Random playback page26(v )
z2
z 1 Press [SEARCH], then press [ENTER] to select the rst letter you
want to search mode.
z 2 When playing les stored on a computer using the random play
function, when a track has nished playing, the next track is
selected at random from all of the tracks on the computer. For
this reason, the same track may be played back to back.
If the list is not in alphabetical order, you may not be able to perform
a character search.
Listening to Pandora® internet radio
(U.S.A. and Canada models only)
Pandora ® is only available in the U.S.
1Prepare for playback.
q Check the network environment, then turn on this unit’s
power ( page8 “Turning the power on”).v
w If settings are required, make the “Network Setup
[Network]” ( page29).v
2Press to switch the input source [ONLINE MUSIC]
to “Pandora”.
•For details on selecting the input source using the unit buttons, see
“Selecting the input source using unit operations” ( page9). v
•If you do not have a Pandora ® account, press to select “I am i
new to Pandora”, then press , or .[ENTER] <1 3/ ENTER> p
The URL needed to activate Pandora ® and the activation code will
be displayed.
Browse to the Pandora ® activation URL from your PC and follow
the on-screen instructions for creating a new account.
3If you have a Pandora ® account, press to ui
select “I have a Pandora account”, then press
[ENTER] < / , 1 3
ENTER
> or p.
4Input “Email address” and “Password”.
•For character input, see page 38.
5After inputting the “Email address” and “Password”,
select “login”, then press [ENTER], <1 3/
ENTER
>
or .p
If the “Email address” and “Password” match, the top menu
for Pandora ® is displayed.
NOTE
Press to cancel the input.[HOME]
n Creating a Personalized radio station
Youcancreateupto100personalizedradiostations.
1Use ui to select “New Station”, then press [ENTER],
< / 1 3
ENTER
> or p.
2Input a “Track Name” or “Artist Name”, then
press , [ENTER] <1 3/
ENTER
> or p.
•For character input, see page 38.
3Use ui to select “Search by artist” or “Search by
track”, then press , [ENTER] <1 3/
ENTER
> or p.
You can search and display a list by track or artist.
4Press ui, select search result (e.g. D&M2) from the
list, and press , [ENTER] <1 3/
ENTER
> or p.
Selected file is played back.
“Radio” is added to the end of a filename, and your original
radio station is created (e.g. D&M2 Radio).
n Listening to a personalized radio station
Listening to a personalized radio station (e.g. D&M2
Radio)
Press and select the radio station (“D&M2 Radio”) ui
that you want to listen to, and press , [ENTER] <1 3/
ENTER
> or p.
When you specify your favorite track, artist or comedian, Pandora ®
willcreateapersonalizedradiostation thatplaysyourfavoriteand
choices similar to your favorite.
Listening to tracks at random
1Press and select the radio station (“D&M2 ui
Radio”) that you want to listen to, and press
[ENTER] < / , 1 3
ENTER
> or p.
2Use to select “Quick Mix”, then press uio p
[ENTER] < / , 1 3
ENTER
> or p.
Created radio stations are selected shuffled, and tracks are
streamed.
See the illustration on the previous page for details of the buttons used for
the operations on this page.


Getting started ConnectionsConnections
Basic OperationsBasic operations Advanced operations TroubleshootingGlossary of termsInformation Specications Index
18
Button located on both the main unit and the remote control
BUTTON
Button only on the main unit <BUTTON>
Button only on the remote control
[BUTTON]
Symbols used to indicate buttons in this manual
n Providing feedback on tracks within radio stations
You can further personalize your radio stations by providing
feedback on tracks. To provide feedback, open the Pandora ®
menu screen while a track is playing.
Press while a track is playing.p
The Pandora ® menu is displayed.
I like this track •Press when you like the track that is being played.
•It will return to the Play Screen. (Thumbs up)
icon is displayed.
I don’t like this
track
•Press when you don’t like the track that is being
played.
•It will return to the Play Screen, (Thumbs
down icon) is displayed and Pandora ® will skip to
the next track.
Create station •Creates a Station for the Track or Artist being
played.
Bookmark this
track
•Bookmarks the track currently being played.
•You can check your bookmarks at Pandora.com.
•For details, see the Pandora ® FAQ at http://blog.
pandora.com/faq/.
Delete this
station
•Press when you want to delete the station that is
being played.
NOTE
•You can Skip up to 6 Tracks per Station, per hour. Even if you run
out of Skips, you can give a Track a “thumbs down”. The Track will
keep playing, but Pandora ®willstillusethefeedbacktopersonalize
your radio station.
•You can create up to 100 New Stations (radio stations).
n Sign out
Disassociate this unit from your Pandora ® account.
1While the Pandora ® top menu is displayed, press .o
2When the popup menu appears, press to select ui
“Yes”.
n Switching the display
During playback, press .[DISPLAY]
Theletype/bitrate,artistnameandalbumnamearedisplayed.
n Pandora ® operation
Operation buttons Function
[ ]9 Auto search (cue)
13 Play / Pause
[ ]2 Stop
[MENU] Menu
uio p i Auto search (cue, )
ENTER Enter
[HOME] Return to Pandora
®’s top menu
Network audio playback
ui
pi
< / ENTER>1 3
[ENTER]
[HOME]
[ ]2
[ / ]1 3
uio p
[MENU]
[ONLINE MUSIC]
[REPEAT]
[RANDOM]
[ ]8 9


Getting started ConnectionsConnections
Basic OperationsBasic operations Advanced operations TroubleshootingGlossary of termsInformation Specications Index
19
Listening to Rhapsody
(U.S.A. and Canada models only)
Rhapsody is not available in all countries.
1Prepare for playback.
q Check the network environment, then turn on this unit’s
power ( page8 “Turning the power on”).v
w If settings are required, make the “Network Setup
[Network]” ( page29).v
2Press to switch the input source [ONLINE MUSIC]
to “Rhapsody”.
•For details on selecting the input source using the unit buttons, see
“Selecting the input source using unit operations” ( page9). v
3Use ui to select “Sign in to your account”, then
press , [ENTER] <1 3/
ENTER
> or p.
4Input Username and Password.
•For character input, see page 38.
5After inputting the “Username” and “Password”,
select “login”, then press or [ENTER] < /1 3
ENTER
>.
If the “Username” and “Password” match, the top menu for
Rhapsody is displayed.
NOTE
•The password should be no longer than 99 characters.
•Press to cancel the input.[HOME]
nSelect the search mode
q Search from Rhapsody latest information
1Use ui to select “Rhapsody Music Guide”, then
press , [ENTER] <1 3/
ENTER
> or p.
2Press to select the information for track ui
selection, then press , or .[ENTER] <1 3/ ENTER> p
3Repeat step 2 until the track is displayed.
4Use , ui to select the track, then press [ENTER]
< / 1 3
ENTER
> or p.
Network audio playback
w Enter a character search for the track you want
to listen to
1Use , ui to select “Search”, then press [ENTER]
< / 1 3
ENTER
> or p.
2Use ui to select the search item, then press [ENTER],
< / 1 3
ENTER
> or p.
The search display appears.
•You can search by artist name, album name, track name or keyword.
3Enter the characters, then press or [ENTER]
< / 1 3
ENTER
>.
e Search from the Rhapsody internet radio station
1Use ui to select “Rhapsody Channels”, then press
[ENTER] < / , 1 3
ENTER
> or p.
2Repeat step 1 until the radio station is displayed.
3Use ui to select radio station, then press [ENTER],
< / 1 3
ENTER
> or p.
The search display appears.
r Listening to tracks registered in my library
1Use ui to select “My Library”, then press [ENTER],
< / 1 3
ENTER
> or p.
2Repeat step 1 until the track is displayed.
3Use ui to select the information or track, then
press , [ENTER] <1 3/
ENTER
> or p.
After selecting, the information is displayed.
nTrack menu
Press during playback to display the track menu.p
q Search from the similar music
Use , ui to select the search item, then press [ENTER]
< / 1 3
ENTER
> or p.
w Registering tracks in my library
Use ui to select “Add to my library”, then press
[ENTER] < / , 1 3
ENTER
> or p.
The track is entered in the library.
e Rating function
1Use , ui to select “Rating”, then press [ENTER]
< / 1 3
ENTER
> or p.
2Use to select the rating, then press or o p [ENTER]
< / 1 3
ENTER
>.
nSwitching the display
During playback, press .[DISPLAY]
Theletype/bitrate,artistnameandalbumnamearedisplayed.
nRhapsody operation
Operation buttons Function
[ ]8 9 Auto search (cue)
1 3/Playback / Pause
[ ]2Stop
[MENU] Menu
uio p ui Cursor operation / Auto search (cue, )
ENTER Enter
[HOME] Return to top page
[REPEAT] Repeat playback page26(v)
[RANDOM] Random playback page26(v)
See the illustration on the previous page for details of the buttons used for
the operations on this page.


Getting started ConnectionsConnections
Basic OperationsBasic operations Advanced operations TroubleshootingGlossary of termsInformation Specifications Index
20
Automatically presetting FM stations
(Auto Preset)
•This unit can be preset with a total of 99, FM broadcast stations.
•Perform this operation when tuned to an FM broadcast station.
NOTE
Auto preset is not possible with AM broadcast stations.
1Press .[SEARCH]
“Auto Preset” menu appears.
2Use , ui to select “Start”, then press [ENTER]
< / 1 3
ENTER
> or p.
“Searching” appears in the display, and the unit searches for
radio stations. When the search is complete, “Complete!!”
appears.
nCancelling auto presetting
Press .[ ]2
NOTE
•Broadcast stations whose antenna signal are weak cannot be preset
automatically. If you wish to preset such stations, tune them in
manually.
•If number that was already assigned as a preset is selected, the old
preset information is overwritten with the new information.
nGiving station names to preset channels
Names of up to 8 characters can be input.
1Tune in the preset channel you want to name.
2Press and hold .[TUNER PRESET]
The display switches to the station name input display.
3Input the station name.
•For character input, see page 38.
4Press or [ENTER] <1 3/
ENTER
>.
The characters you have input are entered.
•To give names to other stations, repeat steps 1 to 4.
Tuning in radio stations
Connect the antenna beforehand ( page6).v
Listening to FM/AM broadcasts
1Press to select the reception band.[TUNER]
The reception band is toggled as shown below each time
[TUNER] is pressed.
FM When listening to an FM broadcast.
AM When listening to an AM broadcast.
•The reception band can also be selected by pressing <SOURCE>
( page9).v
2Tune in the desired broadcast station.
When a station is received, the will light.
Auto tuning To tune in automatically.
q Press [MODE], and “AUTO” lights in the display.
w Press [TUNING ] [TUNING ]d or f to select the station you want
to hear.
Manual tuning To tune in manually.
q Press [MODE] , and “AUTO” goes out in the display.
w Press [TUNING ] [TUNING ]d or f to select the station you want
to hear.
•If the desired station cannot be tuned in with auto tuning, tune it in
manually.
•When tuning in stations manually, press and hold [TUNING ]d or
[TUNING ]f to change frequencies continuously.
•A humming sound may be heard when using a TV nearby while
receiving AM programs. If this happens, move the system as far
fromtheTVaspossible.
nTo stop auto tuning
Press or .[TUNING ]d[TUNING ]f
Button located on both the main unit and the remote control
BUTTON
Button only on the main unit <BUTTON>
Button only on the remote control
[BUTTON]
Symbols used to indicate buttons in this manual
[FAVORITE]
[SEARCH] [HOME]
[MODE]
uio p
[ENTER]
[ ]2
[TUNER PRESET]
[MENU]
[TUNING ]df
[NUMBER]
(0 – 9, +10)
[PRESET +, –]
[TUNER]
< / ENTER>1 3
ui
pi
<FAVORITE><SOURCE>


Getting started ConnectionsConnections
Basic OperationsBasic operations Advanced operations TroubleshootingGlossary of termsInformation Specifications Index
21
Tuning in radio stations
Presetting FM/AM stations manually
This unit can be preset with a total of 99 FM and AM broadcast
stations.
1Tune in the station you want to preset.
2Press .[TUNER PRESET]
“Preset” menu appears.
3Use to select “Add to Preset”, then press ui
[ENTER] < / ,1 3
ENTER
> or p.
4Use ui to select the number to be preset, then press
[ENTER] < / or 1 3
ENTER
>.
The reception frequency and reception mode are preset and
the display switches to the station name input display.
5Input the station name.
•For character input, see page 38.
•If you do not want to input a station name, press or [ENTER]
< / ENTER>1 3 without inputting anything else.
•If you make a mistake inputting, re-input the correct station name.
Whatever was previously input is overwritten.
6Press or [ENTER] <1 3/
ENTER
>.
The characters you have input are entered.
•To give names to other stations, repeat steps 1 to 5.
Listening to preset stations
Use , ), ,[NUMBER] (0 – 9 +10 [PRESET + –] or ui to
select the preset number.
Calling stations registered in Preset List
1Press .[TUNER PRESET]
“Preset” menu appears.
2Use , ui to select “Call Preset”, then press [ENTER]
< / 1 3
ENTER
> or p.
The Preset list appears.
3Use to select the station, and then press ui
[ENTER] < / ENTER>, 1 3 or p.
Deleting stations registered in Preset List
1Press .[TUNER PRESET]
“Preset” menu appears.
2Use to select “Delete Preset”, then press ui
[ENTER] < / , 1 3
ENTER
> or p.
The Preset list appears.
3Use to select the station, and then press ui
[ENTER] < / ENTER>, 1 3 or p.
4When the prompt “Delete?” appears, press [ENTER],
< / 1 3
ENTER
> or p.
•To cancel the operation, press .o
nTuner (FM/AM) operation
Operation buttons Function
[FAVORITE] Calls the Favorite function
<FAVORITE>
(Press and release)
Plays back the radio station or
file at the top of the Favorite List
<FAVORITE>
(Press and hold)
Registers the radio station currently being played back
to the Favorite List
[PRESET +, –] Preset channel selection
[TUNER PRESET] Preset menu
[ ]2Stop
[TUNING ]df Tuning (up/down)
[MENU] Menu
[MODE] Switch search modes
uio p Cursor operation Up/Down/Left/Right ( )
ENTER Enter
[SEARCH] RDS searchz/PTY searchz/TP searchz/Auto preset
[HOME] Return to top page
[0 – 9, +10] Preset channel selection
zEurope model only.
See the illustration on the previous page for details of the buttons used for
the operations on this page.

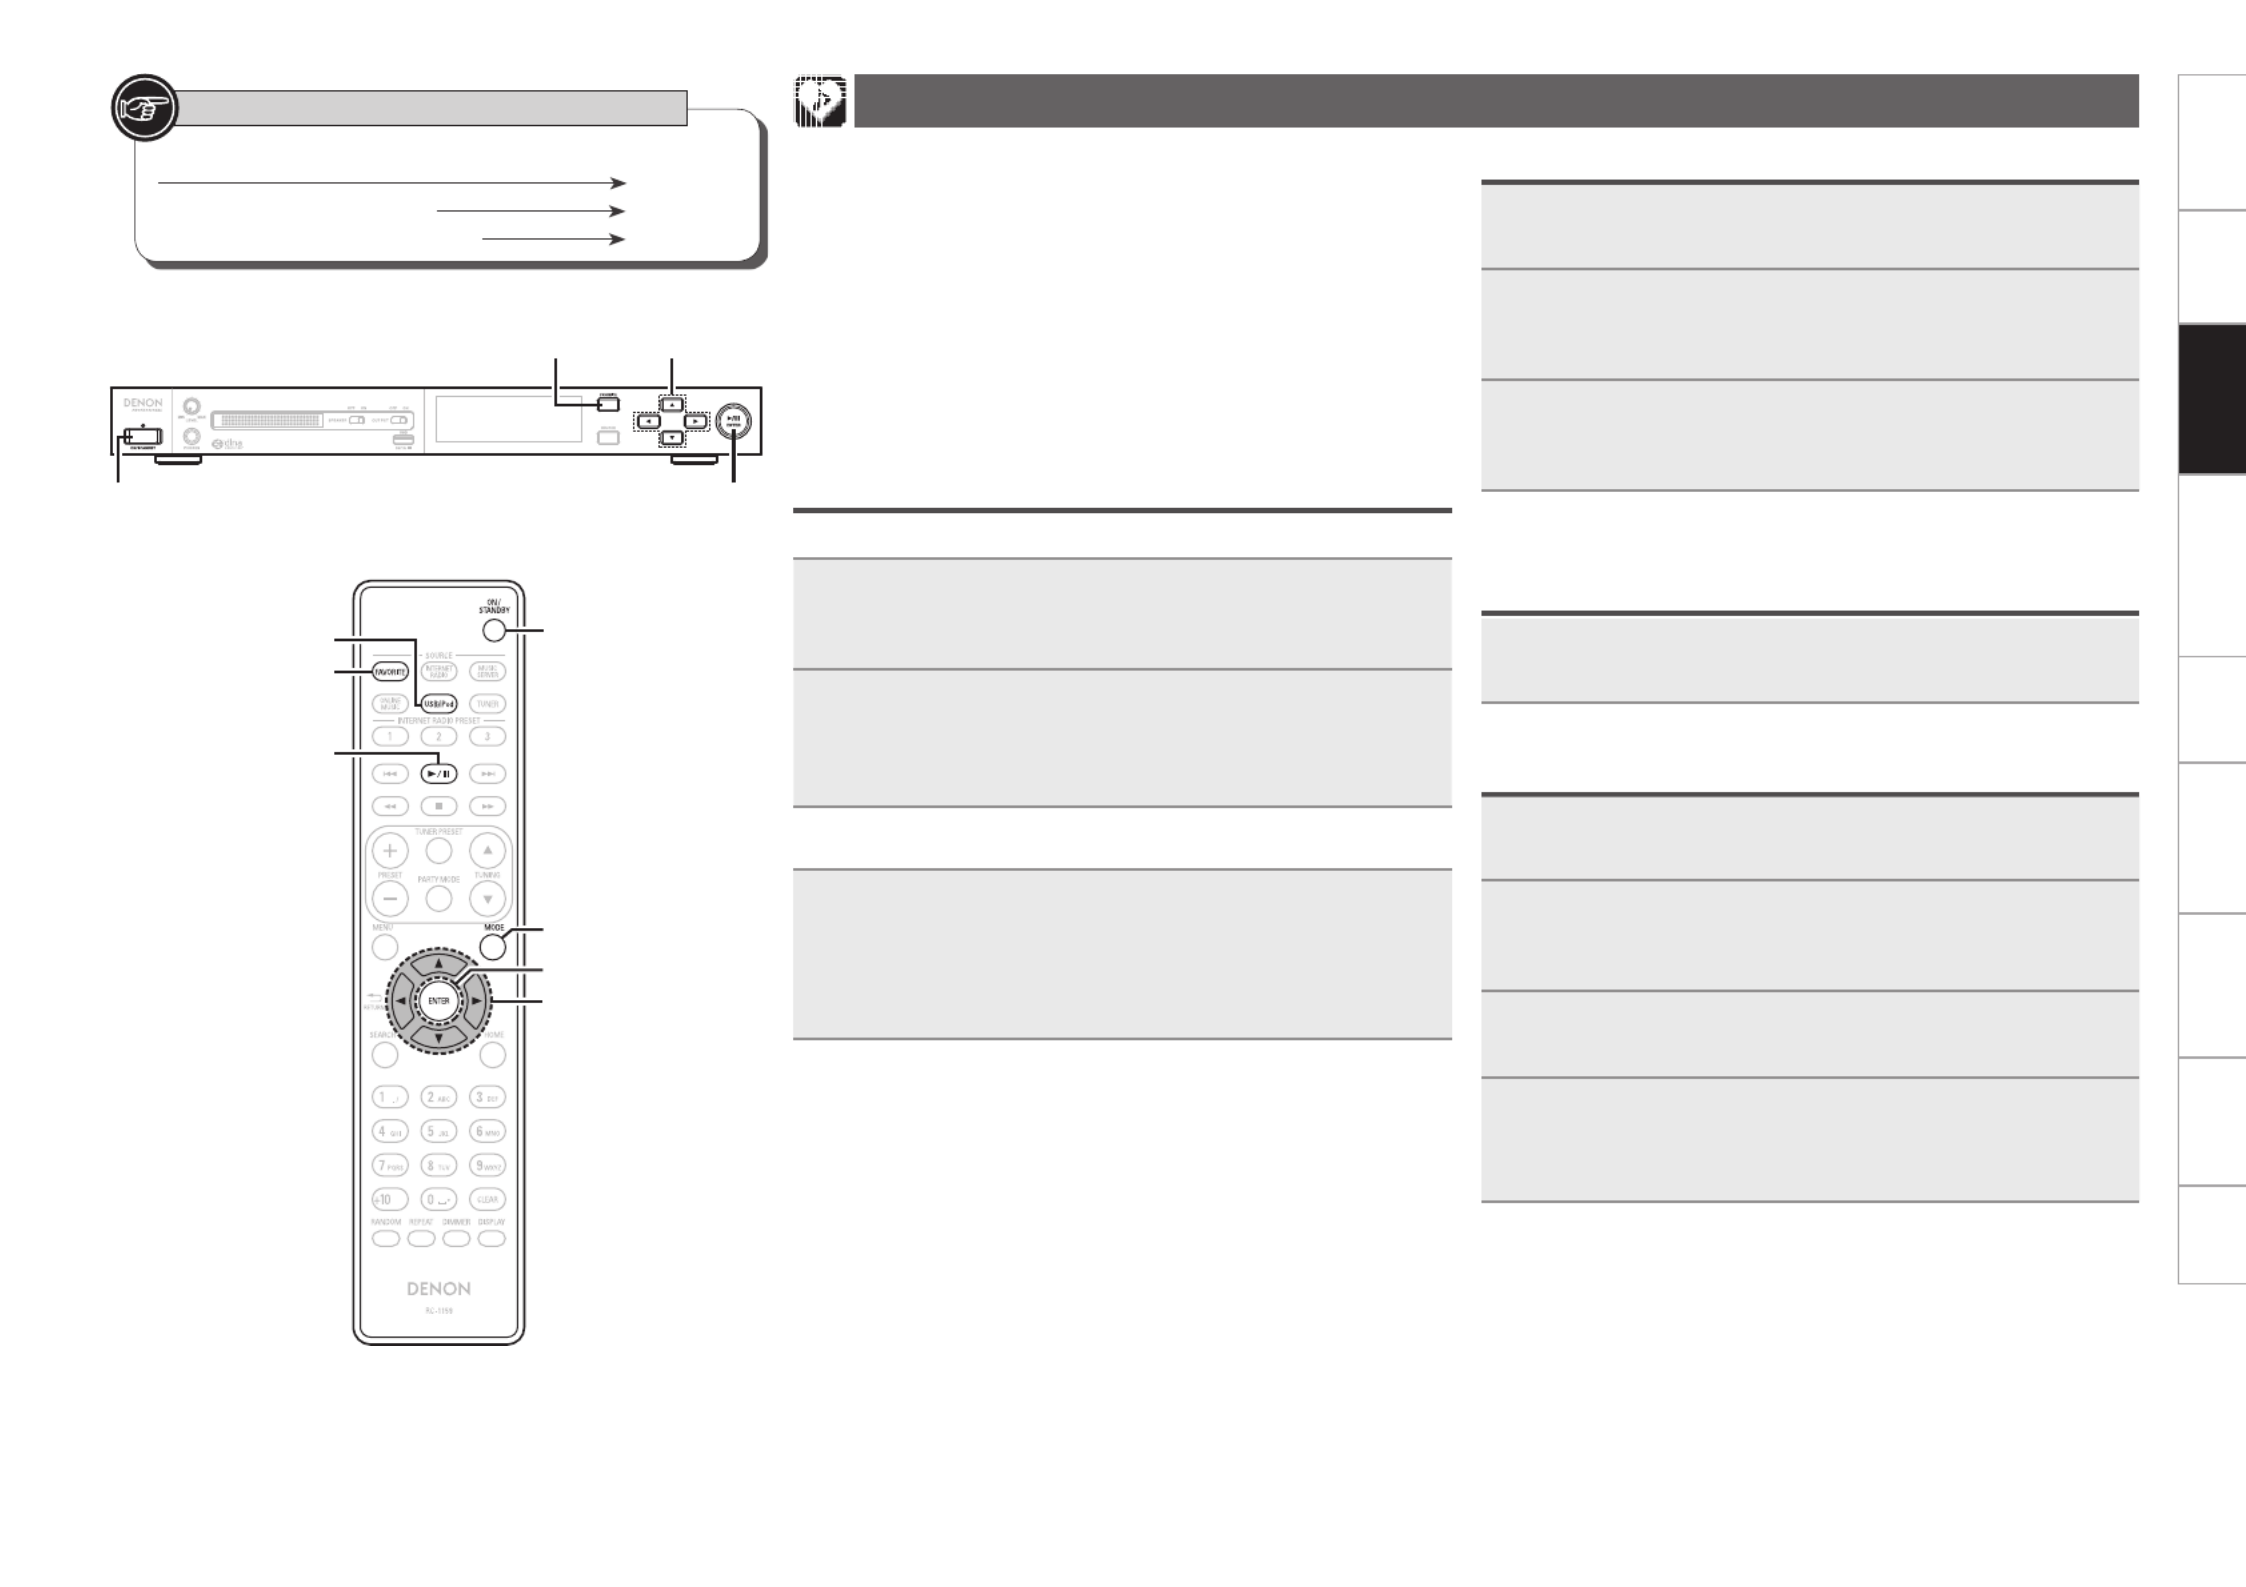
Getting started ConnectionsConnections
Basic OperationsBasic operations Advanced operations TroubleshootingGlossary of termsInformation Specifications Index
22
Favorite function
This section provides information on the Favorite function.
•The Favorite function allows you to register your favorite broadcast
stations and files in Favorite List in advance so that you can call and
listen to the stations or files right away, whenever you want.
•The contents that you can register and call are Internet radio station
and tuner.
•You can register up to 50 items in Favorite List.
•When the 51st item is registered, the least frequently accessed
radio station is replaced by the new item.
•When you select a station from Favorite List, the top of the list is
displayed.
Registering stations or files to the favorites list
nRegistering with the remote control
1Press [FAVORITE] while the Internet radio station,
tuners or le to register is played back.
“Favorite” menu appears.
2Use to select “Add to Favorite”, then press ui
[ENTER] or p.
When the station, server, or tuner is registered, “Add to
Favorite” appears.
nRegistering with the main unit
Press and hold for at least 1 seconds while <FAVORITE>
the Internet radio station, tuners or le to register is
played back.
When registered, the station or file is displayed at the top of the
favorites list.
Calling stations or files from the favorites list
1Press .[FAVORITE]
“Favorite” menu appears.
2Use to select “Call Favorite”, then press ui
[ENTER] < / , 1 3
ENTER
> or p.
The Favorite list appears.
3Press ui to select the station or le that you want
to call, and press , or .[ENTER] <1 3/ ENTER> p
The respective function starts up and playback starts.
Calling the most recently played station or
file from the favorites list
Press .<FAVORITE>
The respective function starts up and playback starts.
Deleting stations or files from the favorite list
1Press .[FAVORITE]
“Favorite” menu appears.
2Use ui to select “Delete Favorite”, then press
[ENTER] < / , 1 3
ENTER
> or p.
The Favorite list appears.
3Press uito select the station or le that you want
to delete, and press , or .[ENTER] <1 3/ ENTER> p
4When the prompt “Delete?” appears, press [ENTER],
< / ENTER>1 3 or p.
•To cancel the operation, press .o
Button located on both the main unit and the remote control
BUTTON
Button only on the main unit <BUTTON>
Button only on the remote control
[BUTTON]
Symbols used to indicate buttons in this manual
[FAVORITE]
uio p
[ENTER]
[MODE]
[ / ]1 3
ON/STANDBY
[USB/iPod]
< /1 3
ENTER
ui
pi
<FAVORITE>
ON/STANDBY

Product specificaties
| Merk: | Denon |
| Categorie: | Hifi systeem |
| Model: | DN-700H |
Heb je hulp nodig?
Als je hulp nodig hebt met Denon DN-700H stel dan hieronder een vraag en andere gebruikers zullen je antwoorden
Handleiding Hifi systeem Denon

16 November 2024
4 September 2023
6 Juli 2023
5 Juli 2023
3 Juni 2023
1 Juni 2023
31 Mei 2023
21 Mei 2023
19 Mei 2023
16 Mei 2023
Handleiding Hifi systeem
- Hifi systeem Philips
- Hifi systeem Sony
- Hifi systeem Samsung
- Hifi systeem Panasonic
- Hifi systeem LG
- Hifi systeem Huawei
- Hifi systeem Asus
- Hifi systeem AEG
- Hifi systeem Garmin
- Hifi systeem Grundig
- Hifi systeem JVC
- Hifi systeem JBL
- Hifi systeem Kenwood
- Hifi systeem Karcher
- Hifi systeem Motorola
- Hifi systeem Medion
- Hifi systeem Nokia
- Hifi systeem Olympus
- Hifi systeem Onkyo
- Hifi systeem Pioneer
- Hifi systeem VTech
- Hifi systeem Yamaha
- Hifi systeem Acoustic Solutions
- Hifi systeem Ade
- Hifi systeem Aiwa
- Hifi systeem Akai
- Hifi systeem Akg
- Hifi systeem Albrecht
- Hifi systeem Alpine
- Hifi systeem Altec Lansing
- Hifi systeem Alto
- Hifi systeem American Audio
- Hifi systeem AOC
- Hifi systeem Arcam
- Hifi systeem Arturia
- Hifi systeem Audio Pro
- Hifi systeem Audio-Technica
- Hifi systeem Audiolab
- Hifi systeem Audiosonic
- Hifi systeem Audison
- Hifi systeem Audizio
- Hifi systeem Auna
- Hifi systeem Autotek
- Hifi systeem AVM
- Hifi systeem BeamZ
- Hifi systeem Behringer
- Hifi systeem Belkin
- Hifi systeem Bigben
- Hifi systeem Blaupunkt
- Hifi systeem Bluesound
- Hifi systeem Bluetrek
- Hifi systeem Bose
- Hifi systeem Boss
- Hifi systeem Boston Acoustics
- Hifi systeem Brandson
- Hifi systeem Brigmton
- Hifi systeem Dali
- Hifi systeem DAP
- Hifi systeem DAP Audio
- Hifi systeem Denver
- Hifi systeem Devialet
- Hifi systeem Dual
- Hifi systeem Duronic
- Hifi systeem E-bench
- Hifi systeem Ebode
- Hifi systeem Elac
- Hifi systeem Elta
- Hifi systeem Ematic
- Hifi systeem Energy Sistem
- Hifi systeem Envivo
- Hifi systeem ESX
- Hifi systeem Fender
- Hifi systeem Fenton
- Hifi systeem Ferguson
- Hifi systeem Fiio
- Hifi systeem Focal
- Hifi systeem Focusrite
- Hifi systeem Franklin
- Hifi systeem Geemarc
- Hifi systeem Gembird
- Hifi systeem Gemini
- Hifi systeem General Electric
- Hifi systeem Geneva
- Hifi systeem GPX
- Hifi systeem Griffin
- Hifi systeem Hama
- Hifi systeem Harman Kardon
- Hifi systeem Hercules
- Hifi systeem Hitachi
- Hifi systeem Homedics
- Hifi systeem Honor
- Hifi systeem House Of Marley
- Hifi systeem HUMANTECHNIK
- Hifi systeem Hyundai
- Hifi systeem Icon
- Hifi systeem ILive
- Hifi systeem Iluv
- Hifi systeem Imperial
- Hifi systeem Infinity
- Hifi systeem Ion
- Hifi systeem Karcher Audio
- Hifi systeem KEF
- Hifi systeem Kicker
- Hifi systeem Klipsch
- Hifi systeem Konig
- Hifi systeem Korg
- Hifi systeem Laser
- Hifi systeem LD Systems
- Hifi systeem Lenco
- Hifi systeem Loewe
- Hifi systeem Logik
- Hifi systeem Logitech
- Hifi systeem Lowrance
- Hifi systeem Luxman
- Hifi systeem Lynx
- Hifi systeem M-Audio
- Hifi systeem Mac Audio
- Hifi systeem Mackie
- Hifi systeem Magnat
- Hifi systeem Magnavox
- Hifi systeem Magnum
- Hifi systeem Manhattan
- Hifi systeem Marantz
- Hifi systeem Marmitek
- Hifi systeem Marquant
- Hifi systeem Marshall
- Hifi systeem MB Quart
- Hifi systeem Meridian
- Hifi systeem Midland
- Hifi systeem Monacor
- Hifi systeem Monitor Audio
- Hifi systeem Mpman
- Hifi systeem Mtx Audio
- Hifi systeem Muse
- Hifi systeem Nacon
- Hifi systeem NAD
- Hifi systeem Nec
- Hifi systeem Nedis
- Hifi systeem Netgear
- Hifi systeem Nextbase
- Hifi systeem Nikkei
- Hifi systeem Paradigm
- Hifi systeem Peaq
- Hifi systeem Peavey
- Hifi systeem Plantronics
- Hifi systeem Polk
- Hifi systeem Power Dynamics
- Hifi systeem Pure
- Hifi systeem Pyle
- Hifi systeem Quantis
- Hifi systeem Razer
- Hifi systeem RCA
- Hifi systeem RCF
- Hifi systeem Reflexion
- Hifi systeem Revo
- Hifi systeem Revox
- Hifi systeem Roadstar
- Hifi systeem Rockford Fosgate
- Hifi systeem Roland
- Hifi systeem Rotel
- Hifi systeem Sagem
- Hifi systeem Salora
- Hifi systeem Samson
- Hifi systeem Sangean
- Hifi systeem Saramonic
- Hifi systeem Schneider
- Hifi systeem Scott
- Hifi systeem Sencor
- Hifi systeem Sennheiser
- Hifi systeem Sharkoon
- Hifi systeem Sharp
- Hifi systeem Silvercrest
- Hifi systeem Skytec
- Hifi systeem Sonoro
- Hifi systeem Sonos
- Hifi systeem Sony Ericsson
- Hifi systeem Soundmaster
- Hifi systeem Soundstream
- Hifi systeem Starkey
- Hifi systeem Steelseries
- Hifi systeem Steinberg
- Hifi systeem Stereoboomm
- Hifi systeem Sunstech
- Hifi systeem Superior
- Hifi systeem Swissvoice
- Hifi systeem Tannoy
- Hifi systeem Tascam
- Hifi systeem TC Helicon
- Hifi systeem TCM
- Hifi systeem Teac
- Hifi systeem Technaxx
- Hifi systeem Technics
- Hifi systeem Technisat
- Hifi systeem Telefunken
- Hifi systeem Terratec
- Hifi systeem Teufel
- Hifi systeem Thomson
- Hifi systeem Toa
- Hifi systeem Tristar
- Hifi systeem Universal Remote Control
- Hifi systeem Velleman
- Hifi systeem Vivax
- Hifi systeem Vizio
- Hifi systeem Vonyx
- Hifi systeem Watson
- Hifi systeem Wolfgang
- Hifi systeem Xoro
- Hifi systeem Zoom
- Hifi systeem Jabra
- Hifi systeem Jamo
- Hifi systeem JB Systems
- Hifi systeem Jensen
- Hifi systeem JL Audio
- Hifi systeem OK
- Hifi systeem Omnitronic
- Hifi systeem OneConcept
- Hifi systeem Oppo
- Hifi systeem Orbitsound
- Hifi systeem Oregon Scientific
- Hifi systeem Anthem
- Hifi systeem Cambridge
- Hifi systeem McIntosh
- Hifi systeem Camry
- Hifi systeem Clatronic
- Hifi systeem Continental Edison
- Hifi systeem ECG
- Hifi systeem Bang And Olufsen
- Hifi systeem Bowers And Wilkins
- Hifi systeem Caliber
- Hifi systeem Creative
- Hifi systeem CSL
- Hifi systeem Exibel
- Hifi systeem GoGEN
- Hifi systeem Krüger And Matz
- Hifi systeem Naxa
- Hifi systeem NGS
- Hifi systeem Proscan
- Hifi systeem Shure
- Hifi systeem Steren
- Hifi systeem Kunft
- Hifi systeem Clarion
- Hifi systeem Cobra
- Hifi systeem Bush
- Hifi systeem Crosley
- Hifi systeem Nevir
- Hifi systeem DPA
- Hifi systeem MXL
- Hifi systeem Aplic
- Hifi systeem Atlona
- Hifi systeem Irradio
- Hifi systeem Defender
- Hifi systeem Alba
- Hifi systeem Majestic
- Hifi systeem Trevi
- Hifi systeem Crunch
- Hifi systeem SIIG
- Hifi systeem Sven
- Hifi systeem Lenoxx
- Hifi systeem Scosche
- Hifi systeem Canton
- Hifi systeem ClearOne
- Hifi systeem Tripp Lite
- Hifi systeem QTX
- Hifi systeem Musical Fidelity
- Hifi systeem SPC
- Hifi systeem Sanus
- Hifi systeem Block
- Hifi systeem Pro-Ject
- Hifi systeem Rega
- Hifi systeem Vision
- Hifi systeem Crown
- Hifi systeem Mark Levinson
- Hifi systeem Rane
- Hifi systeem Coby
- Hifi systeem Massive
- Hifi systeem WAGAN
- Hifi systeem Monster
- Hifi systeem Cardo
- Hifi systeem Dreamgear
- Hifi systeem Auto-T
- Hifi systeem AudioAffairs
- Hifi systeem DataVideo
- Hifi systeem ART
- Hifi systeem Sonance
- Hifi systeem HK Audio
- Hifi systeem Galaxy Audio
- Hifi systeem Bigben Interactive
- Hifi systeem Ikan
- Hifi systeem Native Instruments
- Hifi systeem Apogee
- Hifi systeem Pyle Pro
- Hifi systeem PreSonus
- Hifi systeem Electro-Voice
- Hifi systeem IK Multimedia
- Hifi systeem IDance
- Hifi systeem Chord
- Hifi systeem ESI
- Hifi systeem Rode
- Hifi systeem Anchor Audio
- Hifi systeem ATen
- Hifi systeem Cmx
- Hifi systeem Russound
- Hifi systeem Comica
- Hifi systeem Audient
- Hifi systeem RGBlink
- Hifi systeem PAC
- Hifi systeem Dynaudio
- Hifi systeem DBX
- Hifi systeem Tivoli Audio
- Hifi systeem Senal
- Hifi systeem Victrola
- Hifi systeem Numan
- Hifi systeem Extron
- Hifi systeem Ibiza Sound
- Hifi systeem Nxg
- Hifi systeem MIPRO
- Hifi systeem Solid State Logic
- Hifi systeem HiFi ROSE
- Hifi systeem OSD Audio
- Hifi systeem Andover
- Hifi systeem Crestron
- Hifi systeem RME
- Hifi systeem Avid
- Hifi systeem Adastra
- Hifi systeem Konig & Meyer
- Hifi systeem Avante
- Hifi systeem Music Hall
- Hifi systeem Shokz
- Hifi systeem Electro Harmonix
- Hifi systeem Eissound
- Hifi systeem AudioControl
- Hifi systeem SPL
- Hifi systeem Smart-AVI
- Hifi systeem Primare
- Hifi systeem Sonifex
- Hifi systeem Xantech
- Hifi systeem Audioengine
- Hifi systeem Kramer
- Hifi systeem IFi Audio
- Hifi systeem Motu
- Hifi systeem Zvox
- Hifi systeem KanexPro
- Hifi systeem SVS
- Hifi systeem Vocopro
- Hifi systeem Werma
- Hifi systeem Walrus Audio
- Hifi systeem Glide Gear
- Hifi systeem AVer
- Hifi systeem Universal Audio
- Hifi systeem Teradek
- Hifi systeem Vimar
- Hifi systeem Speco Technologies
- Hifi systeem Morel
- Hifi systeem Antelope Audio
- Hifi systeem CE Labs
- Hifi systeem Z CAM
- Hifi systeem Aquatic AV
- Hifi systeem Parasound
- Hifi systeem Promate
- Hifi systeem SoundCast
- Hifi systeem Hollyland
- Hifi systeem Cyrus
- Hifi systeem Boytone
- Hifi systeem Astell&Kern
- Hifi systeem TV One
- Hifi systeem Maretron
- Hifi systeem Xact
- Hifi systeem Ruark Audio
- Hifi systeem Lotronic
- Hifi systeem Esoteric
- Hifi systeem ANT
- Hifi systeem Leviton
- Hifi systeem Atlas Sound
- Hifi systeem NUVO
- Hifi systeem JK Audio
- Hifi systeem Lexicon
- Hifi systeem Fluance
- Hifi systeem Altra
- Hifi systeem PowerBass
- Hifi systeem Kiloview
- Hifi systeem On-Q
- Hifi systeem Vantage Point
- Hifi systeem Planet Audio
- Hifi systeem Fluid
- Hifi systeem IFi
- Hifi systeem Goodis
- Hifi systeem Roon
- Hifi systeem Voco
- Hifi systeem Hosa
- Hifi systeem Linear
- Hifi systeem SSV Works
- Hifi systeem Sound Devices
- Hifi systeem Vankyo
- Hifi systeem Glorious
- Hifi systeem SWIT
- Hifi systeem Key Digital
- Hifi systeem CAD Audio
- Hifi systeem The Box
- Hifi systeem Polsen
- Hifi systeem BSS Audio
- Hifi systeem AmpliVox
- Hifi systeem Audiofrog
- Hifi systeem Memphis Audio
- Hifi systeem Rolls
- Hifi systeem WyreStorm
- Hifi systeem Accsoon
- Hifi systeem Juke Audio
- Hifi systeem Best Buy
- Hifi systeem DiGiGrid
- Hifi systeem CLXmusic
- Hifi systeem Nuheara
- Hifi systeem Majority
- Hifi systeem Metric Halo
- Hifi systeem Prism Sound
- Hifi systeem MoFi
- Hifi systeem Antelope
- Hifi systeem Auvi
- Hifi systeem Technical Pro
- Hifi systeem Switchcraft
- Hifi systeem Digigram
- Hifi systeem Titanwolf
- Hifi systeem Liam&Daan
- Hifi systeem Crystal Video
- Hifi systeem Atoll
- Hifi systeem Bennett & Ross
- Hifi systeem Beatfoxx
- Hifi systeem Pronomic
- Hifi systeem NEAR
- Hifi systeem INKEE
- Hifi systeem Vaxis
Nieuwste handleidingen voor Hifi systeem
1 April 2025
31 Maart 2025
28 Maart 2025
28 Maart 2025
28 Maart 2025
28 Maart 2025
28 Maart 2025
28 Maart 2025
28 Maart 2025
28 Maart 2025