Dell Inspiron 5442 Handleiding
Lees hieronder de 📖 handleiding in het Nederlandse voor Dell Inspiron 5442 (79 pagina's) in de categorie Laptop. Deze handleiding was nuttig voor 65 personen en werd door 2 gebruikers gemiddeld met 4.5 sterren beoordeeld
Pagina 1/79

Inspiron 14
5000 Series
Owner's Manual
Computer Model: Inspiron 5442
Regulatory Model: P49G
Regulatory Type: P49G001

Notes, Cautions, and Warnings
NOTE:
NOTE:
NOTE:
NOTE: NOTE: A NOTE indicates important information that helps you make better
use of your computer.
CAUTION: A CAUTION indicates either potential damage to hardware or loss
of data and tells you how to avoid the problem.
WARNING: A WARNING indicates a potential for property damage, personal
injury, or death.
Copyright 2014 Dell Inc. All rights reserved.© This product is protected by U.S. and
international copyright and intellectual property laws. Dell™ and the Dell logo are trademarks
of Dell Inc. in the United States and/or other jurisdictions. All other marks and names
mentioned herein may be trademarks of their respective companies.
2014 - 06
Rev. A00

Contents
Before Working Inside Your Computer...................................8
Before You Begin .............................................................................................. 8
Safety Instructions............................................................................................. 8
Recommended Tools........................................................................................ 9
After Working Inside Your Computer.................................... 11
Removing the Base Cover........................................................ 12
Procedure......................................................................................................... 12
Replacing the Base Cover........................................................ 13
Procedure......................................................................................................... 13
Removing the Battery............................................................... 14
Prerequisites.....................................................................................................14
Procedure.........................................................................................................14
Replacing the Battery................................................................15
Procedure......................................................................................................... 15
Post-requisites................................................................................................. 15
Removing the Hard Drive.........................................................16
Prerequisites.....................................................................................................16
Procedure.........................................................................................................16
Replacing the Hard Drive......................................................... 19
Procedure.........................................................................................................19
Post-requisites................................................................................................. 19

Removing the Wireless Card................................................... 20
Prerequisites.................................................................................................... 20
Procedure........................................................................................................ 20
Replacing the Wireless Card................................................... 22
Procedure.........................................................................................................22
Post-requisites................................................................................................. 22
Removing the Memory Module(s).......................................... 23
Prerequisites.....................................................................................................23
Procedure.........................................................................................................23
Replacing the Memory Module(s).......................................... 25
Procedure.........................................................................................................25
Post-requisites................................................................................................. 26
Removing the Fan......................................................................27
Prerequisites.....................................................................................................27
Procedure.........................................................................................................27
Replacing the Fan......................................................................30
Procedure........................................................................................................ 30
Post-requisites.................................................................................................30
Removing the Keyboard...........................................................31
Prerequisites..................................................................................................... 31
Procedure......................................................................................................... 31
Replacing the Keyboard...........................................................34
Procedure........................................................................................................ 34
Post-requisites................................................................................................. 34
Folding the Keyboard Cables.......................................................................... 34

Removing the Base Frame....................................................... 38
Prerequisites.....................................................................................................38
Procedure........................................................................................................ 39
Replacing the Base Frame....................................................... 42
Procedure........................................................................................................ 42
Post-requisites................................................................................................. 42
Removing the Heat Sink...........................................................43
Prerequisites.....................................................................................................43
Procedure........................................................................................................ 43
Replacing the Heat Sink........................................................... 45
Procedure........................................................................................................ 45
Post-requisites................................................................................................. 45
Removing the Coin-Cell Battery............................................ 46
Prerequisites.................................................................................................... 46
Procedure........................................................................................................ 46
Replacing the Coin-Cell Battery............................................ 48
Procedure........................................................................................................ 48
Post-requisites.................................................................................................48
Removing the Speakers............................................................49
Prerequisites.................................................................................................... 49
Procedure........................................................................................................ 49
Replacing the Speakers............................................................ 51
Procedure......................................................................................................... 51
Post-requisites................................................................................................. 51

Removing the I/O Board.......................................................... 52
Prerequisites.....................................................................................................52
Procedure.........................................................................................................52
Replacing the I/O Board.......................................................... 54
Procedure........................................................................................................ 54
Post-requisites................................................................................................. 54
Removing the Status-Light Board..........................................55
Prerequisites.....................................................................................................55
Procedure.........................................................................................................55
Replacing the Status-Light Board.......................................... 59
Procedure........................................................................................................ 59
Post-requisites................................................................................................. 59
Removing the System Board...................................................60
Prerequisites.................................................................................................... 60
Procedure........................................................................................................ 60
Replacing the System Board................................................... 65
Procedure........................................................................................................ 65
Post-requisites................................................................................................. 65
Removing the Display Assembly.............................................66
Prerequisites.................................................................................................... 66
Procedure.........................................................................................................67
Replacing the Display Assembly.............................................69
Procedure........................................................................................................ 69
Post-requisites................................................................................................. 70

Removing the Power-Adapter Port........................................71
Prerequisites..................................................................................................... 71
Procedure......................................................................................................... 71
Replacing the Power-Adapter Port........................................ 75
Procedure.........................................................................................................75
Post-requisites................................................................................................. 75
Removing the Palm Rest.......................................................... 76
Prerequisites.....................................................................................................76
Procedure.........................................................................................................76
Replacing the Palm Rest.......................................................... 78
Procedure.........................................................................................................78
Post-requisites................................................................................................. 78
Flashing the BIOS...................................................................... 79

Before Working Inside Your
Computer
CAUTION: To avoid damaging the components and cards, handle
them by their edges and avoid touching pins and contacts.
NOTE:
NOTE:
NOTE:
NOTE: NOTE: The images in this document may differ from your computer
depending on the configuration you ordered.
Before You Begin
1 Save and close all open files and exit all open applications.
2 Shut down your computer.
– Windows 8.1: On the screen, click or tap the power icon Start →
Shut down.
– Windows 7: Click or tap .Start Shut down→
NOTE:
NOTE:
NOTE:
NOTE: NOTE: If you are using a different operating system, see the
documentation of your operating system for shut-down
instructions.
3 Disconnect your computer and all attached devices from their electrical
outlets.
4 Disconnect all cables such as telephone cables, network cables and so
on, from your computer.
5 Disconnect all attached devices and peripherals, such as keyboard,
mouse, monitor, and so on, from your computer.
6 Remove any media card and optical disc from your computer, if
applicable.
7 After the computer is unplugged, press and hold the power button for 5
seconds to ground the system board.
Safety Instructions
Use the following safety guidelines to protect your computer from potential
damage and ensure your personal safety.
8

WARNING: Before working inside your computer, read the safety
information that shipped with your computer. For more safety best
practices, see the Regulatory Compliance home page at dell.com/
regulatory_compliance.
WARNING: Disconnect all power sources before opening the
computer cover or panels. After you finish working inside the
computer, replace all covers, panels, and screws before connecting to
the power source.
CAUTION: To avoid damaging the computer, make sure that the work
surface is flat and clean.
CAUTION: To avoid damaging the components and cards, handle
them by their edges and avoid touching pins and contacts.
CAUTION: Only a certified service technician is authorized to remove
the computer cover and access any of the components inside the
computer. See the safety instructions for complete information about
safety precautions, working inside your computer, and protecting
against electrostatic discharge.
CAUTION: Before touching anything inside your computer, ground
yourself by touching an unpainted metal surface, such as the metal at
the back of the computer. While you work, periodically touch an
unpainted metal surface to dissipate static electricity, which could
harm internal components.
CAUTION: When you disconnect a cable, pull on its connector or on
its pull-tab, not on the cable itself. Some cables have connectors with
locking tabs or thumb-screws that you must disengage before
disconnecting the cable. When disconnecting cables, keep them
evenly aligned to avoid bending any connector pins. When connecting
cables, make sure that the ports and connectors are correctly oriented
and aligned.
CAUTION: To disconnect a network cable, first unplug the cable from
your computer and then unplug the cable from the network device.
CAUTION: Press and eject any installed card from the media-card
reader.
Recommended Tools
The procedures in this document may require the following tools:
9

• Philips screwdriver
• Plastic scribe
10

After Working Inside Your
Computer
CAUTION: Leaving stray or loose screws inside your computer may
severely damage your computer.
1 Replace all screws and make sure that no stray screws remain inside your
computer.
2 Connect any external devices, peripherals, and cables you removed
before working on your computer.
3 Replace any media cards, discs, and any other part(s) that you removed
before working on your computer.
4 Connect your computer and all attached devices to their electrical
outlets.
5 Turn on your computer.
11

Removing the Base Cover
WARNING: Before working inside your computer, read the safety
information that shipped with your computer and follow the steps in
Before Working Inside Your Computer. After working inside your
computer, follow the instructions in After Working Inside Your
Computer. For more safety best practices, see the Regulatory
Compliance home page at dell.com/regulatory_compliance.
Procedure
1 Close the display and turn the computer over.
2 Remove the screws that secure the base cover to the base frame.
3 Using a plastic scribe, pry the base cover out of the base frame.
4 Slide and lift the base cover off the base frame.
1 plastic scribe 2 screws (2)
3 base cover 4 tabs
5 base frame
12

Replacing the Base Cover
WARNING: Before working inside your computer, read the safety
information that shipped with your computer and follow the steps in
Before Working Inside Your Computer. After working inside your
computer, follow the instructions in After Working Inside Your
Computer. For more safety best practices, see the Regulatory
Compliance home page at dell.com/regulatory_compliance.
Procedure
1 Slide the tabs on the base cover into the slots on the base frame.
2 Press down on the base cover to snap it in place.
3 Replace the screws that secure the base cover to the base frame.
13

Removing the Battery
WARNING: Before working inside your computer, read the safety
information that shipped with your computer and follow the steps in
Before Working Inside Your Computer. After working inside your
computer, follow the instructions in After Working Inside Your
Computer. For more safety best practices, see the Regulatory
Compliance home page at dell.com/regulatory_compliance.
Prerequisites
Remove the .base cover
Procedure
1 Remove the screws that secure the battery to the base frame.
2 Lift the battery off the base frame.
1 screws (2) 2 battery
3 Turn the computer over, open the display, and press the power button
for five seconds to ground the system board.
14

Replacing the Battery
WARNING: Before working inside your computer, read the safety
information that shipped with your computer and follow the steps in
Before Working Inside Your Computer. After working inside your
computer, follow the instructions in After Working Inside Your
Computer. For more safety best practices, see the Regulatory
Compliance home page at dell.com/regulatory_compliance.
Procedure
1 Align the screw holes on the battery with the screw holes on the base
frame and press down on the battery to connect it to the battery
connector.
2 Replace the screws that secure the battery to the base frame.
Post-requisites
Replace the .base cover
15

Removing the Hard Drive
WARNING: Before working inside your computer, read the safety
information that shipped with your computer and follow the steps in
Before Working Inside Your Computer. After working inside your
computer, follow the instructions in After Working Inside Your
Computer. For more safety best practices, see the Regulatory
Compliance home page at dell.com/regulatory_compliance.
CAUTION: Hard drives are fragile. Exercise care when handling the
hard drive.
CAUTION: To avoid data loss, do not remove the hard drive while the
computer is in Sleep or On state.
Prerequisites
1 Remove the .base cover
2 Remove the .battery
Procedure
1 Remove the screws that secure the hard-drive assembly to the base
frame.
16
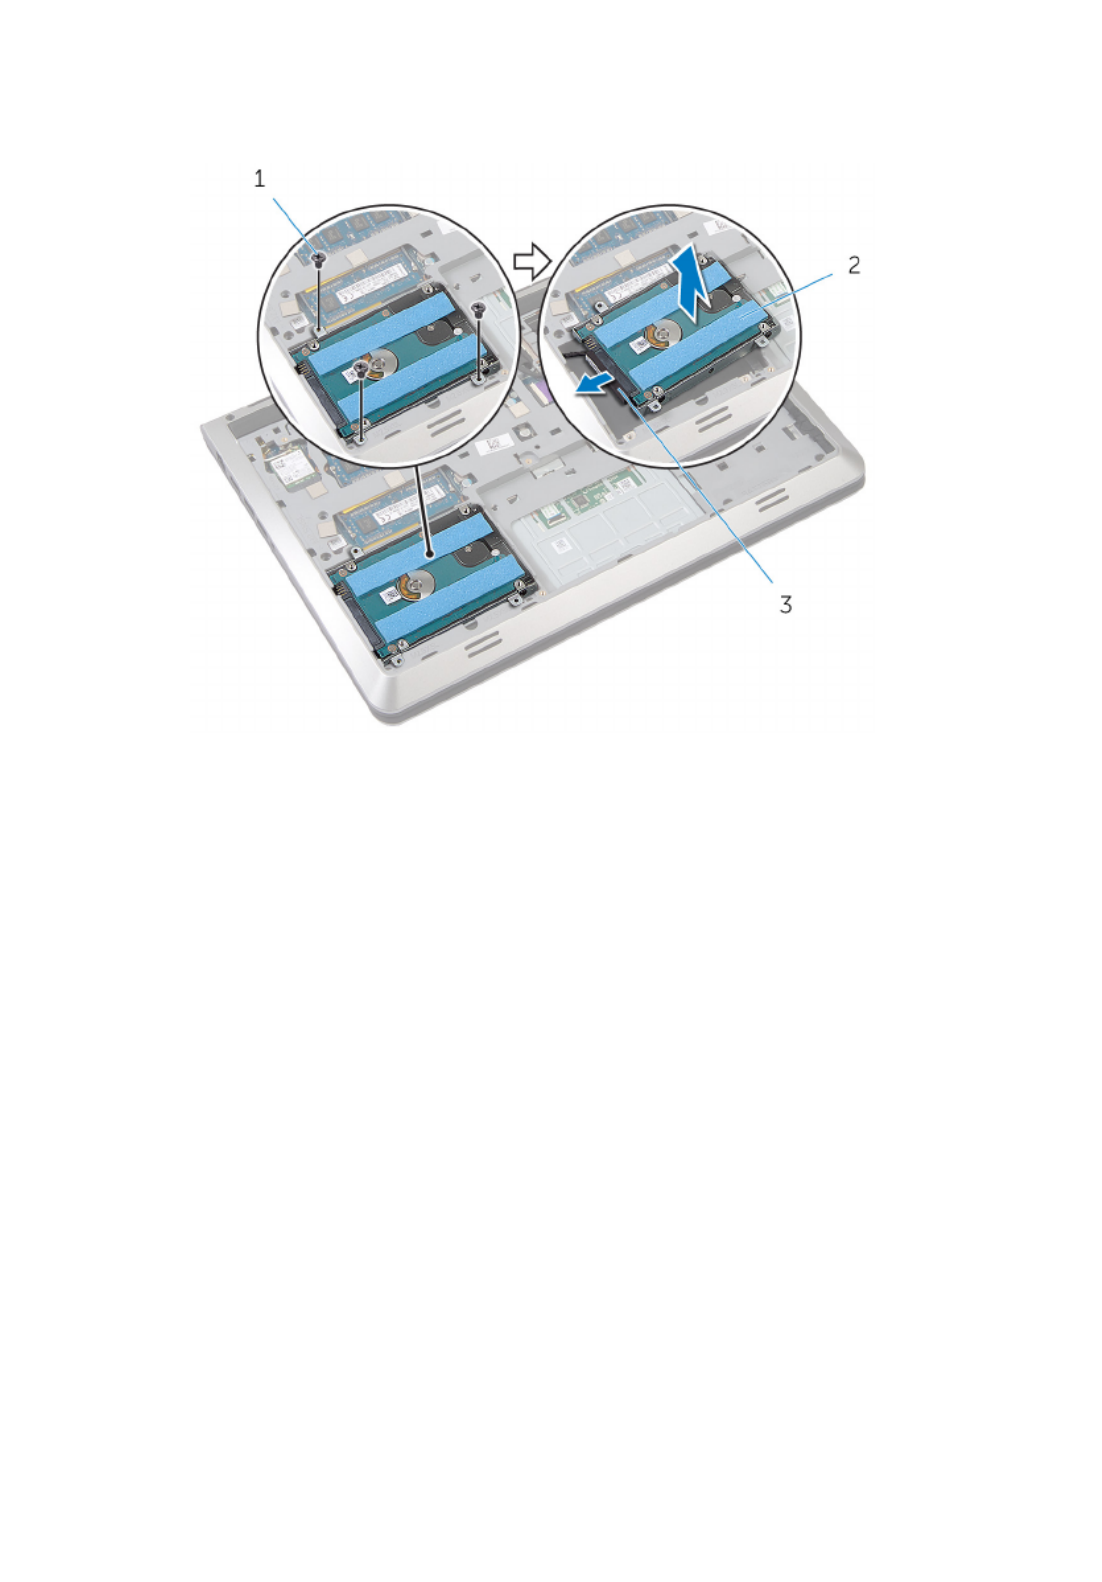
2 Gently lift the hard-drive assembly out of the base frame and disconnect
the hard-drive cable from the hard drive.
1 screws (3) 2 hard drive
3 hard-drive cable
3 Remove the screws that secure the hard-drive bracket to the hard drive.
17

4 Lift the hard-drive bracket off the hard drive.
1 screws (4) 2 hard-drive bracket
3 hard drive
18

Replacing the Hard Drive
WARNING: Before working inside your computer, read the safety
information that shipped with your computer and follow the steps in
Before Working Inside Your Computer. After working inside your
computer, follow the instructions in After Working Inside Your
Computer. For more safety best practices, see the Regulatory
Compliance home page at dell.com/regulatory_compliance.
CAUTION: Hard drives are fragile. Exercise care when handling the
hard drive.
Procedure
1 Place the hard-drive bracket on the hard drive.
2 Align the screw holes on the hard drive-bracket with the screw holes on
the hard drive.
3 Replace the screws that secure the hard-drive bracket to the hard drive.
4 Connect the hard-drive cable to the hard drive.
5 Place the hard-drive assembly in the base frame and align the screw
holes on the hard-drive assembly with the screw holes on the base
frame.
6 Replace the screws that secure the hard-drive assembly to the base
frame.
Post-requisites
1 Replace the .battery
2 Replace the .base cover
19

Removing the Wireless Card
WARNING: Before working inside your computer, read the safety
information that shipped with your computer and follow the steps in
Before Working Inside Your Computer. After working inside your
computer, follow the instructions in After Working Inside Your
Computer. For more safety best practices, see the Regulatory
Compliance home page at dell.com/regulatory_compliance.
Prerequisites
1 Remove the .base cover
2 Remove the .battery
Procedure
1 Disconnect the antenna cables from the wireless card.
2 Remove the screw that secures the wireless card to the system board.
20

3 Lift and slide the wireless card out of the wireless-card slot.
1 antenna cables (2) 2 screw
3 wireless card 4 wireless-card slot
21
Replacing the Wireless Card
WARNING: Before working inside your computer, read the safety
information that shipped with your computer and follow the steps in
Before Working Inside Your Computer. After working inside your
computer, follow the instructions in After Working Inside Your
Computer. For more safety best practices, see the Regulatory
Compliance home page at dell.com/regulatory_compliance.
Procedure
CAUTION: To avoid damage to the wireless card, do not place any
cables under it.
1 Align the notch on the wireless card with the tab on the wireless-card
slot and slide the card into the slot.
2 Align the screw hole on the wireless card with the screw hole on the
system board.
3 Replace the screw that secures the wireless card to the system board.
4 Connect the antenna cables to the wireless card.
The following table provides the antenna-cable color scheme for the
wireless card supported by your computer.
Connectors on the wireless card Antenna-cable color
Main (white triangle) white
Auxiliary (black triangle) black
Post-requisites
1 Replace the .battery
2 Replace the .base cover
22

Removing the Memory
Module(s)
WARNING: Before working inside your computer, read the safety
information that shipped with your computer and follow the steps in
Before Working Inside Your Computer. After working inside your
computer, follow the instructions in After Working Inside Your
Computer. For more safety best practices, see the Regulatory
Compliance home page at dell.com/regulatory_compliance.
Prerequisites
1 Remove the .base cover
2 Remove the .battery
Procedure
1 Use your fingertips to carefully spread apart the securing-clips on each
end of the memory-module slot until the memory module pops up.
23
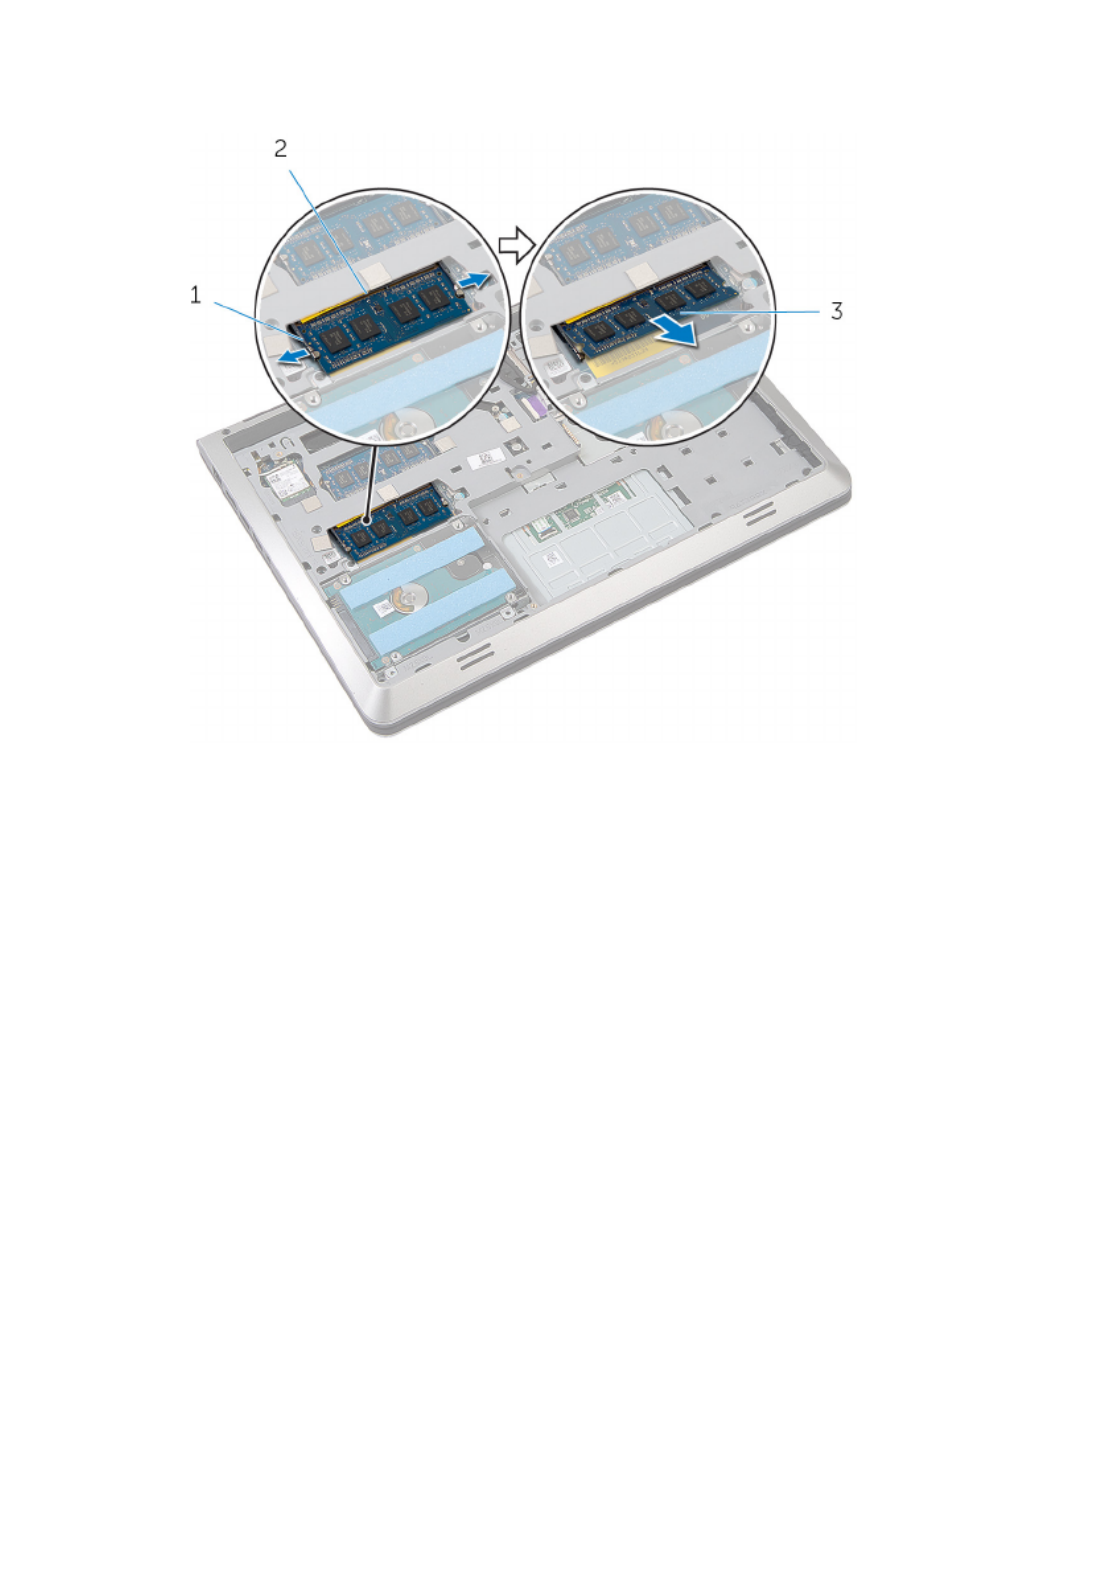
2 Slide and remove the memory module from the memory-module slot.
1 securing-clips (2) 2 memory-module slot
3 memory module
24

Replacing the Memory
Module(s)
WARNING: Before working inside your computer, read the safety
information that shipped with your computer and follow the steps in
Before Working Inside Your Computer. After working inside your
computer, follow the instructions in After Working Inside Your
Computer. For more safety best practices, see the Regulatory
Compliance home page at dell.com/regulatory_compliance.
Procedure
1 Align the notch on the memory module with the tab on the memory-
module slot.
25
Product specificaties
| Merk: | Dell |
| Categorie: | Laptop |
| Model: | Inspiron 5442 |
| Kleur van het product: | Zwart |
| Gewicht: | 2000 g |
| Breedte: | 342 mm |
| Diepte: | 246 mm |
| Hoogte: | 22.4 mm |
| Gebruikershandleiding: | Ja |
| AC-adapterfrequentie: | 50 - 60 Hz |
| AC-adapter ingangsspanning: | 100 - 240 V |
| Bluetooth: | Ja |
| Beeldschermdiagonaal: | 14 " |
| Resolutie: | 1366 x 768 Pixels |
| Oorspronkelijke beeldverhouding: | 16:9 |
| Frequentie van processor: | 1.7 GHz |
| Processorfamilie: | Intel® Core™ i3 |
| Processormodel: | i3-4005U |
| Aantal processorkernen: | 2 |
| Wi-Fi-standaarden: | Wi-Fi 5 (802.11ac),802.11b,802.11g,Wi-Fi 4 (802.11n) |
| Bluetooth-versie: | 4.0 |
| Vormfactor: | Clamshell |
| Resolutie camera voorzijde (numeriek): | 0.92 MP |
| Inclusief besturingssysteem: | Linux |
| Ethernet LAN: | Ja |
| Geïntegreerde geheugenkaartlezer: | Ja |
| Compatibele geheugenkaarten: | Memory Stick (MS),MS PRO,SD,SDHC,SDXC |
| Audiosysteem: | MaxxAudio |
| Processor lithografie: | 22 nm |
| Inclusief AC-adapter: | Ja |
| Markt positionering: | Bedrijf |
| LED backlight: | Ja |
| Aantal USB 2.0-poorten: | 1 |
| Aantal HDMI-poorten: | 1 |
| Microfoon, line-in ingang: | Nee |
| DVI-poort: | Nee |
| Aantal Ethernet LAN (RJ-45)-poorten: | 1 |
| Bevestigingsmogelijkheid voor kabelslot: | Ja |
| Aantal ingebouwde luidsprekers: | 2 |
| Wachtwoordbeveiliging: | Ja |
| AC-adapter, vermogen: | 65 W |
| Inclusief netsnoer: | Ja |
| Ingebouwde microfoon: | Ja |
| Intern geheugen: | 4 GB |
| Opslagmedia: | HDD |
| Levensduur accu/batterij: | - uur |
| Intern geheugentype: | DDR3L-SDRAM |
| HDMI versie: | 1.4a |
| Password bescherming: | BIOS |
| Pixel pitch: | 0.2265 x 0.2265 mm |
| Duurzaamheidscertificaten: | EPEAT Silver,ENERGY STAR |
| Ethernet LAN, data-overdrachtsnelheden: | 10,100 Mbit/s |
| Temperatuur bij opslag: | -40 - 60 °C |
| Intel® Wireless Display (Intel® WiDi): | Ja |
| Aantal poorten USB 3.2 Gen 1 (3.1 Gen 1) Type A: | 2 |
| Processor socket: | BGA 1168 |
| Systeembus: | 5 GT/s |
| Processor aantal threads: | 4 |
| PCI Express slots versie: | 2.0 |
| Processor operating modes: | 64-bit |
| Processor cache: | 3 MB |
| Tjunction: | 100 °C |
| Bus type: | DMI |
| PCI Express configuraties: | 4x1,1x4 |
| Thermal Design Power (TDP): | 15 W |
| Codenaam processor: | Haswell |
| Maximaal aantal PCI Express-lijnen: | 10 |
| Processor cache type: | Smart Cache |
| ECC ondersteund door processor: | Nee |
| Processorfabrikant: | Intel |
| Maximum intern geheugen: | 8 GB |
| Totale opslagcapaciteit: | 500 GB |
| Soort optische drive: | Nee |
| Ingebouwde grafische adapter: | Ja |
| Familie ingebouwde grafische adapter: | Intel® HD Graphics |
| On-board graphics adapter model: | Intel® HD Graphics 4400 |
| Basisfrequentie ingebouwde grafische adapter: | 200 MHz |
| Graphics on-board -adapter dynamische frequentie (max): | 950 MHz |
| On-board grafische adapter ID: | 0xA16 |
| Maximaal geheugen ingebouwde grafische adapter: | 2 GB |
| On-board grafische adapter DirectX-versie: | 12 |
| Camera voorzijde: | Ja |
| Numeriek toetsenblok: | Nee |
| Ondersteunde instructie sets: | AVX 2.0,SSE4.1,SSE4.2 |
| Intel® My WiFi Technology (Intel® MWT): | Nee |
| Intel® Smart Response Technology: | Nee |
| Intel® Hyper Threading Technology (Intel® HT Technology): | Ja |
| Intel® Turbo Boost Technology: | Nee |
| Intel® Quick Sync Video Technology: | Ja |
| Intel® InTru™ 3D Technology: | Ja |
| Intel® Clear Video HD Technology (Intel® CVT HD): | Ja |
| Intel® Insider™: | Ja |
| Intel® Flex Memory Access: | Nee |
| Intel® AES New Instructions (Intel® AES-NI): | Ja |
| Enhanced Intel SpeedStep Technology: | Ja |
| Execute Disable Bit: | Ja |
| Idle States: | Ja |
| Thermal Monitoring Technologies: | Ja |
| CPU configuratie (max): | 1 |
| Intel® Enhanced Halt State: | Ja |
| Intel® Clear Video Technology for Mobile Internet Devices (Intel® CVT for MID): | Nee |
| Intel® VT-x with Extended Page Tables (EPT): | Ja |
| Ingebouwde opties beschikbaar: | Nee |
| Intel® Small Business Advantage (Intel® SBA): | Nee |
| Intel® Secure Key: | Ja |
| Intel® 64: | Ja |
| Intel® Virtualization Technology for Directed I/O (VT-d): | Nee |
| Intel® Clear Video-technologie: | Nee |
| Intel® Virtualization Technology (VT-x): | Ja |
| Verpakkingsgrootte processor: | 40 x 24 x 1.5 mm |
| Conflictvrije processor: | Ja |
| Intel® Identity Protection Technology (Intel® IPT): | Ja |
| Versie Intel® Identity Protection Technology: | 1.00 |
| Versie Intel® Secure Key Technology: | 1.00 |
| Versie Intel® Smart Response Technology: | 0.00 |
| ARK ID processor: | 75105 |
| Intel® Trusted Execution Technology: | Nee |
| Intel® TSX-NI: | Nee |
| Versie Intel® TSX-NI: | 0.00 |
| Intel® Anti-Theft Technology (Intel® AT): | Ja |
| Intel® Rapid Start Technology: | Nee |
| Intel® Smart Connect Technology: | Ja |
| Basisstationaansluiting: | Nee |
| Combo koptelefoon/microfoon port: | Ja |
| SmartCard-slot: | Nee |
| Luchtvochtigheid bij opslag: | 0 - 92 procent |
| Aanwijsapparaat: | Touchpad |
| Windows-toetsen: | Ja |
| AC-adapter, uitgangsspanning: | 19.5 V |
| AC-adapter, uitgangsstroom: | 3.34 A |
| Merk luidsprekers: | Waves |
| Kloksnelheid geheugen: | 1600 MHz |
| Geheugenslots: | 2x SO-DIMM |
| Geheugen form factor: | SO-DIMM |
| Full-size toetsenbord: | Ja |
| Hoogte, in bedrijf: | -15.2 - 3048 m |
| Hoogte bij opslag: | -15.2 - 10668 m |
| Het aantal geïnstalleerde HDD's: | 1 |
| HDD capaciteit: | 500 GB |
| HDD interface: | SATA |
| Morsbestendig toetsenbord: | Ja |
| FSB Parity: | Nee |
| Front-side bus processor: | - MHz |
| Intel® Demand Based Switching: | Nee |
| UART: | Ja |
| Charging port type: | DC-in ingang |
| Type CardBus PCMCIA-slot: | Nee |
| Processorserie: | Intel® Core™ i3-4000 Mobile Series |
| ExpressCard slot: | Nee |
| S/PDIF-uitgang: | Nee |
| Intel® Dual Display Capable Technology: | Nee |
| Intel® FDI Technology: | Nee |
| Intel® Rapid Storage Technology: | Ja |
| Intel® Fast Memory Access: | Nee |
| Intel® Smart Cache: | Ja |
| Intel® Small Business Advantage (SBA)-versie: | 0.00 |
| Intel® segment tagging: | Thuiskantoor |
| HDD omvang: | 2.5 " |
| Vermogen luidsprekers: | 2 W |
| Intel® High Definition Audio (Intel® HD Audio): | Ja |
| Versie Intel® Smart Connect Technology: | 1.00 |
| Resolutie camera voorzijde: | 1280 x 720 Pixels |
| Intel® Virtualization Technology (Intel® VT): | VT-x |
| LightScribe: | Nee |
| Aantal SATA III connectors: | 2 |
| Intel® ME Firmware-versie: | 9.5 |
| Maximaal intern geheugen (64-bit): | 8 GB |
| Schokbestendigheid: | 110 G |
| Schokbestendigheid (buiten gebruik): | 160 G |
| Trillingen, in bedrijf: | 0.66 G |
| Trillingen bij opslag: | 1.3 G |
| Wifi: | Ja |
| Bedrijfstemperatuur (T-T): | 0 - 35 °C |
| Relatieve vochtigheid in bedrijf (V-V): | 10 - 90 procent |
| Type product: | Notebook |
| Intel® Matrix Storage Technology (Intel® MST): | Nee |
| Intel® Active Management Technology (Intel® AMT): | Nee |
| Batterijtechnologie: | Lithium-Ion (Li-Ion) |
| Aantal batterijcellen: | 4 |
| Processorgeneratie: | Vierde generatie Intel® Core™ i3 |
| Totaal aantal SATA-connectoren: | 2 |
| Batterijcapaciteit: | 58 Wh |
Heb je hulp nodig?
Als je hulp nodig hebt met Dell Inspiron 5442 stel dan hieronder een vraag en andere gebruikers zullen je antwoorden
Handleiding Laptop Dell

27 Januari 2025
3 December 2024
3 December 2024
3 December 2024
3 December 2024
3 December 2024
3 December 2024
3 December 2024
16 November 2024
4 September 2024
Handleiding Laptop
- Laptop HP
- Laptop Sony
- Laptop Samsung
- Laptop Xiaomi
- Laptop Panasonic
- Laptop LG
- Laptop Huawei
- Laptop Asus
- Laptop Medion
- Laptop Toshiba
- Laptop Acer
- Laptop Airis
- Laptop Alienware
- Laptop Apple
- Laptop Denver
- Laptop Emachines
- Laptop Ematic
- Laptop Evga
- Laptop Fellowes
- Laptop Fujitsu
- Laptop Gigabyte
- Laptop Goclever
- Laptop Haier
- Laptop Hannspree
- Laptop Hercules
- Laptop Honor
- Laptop Hyundai
- Laptop Ibm
- Laptop Kogan
- Laptop Lenovo
- Laptop Lexibook
- Laptop Micromax
- Laptop Microsoft
- Laptop Mpman
- Laptop MSI
- Laptop Nec
- Laptop Packard Bell
- Laptop Peaq
- Laptop Pyle
- Laptop Razer
- Laptop Ricatech
- Laptop Schneider
- Laptop Sylvania
- Laptop Targa
- Laptop Thomson
- Laptop Trekstor
- Laptop Viewsonic
- Laptop Vizio
- Laptop Zebra
- Laptop Jay-tech
- Laptop Odys
- Laptop Olidata
- Laptop Oregon Scientific
- Laptop Naxa
- Laptop Aplic
- Laptop ADATA
- Laptop Humanscale
- Laptop Hamilton Buhl
- Laptop Compaq
- Laptop SIIG
- Laptop Tripp Lite
- Laptop SPC
- Laptop Prixton
- Laptop Coby
- Laptop AORUS
- Laptop Hähnel
- Laptop XPG
- Laptop ECS
- Laptop Inovia
- Laptop Ergotron
- Laptop Atdec
- Laptop Getac
- Laptop Vulcan
- Laptop System76
- Laptop General Dynamics Itronix
- Laptop CTL
- Laptop Everex
- Laptop Dynabook
- Laptop TechBite
- Laptop Schenker
Nieuwste handleidingen voor Laptop

2 April 2025

28 Maart 2025

27 Maart 2025
26 Maart 2025

4 Maart 2025
10 Februari 2025
10 Februari 2025
10 Februari 2025
5 Februari 2025
5 Februari 2025