D-Link AirPlus Xtreme G DI-634M Handleiding
Lees hieronder de 📖 handleiding in het Nederlandse voor D-Link AirPlus Xtreme G DI-634M (99 pagina's) in de categorie Router. Deze handleiding was nuttig voor 35 personen en werd door 2 gebruikers gemiddeld met 4.5 sterren beoordeeld
Pagina 1/99


2
DI-634M User’s Manual
D-Link Systems, Inc.
Table of Contents
Table of Contents
Package Contents ............................................................................................ 4
Minimum System Requirements ....................................................................... 4
Introduction ....................................................................................................... 5
Features and Benefits ...................................................................................... 6
Hardware Overview .......................................................................................... 7
Connections ............................................................................................ 7
LEDs ....................................................................................................... 8
Wireless Basics ................................................................................................ 9
Getting Started ............................................................................................... 11
Using the Configuration Menu ........................................................................ 12
Home .................................................................................................... 13
WCN Wizard .................................................................................... 14
Wireless Settings ............................................................................. 15
Super G Settings ........................................................................ 16
WEP Encryption ......................................................................... 17
WPA-EAP Authentication ............................................................ 18
WPA-PSK Authentication ............................................................ 19
WAN Settings (Connect to Internet) ................................................ 20
Dynamic IP Address ................................................................... 20
Static IP Address ........................................................................ 21
PPPoE ........................................................................................ 22
PPTP .......................................................................................... 24
L2TP ........................................................................................... 26
Big Pond ..................................................................................... 28
LAN .................................................................................................. 29
DHCP .............................................................................................. 30
Static DHCP ............................................................................... 31
Advanced .............................................................................................. 32
Virtual Server ................................................................................... 32
Applications ..................................................................................... 34
Port Forwarding ............................................................................... 35
StreamEngine .................................................................................. 36
Filters ............................................................................................... 38
IP Filters ..................................................................................... 38
MAC Filters ................................................................................. 39
Parental Control (Domain Blocking) ................................................ 40

3
DI-634M User’s Manual
D-Link Systems, Inc.
Table of Contents
Firewall ............................................................................................ 41
DMZ ................................................................................................. 42
Performance Settings ...................................................................... 43
Schedules ........................................................................................ 44
Tools ..................................................................................................... 45
Admin .............................................................................................. 45
Change Passwords .....................................................................45
Remote Management ................................................................. 45
Time ................................................................................................. 46
System ............................................................................................. 47
Save/Load Settings ..................................................................... 47
Save Configuration to WCN ........................................................48
Firmware .......................................................................................... 49
DDNS .............................................................................................. 50
Misc. ................................................................................................ 51
Block WAN Ping .......................................................................... 51
VPN Passthrough .......................................................................52
Log Email Settings ...................................................................... 52
Status ................................................................................................... 53
Device Info ....................................................................................... 53
Log ................................................................................................... 54
Stats ................................................................................................ 55
Wireless ........................................................................................... 56
Technical Specifications ................................................................................. 57
Troubleshooting .............................................................................................. 60
Frequently Asked Questions ........................................................................... 66
Appendix ......................................................................................................... 85
Securing Your Network ........................................................................ 85
Glossary ............................................................................................... 86
Contacting Technical Suppor t ......................................................................... 94
Warranty ........................................................................................................ 95
Registration .................................................................................................... 99

4
DI-634M User’s Manual
D-Link Systems, Inc.
Package Contents
Package Contents
DI-634M Wireless 108G MIMO Router
CAT-5 Ethernet Cable
Power Adapter (5.0V, 3.0A)
Vertical Stands
Mounting Kit
CD-ROM with Software and Manual
Note: Using a power supply with a different voltage than the one included with your
product will cause damage and void the warranty for this product.
If any of the above items are missing, please contact your reseller.
Minimum System Requirements
Ethernet-Based Cable or DSL Modem
Computers with Windows, Macintosh, or Linux-based operating systems with
an installed Ethernet adapter and CD-ROM Drive
Internet Explorer Version 6.0 or Netscape Navigator Version 7.0 and Above

5
DI-634M User’s Manual
D-Link Systems, Inc.
Introduction
Introduction
The D-Link DI-634M Wireless 108G MIMO Router is an 802.11g high-performance,
wireless router that supports high-speed wireless networking at home, at work or in
public places.
Unlike most routers, the DI-634M provides data transfers at up to 108Mbps* (compared
to the standard 54Mbps) when used with other D-Link Wireless 108G MIMO and AirPlus
Xtreme G™ Products. The 802.11g standard is backwards compatible with 802.11b
products. This means that you do not need to change your entire network to maintain
connectivity. You may sacrice some of 802.11g’s speed when you mix 802.11b and
802.11g devices, but you will not lose the ability to communicate when you incorporate
the 802.11g standard into your 802.11b network. You may choose to slowly change
your network by gradually replacing the 802.11b devices with 802.11g devices .
In addition to offering faster data transfer speeds when used with other 802.11g products,
the DI-634M has the newest, strongest, most advanced security features available today.
When used with other 802.11g WPA (WiFi Protected Access) compatible products in
a network, the security features include:
WPA: Wi-Fi Protected Access authorizes and identies users based on a secret
key that changes automatically at a regular interval. WPA TKIP Temporal Key uses (
Integrity Protocol) to change the temporal key every 10,000 packets (a packet is a
kind of message transmitted over a network.) This insures much greater security than
the standard WEP security. By contrast, the older WEP encryption required the keys
to be changed manually.
The DI-634M router includes an easy-to-use installation wizard located on the D-Link
CD. Simply insert the CD into your computer and follow the on-screen instructions. Your
router will automatically be congured.

6
DI-634M User’s Manual
D-Link Systems, Inc.
Features and Benets
Features and Benets
Fully compatible with the 802.11g standard to provide a wireless data rate of up
to 108Mbps*.
Backwards compatible with the 802.11b standard to provide a wireless data rate
of up to 11Mbps
WPA (Wi-Fi Protected Access) authorizes and identies users based on a secret
key that changes automatically at a regular interval, for example:
Pre Shared Key mode means that the home user, without a RADIUS server,
will obtain a new security key every time the he or she connects to the network,
vastly improving the safety of communications on the network
Utilizes technology ( rthogonal requency ivision ultiplexing)OFDM O F D M
User-friendly conguration and diagnostic utilities
Operates in the 2.4GHz frequency range
Connects multiple computers to a Broadband (Cable or DSL) modem to share
the Internet connection
Advanced Firewall features: Supports NAT with VPN pass-through, providing
added security, MAC Filtering, URL Filtering, and Scheduling
DHCP server enables all networked computers to automatically receive IP
addresses
Web-based interface for Managing and Conguring
Access Control to manage users on the network
Supports special applications that require multiple connections
Equipped with 4 10/100 Ethernet ports, 1 WAN port, Auto MDI/MDIX
* Maximum wireless signal rate derived from IEEE Standard 802.11g specications. Actual data
throughput will vary. Network conditions and environmental factors, including volume of network trafc,
building materials and construction, and network overhead lower actual data throughput rate. D-Link
108G performance results are based on testing with other D-Link 108G enabled devices utilizing Packet
Bursting, FastFrames, Turbo Mode and Compression techniques. Data already compressed may not
benet from the D-Link 108G compression techniques.
7
DI-634M User’s Manual
D-Link Systems, Inc.
Hardware Overview
Hardware Overview
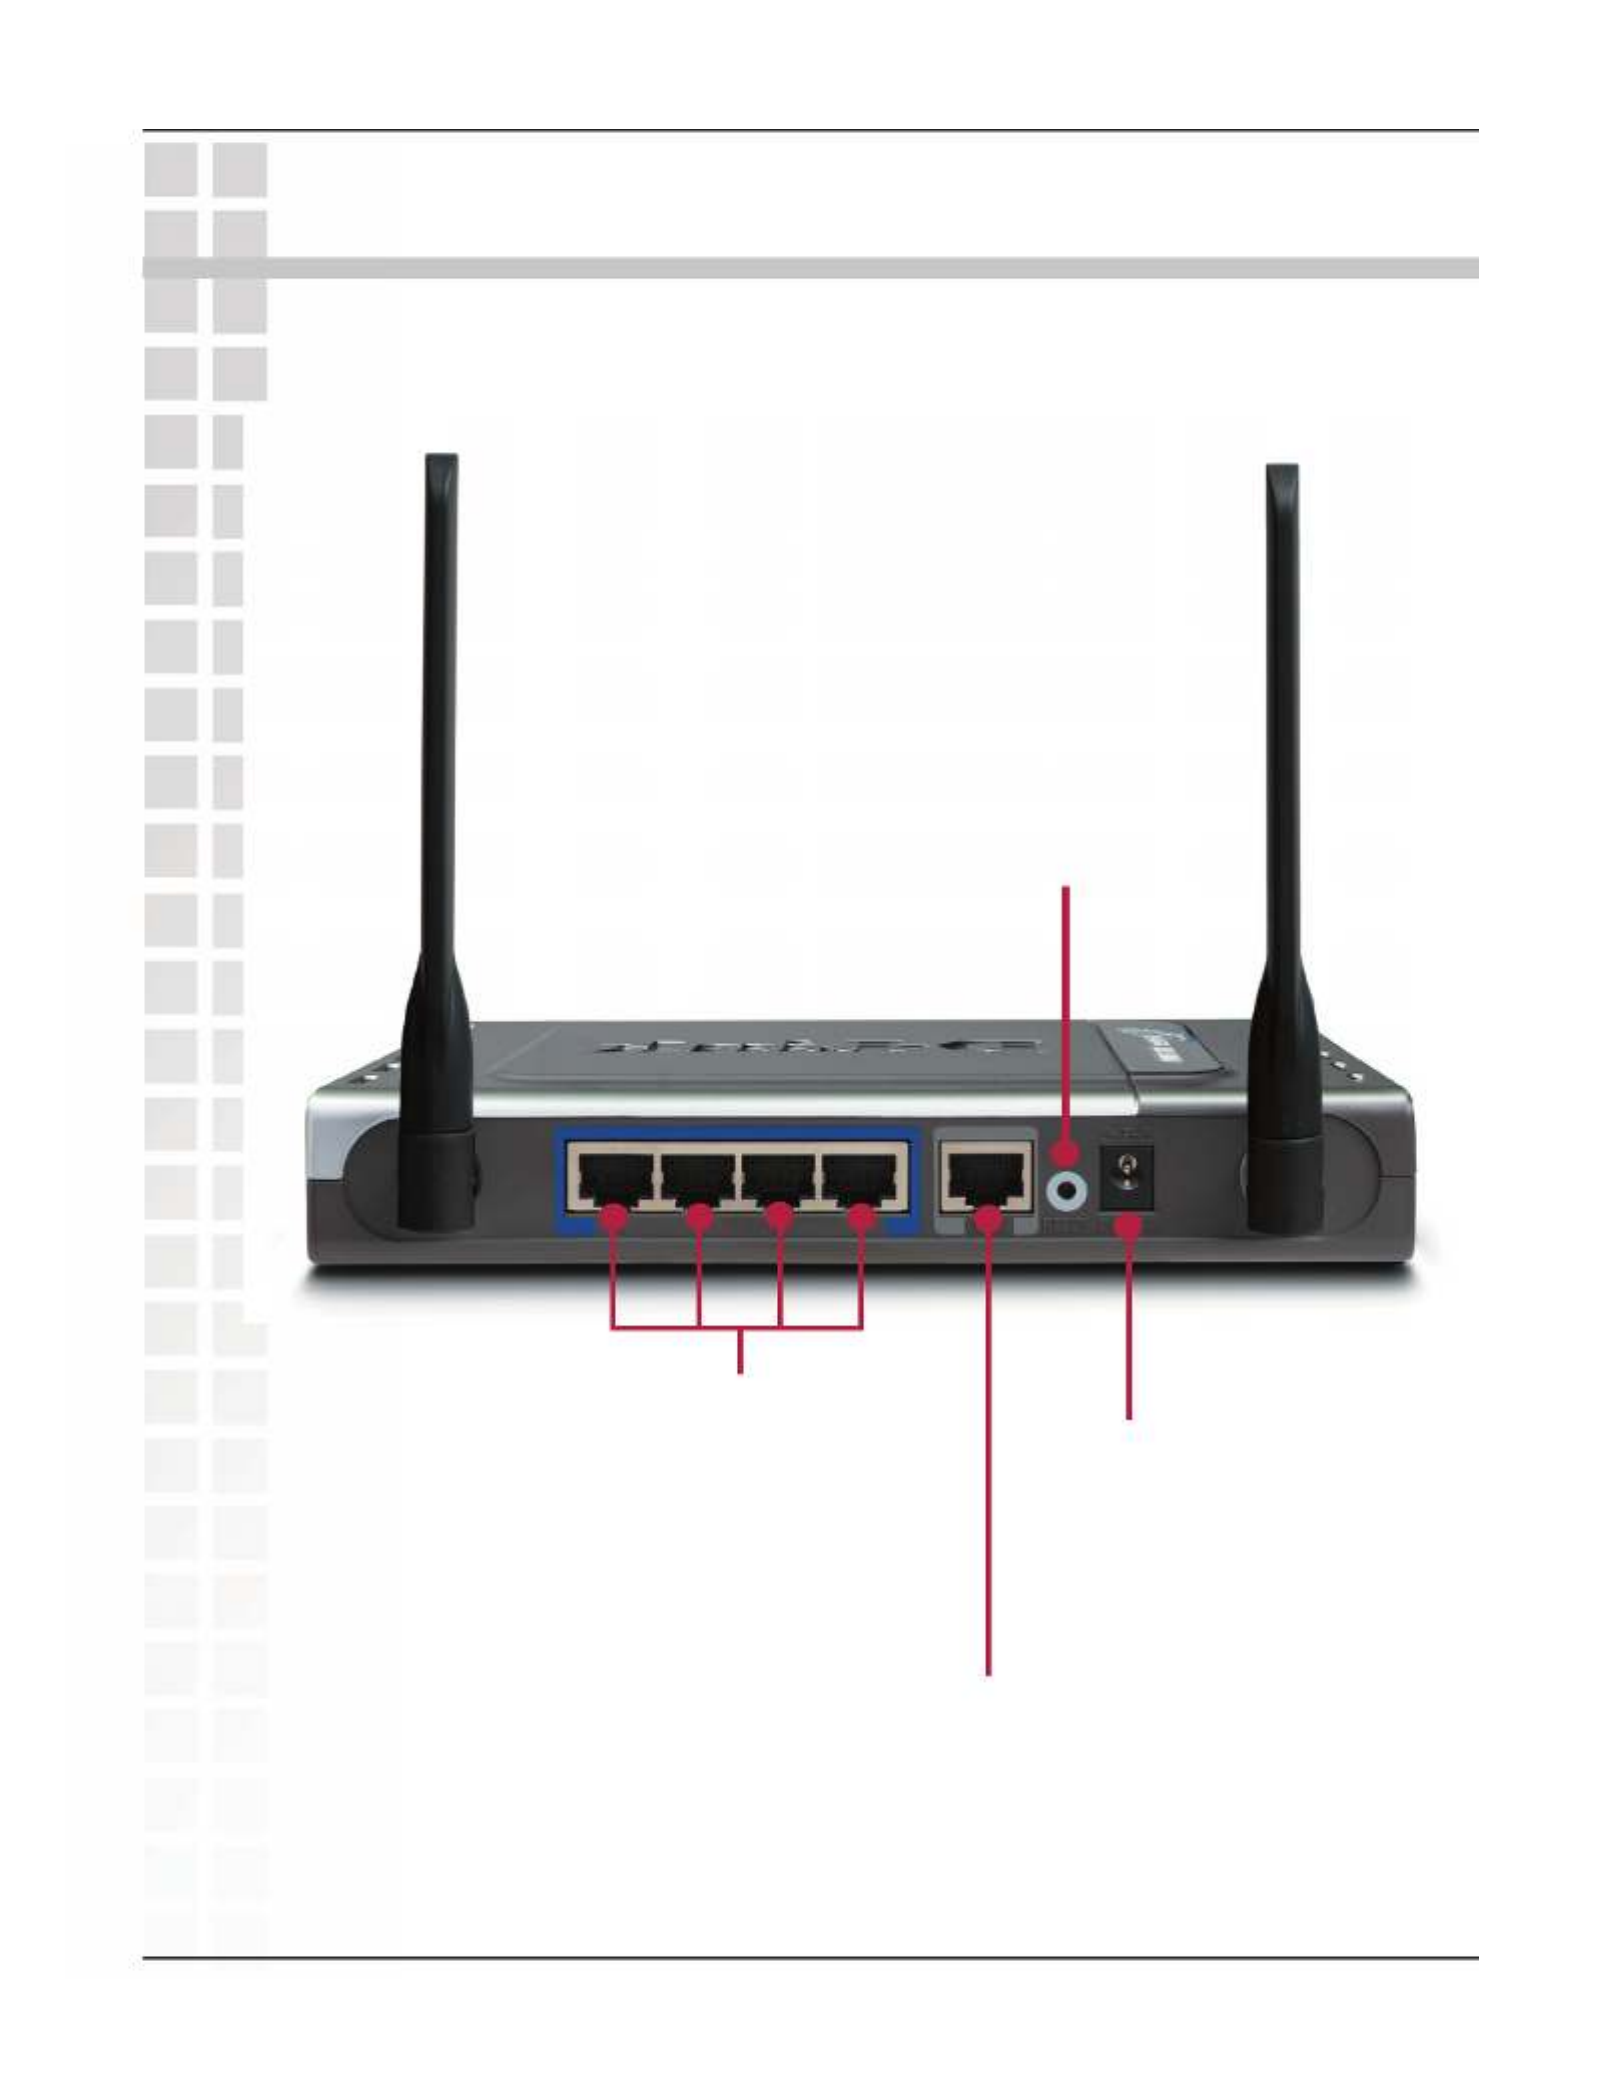
Rear Panel
DC Power Connector
The DC power input
connector is labeled DC
5V 3A with a single jack
socket to supply power
to the DI-634M.
All Ethernet Ports (WAN and LAN) are
auto MDI/MDIX, meaning you can use
either a straight-through or a crossover
Ethernet cable.
Auto MDI/MDIX WAN Port
This is the connection for the Ethernet
cable to the Cable or DSL modem.
Auto MDI/MDIX LAN Ports
These ports automatically
sense the cable type when
connecting to Ether net-
enabled computers.
Reset Button
Pressing and holding the reset
button for 10 seconds restores the
router to its original factory default
settings.

8
DI-634M User’s Manual
D-Link Systems, Inc.
Hardware Overview
Hardware Overview (continued)
Rear Panel
WLAN LED
A solid orange light indicates that
the wireless segment is ready. This
LED blinks during wireless data
transmission.
WAN LED
A solid green light
indicates connection
on the WAN port. This
LED blinks during data
transmission.
LOCAL NETWORK LED
A solid green light indicates
a connection to an Ethernet-
enabled computer on ports
1-4. This LED blinks during
data transmission.
STATUS
A blinking yellow
light indicates that
th e DI -6 34 M is
ready.
POWER LED
A solid green light
indicates a proper
connection to the
power supply.

9
DI-634M User’s Manual
D-Link Systems, Inc.
Wireless Basics
Wireless Basics
D-Link wireless products are based on industry standards to provide easy-to-use and
compatible high-speed wireless connectivity within your home, business or public
access wireless networks. D-Link wireless products will allow you access to the data you
want, when and where you want it. You will be able to enjoy the freedom that wireless
networking brings.
A WLAN is a cellular computer network that transmits and receives data with radio signals
instead of wires. WLANs are used increasingly in both home and ofce environments,
and public areas such as airports, coffee shops and universities. Innovative ways to
utilize WLAN technology are helping people to work and communicate more efciently.
Increased mobility and the absence of cabling and other xed infrastructure have proven
to be benecial for many users.
Wireless users can use the same applications they use on a wired network. Wireless
adapter cards used on laptop and desktop systems support the same protocols as
Ethernet adapter cards.
People use wireless LAN technology for many different purposes:
Mobility - Productivity increases when people have access to data in any location
within the operating range of the WLAN. Management decisions based on real-time
information can signicantly improve worker efciency.
Low Implementation Costs – WLANs are easy to set up, manage, change and relocate.
Networks that frequently change can benet from WLANs ease of implementation.
WLANs can operate in locations where installation of wiring may be impractical.
Installation and Network Expansion - Installing a WLAN system can be fast and easy
and can eliminate the need to pull cable through walls and ceilings. Wireless technology
allows the network to go where wires cannot go - even outside the home or ofce.
Scalability – WLANs can be congured in a variety of topologies to meet the needs
of specic applications and installations. Congurations are easily changed and range
from peer-to-peer networks suitable for a small number of users to larger infrastructure
networks to accommodate hundreds or thousands of users, depending on the number
of wireless devices deployed.
Inexpensive Solution - Wireless network devices are as competitively priced as
conventional Ethernet network devices.

10
DI-634M User’s Manual
D-Link Systems, Inc.
Wireless Basics
Installation Considerations
The D-Link DI-634M Wireless 108G MIMO Router lets you access your network, using
a wireless connection, from virtually anywhere within its operating range. Keep in mind,
however, that the number, thickness and location of walls, ceilings, or other objects
that the wireless signals must pass through, may limit the range. Typical ranges vary
depending on the types of materials and background RF (radio frequency) noise in
your home or business. The key to maximizing wireless range is to follow these basic
guidelines:
1 Keep the number of walls and ceilings between the DI-634M and other network
devices to a minimum - each wall or ceiling can reduce your D-Link wireless
product’s range from 3-90 feet (1-30 meters.) Position your devices so that the
number of walls or ceilings is minimized.
2 Be aware of the direct line between network devices. A wall that is 1.5 feet thick
(.5 meters), at a 45-degree angle appears to be just over 2 feet (.6 meters) thick.
At a 2-degree angle it looks over 42 feet (14 meters) thick! Position devices so
that the signal will travel straight through a wall or ceiling (instead of at an angle)
for better reception.
3 Building Materials can impede the wireless signal - a solid metal door or aluminum
studs may have a negative effect on range. Try to position wireless devices and
computers with wireless adapters so that the signal passes through drywall or
open doorways and not other materials.
4 Keep your product away (at least 3-6 feet or 1-2 meters) from electrical
devices or appliances that generate extreme RF noise.
Standards-based Technology
The DI-634M Wireless 108G MIMO Router utilizes the standard.802.11g
The IEEE 802.11g standard is an extension of the 802.11b standard. It increases the
data rate up to 54Mbps* within the 2.4GHz band, utilizing OFDM technology.
This means that in most environments, within the specied range of this device, you
will be able to transfer large les quickly or even watch a movie in MPEG format over
your network without noticeable delays. This technology works by transmitting high-
speed digital data over a radio wave utilizing ( rthogonal requency ivision OFDM O F D
Multiplexing) technology. works by splitting the radio signal into multiple OFDM
smaller sub-signals that are then transmitted simultaneously at different frequencies
to the receiver. reduces the amount of (interference) in signal OFDM crosstalk
transmissions.
The DI-634M is backwards compatible with 802.11b devices. This means that if you
have an existing 802.11b network, the devices in that network will be compatible with
802.11g devices at speeds of up to 11Mbps in the 2.4GHz range.
* Maximum wireless signal rate derived from IEEE Standard 802.11g specications. Actual data
throughput will vary. Network conditions and environmental factors, including volume of network
trafc, building materials and construction, and network overhead lower actual data throughput rate.

11
DI-634M User’s Manual
D-Link Systems, Inc.
Getting Started
Getting Started
Please remember that devices are pre-congured to D-Link Wireless 108G MIMO
connect together, right out of the box, with their default settings.
For a typical wireless setup at home (as shown above), please do the following:
You will need broadband Internet access (a Cable or DSL-subscriber line into
your home or ofce)
Consult with your Cable or DSL provider for proper installation of the modem.
Connect the Cable or DSL modem to the DI-634M Wireless Broadband Router
(see the printed Quick Installation Guide included with your router).
If you are connecting a desktop computer to your network, install the D-Link
DWL-G520M wireless PCI adapter into an available PCI slot on your desktop
computer. You may also install the DWL-G510 or DWL-G520 (See the printed
Quick Installation Guide included with the network adapter).
Install the D-Link DWL-G650M wireless Cardbus adapter into a notebook
computer. (See the printed Quick Installation Guide included with the
DWL-G650M. )
Install the D-Link DFE-530TX+ adapter into a desktop computer. The four Ethernet
LAN ports of the DI-634M are Auto MDI/MDIX and will work with both straight
through and cross-over cable. (See the printed Quick Installation Guide included
with the DFE-530TX+.)
1
2
3
4
5
6

12
DI-634M User’s Manual
D-Link Systems, Inc.
Using the Conguration Menu
Using the Conguration Menu
Whenever you want to congure your DI-634M, you can access the Conguration
Menu by opening the Web-browser and typing in the IP Address of the DI-634M. The
DI-634M’s default IP Address is 192.168.0.1.
Open the Web browser.
Type in the of the Router (http://192.168.0.1).IP Address
Note: if you have changed the default IP Address assigned to the DI-634M, make sure
to enter the correct IP Address.
Select or from the drop-down menu. cannot make changes.Admin User User
Leave the Password blank.
Click .Log In

13
DI-634M User’s Manual
D-Link Systems, Inc.
Using the Conguration Menu
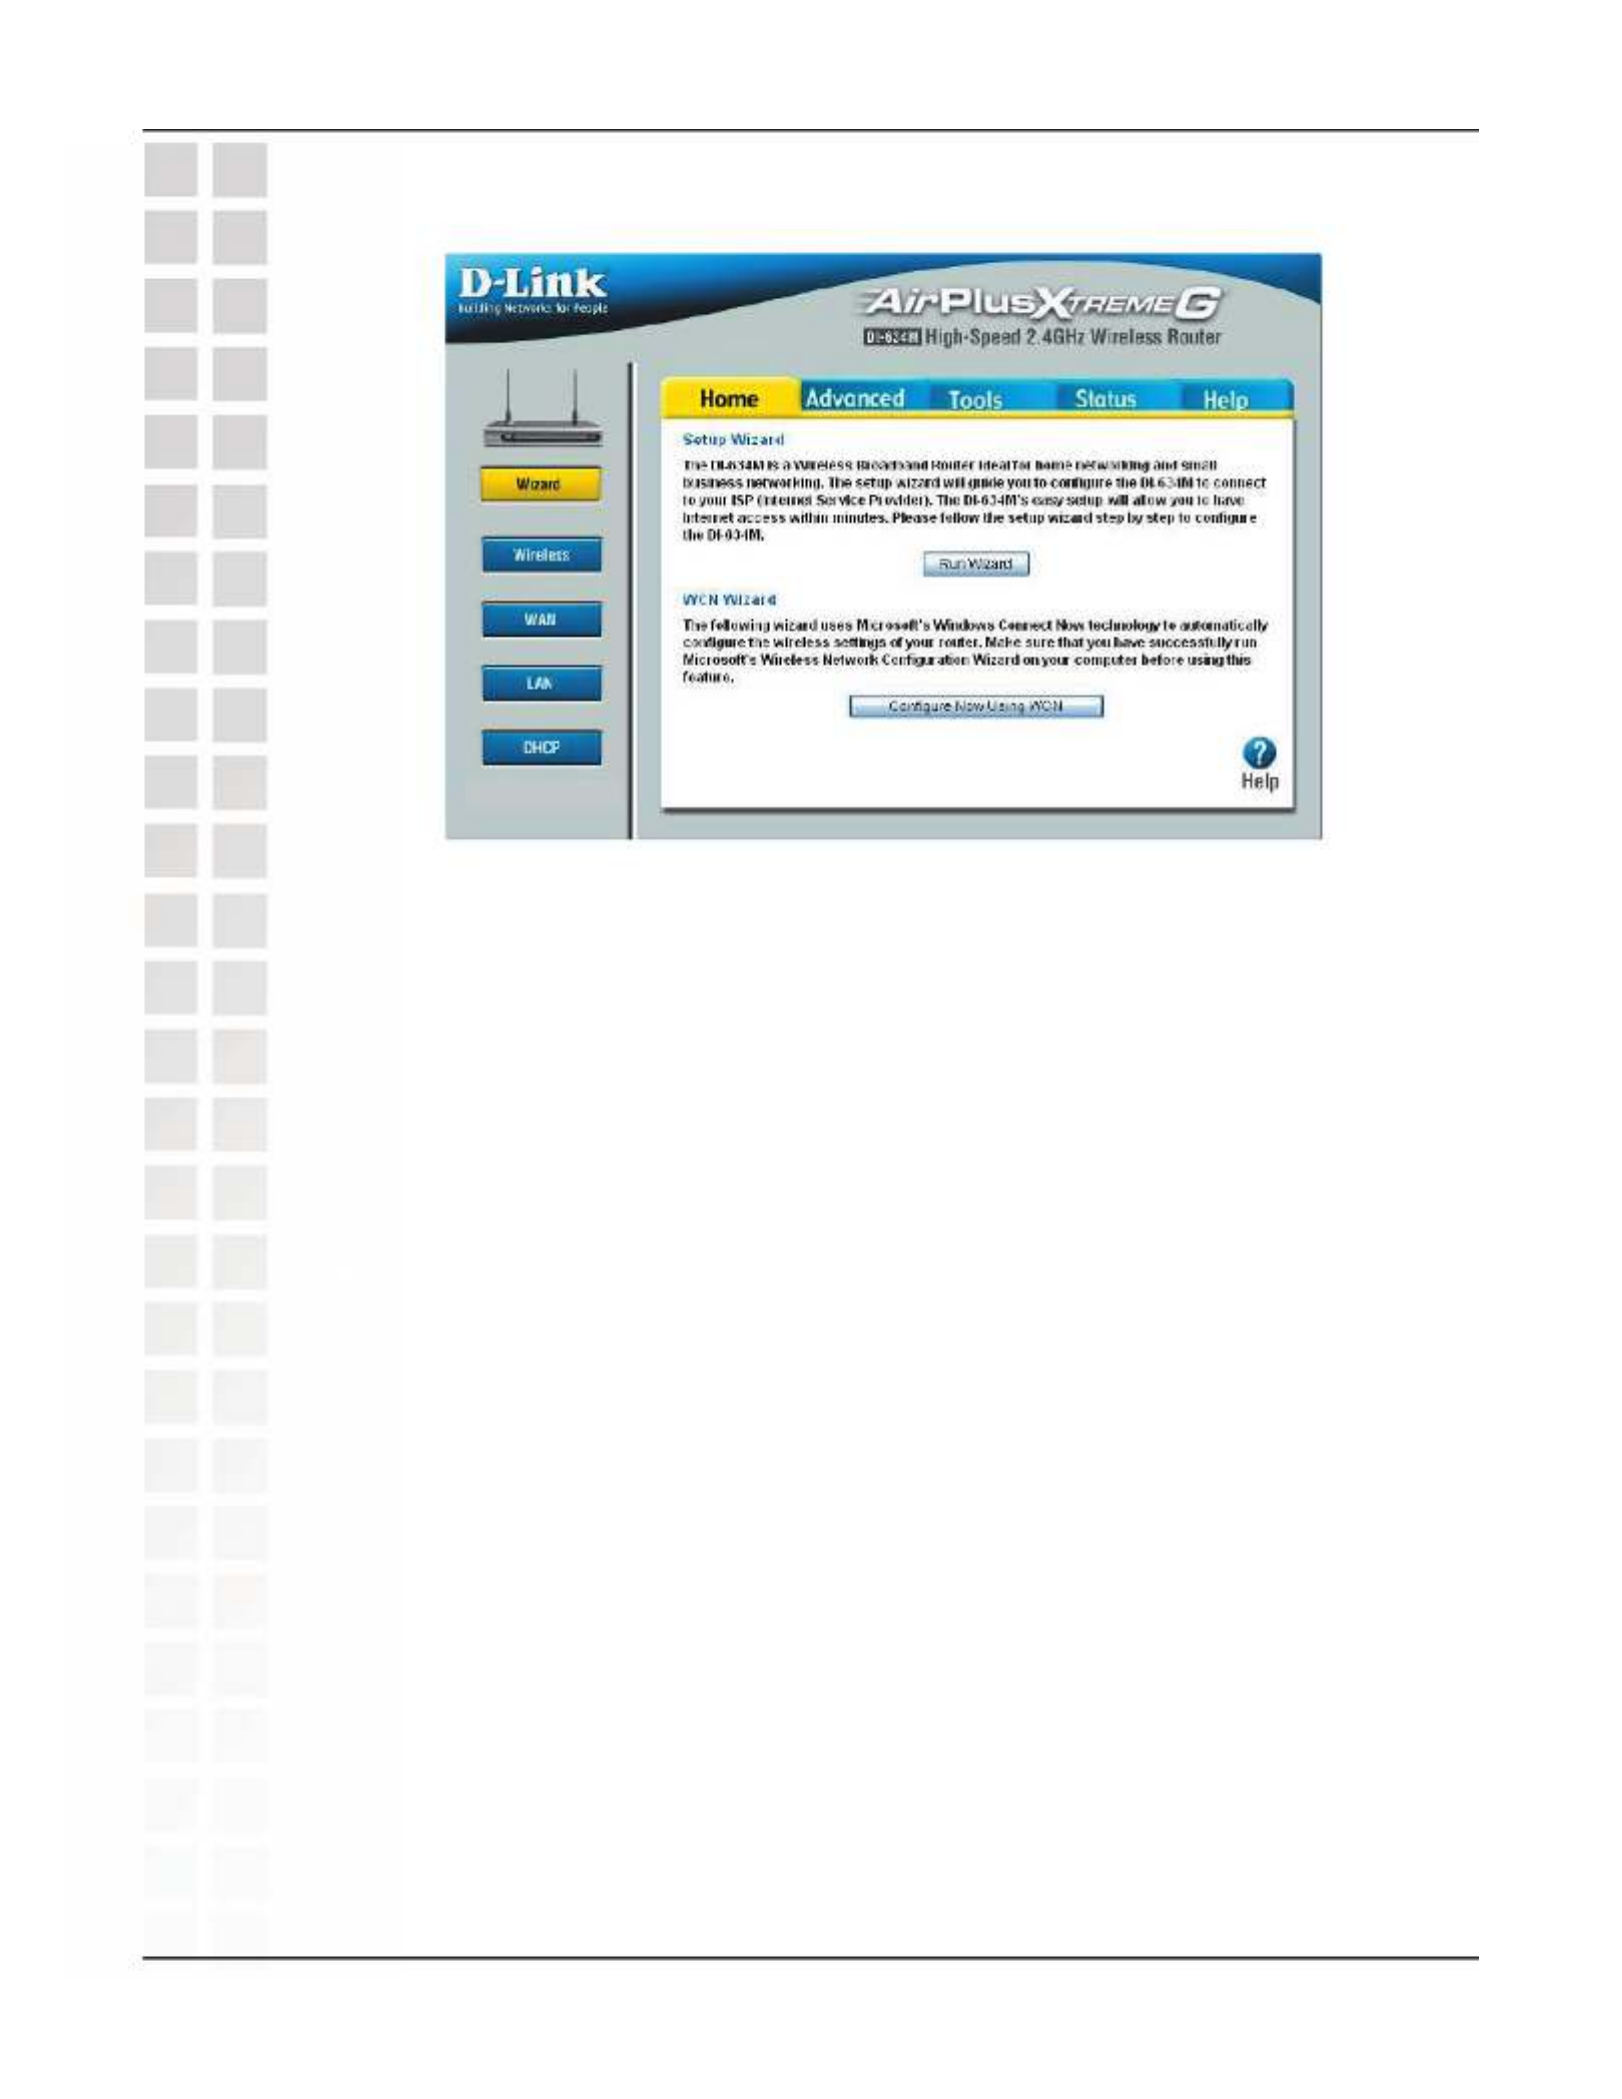
The Home > Wizard screen will appear. Click Run Wizard to start the setup wizard or
insert your CD-ROM to setup your D-Link wireless router.
These buttons appear on most of the conguration screens in this section. Please
click on the appropriate button at the bottom of each screen after you have made a
conguration change.
Home > Wizard
14
DI-634M User’s Manual
D-Link Systems, Inc.
Using the Conguration Menu
Home > Wizard > WCN
WCN Wizard
If your PC’s operating system is Windows XP Service Pack 2 (SP2) or later and you are
using Windows Internet Explorer (IE) as your browser, you can use Windows Connect
Now (WCN) technology to help congure the router’s wireless security settings.
Wireless Network Setup Wizard
Before you can use the router’s WCN Wizard, you must rst execute the Wireless
Network Setup Wizard on your PC. If you have not already done so, go to the Windows
Control Panel and select Wireless Network Setup Wizard. The Wireless Network
Setup Wizard gives you the choices: “Use a USB ash drive” and “Set up a network
manually”. Choose “Set up a network manually”. In fact, you will not have to do the
set-up manually; it will be done with the WCN ActiveX Control.
WCN ActiveX Control
The WCN ActiveX Control provides the WCN link between your PC and the router
via the browser that communicates wireless conguration data without a USB ash
drive. The browser will attempt to download the WCN ActiveX Control, if it is not
already available on your PC. For this action to succeed, you must already have a
WAN connection, and the browser’s internet security setting must be Medium or lower
(select Tools > Internet Options > Security > Custom Level > Medium).
When the necessary preparations are complete, the WCN technology will propagate
the wireless network settings from your PC to the router. Then you will have to reboot
the router for the settings to take effect.
Note that WCN only sets a few of the wireless options. You will still need to go to
the Home > Wireless page to set other wireless options such as Super G Mode and
transmission rate.

15
DI-634M User’s Manual
D-Link Systems, Inc.
Using the Conguration Menu
Home > Wireless
Select On or Off. Selecting off will turn disable all wireless
functions of the router.
Service Set Identier (SSID) is the name designated for a
specic wireless local area network (WLAN). The SSID’s factory
default setting is . The SSID can be easily changed to default
connect to an existing wireless network or to establish a new
wireless network.
6 is the default channel. All devices on the network must
share the same channel. Note: The wireless adapters will
automatically scan and match the wireless setting. Check the
Auto Channel Select box to allow the router to automatically
nd the best channel to use.
By default Super G mode is . Super G is a group of Disabled
performance enhancement features that increase end user
application throughput in an 802.11g network. Super G is
backward compatible to standard 802.11g devices. For top
performance, all wireless devices on the network should be
Super G capable. Select either Disabled, Super G without Turbo,
Super G with Dynamic Turbo, or Super G with Static Turbo.
SSID:
Channel:
Super G Mode:
Wireless Radio:

16
DI-634M User’s Manual
D-Link Systems, Inc.
Using the Conguration Menu
Standard 802.11g support, no enhanced capabilities.
Capable of Packet Bursting, FastFrames, Compression, and
no Turbo mode.
Capable of Packet Bursting, FastFrames, Compression, and
Dynamic Turbo. This setting is backwards compatible with
non-Turbo (legacy) devices. Dynamic Turbo mode is only
enabled when all nodes on the wireless network is Super G
with Dynamic Turbo enabled.
Capable of Packet Bursting, FastFrames, Compression, and
Static Turbo. This setting is not backwards compatible with
non-Turbo (legacy) devices. Static turbo mode is always on
and is only enabled when all nodes on the wireless network is
Super G with Static Turbo enabled.
Set a specic transmission rate. It is strongly recommended
to set to Auto.
Select Enabled if your network uses all 802.11g devices. Select
Disabled if you are using a mixure (802.11b and 802.11g) of
wireless devices.
Choose to broadcast the SSID across the network. Enabled
All devices on a network must share the same SSID (Service
Set Identier) to establish communication. Choose Disabled if
you do not wish to broadcast the SSID over the network.
Select WEP, WPA-EAP, WPA-PSK or authentication.
Super G without
Turbo:
Super G with
Static Turbo:
Super G with
Dynamic Turbo:
SSID Broadcast:
Security Mode:
Transmission
Rate:
802.11g-Only
Mode:
Disabled:

17
DI-634M User’s Manual
D-Link Systems, Inc.
Using the Conguration Menu
Select Shared Key.
Wired Equivalent Privacy (WEP) is a wireless security protocol
for Wireless Local Area Networks (WLAN). WEP provides
security by encrypting the data that is sent over the WLAN.
Select Enabled Disabled or . Disabled is the default setting.
(Note: If you enable encryption on the DI-634M make sure to
also enable encryption on all the wireless clients or wireless
connection will not be established).
Select the level of encryption desired: 64-bit or 128-bit.
Select or . HEX ASCII
Input up to 4 WEP keys; select the one you wish to use.
Home > Wireless (WEP)
Authentication:
Key Type:
WEP Encryption:
Keys 1-4:
WEP:

18
DI-634M User’s Manual
D-Link Systems, Inc.
Using the Conguration Menu
Home > Wireless (WPA-EAP)
Select WPA, WPA2, or WPA2 only.
Select TKIP, AES, TKIP and AESor .
Enter the IP address of your primary RADIUS server. The server
must be on the same IP network as the router.
Enter the port used for the RADIUS Server (1812 is default).
Enter the “Shared Secret” or security key.
Enter the IP address of your secondary RADIUS server
(optional).
Enter the port used for the RADIUS Server (1812 is default).
Enter the “Shared Secret” or security key.
WPA Mode:
Port:
RADIUS
Server IP 1:
Cipher Type:
RADIUS
Server IP 2:
Port:
Shared Secret:
Shared Secret:

19
DI-634M User’s Manual
D-Link Systems, Inc.
Using the Conguration Menu
Select WPA, WPA2, or WPA2 only.
Select TKIP, AES, TKIP and AESor .
Enter a passphrase. The passphrase is an alpha-numeric
password between 8 and 63 characters long. The password
can include symbols (!?*&_) and spaces. Make sure you enter
this key exactly the same on all other wireless clients.
Re-enter the passphrase.
Home > Wireless (WPA-PSK)
WPA Mode:
Conrm
Passphrase:
Passphrase:
Cipher Type:
20
DI-634M User’s Manual
D-Link Systems, Inc.
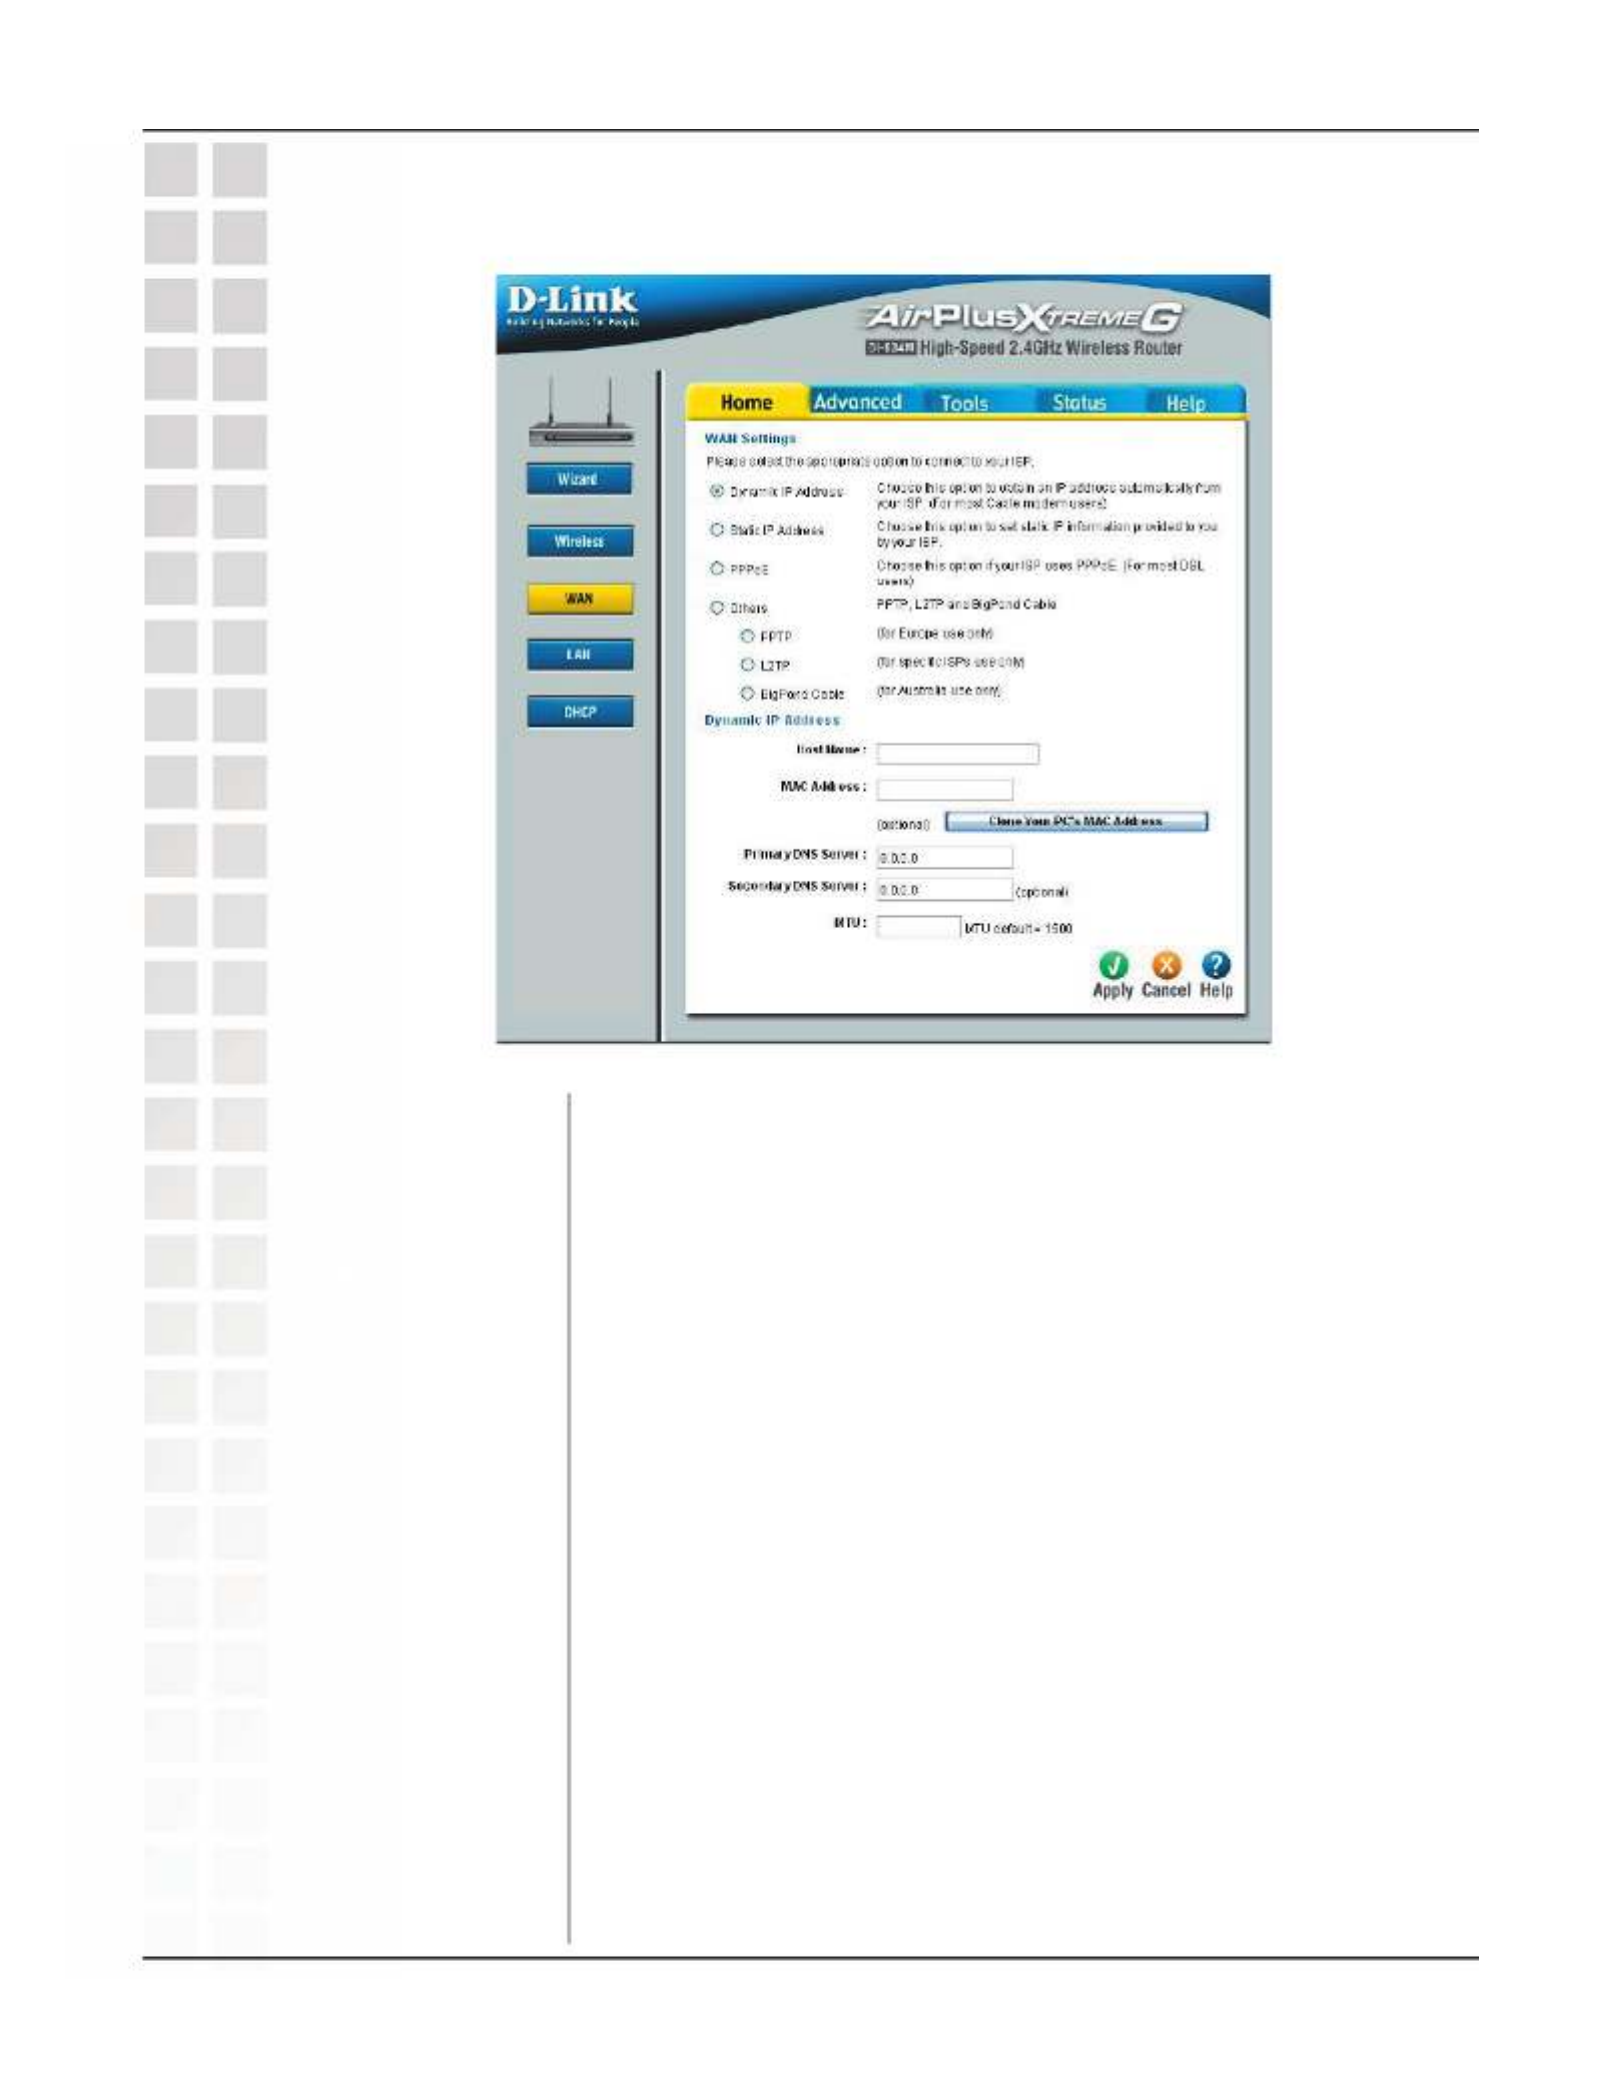
Using the Conguration Menu
Choose Dynamic IP Address to obtain IP Address information
automatically from your ISP. Select this option if your ISP does
not give you any IP numbers to use (most Cable ISPs).
The Host Name is optional but may be required by some ISPs.
The default host name is the device name of the Router and
may be changed.
The default MAC Address is set to the WAN’s physical interface
MAC address on the Broadband Router. It is not recommended
that you change the default MAC address unless required by
your ISP.
The default MAC address is set to the WAN’s physical interface
MAC address on the Broadband Router. Checking this checkbox
will allow you to copy the MAC address of your computer to the
WAN port on the router.
Maximum Transmission Unit-1500 is the default setting-you
may need to change the MTU for optimal performance with
your specic ISP.
Dynamic IP
Address:
Host Name:
MAC Address:
Home > WAN (Dynamic)
Clone Your PC’s
MAC Address:
MTU:

21
DI-634M User’s Manual
D-Link Systems, Inc.
Using the Conguration Menu
Choose Static IP Address if all WAN IP information is provided to you by your ISP.
Each IP address entered in the elds must be in the appropriate IP form, which are
four octets separated by a dot (x.x.x.x). The Router will not accept the IP address if it
is not in this format.
Input the public IP Address provided by your ISP.
Input your Subnet mask. (All devices in the network must have
the same subnet mask.)
Input the public IP address of the ISP to which you are
connecting.
Input the primary DNS (Domain Name Server) IP address
provided by your ISP. The Secondary DNS is optional.
The default MAC Address is set to the WAN’s physical interface
MAC address on the Broadband Router.
The default MAC address is set to the WAN’s physical
inte rfac e MAC a ddress o n the Broadba nd R oute r.
Checking this checkbox will allow you to copy the MAC
address of your computer to the WAN port on the router.
Maximum Transmission Unit-1492 is the default setting-you
may need to change the MTU for optimal performance with
your specic ISP.
Primary/
Secondary DNS
Address:
ISP Gateway
Address:
Subnet Mask:
IP Address:
Home > WAN (Static)
MAC Address:
Clone Your PC’s
MAC Address:
MTU:
22
DI-634M User’s Manual
D-Link Systems, Inc.
Using the Conguration Menu
Please be sure to remove any existing PPPoE client software installed on your
computers.
Choose PPPoE (Point to Point Protocol over Ethernet) if your ISP uses a PPPoE
connection. Your ISP will provide you with a username and password. This option
is typically used for DSL services. Select Dynamic PPPoE to obtain an IP address
automatically for your PPPoE connection. Select Static PPPoE to use a static IP address
for your PPPoE connection.
Home > WAN (PPPoE)

23
DI-634M User’s Manual
D-Link Systems, Inc.
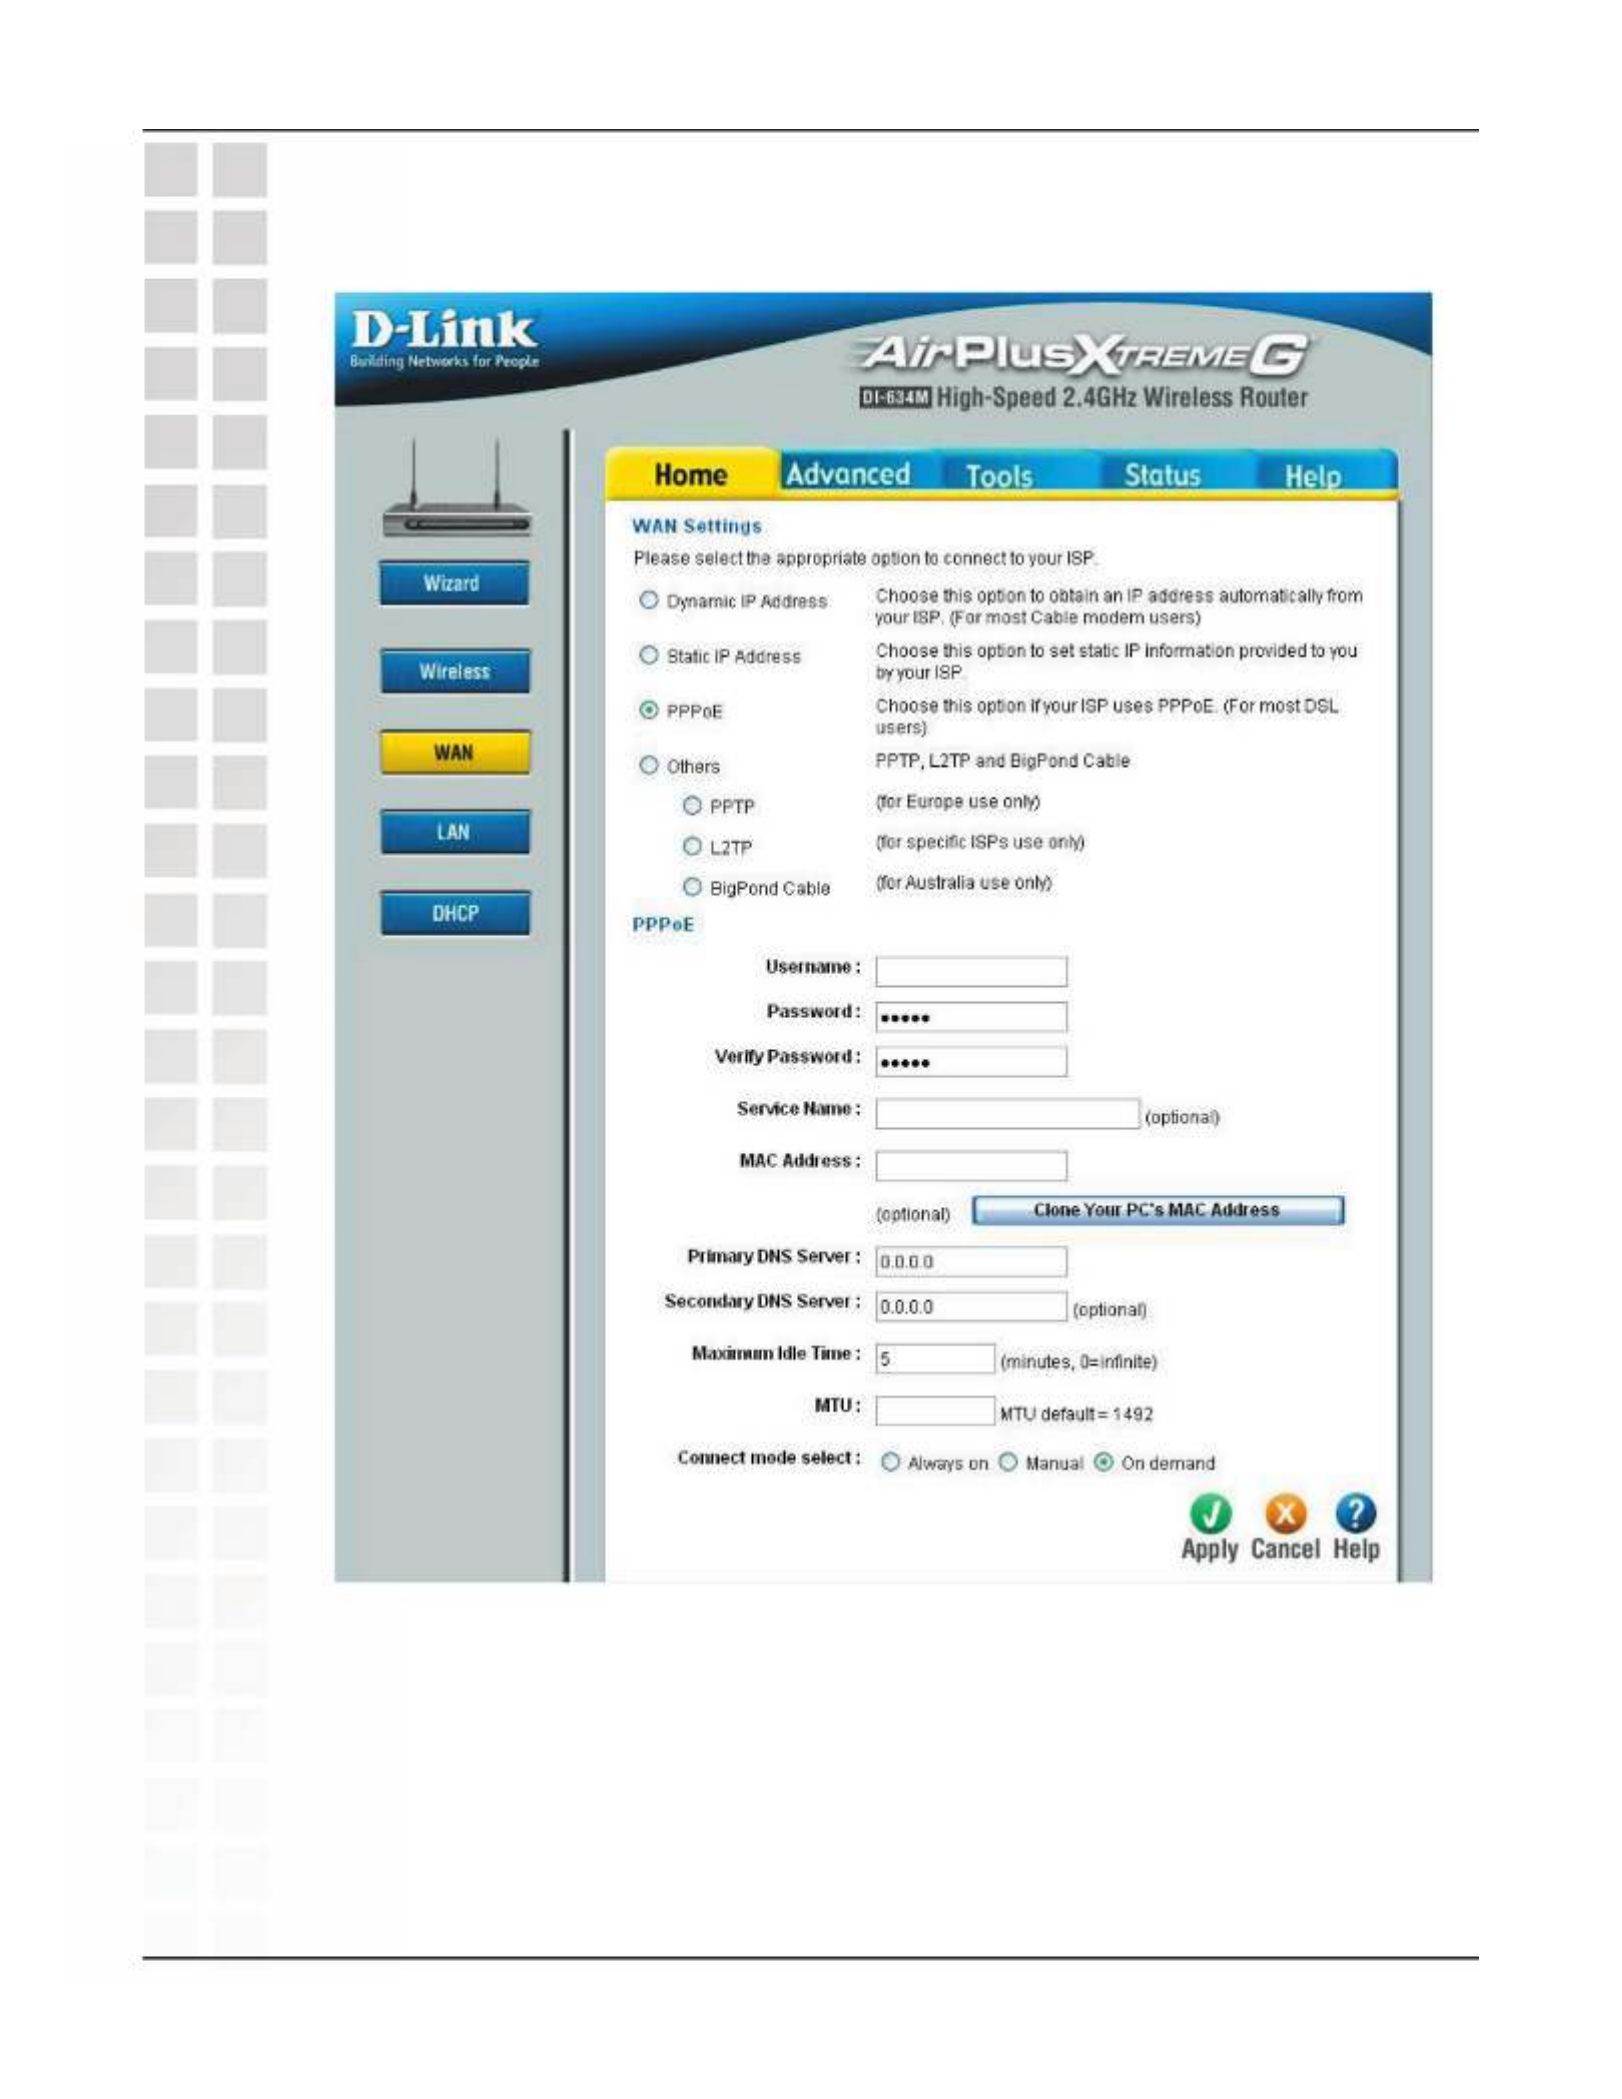
Using the Conguration Menu
Choose this option if your ISP uses PPPoE. (Most DSL users
will select this option.)
Your PPPoE username provided by your ISP.
Re-enter the PPPoE password.
Enter the Service Name provided by your ISP (optional).
This option is only available for Static PPPoE. Enter the static
IP Address for the PPPoE connection.
The network mask of the PPPoE interface.
The Maximum Idle Time value is only used for the On Demand
connection mode. It species how many minutes the WAN
connection can be idle before the connection is dropped. A
value of zero means the connection will not be dropped due
to idle time.
Maximum Transmission Unit-1492 is the default setting-you
may need to change the MTU for optimal performance with
your specic ISP. If you are using AOL DSL+ service, you may
need to set the MTU to 1400.
Typically, connections such as PPPoE, PPTP, and L2TP are not
always on. The router allows you to set the connection mode.
The settings are:
Always on: A conne ction to the Int ern et is alway s
maintained.
Connect on demand: A connection to the Internet is made
as needed; and the connection is dropped after “Maximum
Idle Time” minutes of no activity.
Manual: You have to open up the Web-based management
interface and click the Connect button manually any time that
you wish to connect to the Internet.
PPPoE:
User Name:
Verify Password:
Service Name:
IP Address:
Network Mask:
Maximum Idle
Time:
Connection Mode
Select:
MTU:
Home > WAN (PPPoE)
24
DI-634M User’s Manual
D-Link Systems, Inc.
Using the Conguration Menu
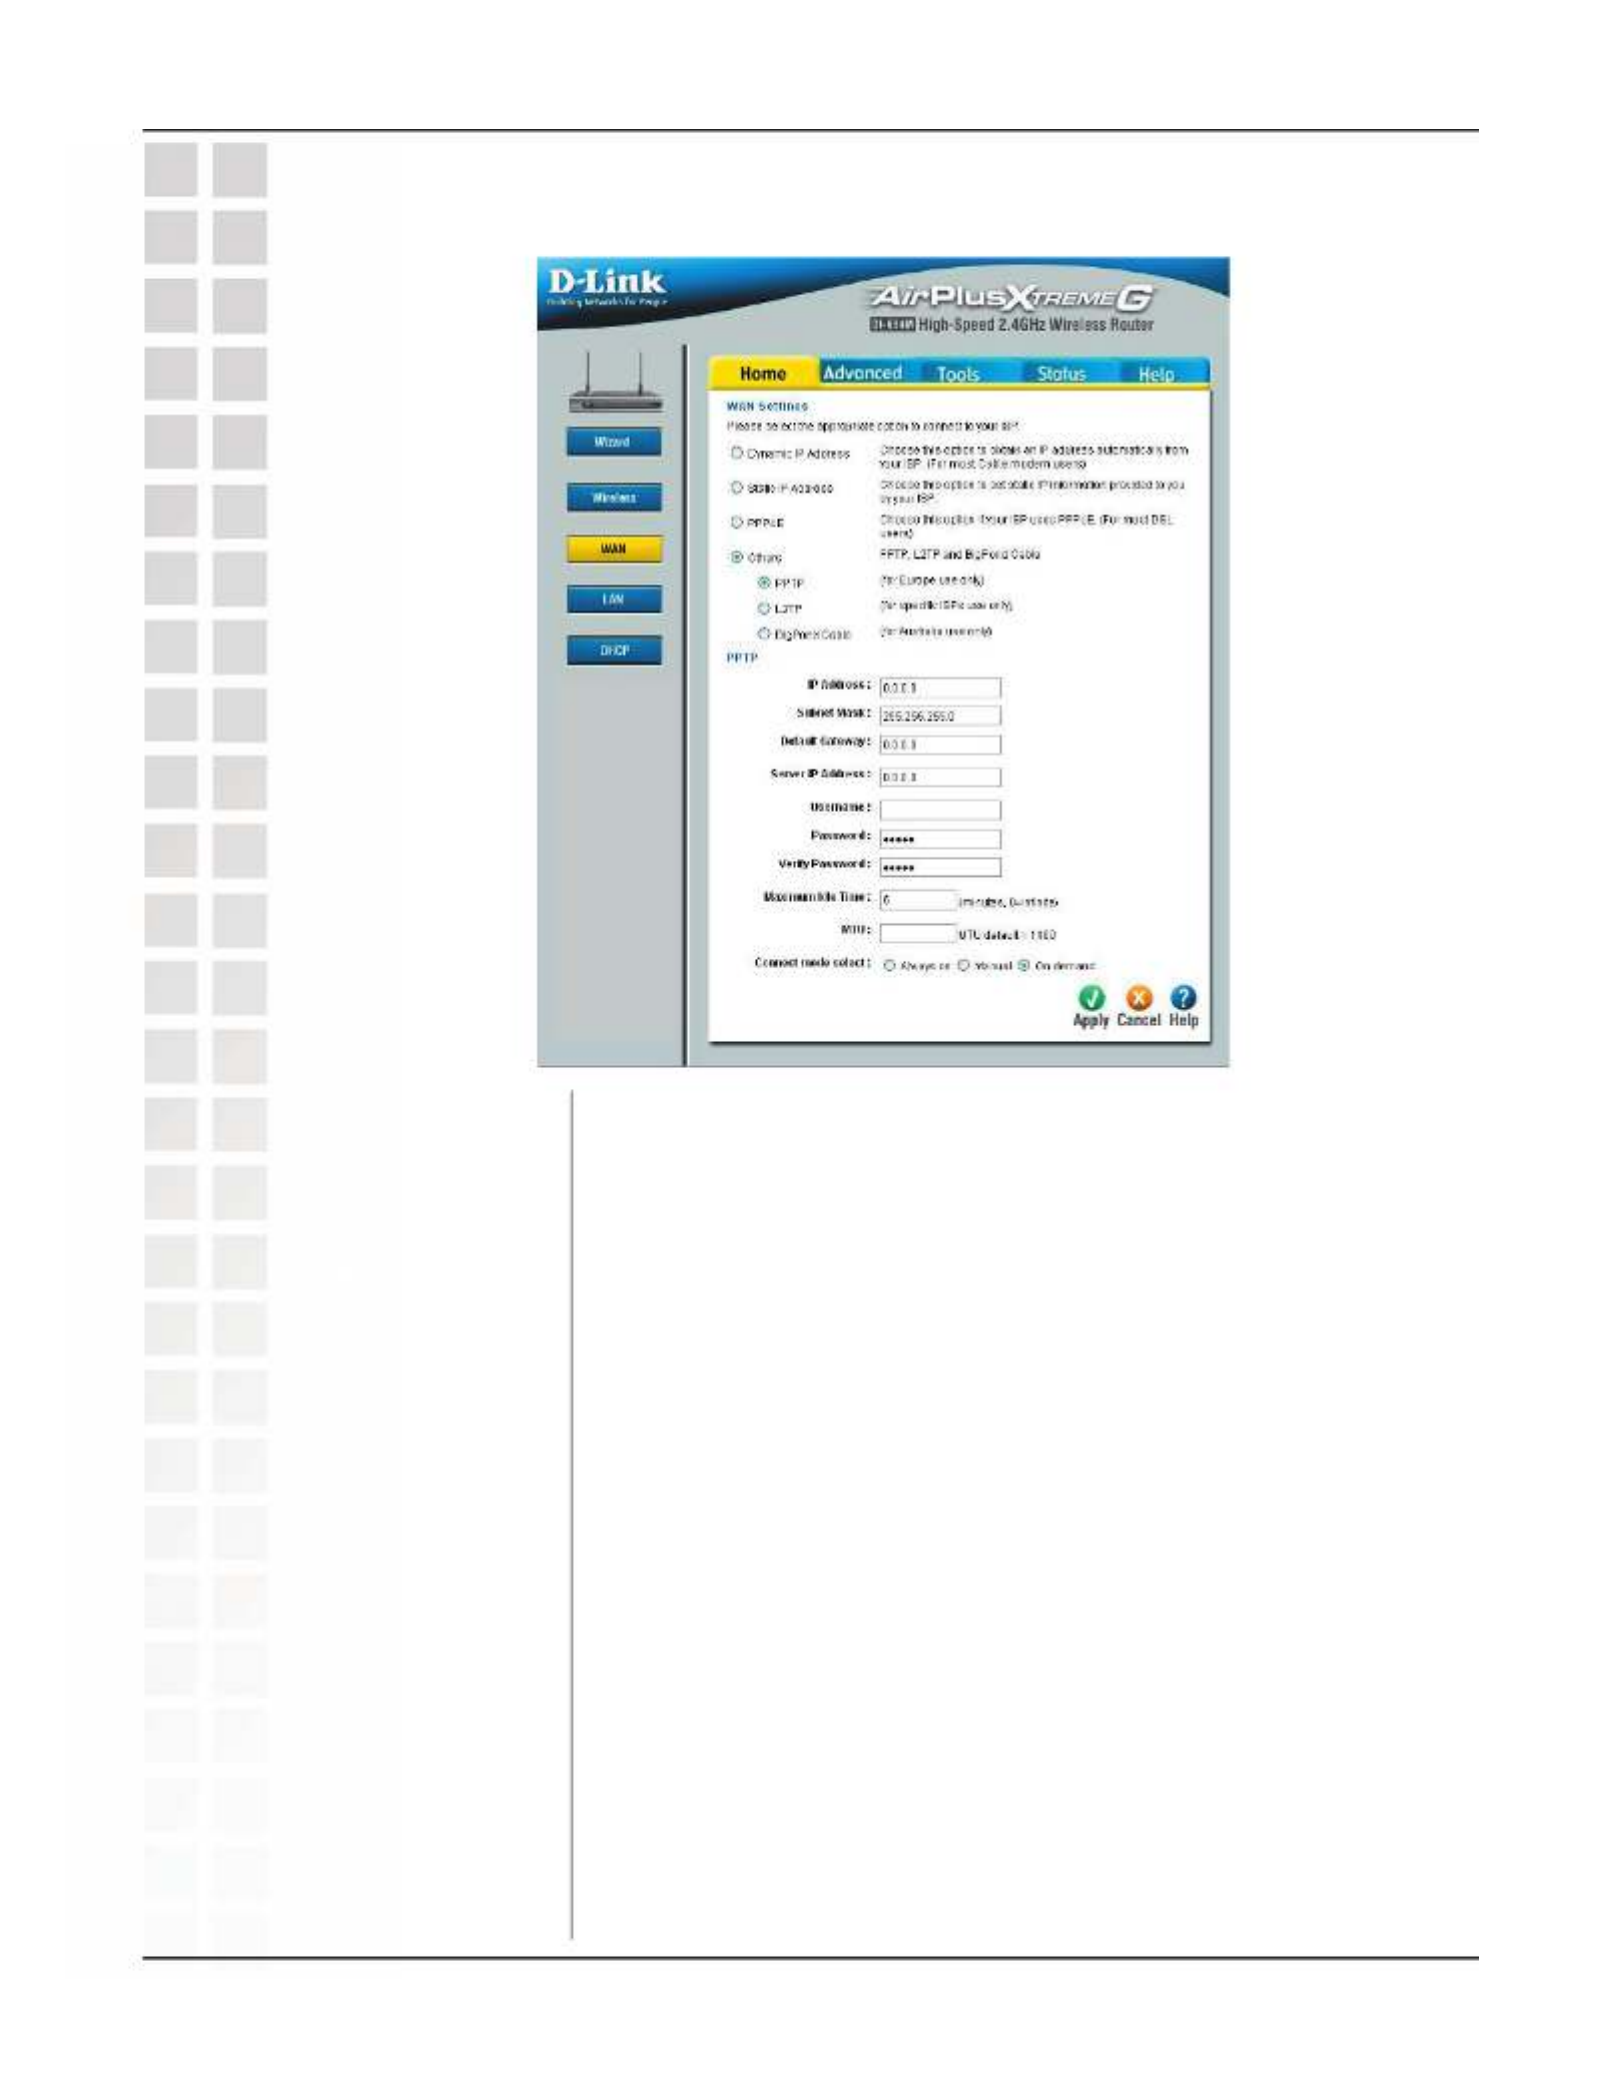
Input the public IP Address provided by your ISP.
Input your Subnet mask. (All devices in the network must have
the same subnet mask.)
Input the public IP address of the ISP to which you are
connecting.
Input the primary and secondary DNS (Domain Name Server)
IP addresses provided by your ISP.
Enter your account or username.
Enter your password (and again to conrm).
The Maximum Idle Time value is only used for the On Demand
connection mode. It species how many minutes the WAN
connection can be idle before the connection is dropped. A
value of zero means the connection will not be dropped due
to idle time.
User Name:
DNS Addresses:
ISP Gateway
Address:
Subnet Mask:
IP Address:
Home > WAN (PPTP)
Password:
Maximum Idle
Time:

25
DI-634M User’s Manual
D-Link Systems, Inc.
Using the Conguration Menu
Maximum Transmission Unit-1492 is the default setting-you
may need to change the MTU for optimal performance with
your specic ISP.
Typically, connections such as PPPoE, PPTP, and L2TP are not
always on. The router allows you to set the connection mode.
The settings are:
Always on: A connection to the Inter net is always
maintained.
Connect on demand: A connection to the Internet is made
as needed; and the connection is dropped after “Maximum
Idle Time” minutes of no activity.
Manual: You have to open up the Web-based management
interface and click the Connect button manually any time that
you wish to connect to the Internet.
Home > WAN (PPTP)
MTU:
Connection Mode
Select:

26
DI-634M User’s Manual
D-Link Systems, Inc.
Using the Conguration Menu
Input the public IP Address provided by your ISP.
Input your Subnet mask. (All devices in the network must have
the same subnet mask.)
Input the public IP address of the ISP to which you are
connecting.
Input the primary and secondary DNS (Domain Name Server)
IP addresses provided by your ISP.
Enter your account or username.
Enter your password (and again to conrm).
The Maximum Idle Time value is only used for the On Demand
connection mode. It species how many minutes the WAN
connection can be idle before the connection is dropped. A
value of zero means the connection will not be dropped due
to idle time.
Account:
DNS Addresses:
ISP Gateway
Address:
Subnet Mask:
IP Address:
Home > WAN (L2TP)
Password:
Maximum Idle
Time:

27
DI-634M User’s Manual
D-Link Systems, Inc.
Using the Conguration Menu
Maximum Transmission Unit-1492 is the default setting-you
may need to change the MTU for optimal performance with
your specic ISP.
Typically, connections such as PPPoE, PPTP, and L2TP are not
always on. The router allows you to set the connection mode.
The settings are:
Always on: A connection to the Inter net is always
maintained.
Connect on demand: A connection to the Internet is made
as needed; and the connection is dropped after “Maximum
Idle Time” minutes of no activity.
Manual: You have to open up the Web-based management
interface and click the Connect button manually any time that
you wish to connect to the Internet.
Home > WAN (L2TP)
MTU:
Connection Mode
Select:
28
DI-634M User’s Manual
D-Link Systems, Inc.
Using the Conguration Menu
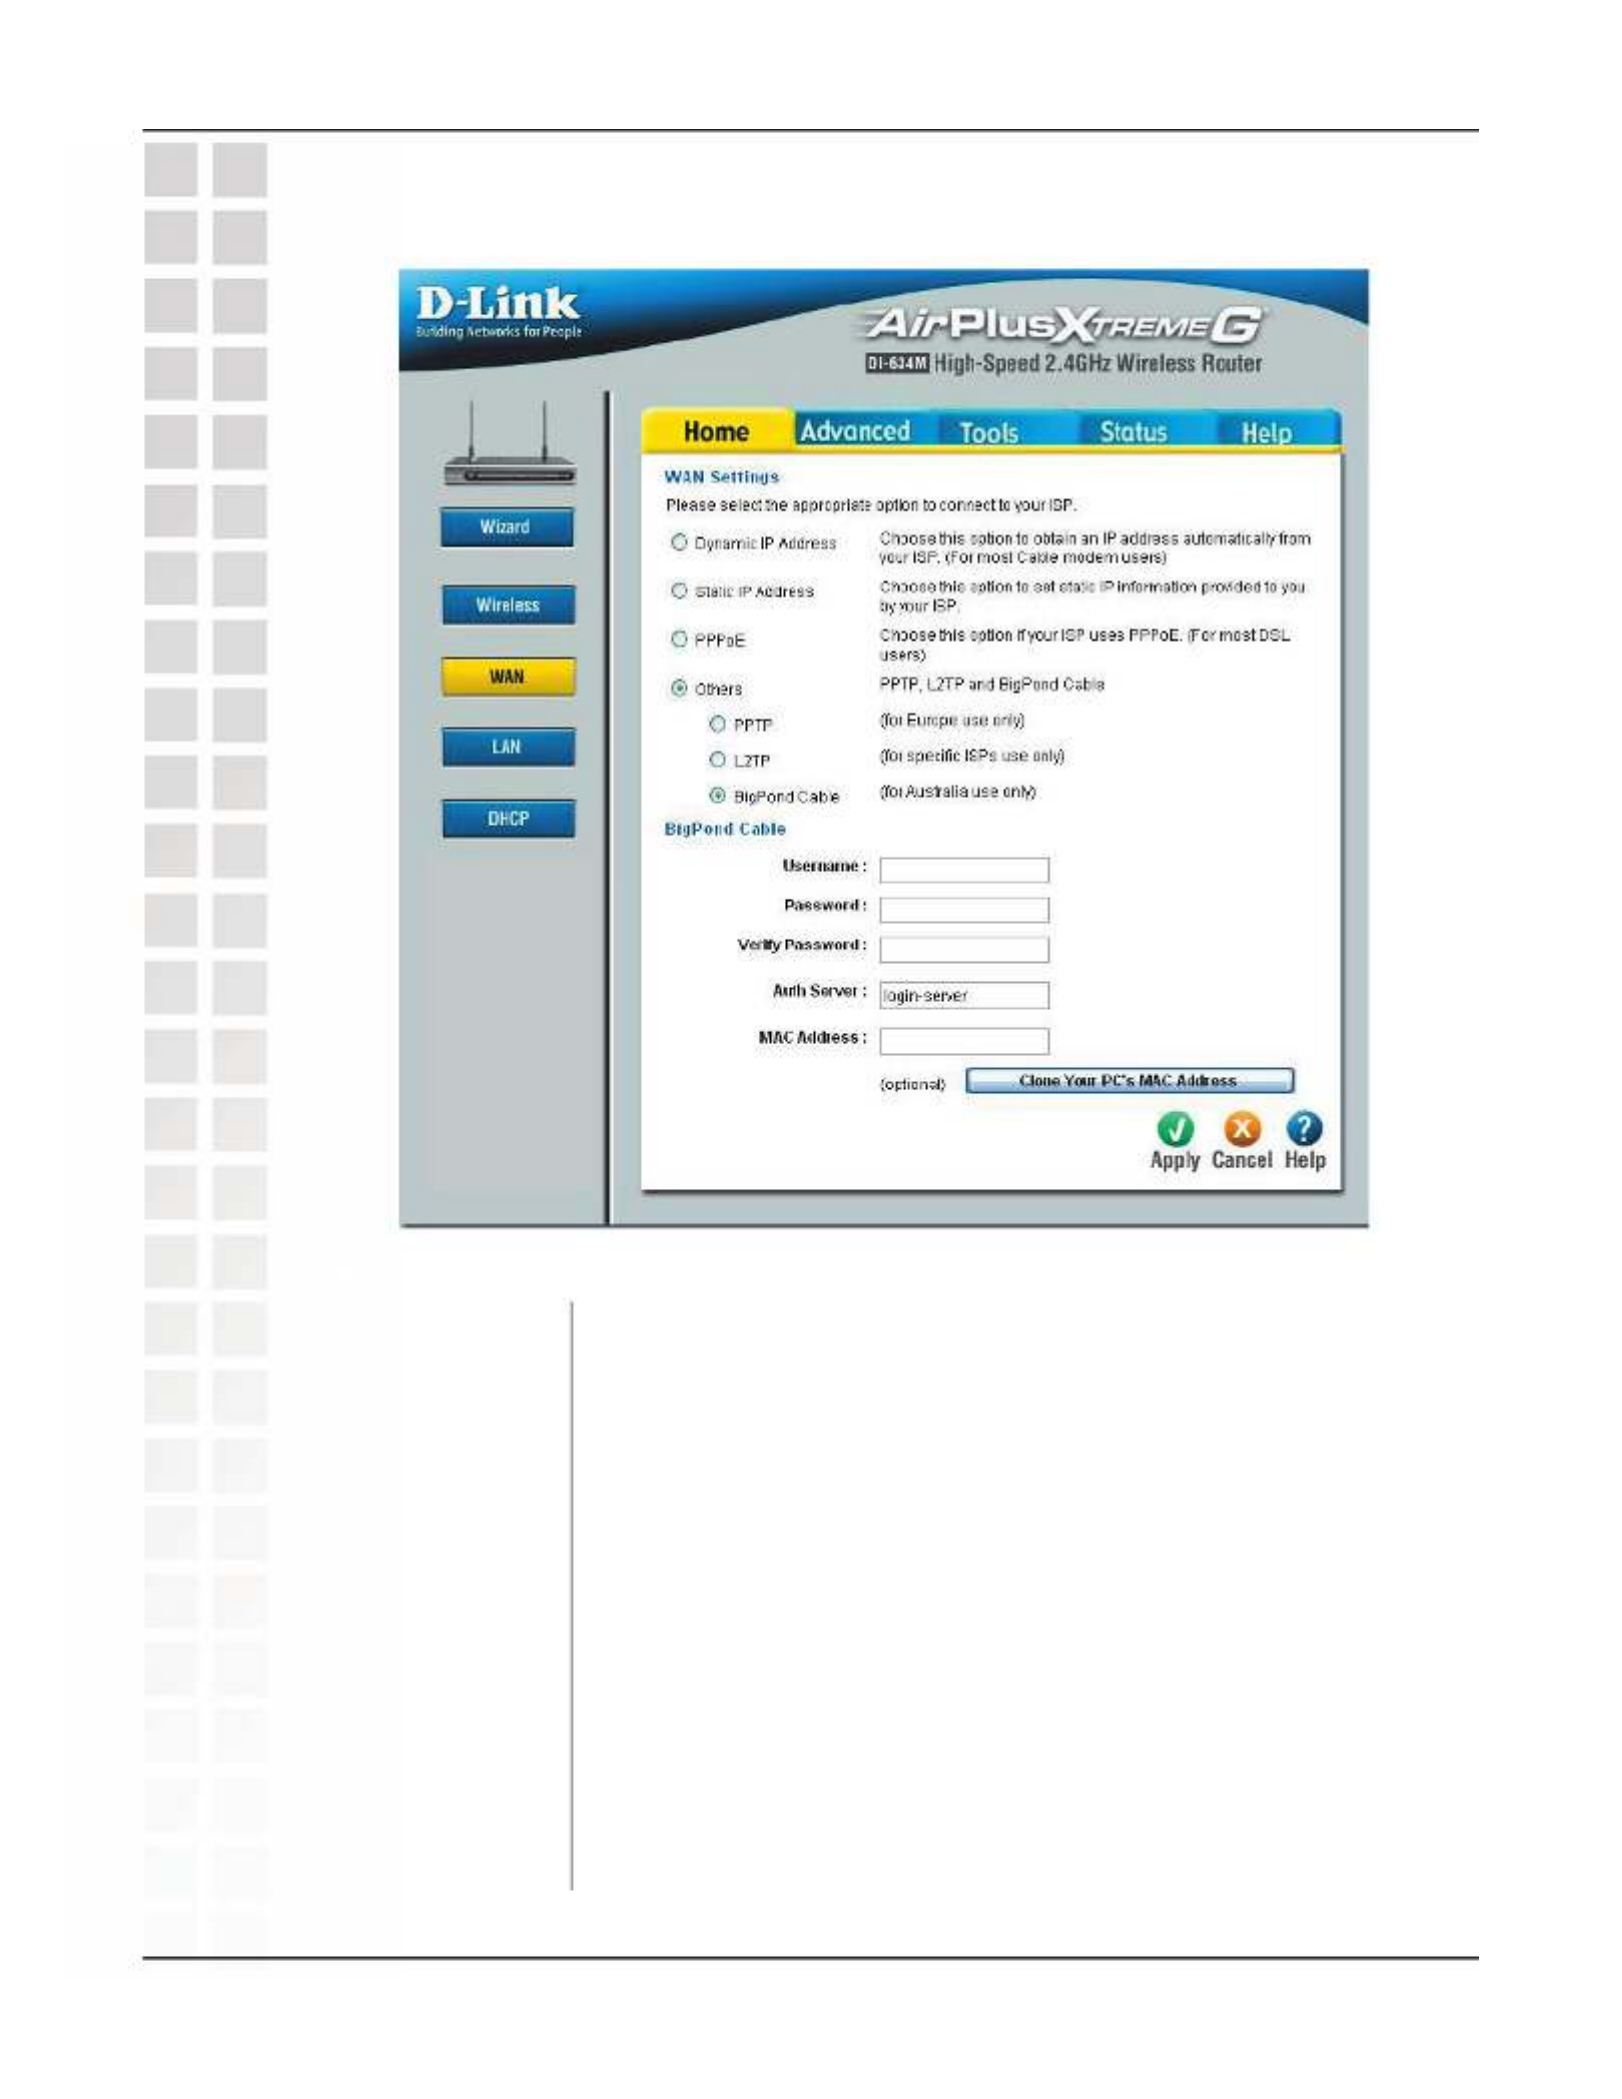
Enter your username.
Enter your password (and again to conrm).
Select the type of authentication server you are connecting to
from the drop-down menu.
The default MAC Address is set to the WAN’s physical interface
MAC address on the Broadband Router.
The default MAC address is set to the WAN’s physical interface
MAC address on the Broadband Router. Checking this checkbox
will allow you to copy the MAC address of your computer to the
WAN port on the router.
Username:
Home > WAN (Big Pond)
Password:
Auth Server:
MAC Address:
Clone Your PC’s
MAC Address:

29
DI-634M User’s Manual
D-Link Systems, Inc.
Using the Configuration Menu
LAN is short for Local Area Network. This is considered your internal network. These are
the IP settings of the LAN interface for the DI-634M. These settings may be referred to
as Private settings. You may change the LAN IP address if needed. The LAN IP address
is private to your internal network and cannot be seen on the Internet.
The IP address of the LAN interface. The default IP address
is .192.168.0.1
The subnet mask of the LAN interface. The default subnet
mask is .255.255.255.0
Enter the name of your Domain (optional).
If , the DHCP assigns its own IP address as Enabled
the DNS server to your computers. If Disabled, the DNS
server address(es) from your ISP will be assigned to your
computers.
IP Address:
Default Subnet Mask:
Local Domain Name:
Home > LAN
DNS Relay:

30
DI-634M User’s Manual
D-Link Systems, Inc.
Using the Conguration Menu
DHCP stands for . The DI-634M has a built-in DHCP Dynamic Host Control Protocol
server. The DHCP Server will automatically assign an IP address to the computers on
the LAN/private network. Be sure to set your computers to be DHCP clients by setting
their TCP/IP settings to “Obtain an IP Address Automatically.” When you turn your
computers on, they will automatically load the proper TCP/IP settings provided by the
DI-634M. The DHCP Server will automatically allocate an unused IP address from the
IP address pool to the requesting computer. You must specify the starting and ending
address of the IP address pool.
Select or Enabled Disabled. default EnabledThe setting is .
Enter the starting and ending IP address for the DHCP server’s
IP assignment.
Select the amount of time of the DHCP lease from the
drop-down menu.
If one or more computers or devices fail to obtain an IP address
from the router, it may have an old DHCP client that incorrectly
turns off the broadcast flag of DHCP packets. Enabling this
option will cause the router to always broadcast its responses
to all clients, thereby working around the problem. This will add
broadcast traffic to the network.
DHCP Server:
DHCP IP Address
Range:
Lease TIme:
Always Broadcast:
Home > DHCP

31
DI-634M User’s Manual
D-Link Systems, Inc.
Using the Configuration Menu
Enter a name for the computer or device.
Enter the IP address you would like to assign the computer or
device. This IP address must be within the IP address range.
Enter the MAC Address of the computer or device.
If the device has already received an IP address from the router,
it will show up in the drop-down menu. Select the computer or
device from the drop-down menu and click Clone Your PC.
MAC Address:
DHCP Client:
Home > DHCP (Static DHCP)
Computer Name:
IP Address:

32
DI-634M User’s Manual
D-Link Systems, Inc.
Using the Configuration Menu
The DI-634M can be configured as a virtual server so that remote users accessing
Web or FTP services (for example) via the public IP address can be automatically
redirected to local servers in the LAN (Local Area Network).
The DI-634M firewall feature filters out unrecognized packets to protect your LAN
network so all computers networked with the DI-634M are invisible to the outside world.
If you wish, you can make some of the LAN computers accessible from the Internet by
enabling Virtual Server. Depending on the requested service, the DI-634M redirects
the external service request to the appropriate server within the LAN network.
The DI-634M is also capable of port-redirection meaning incoming traffic to a particular
port may be redirected to a different port on the server computer.
Each virtual service that is created will be listed at the bottom of the screen in the
Virtual Servers List. There are pre-defined virtual services already in the table. You may
use them by enabling them and assigning the server IP to use that particular virtual
service.
Advanced > Virtual Server

33
DI-634M User’s Manual
D-Link Systems, Inc.
Using the Configuration Menu
Select or .Enabled Disabled
Enter the name referencing the virtual service.
The server computer in the LAN (Local Area Network) that will
be providing the virtual services.
The protocol used for the virtual service.
The port number of the service used by the Private IP
computer.
The port number on the WAN (Wide Area Network) side that
will be used to access the virtual service.
Select to Allow or Deny.
The schedule of time when the virtual service will be enabled.
The schedule may be set to , which will allow the Always
particular service to always be enabled. If it is set to Time, select
the time frame for the service to be enabled. If the system time
is outside of the scheduled time, the service will be disabled.
Virtual Server:
Name:
Private IP:
Protocol Type:
Private Port:
Public Port:
Schedule:
If you have an FTP server that you wanted Internet users to
access by WAN port 2100 and only during the weekends, you
would need to enable it as such. FTP server is on LAN computer
192.168.0.30. FTP uses port 21, TCP.
Name: FTP Server
Private IP: 192.168.0.30
Protocol Type: TCP
Private Port: 21
Public Port: 2100
Schedule: From: 01:00AM to 01:00AM, Sat to Sun
All Internet users who want to access this FTP Server must connect to it from port
2100. This is an example of port redirection and can be useful in cases where there
are many of the same servers on the LAN network.
Example #1:
Advanced > Virtual Server (continued)
Firewall Rule:

34
DI-634M User’s Manual
D-Link Systems, Inc.
Using the Configuration Menu
Some applications require multiple connections, such as Internet gaming, video
conferences, Internet telephony and others. These applications have difficulties working
through NAT (Network Address Translation). Special Applications makes some of these
applications work with the DI-634M. If you need to run applications that require multiple
connections, specify the port normally associated with an application in the “Trigger Port”
field, select the protocol type as TCP or UDP, then enter the public ports associated
with the trigger port to open them for inbound traffic.
The DI-634M provides some predefined applications in the table on the bottom of the
web page. Select the application you want to use and enable it.
Note: Only one PC can use each Special Application tunnel.
This is the name referencing the special application.
This is the port used to trigger the application. It can be either
a single port or a range of ports.
This is the protocol used to trigger the special application.
This is the port number on the WAN side that will be used to
access the application. You may define a single port or a range
of ports. You can use a comma to add multiple ports or port
ranges.
This is the protocol used to trigger the special application.
Name:
Trigger Port:
Trigger Type:
Public Port:
Public Type:
Advanced > Applications

35
DI-634M User’s Manual
D-Link Systems, Inc.
Using the Configuration Menu
Port forwarding is used to open a port or a range of ports in your router and redirect
data through to these ports to a single PC on your network.
Click the Enabled or Disabled radio button.
Enter a name for your port forwarding rule.
Enter the IP address of the computer or device you want to
forward the ports to.
Enter the TCP ports to open. You may enter a single port or a
range of ports (1000-2000). Use a comma to seperate ports
or range of ports (1000-2000,99,133).
Enter the UDP ports to open.
Select to Allow or Deny (block) the ports.
The schedule of time when the virtual service will be enabled.
The schedule may be set to , which will allow the Always
particular service to always be enabled. If it is set to Time, select
the time frame for the service to be enabled. If the system time
is outside of the scheduled time, the service will be disabled.
Name:
IP Address:
TCP Ports to
Open:
UDP Ports to
Open:
Firewall Rule:
Advanced > Port Forwarding
Schedule:
36
DI-634M User’s Manual
D-Link Systems, Inc.
Using the Configuration Menu
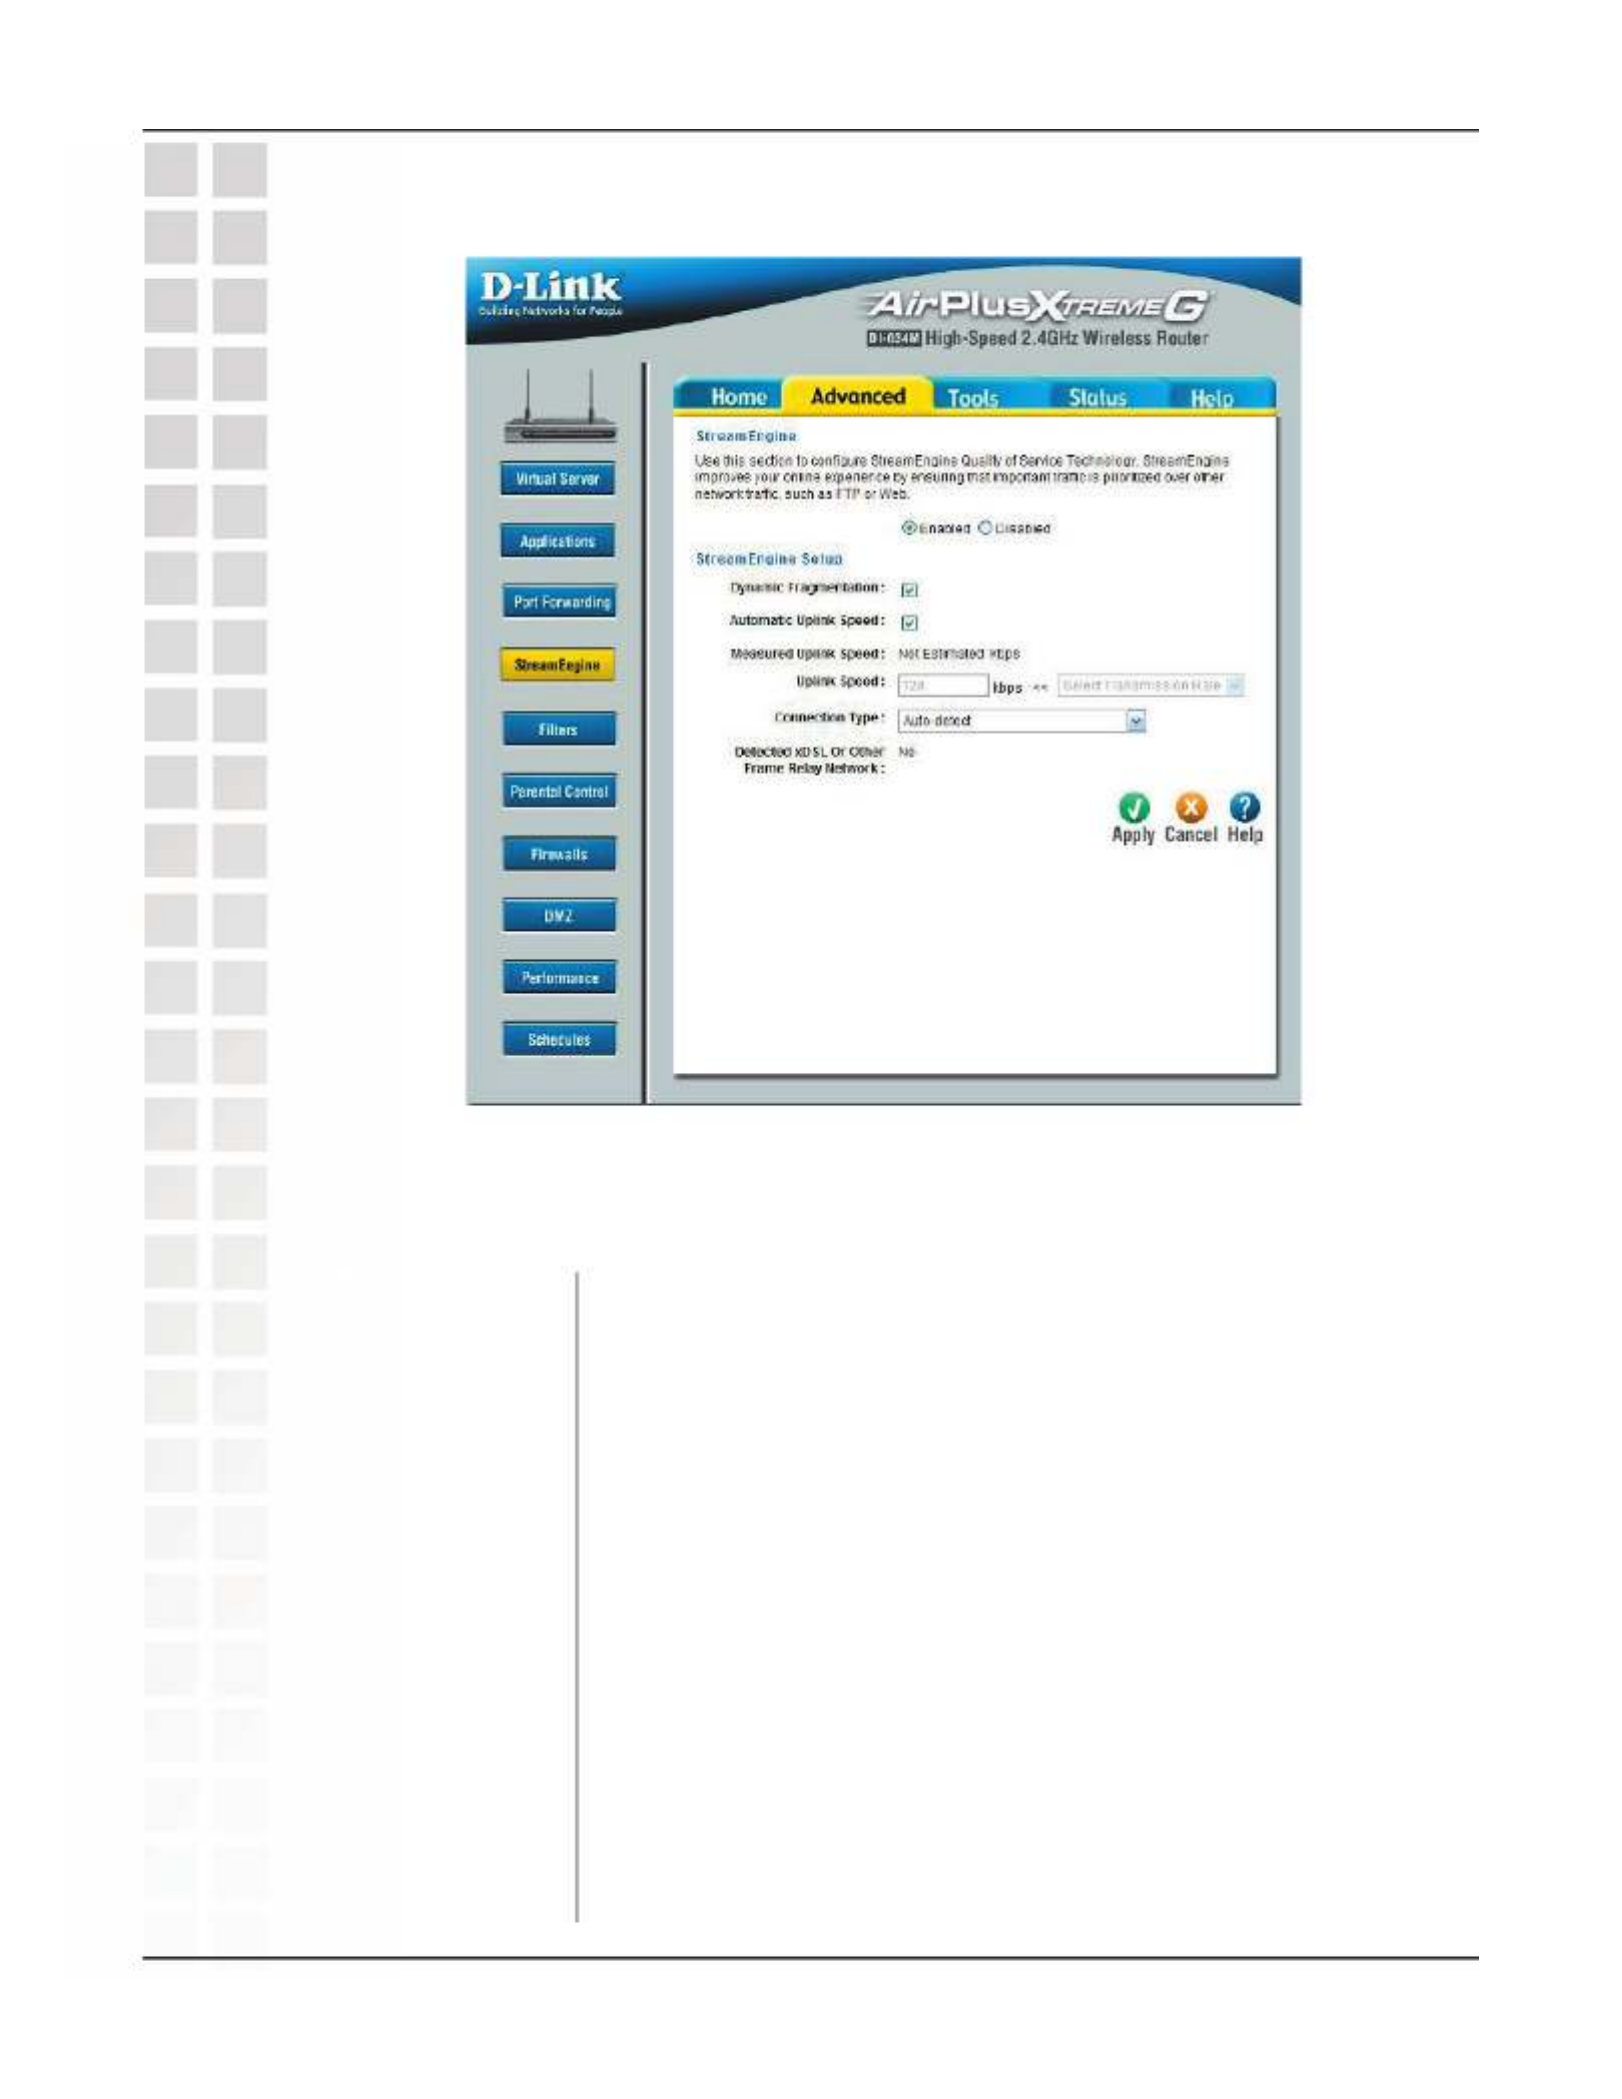
StreamEngine QoS (Quality of Service) Technology will improve your online experience
by ensuring that important traffic is prioritized over other network traffic, such as FTP
or Web. Click Enabled to turn this service on.
Enable this option when you have a slow Internet uplink. This
will reduce the impact that large low priority packets can have
on more urgent ones by breaking the large packets into several
smaller packets.
When enabled, this option causes the router to automatically
measure the useful uplink bandwidth each time the WAN
interface is re-established (e.g. after a reboot).
This is the uplink speed measured when the WAN interface was
last re-established. The value may be lower than that reported
by your ISP as it does not include all of the network protocol
overheads associated with your ISP’s network. Typically, this
figure will be between 87% and 91% of the stated uplink speed
for xDSL connections and around 5 kbps lower for cable network
connections.
Dynamic
Fragmentation:
Automatic Uplink
Speed:
Measured Uplink
Speed:
Advanced > StreamEngine

37
DI-634M User’s Manual
D-Link Systems, Inc.
Using the Configuration Menu
If Automatic Uplink Speed is disabled, this options allows you
to set the uplink speed manually. Uplink speed is the speed
at which data can be transferred from the router to your ISP.
This is determined by your ISP. ISPs often specify speed as a
downlink/uplink pair; for example, 1.5Mbits/284Kbits. For this
example, you would enter “284”. Alternatively you can test your
uplink speed with a service such as www.dslreports.com. Note
however that sites such as DSL Reports, because they do not
consider as many network protocol overheads, will generally
note speeds slightly lower than the Measured Uplink Speed or
the ISP rated speed.
By default, the router automatically determines whether the
underlying connection is an xDSL/Frame-relay network or some
other connection type (such as cable modem or Ethernet), and
it displays the result as Detected xDSL or Frame Relay Network.
If you have an unusual network connection in which you are
actually connected via xDSL but for which you configure either
“Static” or “DHCP” in the WAN settings, setting this option to
xDSL or Other Frame Relay Network ensures that the router
will recognize that it needs to shape traffic slightly differently in
order to give the best performance. Choosing xDSL or Other
Frame Relay Network causes the measured uplink speed to
be reported slightly lower than before on such connections, but
gives much better results.
When Connection Type is set to Auto-detect, the automatically
detected connection type is displayed here.
Uplink Speed:
Advanced > StreamEngine (continued)
Connection Type:
Detected xDSL or
Other Frame Relay
Network:

38
DI-634M User’s Manual
D-Link Systems, Inc.
Using the Configuration Menu
Use IP Filters to deny LAN (Local Area Network) computers access to the Internet.
Enter the IP address or range of IP addresses and the ports you would like to block
access to.
Select or .Enabled Disabled
Enter the IP address or range you want to block.
Enter the port or range of ports to block.
Select the protocol type (TCP, UDP, or Both).
Select a schedule from the drop-down menu.
Enter a description for your rule.
Filters:
IP Range:
Port:
Protocol Type:
Schedule:
Advanced > Filters (IP Filters)
Details:

39
DI-634M User’s Manual
D-Link Systems, Inc.
Using the Configuration Menu
Use MAC (Media Access Control) Filters to allow or deny LAN (Local Area Network)
computers by their MAC addresses from accessing the Network. You can either manually
add a MAC address or select the MAC address from the list of clients that are currently
connected to the Broadband Router.
Select the filter you wish to use; in this case, MAC filters was
chosen.
Choose MAC filters; MAC addresses listed Disable allow
below; or deny MAC addresses listed below.
Enter the name here.
Enter the MAC Address.
Select a DHCP client from the pull-down list; click to Clone
copy that MAC Address.
Filters:
MAC Filters:
Name:
MAC Address:
DHCP Client:
Advanced > Filters (MAC Filters)

40
DI-634M User’s Manual
D-Link Systems, Inc.
Using the Configuration Menu
The Parental Controls section controls access to Web sites from computers on the
LAN.
Select or . Enabled Disabled
Enter the domain name that you want to allow; for example:
google.com. Do not enter the http:// preceding the URL. Enter
the most inclusive domain; for example, enter dlink.com and
access will be permitted to both www.dlink.com and support.
dlink.com.
URL Blocking:
Domain:
Advanced > Parental Controls
Note: Many web sites construct pages with images and content from other web sites.
Access will be forbidden if you do not enable all the web sites used to construct a
page. For example, to access my.yahoo.com, you need to enable access to yahoo.
com, yimg.com, and doubleclick.net.
41
DI-634M User’s Manual
D-Link Systems, Inc.
Using the Configuration Menu
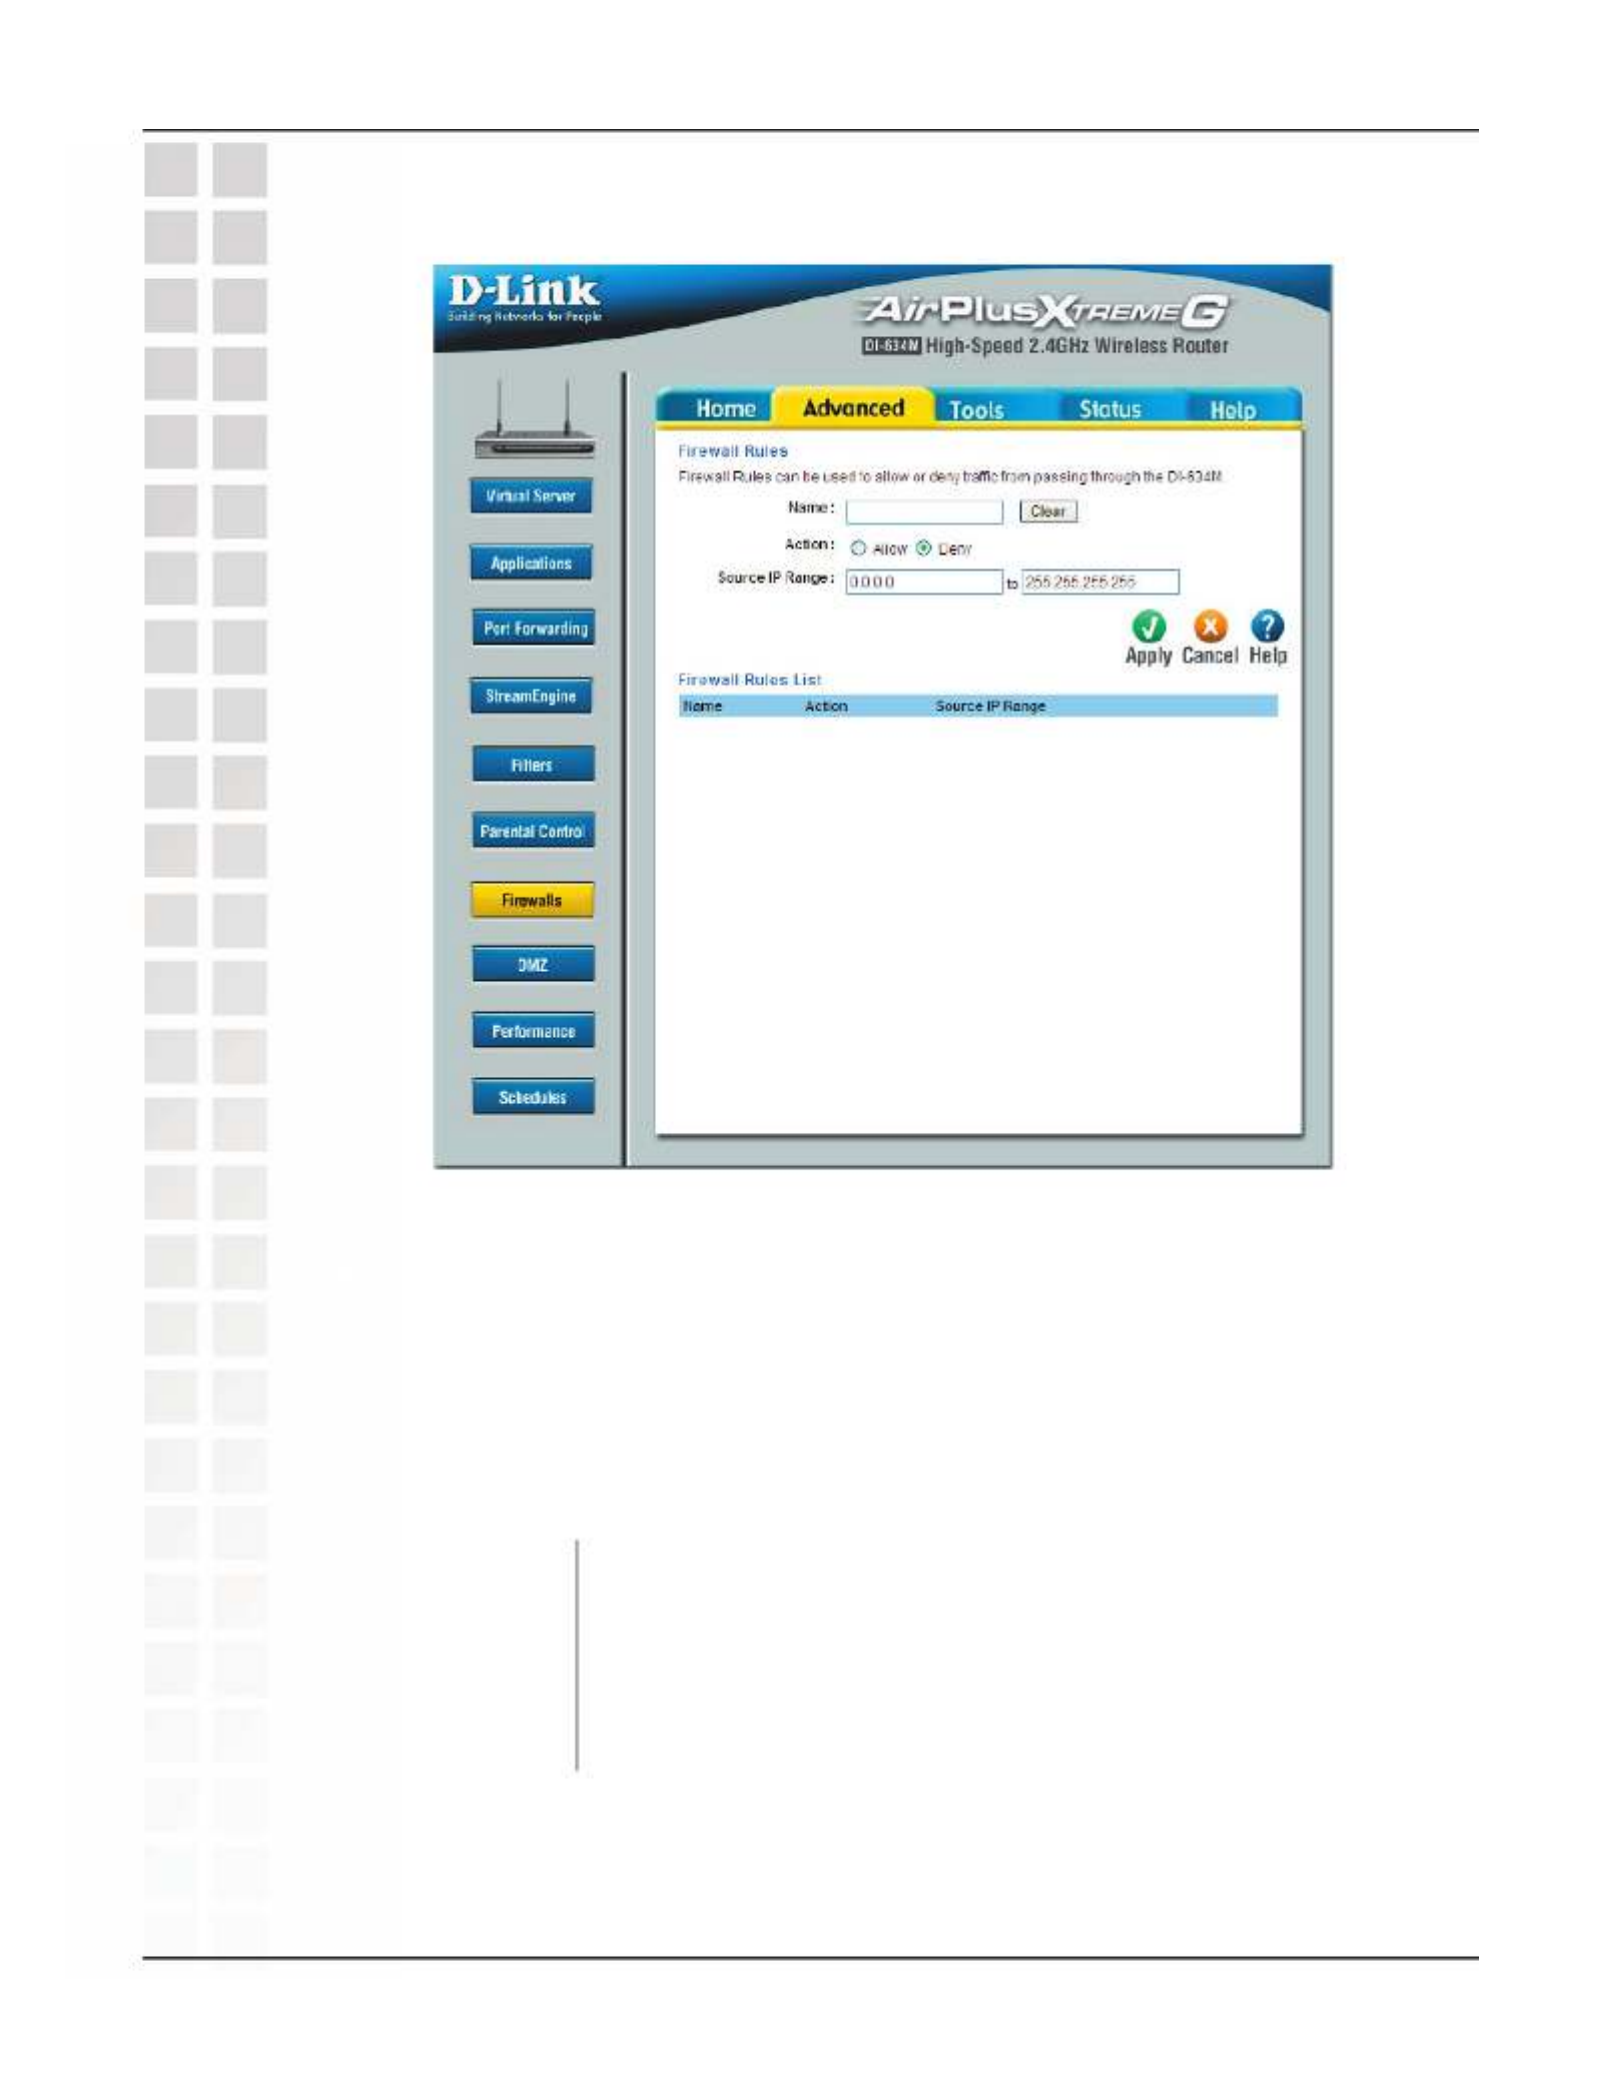
The Firewall option is an advanced method of controlling data received from the Internet.
With this feature you can configure inbound data filtering rules that control data based
on IP Address.
The Firewall option is best suited for custom applications. For most applications you
should use the Virtual Server, Special Applications, or Gaming section to create rules
that will allow applications to communicate through the router.
Enter a name for your rule.
Select or Allow Deny.
Define the range of Internet addresses this rule applies to.
Name:
Action:
Source IP:
Advanced > Firewall

42
DI-634M User’s Manual
D-Link Systems, Inc.
Using the Configuration Menu
If you have a client PC that cannot run Internet applications properly from behind the
DI-634M, then you can set the client up for unrestricted Internet access. It allows a
computer to be exposed to the Internet. This feature is useful for gaming purposes.
Enter the IP address of the internal computer that will be the DMZ host. Adding a client
to the DMZ (Demilitarized Zone) may expose your local network to a variety of security
risks, so only use this option as a last resort.
Enable Disable or the DMZ. The DMZ (Demilitarized Zone)
allows a single computer to be exposed to the internet.
By the DMZ is disabled.default
Enter the of the computer to be in the . IP Address DMZ
IP Address:
DMZ:
Advanced > DMZ

43
DI-634M User’s Manual
D-Link Systems, Inc.
Using the Configuration Menu
Normally the wireless transmitter operates at 100% power. In
some circumstances, however, there might be a need to isolate
specific frequencies to a smaller area. By reducing the power of
the radio, you can prevent transmissions from reaching beyond
your corporate/home office or designated wireless area.
Beacons are packets sent by a wireless router to synchronize
wireless devices. Specify a Beacon Interval value between 20
and 1000 milliseconds. The default value is 100 milliseconds.
This setting should remain at its default value of 2346. If you
encounter inconsistent data flow, only minor modifications to
the value range between 1 and 2346 are recommended.
This setting should remain at its default value of 2346. Setting the
Fragmentation value too low may result in poor performance.
A DTIM is a countdown for informing clients of the next window
for listening to broadcast and multicast messages. When the
wireless router has buffered broadcast or multicast messages
for associated clients, it sends the next DTIM with a DTIM
Interval value. Wireless clients detect the beacons and awaken
to receive the broadcast and multicast messages. The default
value is 1. Valid settings are between 1 and 255.
Beacon Interval:
Transmit Power:
Advanced > Performance
RTS Threshold:
Fragmentation
Threshold:
DTIM Interval:
44
DI-634M User’s Manual
D-Link Systems, Inc.
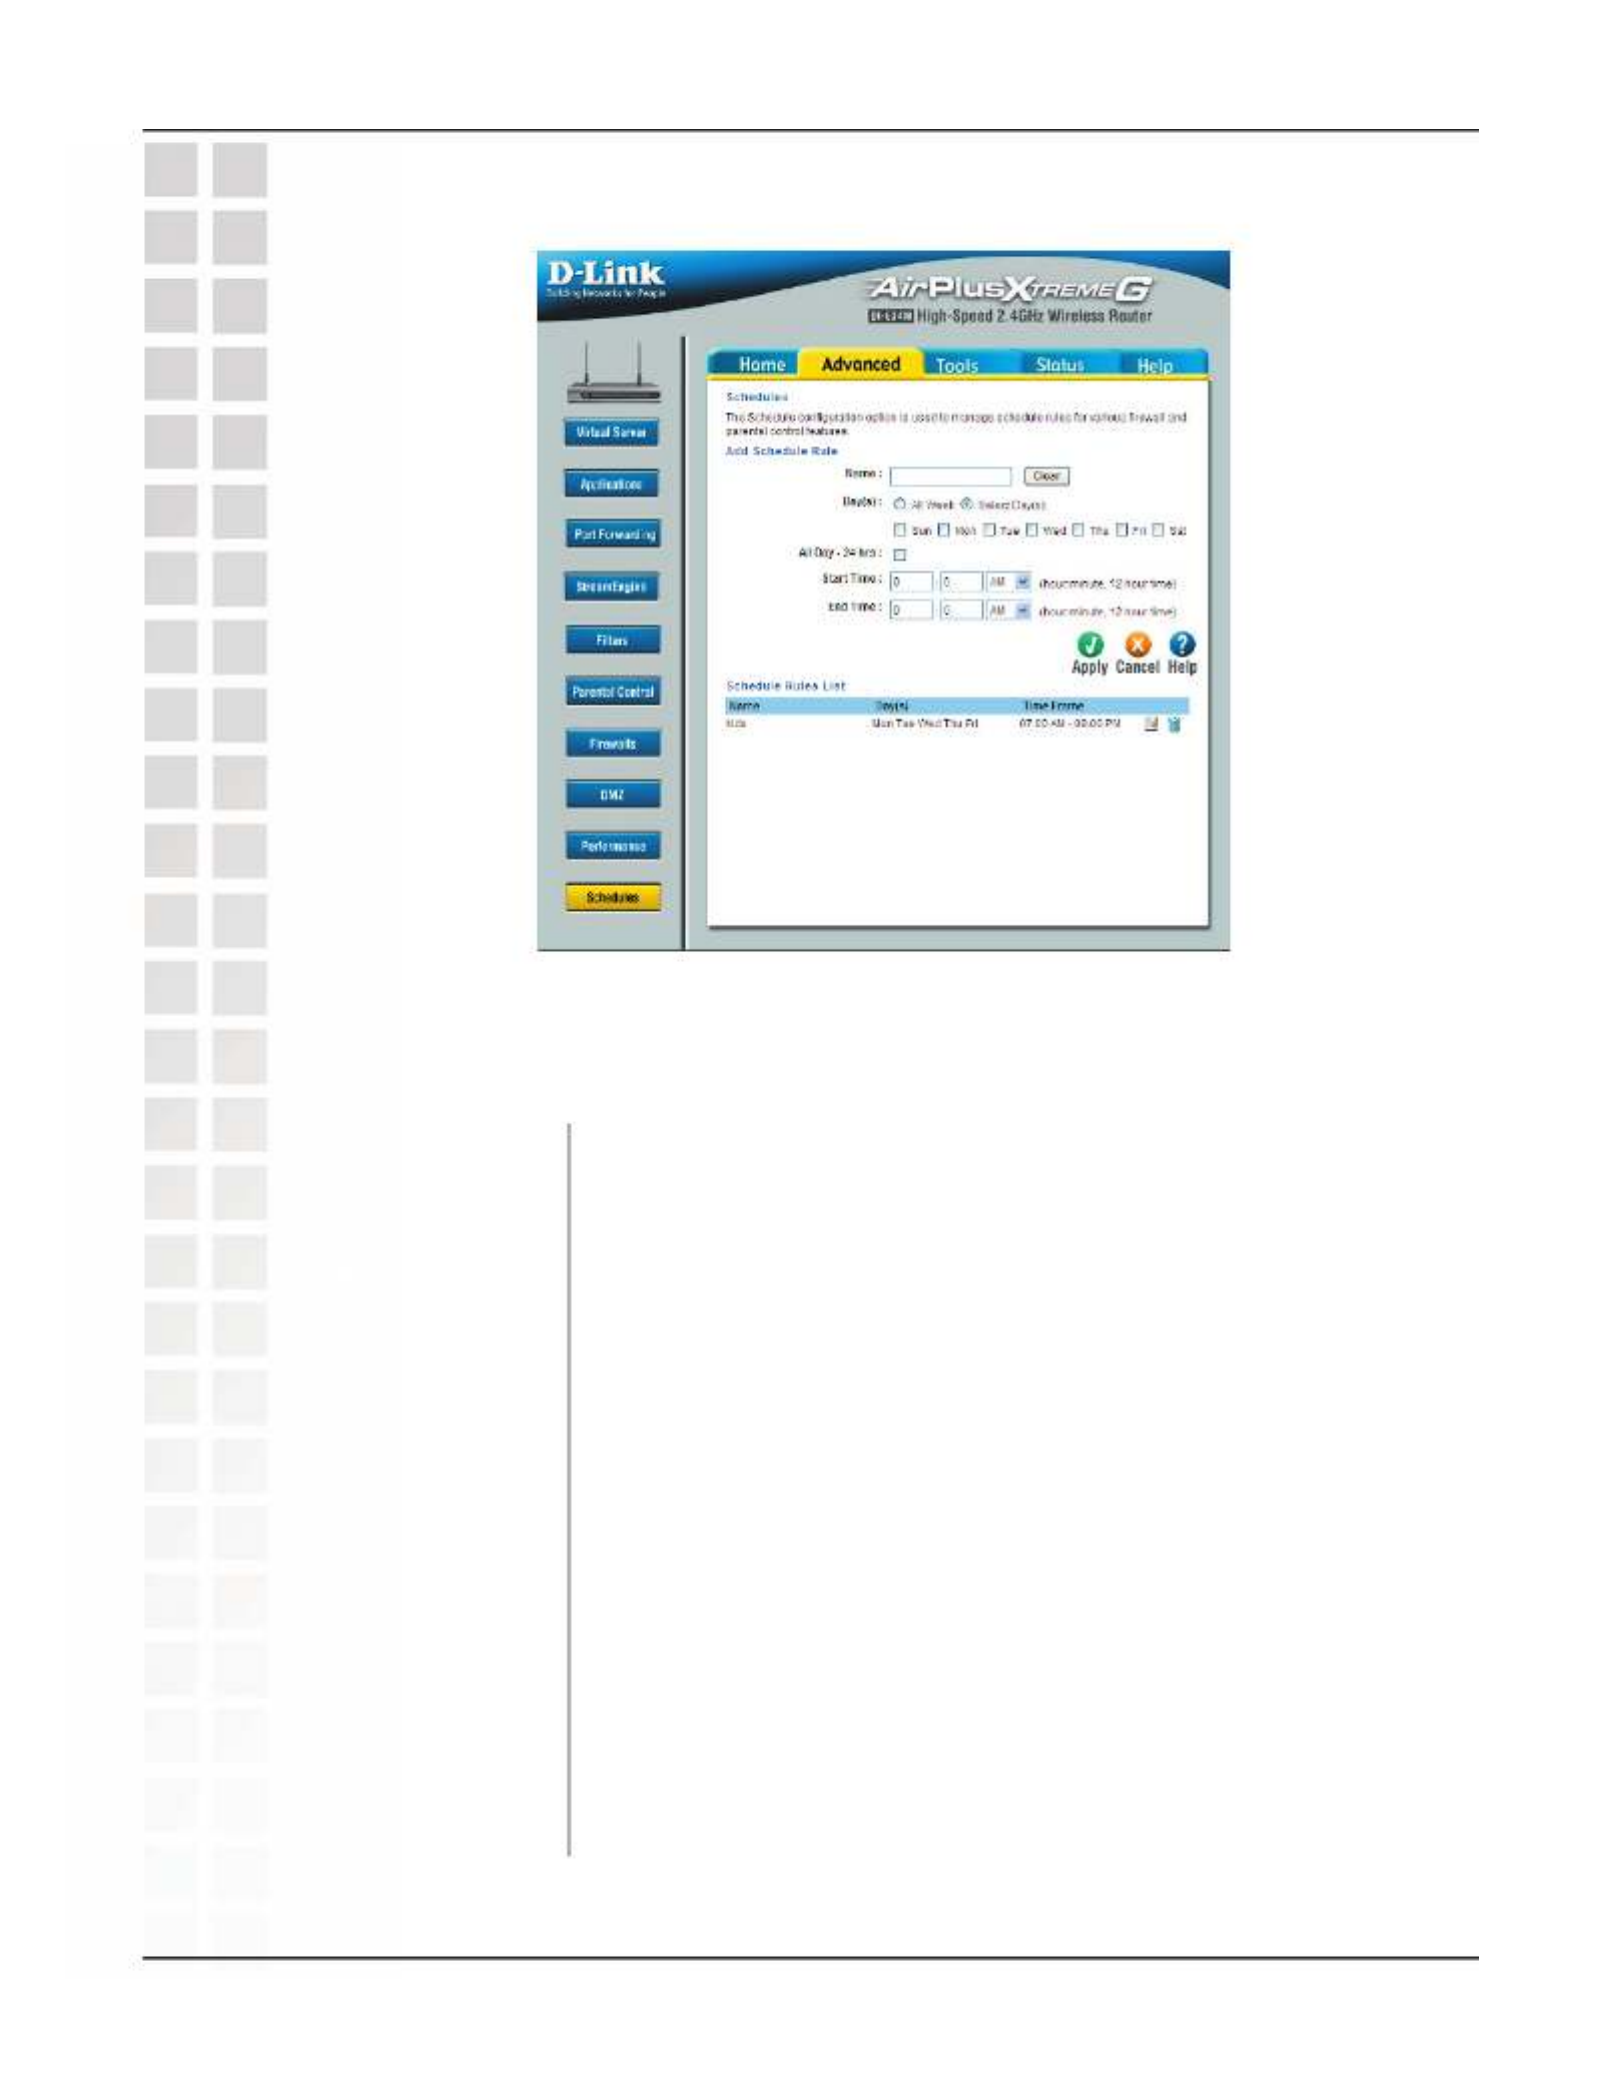
Using the Configuration Menu
Enter a name for the rule.
Place a checkmark in the boxes for the desired days, or select
the All Week radio button to schedule all seven days of the
week.
Select this option if you want this schedule in effect all day for
the selected day(s).
If you don’t use the All Day option, then you enter the time here.
The start time is entered in two fields. The first box is for the
hour and the second box is for the minute. Email events are
triggered only by the start time.
The end time is entered in the same format as the start time.
The hour in the first box and the minutes in the second box.
The end time is used for most other rules, but is not used for
email events.
Name:
Advanced > Schedules
Day(s):
All Day - 24 hrs:
Start Time:
Schedules define the times with other rules are in force. For example, if you want to
restrict web access to Mon-Fri from 3pm to 8pm, you could create a schedule selecting
Mon, Tue, Wed, Thu, and Fri and enter a Start Time of 3pm and End Time of 8pm.
End Time:
45
DI-634M User’s Manual
D-Link Systems, Inc.
Using the Configuration Menu
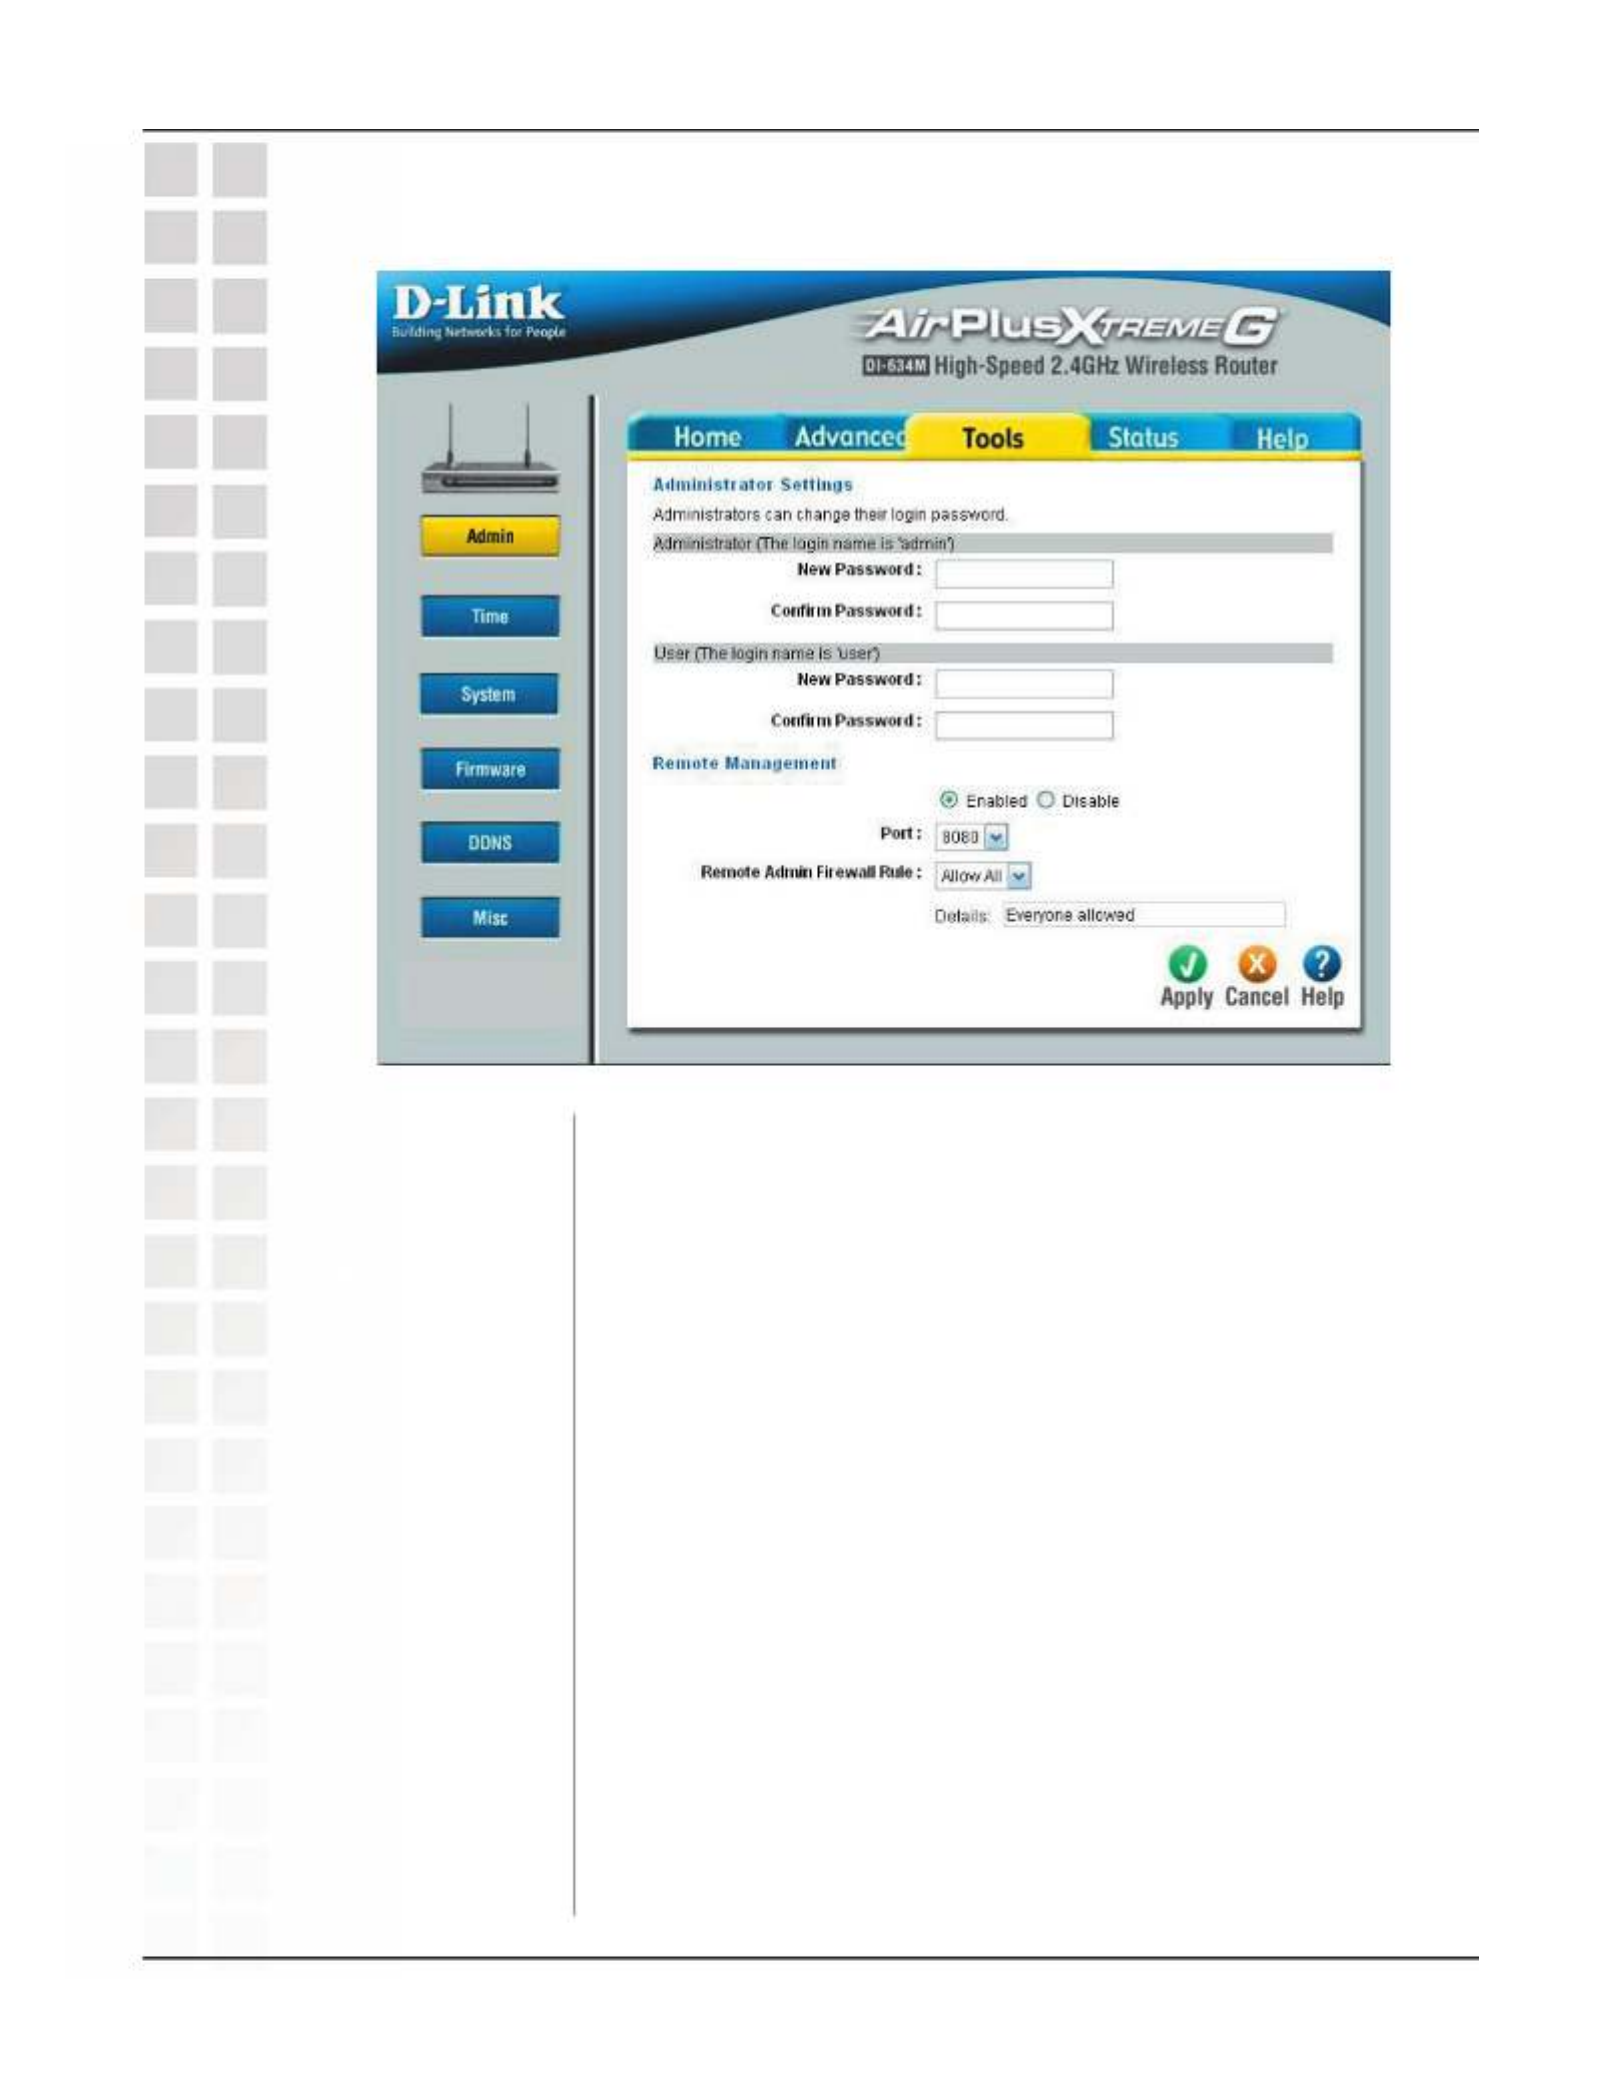
Tools > Admin
Enter a password for the user “admin”, who will have full access
to the Web-based management interface.
Enter a password for the user “user”, who will have read-only
access to the Web-based management interface.
Enabling Remote Management allows you to manage the router
from anywhere on the Internet. Disabling Remote Management
allows you to manage the router only from computers on your
LAN.
The port that you will use to address the management interface
from the Internet. For example, if you choose port 1080 here,
then, to access the router from the Internet, you would use a
URL of the form: http://my.domain.com:1080/.
Select a firewall rule that controls access as needed for this
admin port. If you do not see the firewall rule you need in the
list of firewall rules, go to the Advanced > Firewalls page and
create a new firewall rule.
Admin Password:
User Password:
Remote
Management:
Remote Admin
Firewall Rule:
Port:

46
DI-634M User’s Manual
D-Link Systems, Inc.
Using the Configuration Menu
Select Automatic to use the default time server or enter a
specific time server next to . You must be Customized NTP
connected to the Internet.
To manually input the time, select Manual and enter the values
for the Year, Month, Day, Hour, and Minute. After inputing the
values, click Apply. Select your time zone from the drop-down
menu.
Select Enabled or Disabled.
Automatic:
Daylight Saving:
Manual:
Tools > Time
The Time Configuration option allows you to configure, update, and maintain the correct
time on the router’s internal system clock. From this section you can set the time zone
that you are in and set the Time Server. Daylight saving can also be configured to
automatically adjust the time when needed. Maintaining accurate time is important if
you have created schedule-based rules.

47
DI-634M User’s Manual
D-Link Systems, Inc.
Using the Configuration Menu
Use this option to save the current router configuration settings
to a file on the hard disk of the computer you are using. First,
click the Save button. You will then see a file dialog, where you
can select a location and file name for the settings.
Use this option to load previously saved router configuration
settings. First, use the Browse control to find a previously save
file of configuration settings. Then, click the Load button to
transfer those settings to the router.
This option will restore all configuration settings back to the
settings that were in effect at the time the router was shipped
from the factory. Any settings that have not been saved will be
lost, including any rules that you have created. If you want to
save the current router configuration settings, use the Save
button above.
Save Settings to
Local Hard Drive:
Load Settings
from Local Hard
Drive:
Restore to Factory
Default Settings:
Tools > System

48
DI-634M User’s Manual
D-Link Systems, Inc.
Using the Configuration Menu
If your PC’s operating system is Windows XP Service Pack 2
(SP2) or later and you are using Windows Internet Explorer (IE)
as your browser (or any browser that supports ActiveX controls),
you can use this option to save key parts of the router’s current
wireless security settings to your PC with Windows Connect
Now (WCN) technology. The settings will then be available to
propagate to other wireless devices.
The WCN ActiveX Control provides the necessary WCN
link between the router and your PC via the browser. The
browser will attempt to download the WCN ActiveX Control,
if it is not already available on your PC. For this action to
succeed, you must already have a WAN connection, and the
browser’s Internet security setting must be Medium or lower
(select Tools > Internet Options > Security > Custom Level >
Medium).
Tools > System (continued)
Save to Windows
Connect Now:
WCN ActiveX
Control:
When the necessary preparations are complete, click the Save to Windows Connect
Now button, and the WCN technology will capture the wireless network settings from
your router and save them on your PC.
Note that WCN only saves a few of the wireless security settings. When you use WCN to
propagate settings to other wireless devices, you may have to make additional settings
manually on those devices.
Note that, in Microsoft’s current implementation of WCN, you cannot save the wireless
settings if a profile of the same name already exists. To work around this limitation, either
delete the existing profile or change the SSID when you change the wireless settings;
then, when you save the new settings, a new profile will be created.

50
DI-634M User’s Manual
D-Link Systems, Inc.
Using the Configuration Menu
If , this will allow you to use the DDNS update client Enabled
built into the router.
Choose your DDNS provider from the drop-down menu.
Enter the hostname that you registered with your DDNS service
provider.
Enter the username for your DDNS acount.
Enter the password for your DDNS account.
DDNS:
Server Address:
Host Name:
User Name or Key:
Password or Key:
Tools > DDNS
The Dynamic DNS feature allows you to host a server (Web, FTP, Game Server, etc.)
using a domain name that you have purchased (www.whateveryournameis.com) with
your dynamically assigned IP address. Most broadband Internet Service Providers
assign dynamic (changing) IP addresses. When you use a Dynamic DNS service
provider, others can enter your domain name to connect to your server, no matter what
your IP address is. The router automatically updates your DDNS server every time it
receives a different IP address.

51
DI-634M User’s Manual
D-Link Systems, Inc.
Using the Configuration Menu
Tools > Misc
Click to restart the DI-634M.Reboot
If you enable this option, you are causing the router not to
respond to ping commands to the public WAN IP address of
the router. Pinging public WAN IP addresses is a common
method used by hackers to test whether your WAN IP address
is valid.
Select a firewall rule that controls access as needed for ping
commands. If you do not see the firewall rule you need in the
list of firewall rules, go to the Advanced -> Firewalls page and
create a new firewall rule.
Select to enable or disable UPnP™ (Universal Plug & Play).
If you are experiencing difficulties when playing online games
or even certain applications that use voice data, you may need
to enable Gaming Mode for these applications to work correctly.
When not playing games or using these voice applications, it
is recommended that Gaming Mode be disabled.
Restart Device:
Discard Ping from
WAN side:
UPnP Settings:
Gaming Mode:
Firewall Rule:

52
DI-634M User’s Manual
D-Link Systems, Inc.
Using the Configuration Menu
Tools > Misc (continued)
The DI-634M supports VPN (Virtual Private Network)
pass-through for both PPTP (Point-to-Point Tunneling Protocol)
and IPSec (IP Security). Once VPN pass-through is enabled,
there is no need to open up virtual services. Multiple VPN
connections can be made through the DI-634M. This is useful
when you have many VPN clients on the LAN network.
Normally, this is set to “auto”. If you have trouble connecting to
the WAN, try the other settings.
The Email feature can be used to send the system log files to
a designated email address.
This email address will appear as the sender when you receive
a log file via email.
Enter the email address where you want the email sent.
Enter the SMTP server address for sending email.
If your SMTP server requires authentication, select this
option.
Enter your account for sending email.
Enter the password associated with the account.
Select this option if you want logs to be sent by email when
the log is full.
Select this option if you want logs to be sent by email according
to a schedule.
If you selected the On Schedule option, select one of the
defined schedule rules. If you do not see the schedule you
need in the list of schedules, go to the Advanced -> Schedules
screen and create a new schedule.
Note: Email is sent at the start time defined for a schedule; the
schedule end time is not used for email.
WAN Select to
10/100Mbps:
VPN Pass Through:
Log Email Settings:
From Email
Address:
To Email Address:
SMTP Server:
Enable
Authentication:
Account Name:
Password:
On Log Full:
On Schedule:
Schedule:

54
DI-634M User’s Manual
D-Link Systems, Inc.
Using the Conguration Menu
The Broadband Router keeps a running log of events and activities occurring on the
Router. If the device is rebooted, the logs are automatically cleared. You may save the
log files under Log Settings.
Status > Log

55
DI-634M User’s Manual
D-Link Systems, Inc.
Using the Conguration Menu
The screen above displays the Trafc Statistics. Here you can view the amount of packets
that pass through the DI-634M on both the WAN and the LAN ports. The trafc counter
will reset if the device is rebooted.
Status > Stats

56
DI-634M User’s Manual
D-Link Systems, Inc.
Using the Configuration Menu
This screen will display any wireless client that is currently connected to the wireless
router. The connected time and MAC address will be displayed.
Status > Wireless
Product specificaties
| Merk: | D-Link |
| Categorie: | Router |
| Model: | AirPlus Xtreme G DI-634M |
Heb je hulp nodig?
Als je hulp nodig hebt met D-Link AirPlus Xtreme G DI-634M stel dan hieronder een vraag en andere gebruikers zullen je antwoorden
Handleiding Router D-Link

29 December 2024
7 December 2024
1 December 2024
21 November 2024
10 November 2024
10 November 2024
2 November 2024
27 Oktober 2024
27 Oktober 2024
27 Oktober 2024
Handleiding Router
- Router Bosch
- Router HP
- Router Samsung
- Router Xiaomi
- Router Huawei
- Router Asus
- Router AEG
- Router DeWalt
- Router Motorola
- Router Medion
- Router Nokia
- Router Siemens
- Router Topcom
- Router UPC
- Router VTech
- Router Acer
- Router Actiontec
- Router Airlive
- Router Alcatel
- Router Alfa
- Router Allied Telesis
- Router Allnet
- Router Anker
- Router Apple
- Router Arcadyan
- Router Arris
- Router AVM
- Router Barco
- Router Beafon
- Router Belkin
- Router BenQ
- Router Billion
- Router BT
- Router Buffalo
- Router Davolink
- Router Dell
- Router Devolo
- Router Digi
- Router Digiconnect
- Router Digitus
- Router Draytek
- Router Edimax
- Router Einhell
- Router Eminent
- Router Engenius
- Router Envivo
- Router Ezviz
- Router Festool
- Router Foscam
- Router Gembird
- Router Gigabyte
- Router Google
- Router Gude
- Router Hama
- Router Hercules
- Router Hikoki
- Router Hikvision
- Router Hitachi
- Router Holzmann
- Router ICIDU
- Router Kathrein
- Router Kogan
- Router Konig
- Router KPN
- Router Kyocera
- Router Lancom
- Router Leoxsys
- Router LevelOne
- Router Linksys
- Router Logilink
- Router Makita
- Router Manhattan
- Router Media-tech
- Router Mercku
- Router Metabo
- Router Mikrotik
- Router Milwaukee
- Router MSI
- Router Nec
- Router Nest
- Router Netgear
- Router Netis
- Router Patton
- Router PENTAGRAM
- Router Phicomm
- Router Powerplus
- Router Proximus
- Router QNAP
- Router Razer
- Router Renkforce
- Router Roland
- Router Sagem
- Router Sagemcom
- Router Schneider
- Router Sigma
- Router Silverline
- Router Sitecom
- Router Skil
- Router SMC
- Router Sonos
- Router Strong
- Router Sweex
- Router Synology
- Router T-com
- Router T-Mobile
- Router TCL
- Router Technicolor
- Router Tele 2
- Router Telstra
- Router Teltonika
- Router Tenda
- Router Thomson
- Router Thrustmaster
- Router Toolcraft
- Router TP Link
- Router Trendnet
- Router Trust
- Router Ubee
- Router United Telecom
- Router Verizon
- Router Vivanco
- Router Vodafone
- Router Western Digital
- Router Wisetiger
- Router Zebra
- Router Zolid
- Router Zoom
- Router ZTE
- Router ZyXEL
- Router Jung
- Router On Networks
- Router Clas Ohlson
- Router Black And Decker
- Router Rosewill
- Router Peak
- Router Ubiquiti Networks
- Router Conceptronic
- Router Cotech
- Router Atlona
- Router Hamlet
- Router Porter-Cable
- Router Techly
- Router SIIG
- Router 7inova
- Router AT&T
- Router Evolution
- Router Nilox
- Router Approx
- Router Milan
- Router Cisco
- Router Gefen
- Router 3Com
- Router Amped Wireless
- Router Comtrend
- Router CradlePoint
- Router Dovado
- Router Juniper
- Router Planet
- Router Intellinet
- Router Predator
- Router I-Tec
- Router NetComm
- Router Lindy
- Router IOGEAR
- Router Black Box
- Router IFM
- Router Totolink
- Router AJA
- Router Dahua Technology
- Router Mercusys
- Router Aruba
- Router Kasda
- Router Marshall Electronics
- Router Blackmagic Design
- Router ATen
- Router RGBlink
- Router RAVPower
- Router Hawking Technologies
- Router Kopul
- Router Nexxt
- Router Kraun
- Router LTS
- Router StarTech.com
- Router SPL
- Router Advantech
- Router Moxa
- Router Smart-AVI
- Router Eero
- Router Xantech
- Router Kramer
- Router KanexPro
- Router Intelix
- Router Blustream
- Router ModeCom
- Router Vimar
- Router Ocean Matrix
- Router Sixnet
- Router AVPro Edge
- Router Cudy
- Router F-Secure
- Router Digicom
- Router Sabrent
- Router AVMATRIX
- Router Readynet
- Router OneAccess
- Router Accelerated
- Router Nexaira
- Router FSR
- Router Alfatron
- Router Key Digital
- Router Cambium Networks
- Router Avenview
- Router BZBGear
- Router WyreStorm
- Router Rocstor
- Router Ruckus Wireless
- Router Mach Power
- Router MuxLab
- Router StarIink
- Router EXSYS
- Router Premiertek
- Router Bea-fon
- Router GL.iNet
- Router A-NeuVideo
- Router Shinybow
- Router Edgewater
- Router Atlantis Land
- Router Lantronix
- Router Lumantek
- Router Keenetic
- Router Starlink
- Router Keewifi
- Router Milesight
- Router PulseAudio
- Router Comprehensive
- Router Digitalinx
- Router Luxul
- Router DVDO
- Router Silentwind
- Router Keezel
- Router VigilLink
- Router Digital Forecast
Nieuwste handleidingen voor Router

29 Maart 2025
25 Februari 2025
20 Februari 2025
20 Februari 2025
20 Februari 2025
20 Februari 2025

20 Februari 2025

19 Februari 2025
12 Februari 2025
12 Februari 2025