Asus Eee PC 1000HE Handleiding
Lees hieronder de 📖 handleiding in het Nederlandse voor Asus Eee PC 1000HE (86 pagina's) in de categorie Laptop. Deze handleiding was nuttig voor 46 personen en werd door 2 gebruikers gemiddeld met 4.5 sterren beoordeeld
Pagina 1/86
Eee PC User’s Manual
Windows® XP Edition
Eee PC 1000 Series
Eee PC 904 Series
Eee PC 901 Series
E4478
15G06Q034201
January 2009

ii
Table of Contents
Table of Contents
Chapter 1: Introducing the Eee PC
About This User’s Manual ............................................................................ 1-2
Notes for This Manual ................................................................................... 1-3
Safety Precautions ......................................................................................... 1-4
Transportation Precautions ...................................................................... 1-6
Charging Your Batteries .............................................................................. 1-6
Airplane Precautions ................................................................................... 1-6
Preparing your Eee PC .................................................................................. 1-7
Chapter 2: Knowing the Parts
Top Side ............................................................................................................. 2-2
Bottom Side ...................................................................................................... 2-6
Right Side .......................................................................................................... 2-8
Left Side ...........................................................................................................2-10
Rear Side ..........................................................................................................2-11
Chapter 3: Getting Started
Power System .................................................................................................. 3-2
Using AC Power ............................................................................................. 3-2
Using Battery Power .................................................................................... 3-3
Battery Care .................................................................................................... 3-4
Power Mode ................................................................................................... 3-4
Emergency Shutdown & Reset ................................................................ 3-5
Touchpad Usage ............................................................................................. 3-6
Single-finger gesture input ....................................................................... 3-6
Multi-finger gesture input ......................................................................... 3-8
Keyboard Usage .............................................................................................. 3-9
Special Function Keys ................................................................................. 3-9
First-time Startup .........................................................................................3-14
Desktop ............................................................................................................3-17
ASUS EeePC Tray Utility ..............................................................................3-18
Enabling and Disabling Devices ............................................................3-18
Adjusting the display resolution ...........................................................3-19
Shutdown........................................................................................................3-20

ASUS Eee PC
iii
Table of Contents
Chapter 4: Using the Eee PC
Network Connection ..................................................................................... 4-2
Configuring a wireless network connection ....................................... 4-2
Configuring a network connection ........................................................ 4-4
Browsing web pages .................................................................................4-10
ASUS Update ..................................................................................................4-11
Updating the BIOS through the Internet ...........................................4-11
Updating the BIOS through a BIOS file ...............................................4-13
Bluetooth Connection(on selected models) ......................................4-14
ASUS Instant Key ..........................................................................................4-16
Super Hybrid Engine ...................................................................................4-17
Super Hybrid Engine Modes ...................................................................4-17
Eee Storage .....................................................................................................4-18
Video Conferencing.....................................................................................4-20
Chapter 5: Support DVD &System Recovery
Support DVD information ........................................................................... 5-2
Running the support DVD ......................................................................... 5-2
Drivers menu .................................................................................................. 5-2
Utilities menu ................................................................................................. 5-3
Contact ........................................................................................................... 5-4
Other information ........................................................................................ 5-4
System Recovery ............................................................................................ 5-5
Using the Support DVD .............................................................................. 5-5
Using Hard Disk Partition ........................................................................... 5-7
Boot Booster .................................................................................................... 5-8
Appendix
Declarations and Safety Statements .......................................................A-2
Federal Communications Commission Statement ...........................A-2
FCC Radio Frequency (RF) Exposure Caution Statement ...............A-3
Declaration of Conformity(R&TTE directive 1999/5/EC) .................A-4
CE Mark Warning ...........................................................................................A-4
IC Radiation Exposure Statement for Canada ....................................A-4
Wireless Operation Channel for Different Domains .........................A-6

iv
Table of Contents
France Restricted Wireless Frequency Bands .....................................A-6
UL Safety Notices ..........................................................................................A-8
Power Safety Requirement .......................................................................A-9
Nordic Lithium Cautions (for lithium-ion batteries) ...................... A-10
Copyright Information .............................................................................. A-12
Limitation of Liability ................................................................................. A-13
Service and Support ................................................................................... A-13

About This User’s Manual
Notes for This Manual
Safety Precautions
Preparing Your Eee PC
1
Introducing
the Eee PC

1-2
Chapter 1: Introducing the Eee PC
About This User’s Manual
You are reading the Eee PC User’s Manual. This User’s Manual
provides information regarding the various components in the Eee
PC and how to use them. The following are major sections of this
User’s Manual:
1. Introducing the Eee PC
Introduces the Eee PC and this User’s Manual.
2. Knowing the Parts
Provides information on the Eee PC’s components.
3. Getting Started
Provides information on getting started with the Eee PC.
4. Using the Eee PC
Provides information on using the Eee PC’s utilities.
5. System Recovery
Gives you information on system recovery.
6. Appendix
Gives you safety statements.
The actual bundled applications differ by models and territories.
There may be differences between your Eee PC and the pictures
shown in this manual. Please accept your Eee PC as being correct.

1-4
Chapter 1: Introducing the Eee PC
Safety Precautions
The following safety precautions will increase the life of the Eee PC.
Follow all precautions and instructions. Except as described in this
manual, refer all servicing to qualified personnel.
Battery safety warning:
DO NOT throw the
battery in fire. DO NOT
short circuit the contacts.
DO NOT disassemble the
battery.
DO NOT leave the Eee PC
on your lap or any part
of the body to prevent
discomfort or injury from
heat exposure.
DO NOT expose to dirty
or dusty environments.
DO NOT operate during a
gas leak.
DO NOT expose to
strong magnetic or
electrical fields.
DO NOT expose to or
use near liquids, rain,
or moisture. DO NOT
use the modem during
electrical storms.
DO NOT press or touch
the display panel. DO NOT
place together with small
items that may scratch or
enter the Eee PC.
DO NOT place on
uneven or unstable work
surfaces. Seek servicing
if the casing has been
damaged.
DO NOT place or drop
objects on top and do
not shove any foreign
objects into the Eee PC.
Disconnect the AC power and remove the battery pack(s)
before cleaning. Wipe the Eee PC using a clean cellulose sponge
or chamois cloth dampened with a solution of nonabrasive
detergent and a few drops of warm water and remove any extra
moisture with a dry cloth.

ASUS Eee PC
1-5
SAFE TEMP: This Eee PC
should only be used
in environments with
ambient temperatures
between 5°C (41°F) and
35°C (95°F)
DO NOT carry or
cover an Eee PC that
is powered ON with
any materials that will
reduce air circulation
such as a carrying bag.
DO NOT throw the Eee PC in municipal waste. This product
has been designed to enable proper reuse of parts and
recycling. The symbol of the crossed out wheeled bin
indicates that the product (electrical, electronic equipment
and mercury-containing button cell battery) should not
be placed in municipal waste. Check local regulations for
disposal of electronic products.
DO NOT throw the battery in municipal waste. The symbol
of the crossed out wheeled bin indicates that the battery
should not be placed in municipal waste.
INPUT RATING: Refer to
the rating label on the
bottom of the Eee PC
and be sure that your
power adapter complies
with the rating.
Incorrect installation
of battery may cause
explosion and damage
the Eee PC.
DO NOT use damaged
power cords, accessories,
or other peripherals.
DO NOT use strong
solvents such as
thinners, benzene, or
other chemicals on or
near the surface.

1-6
Chapter 1: Introducing the Eee PC
Transportation Precautions
To prepare the Eee PC for transport, you should close the display
panel to protect the keyboard and display panel.
The Eee PC’s surface is easily dulled if not properly cared for. Be
careful not to rub or scrape surfaces when transporting your Eee PC.
You can put your Eee PC in a carrying case for protection from dirt,
water, shock, and scratches.
Charging Your Batteries
If you intend to use battery power, be sure to fully charge your
battery pack and any optional battery packs before going on long
trips. Remember that the power adapter charges the battery pack as
long as it is plugged into the computer and an AC power source. Be
aware that it takes much longer to charge the battery pack when the
Eee PC is in use.
Airplane Precautions
Contact your airline if you want to use the Eee PC on the airplane.
Most airlines have restrictions for using electronic devices. Most
airlines allow electronic use only between and not during takeoffs
and landings.
There are three main types of airport security devices: X-ray
machines (used on items placed on conveyor belts), magnetic
detectors (used on people walking through security checks),
and magnetic wands (hand-held devices used on people or
individual items). You can send your Eee PC and diskettes
through airport X-ray machines. However, it is recommended
that you do not send your Eee PC or diskettes through airport
magnetic detectors or expose them to magnetic wands.
For the model that comes with a hard disk drive, you should
turn it OFF and disconnect all external peripherals to prevent
damage to the connectors when you prepare for transport. The
hard disk drive’s head retracts when the power is turned OFF
to prevent scratching of the hard disk surface during transport.
Never transport it while the power is still ON.

ASUS Eee PC
1-7
Preparing your Eee PC
These are only quick instructions for using your Eee PC. Read the
following chapters for detailed information.
1. Install the battery pack
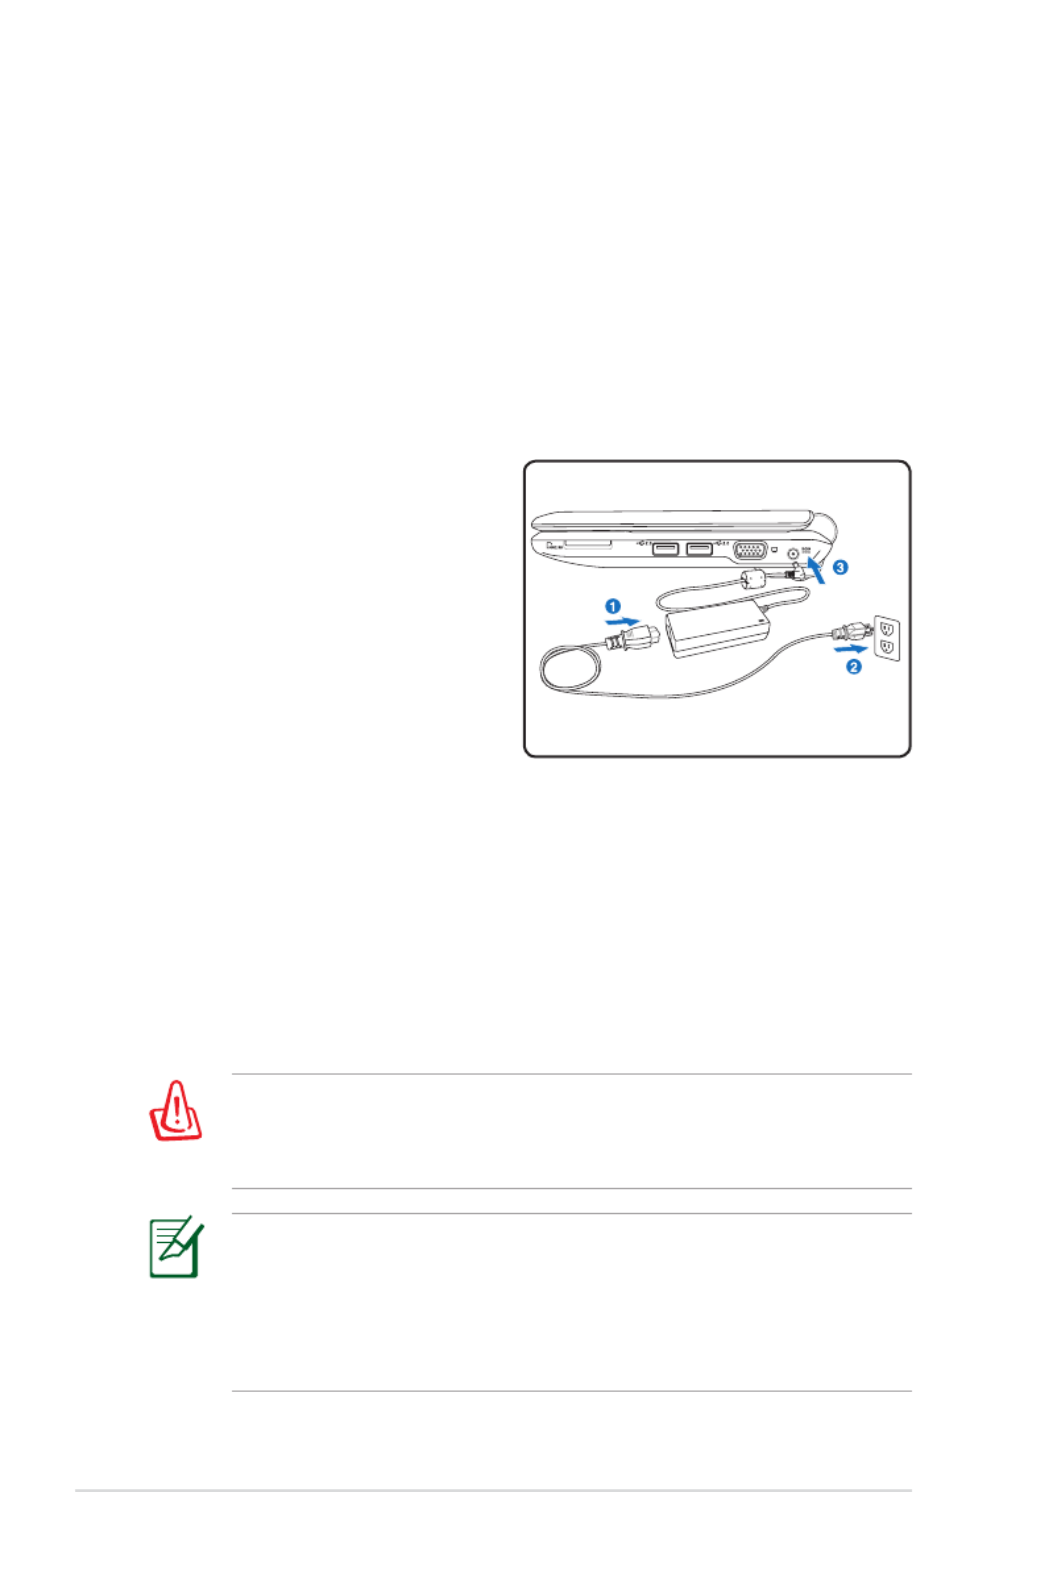
2. Connect the AC power adapter
Your Eee PC may come with either a two or three-prong plug
depending on territory. If a three-prong plug is provided, you
must use a grounded AC outlet or use a properly grounded
adapter to ensure safe operation of the Eee PC.
1
3
2

1-8
Chapter 1: Introducing the Eee PC
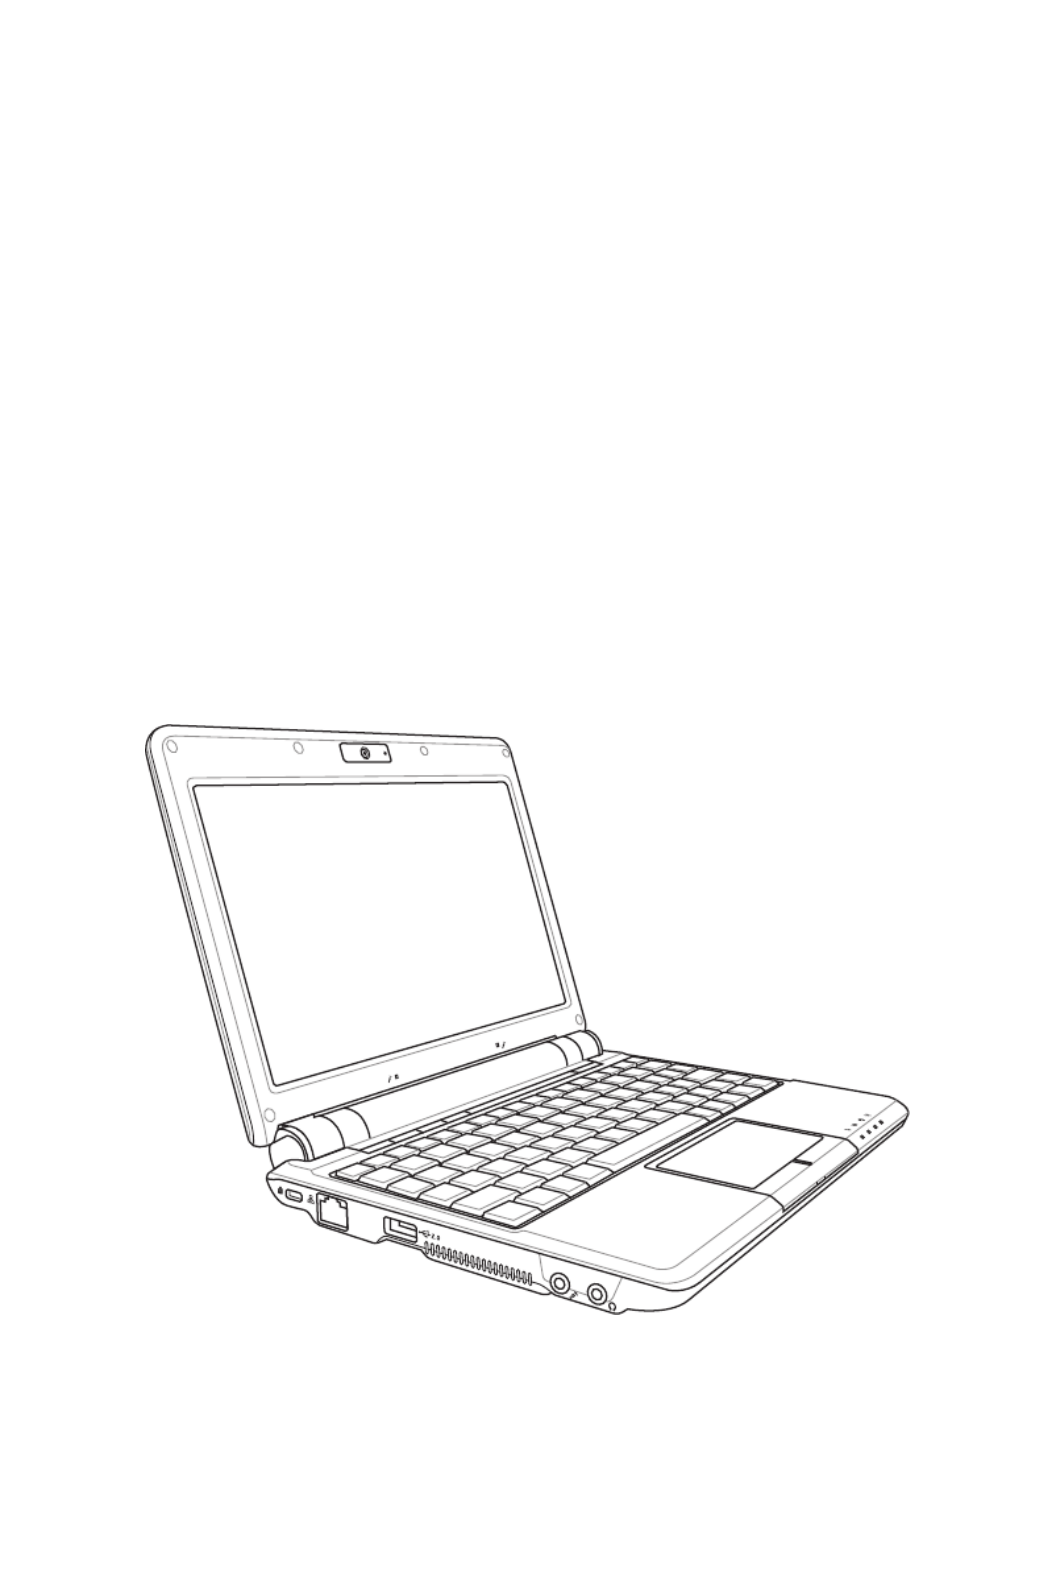
3. Open the display panel
4. Turn ON the Eee PC
When you open the display panel, do not force it down to the
table or else the hinges may break! Never lift the Eee PC by the
display panel!
1.3
MEGA
PIXELS

Top Side
Bottom Side
Right Side
Left Side
Rear Side
2
Knowing the Parts
2-2
Chapter 2: Knowing the Parts
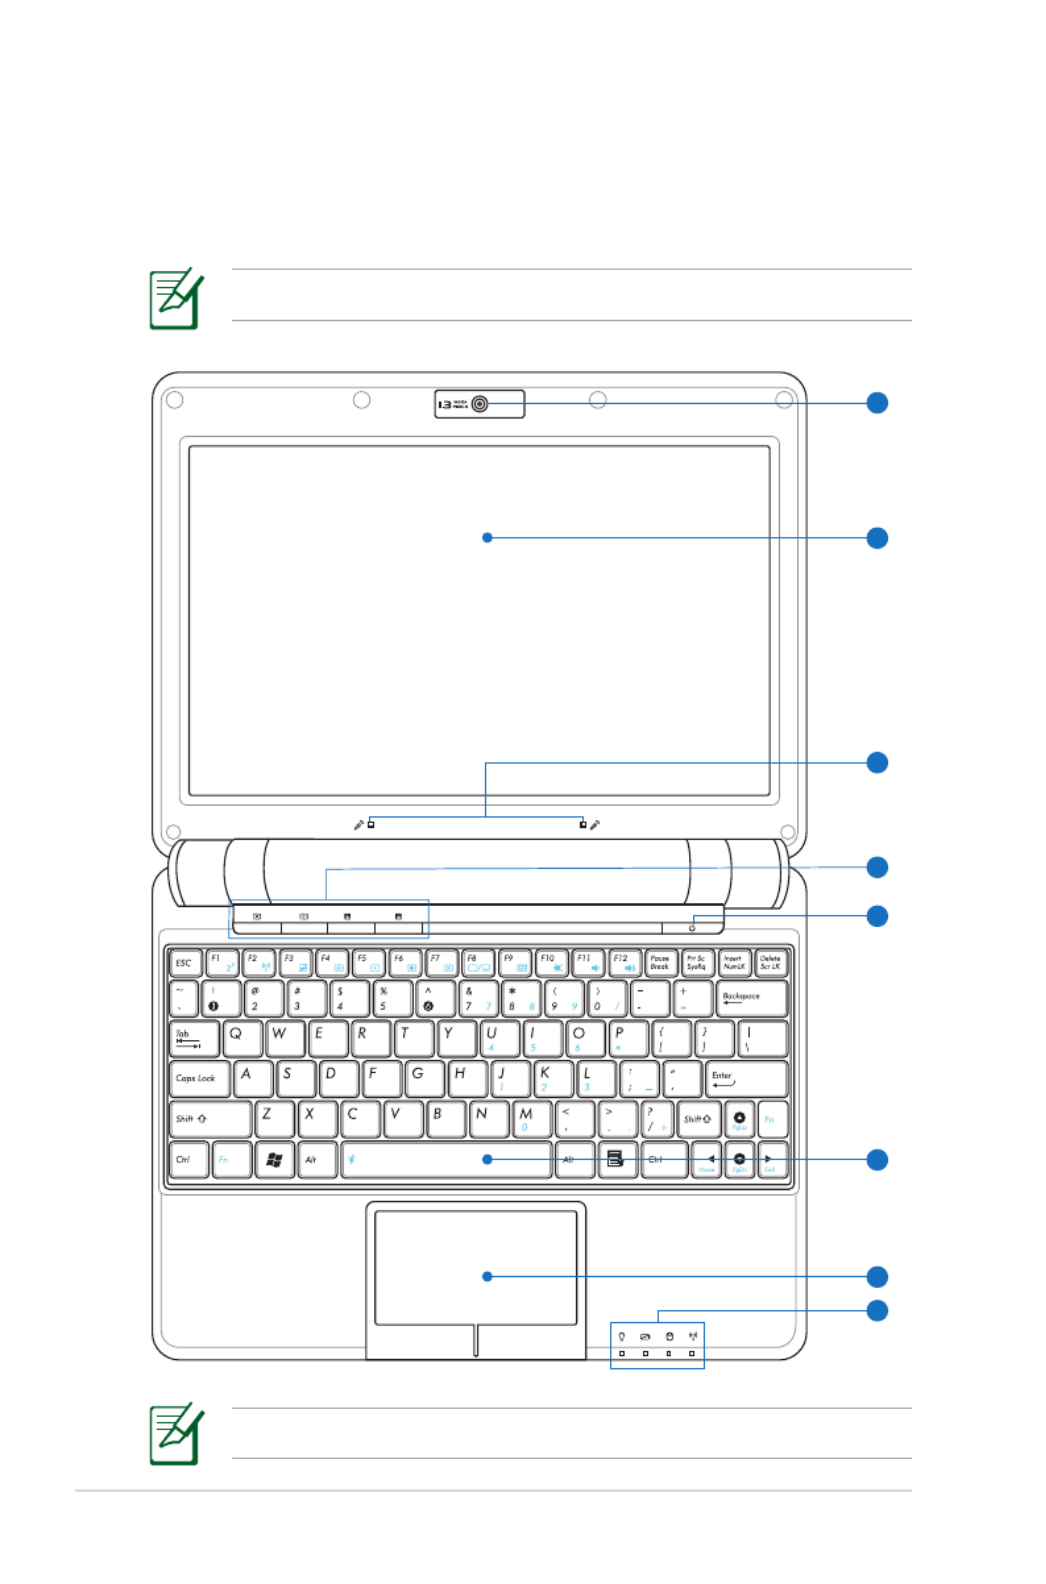
Top Side
Refer to the illustration below to identify the components on this
side of the Eee PC.
The keyboard differs for each territory.
2
3
1
6
7
5
8
4
The top side may vary in appearance depending on model.

ASUS Eee PC
2-3
Built-in Camera
The built-in camera allows picture taking or video
recording.
Display Panel
The display panel functions the same as a desktop monitor.
The Eee PC uses an active matrix TFT LCD, which provides
excellent viewing like that of desktop monitors. Unlike
desktop monitors, the LCD panel does not produce any
radiation or flickering, so it is easier on the eyes. Use a soft
cloth without chemical liquids (use plain water if necessary)
to clean the display panel.
Array Microphone (Built-in)
The built-in array microphone is more clear and echo-free
compared with traditional single microphones and can
be used for video conferencing, voice narrations, audio
recordings, and multimedia applications.
Instant Keys
Instant keys allow you to launch frequently used
applications with one push of a button.
1
2
3
4
Backlight Key
Pressing this key turns off the LCD monitor backlight.
Any action on the keyboard, mouse or touchpad will
activate monitor again.
Resolution Key
The Resolution key allows you to adjust display
resolution. Press this key repeatedly to switch
resolution.
User-defined Key
This key is reserved for customized definition. The
default definition is for Super Hybrid Engine function.

2-4
Chapter 2: Knowing the Parts
User-defined Key
This key is reserved for customized definition. The
default definition is for launching Skype.
Power Switch
The power switch allows powering ON and OFF the Eee PC
and recovering from STR. Press the switch once to turn ON
and hold it to turn OFF the Eee PC. The power switch only
works when the display panel is opened.
Keyboard
The keyboard provides keys with comfortable travel (depth
at which the keys can be depressed) and palm rest for both
hands.
Only models with built-in wireless LAN and Bluetooth supoort
the user-defined key for Skype.
5
6
7
The keyboard differs depending on model.
Touchpad and Buttons
The touchpad and its buttons comprises a pointing device
that provides the same functions as a desktop mouse.
Multi-finger gesture input is available to allow easy web
and document navigation.

ASUS Eee PC
2-5
8
Status Indicators (front)
Power Indicator
The power indicator lights when the Eee PC is turned ON
and blinks slowly when the Eee PC is in the Save-to-RAM
(Suspend) mode. This indicator is OFF when the Eee PC is
turned OFF.
Battery Charge Indicator
The battery charge indicator (LED) shows the status of the
battery’s power as follows:
Powered ON
AC Mode Battery Mode
Battery charge is
between 100%–80% Orange ON Green ON
Battery charge is
between 80%–10% Orange Blinking Slowly Green Blinking Slowly
Battery charge is
less than 10% Orange Blinking Quickly Green Blinking Quickly
Standby Mode / Powered OFF
AC Mode Battery Mode
Battery charge is
between 100%–80% Orange ON Off
Battery charge is
between 80%–10% Orange Blinking Slowly Off
Battery charge is
less than 10% Orange Blinking Quickly Off
The Battery Charge Indicator will not light when the battery is
removed from your Eee PC.
Solid-State disk (SSD)/Hard disk (HDD) Indicator
The solid-state disk drive/hard disk drive indicator blinks
when data is written to or read from the disk drive.
Wireless/Bluetooth Indicator
This is only applicable on models with built-in wireless
LAN/Bluetooth. When the built-in wireless LAN/Bluetooth is
enabled, this indicator lights.

2-6
Chapter 2: Knowing the Parts
Bottom Side
Refer to the illustration below to identify the components on this
side of the Eee PC.
The bottom side may vary in appearance depending on model.
The bottom of the Eee PC can get very hot. Be careful when
handling the Eee PC while it is in operation or recently been in
operation. High temperatures are normal during charging or
operation. DO NOT use on soft surfaces such as beds or sofas
,which may block the vents. DO NOT PUT THE Eee PC ON YOUR
LAP OR OTHER PARTS OF THE BODY TO AVOID INJURY FROM THE
HEAT.
12
21 3
4
5
6 6
Battery Lock - Spring
The spring battery lock keeps the battery pack secure.
When the battery pack is inserted, it will automatically lock.
When removing the battery pack, this spring lock must be
retained in the unlocked position.
1

2-8
Chapter 2: Knowing the Parts
Right Side
Refer to the illustration below to identify the components on this
side of the Eee PC.
1 2 3 4
Memory Card Slot
The built-in memory card reader can read MMC/SD cards
from devices such as digital cameras, MP3 players, mobile
phones, and PDAs.
2.0
USB Port (2.0/1.1)
The USB (Universal Serial Bus) port is compatible with USB
2.0 or USB 1.1 devices such as keyboards, pointing devices,
cameras, and storage devices, connected in a series up to
12Mbits/sec (USB 1.1) and 480Mbits/sec (USB 2.0). USB
allows many devices to run simultaneously on a single
computer, with some peripherals acting as additional
plug-in sites or hubs. Also, the USB supports hot-swapping
function.
Display (Monitor) Output
The 15-pin D-sub monitor port supports a standard VGA-
compatible device such as a monitor or projector to allow
viewing on a larger external display.
1
2
3

ASUS Eee PC
2-9
4
Power (DC) Input
The supplied power adapter converts AC power to DC
power for use with this jack. Power supplied through this
jack supplies power to the Eee PC and charges the internal
battery pack. To prevent damage to the Eee PC and battery
pack, always use the supplied power adapter.
CAUTION: MAY BECOME WARM TO HOT WHEN IN USE. BE SURE
NOT TO COVER THE ADAPTER AND KEEP IT AWAY FROM YOUR
BODY.

2-10
Chapter 2: Knowing the Parts
21 3 4 5
Left Side
Refer to the illustration below to identify the components on this
side of the Eee PC.
Kensington® Lock Port
The Kensington® lock port allows the Eee PC to be secured
using Kensington®
compatible security products. These
security products usually include a metal cable and lock
that prevent the Eee PC to be removed from a fixed object.
LAN Port
The eight-pin RJ-45 LAN port (10/100M bit) supports a
standard Ethernet cable for connection to a local network.
The built-in connector allows convenient use without
additional adapters.
2.0
USB Port (2.0/1.1)
The USB (Universal Serial Bus) port is compatible with USB
2.0 or USB 1.1 devices such as keyboards, pointing devices,
cameras, and storage devices, connected in a series up to
12Mbits/sec (USB 1.1) and 480Mbits/sec (USB 2.0). USB
allows many devices to run simultaneously on a single
computer, with some peripherals acting as additional plug-
in sites or hubs. Also, it supports hot-swapping function.
Microphone Jack
The microphone jack is designed to connect the
microphone used for Skype, voice narrations, or simple
audio recordings.
1
2
3
4

ASUS Eee PC
2-11
Headphone Output Jack
The 1/8” stereo headphone jack (3.55mm) connects the Eee
PC’s audio out signal to amplified speakers or headphones.
Using this jack automatically disables the built-in speakers.
5
Rear Side
Refer to the illustration below to identify the components on this
side of the Eee PC.
1
Battery Pack
The battery pack is automatically charged when connected
to an AC power source and maintains power to the Eee PC
when AC power is not connected. This allows use when
moving temporarily between locations. Battery time
varies by usage and by the specifications for this Eee PC.
The battery pack cannot be disassembled and must be
purchased as a single unit.
1

2-12
Chapter 2: Knowing the Parts

Power System
Touchpad Usage
Keyboard Usage
First Run Wizard
Operating Mode
Shutdown
3
Getting Started
3-2
Chapter 3: Getting Started
This Eee PC may come with either a two or three-prong plug
depending on territory to fit your wall outlet. If a three-prong
plug is provided, you must use a grounded AC outlet or use a
properly grounded adapter to ensure safe operation of the Eee
PC.
THE POWER ADAPTER MAY BECOME WARM TO HOT WHEN IN
USE. BE SURE NOT TO COVER THE ADAPTER AND KEEP IT AWAY
FROM YOUR BODY.
Power System
Using AC Power
The Eee PC power comprises two parts, the power adapter and
the battery power system. The power adapter converts AC power
from a wall outlet to the DC power required by the Eee PC. Your Eee
PC comes with a universal AC-DC adapter for connection to any
100V-120V as well as 220V-240V outlets without setting switches or
using power converters. Different countries may require an adapter
to connect the provided US-
standard AC power cord to a
different standard. Most hotels
will provide universal outlets to
support different power cords as
well as voltages. It is always best
to ask an experienced traveler
about AC outlet voltages before
travelling.
With the AC power cord connected to the AC-DC converter, connect
the AC power cord to an AC outlet (preferably with surge-protection)
and then connect the DC plug to the Eee PC. Connecting the AC-DC
adapter to the AC outlet first allows you to test the AC outlet’s power
and the AC-DC converter itself for compatibility problems before
connecting the DC power to the Eee PC. The power indicator on the
adapter (if available) will light if the power is within accepted ranges.

ASUS Eee PC
3-3
Damage may occur if you use a different adapter to power the
Eee PC or use the Eee PC’s adapter to power other electrical
devices. If there is smoke, burning scent, or extreme heat coming
from the AC-DC adapter, seek servicing. Seek servicing if you
suspect a faulty AC-DC adapter. You may damage both your
battery pack(s) and the Eee PC with a faulty AC-DC adapter.
Never attempt to remove the battery pack while the Eee PC is
turned ON, as this may result in the loss of working data.
Using Battery Power
The Eee PC is designed to work with a removable battery pack. The
battery pack consists of a set of battery cells housed together. A fully
charged pack will provide several hours of battery life. Additional
battery packs are optional and can be purchased separately through
an Eee PC retailer.
Remember to fully charge the battery before first use and
whenever it is depleted to prolong battery life. The battery
reaches its maximum capacity after a few full charging and
discharging cycles.
Installing and Removing the Battery Pack
Your Eee PC may not have its battery pack installed. If not, use the
following procedures to install the battery pack.
To install the battery pack: To remove the battery pack:
1
3
2
Only use battery packs and power adapters supplied with this
Eee PC or specifically approved by the manufacturer or retailer
for use with this model or else damage may occur to the Eee PC.
1
2
3

3-4
Chapter 3: Getting Started
For safety reasons, DO NOT throw the battery in
fire, DO NOT short circuit the contacts, and DO NOT
disassemble the battery. If there is any abnormal
operation or damage to the battery pack caused
by impact, turn OFF the Eee PC and contact an
authorized service center.
Battery Care
The Eee PC’s battery pack, like all rechargeable batteries, has a limit
on the number times it can be recharged. The battery pack’s useful
life will depend on your environment temperature, humidity, and
how your Eee PC is used. It is ideal that the battery be used in a
temperature range between 5˚C and 35˚C (41˚F and 95˚F). You
must also take into account that the Eee PC’s internal temperature
is higher than the outside temperature. Any temperatures above or
below this range will shorten the life of the battery. But in any case,
the battery pack’s usage time will eventually decrease and a new
battery pack must be purchased from an authorized dealer for this
Eee PC. Because batteries also have a shelf life, it is not recommended
to buy extras for storing.
Power Mode
Your Eee PC is equipped with a smart power system. The power-
saving Battery mode lowers down the CPU frequency and decreases
the power consumption to maximize the battery life. The AC mode
enables the CPU to run at the full speed and to obtain the best
performance. When applying or removing the power adapter, the AC
mode and Battery mode will be shown on the display as a reminder.
Battery Mode AC Mode
ASUS Eee PC
3-5
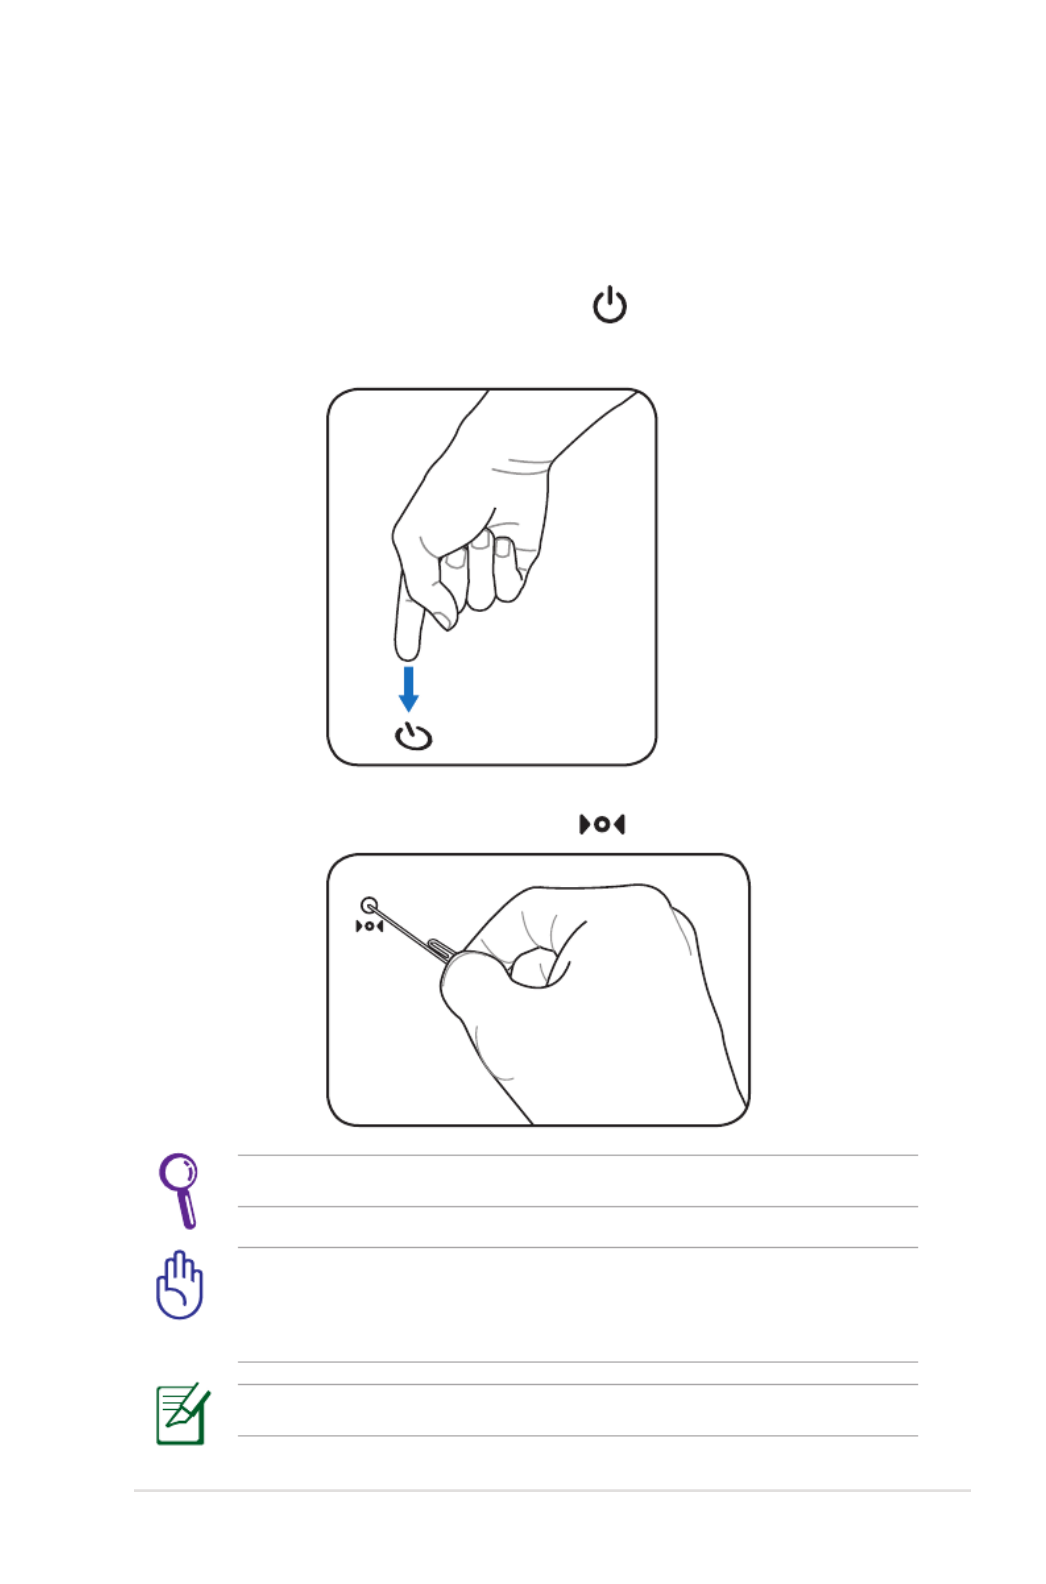
Emergency Shutdown & Reset
In case your operating system cannot properly turn OFF or restart,
there are additional ways to shutdown and reset your Eee PC:
Shutdown: Hold the power button until the system shuts
down.
DO NOT use emergency shutdown/reset while data is being
written or read; doing so can result in loss or destruction of your
data.
Use a pin or a straightened paper clip to press the reset button.
Reset: Press the reset button .
The reset button is available on selected models.

3-6
Chapter 3: Getting Started
Touchpad Usage
Single-finger gesture input
Clicking/Tapping - With the pointer over an item, press the left
button or use your fingertip to touch the touchpad lightly, keeping
your finger on the touchpad until the item is selected. The selected
item will change color. The following 2 illustrations produce the
same results.
Double-clicking/Double-tapping - This is a common skill for
launching a program directly from the corresponding icon you
select. Move the pointer over the icon you wish to execute, press the
left button or tap the pad twice in rapid succession, and the system
launches the corresponding program. If the interval between the
clicks or taps is too long, the operation will not be executed. The
following 2 illustrations produce the same results.

ASUS Eee PC
3-7
Dragging - Dragging means to pick up an item and place it
anywhere on the screen you wish. You can move the pointer over
the item you select, and while keeping the left button depressed,
moving the pointer to the desired location, then release the button.
Or, you can simply double-tap on the item and hold while dragging
the item with your fingertip. The following illustrations produce the
same results.

3-8
Chapter 3: Getting Started
Two-finger scrolling - Use two
fingertips to slide up or down on
the touchpad to scroll a window
up or down. If your display window
includes several sub-windows,
move the pointer on that pane
before scrolling.
Zoom in Zoom out
Multi-finger gesture input
Two-finger zooming in/out - Moving two fingertips apart or
together on the touchpad to zoom in or zoom out. This is convenient
when viewing photos or reading documents.
Finger gesture Applications
Two-finger zooming in/out OpenOffice Writer/Impress,
Adobe reader, Photomanager
Two-finger scrolling All
ASUS Eee PC
3-9
Keyboard Usage
Special Function Keys
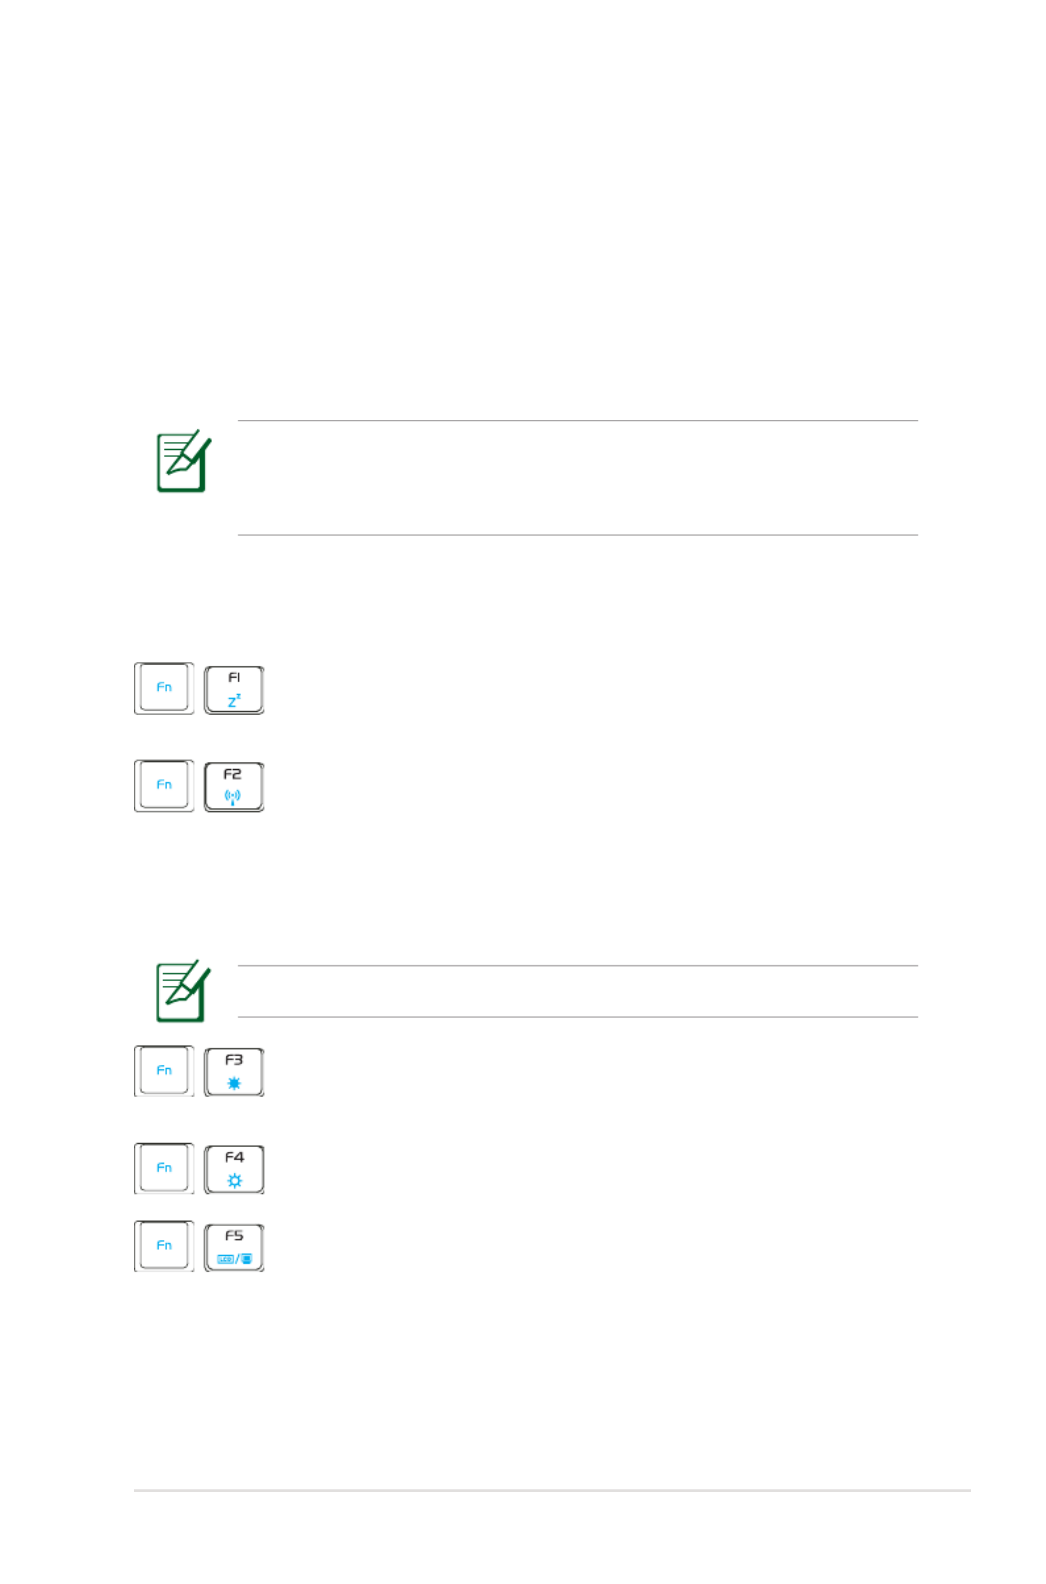
The following defines the colored hot keys on the Eee PC’s keyboard.
The colored commands can only be accessed by first pressing
and holding the function key while pressing a key with a colored
command. Some function icons appear in the Notification area after
activation.
The Hot Key locations on the function keys may vary depending
on model but the functions should remain the same. Follow the
icons whenever your hot key locations do not match the manual.
: Places the Eee PC in suspend mode zzZ Icon (F1)
(Save-to-RAM).
Radio Tower (F2): Wireless Models Only: Toggles
the internal wireless LAN or Bluetooth (on selected
models) ON or OFF with an on-screen-display.
When enabled, the corresponding wireless indicator
will light.
The default setting is WLAN ON / Bluetooth OFF.
): Decreases the display Sun Down Icon (F3
brightness.
: Increases the display brightness.Sun Up Icon (F4)
LCD/Monitor Icons (F5): Toggles between the Eee
PC’s LCD display and an external monitor in this
series: LCD Only -> CRT Only (External Monitor) ->
LCD + CRT Clone -> LCD + CRT Extend.
901 Series

3-10
Chapter 3: Getting Started
LCD + CRT Clone mode only supports a maximum resolution of
1024 x 600 pixels.
Set your Eee PC to High Performance Super Performance or
mode if you want to use a higher resolution with a connected
external monitor.
Connect an external monitor before booting up the Eee PC.
Task Manager Icon (F6): Initiates the Task Manager
to view the application process or terminates
applications.
Crossed Speaker Icon (F7): Mutes the speaker.
Speaker Down Icon (F8): Decreases speaker
volume.
Speaker Up Icon (F9): Increases the speaker
volume.
Num Lk (F11): Toggles the numeric keypad (number
lock) ON and OFF. Allows use of a larger portion
of the keyboard for number entering.
Toggles the “Scroll Lock” ON and Scr Lk (F12):
OFF. Allows you to use a larger portion of the
keyboard for cell navigation.
Toggles the “Print Screen” key to Prt Sc (Ins):
initiate screen capture utility to capture, save, or
print the contents of entire desktop.
Pg Up (↑): Press to scroll up in documents or the
web browser.
ASUS Eee PC
3-11
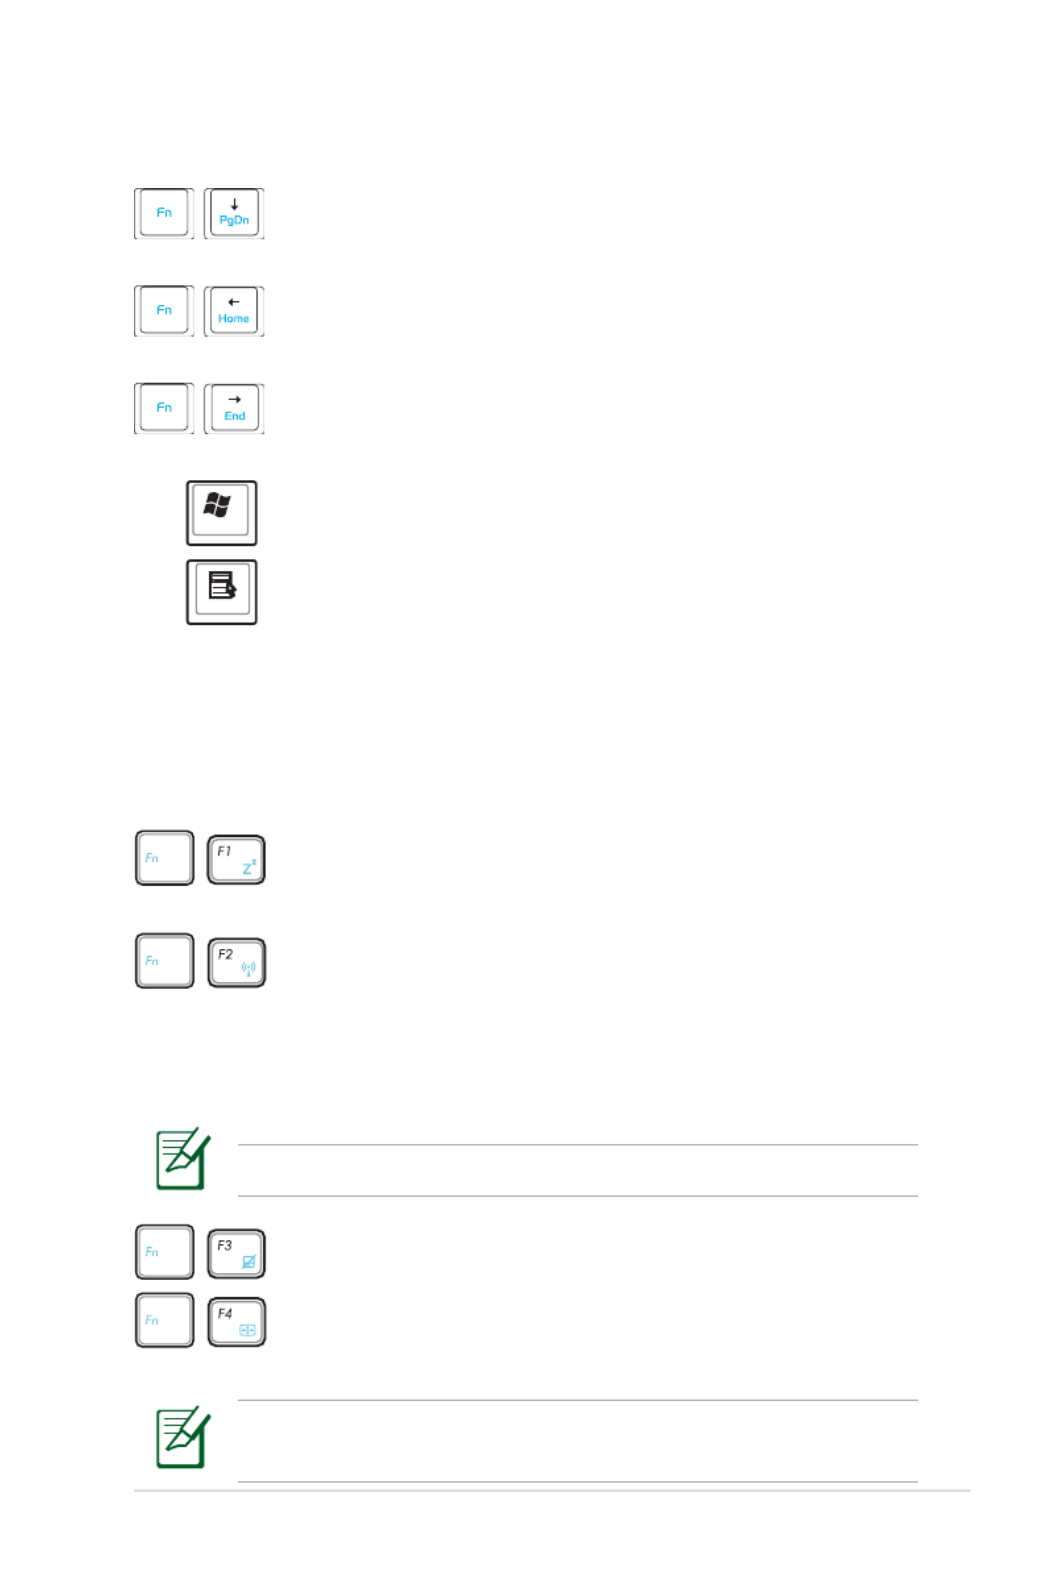
Pg Dn (
↓
): Press to scroll down in documents or the
web browser.
Home (
←
): Press to move the pointer to the
beginning of the line.
End (
→
): Press to move the pointer to the end of
the line.
Windows icon: Displays the start menu.
Activates the properties Menu with pointer icon :
menu and is equivalent to right-clicking the
touchpad/mouse on an object.
904 series / 1000 series
: Places the Eee PC in suspend mode zzZ Icon (F1)
(Save-to-RAM).
Radio Tower (F2): Wireless Models Only: Toggles
the internal wireless LAN or Bluetooth (on selected
models) ON or OFF with an on-screen-display.
When enabled, the corresponding wireless indicator
will light.
The default setting is WLAN ON / Bluetooth OFF.
Touchpad (F3): Toggles the touchpad ON/OFF.
): Press to adjust the Resolution Selection (F4
display resolution.
The Touchpad (<Fn> + <F3>) and Resolution Selection (<Fn> +
<F4>) functions are available on selected models.

ASUS Eee PC
3-13
Volume Up Icon (F12): Increases the speaker
volume.
Num Lk (Insert): Toggles the numeric keypad
(number lock) ON and OFF. Allows use of a larger
portion of the keyboard for number entering.
Toggles the “Scroll Lock” ON and Scr Lk (Delete):
OFF. Allows you to use a larger portion of the
keyboard for cell navigation.
Pg Up (↑): Press to scroll up in documents or the
web browser.
Pg Dn (
↓
): Press to scroll down in documents or the
web browser.
Home (
←
): Press to move the pointer to the
beginning of the line.
End (
→
): Press to move the pointer to the end of
the line.
Windows icon: Displays the start menu.
Activates the properties Menu with pointer icon :
menu and is equivalent to right-clicking the
touchpad/mouse on an object.
3-14
Chapter 3: Getting Started
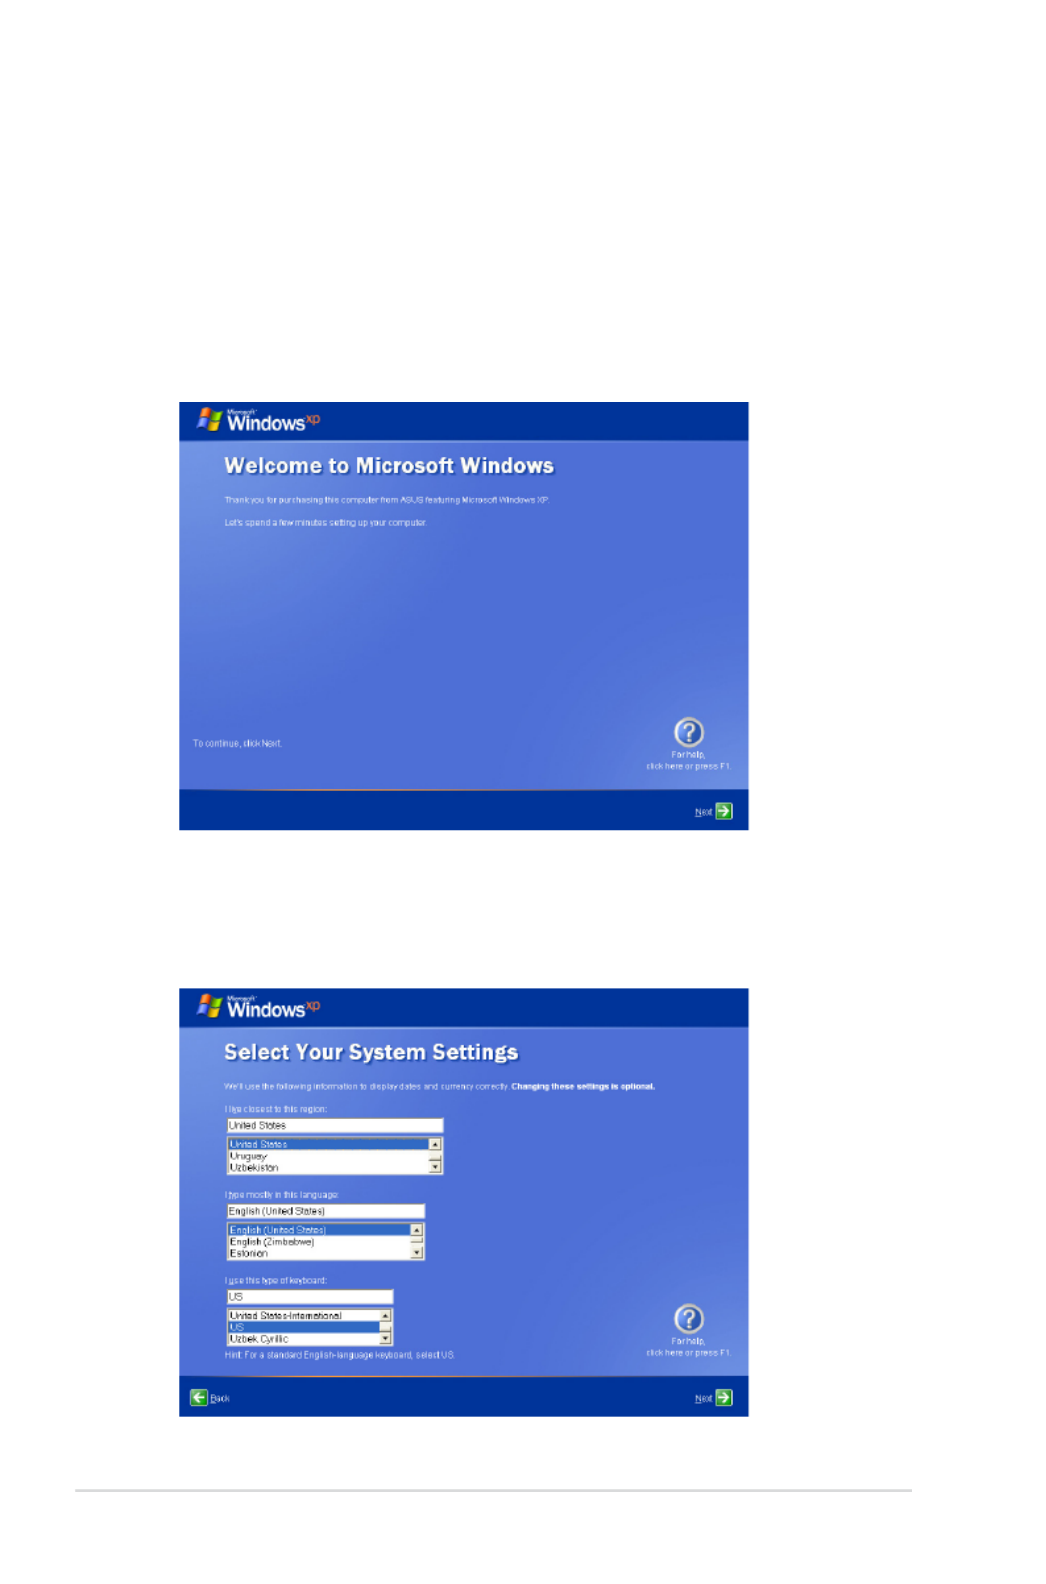
First-time Startup
For the first time you start your Eee PC, the Windows wizard
will launch automatically and lead you through setting up your
preferences and some basic information.
Follow the wizard instructions to finish the initialization:
1. The Welcome message appears. Click Next to continue.
2. Select you system settings by specifying the region you are in,
the language you use and the keyboard type you use. Click Next
to continue.

ASUS Eee PC
3-15
3 Select the time zone you are in and click to continue.Next
4. Read the end user license agreement and click Yes, I accept.
Click to continue.Next
3-16
Chapter 3: Getting Started
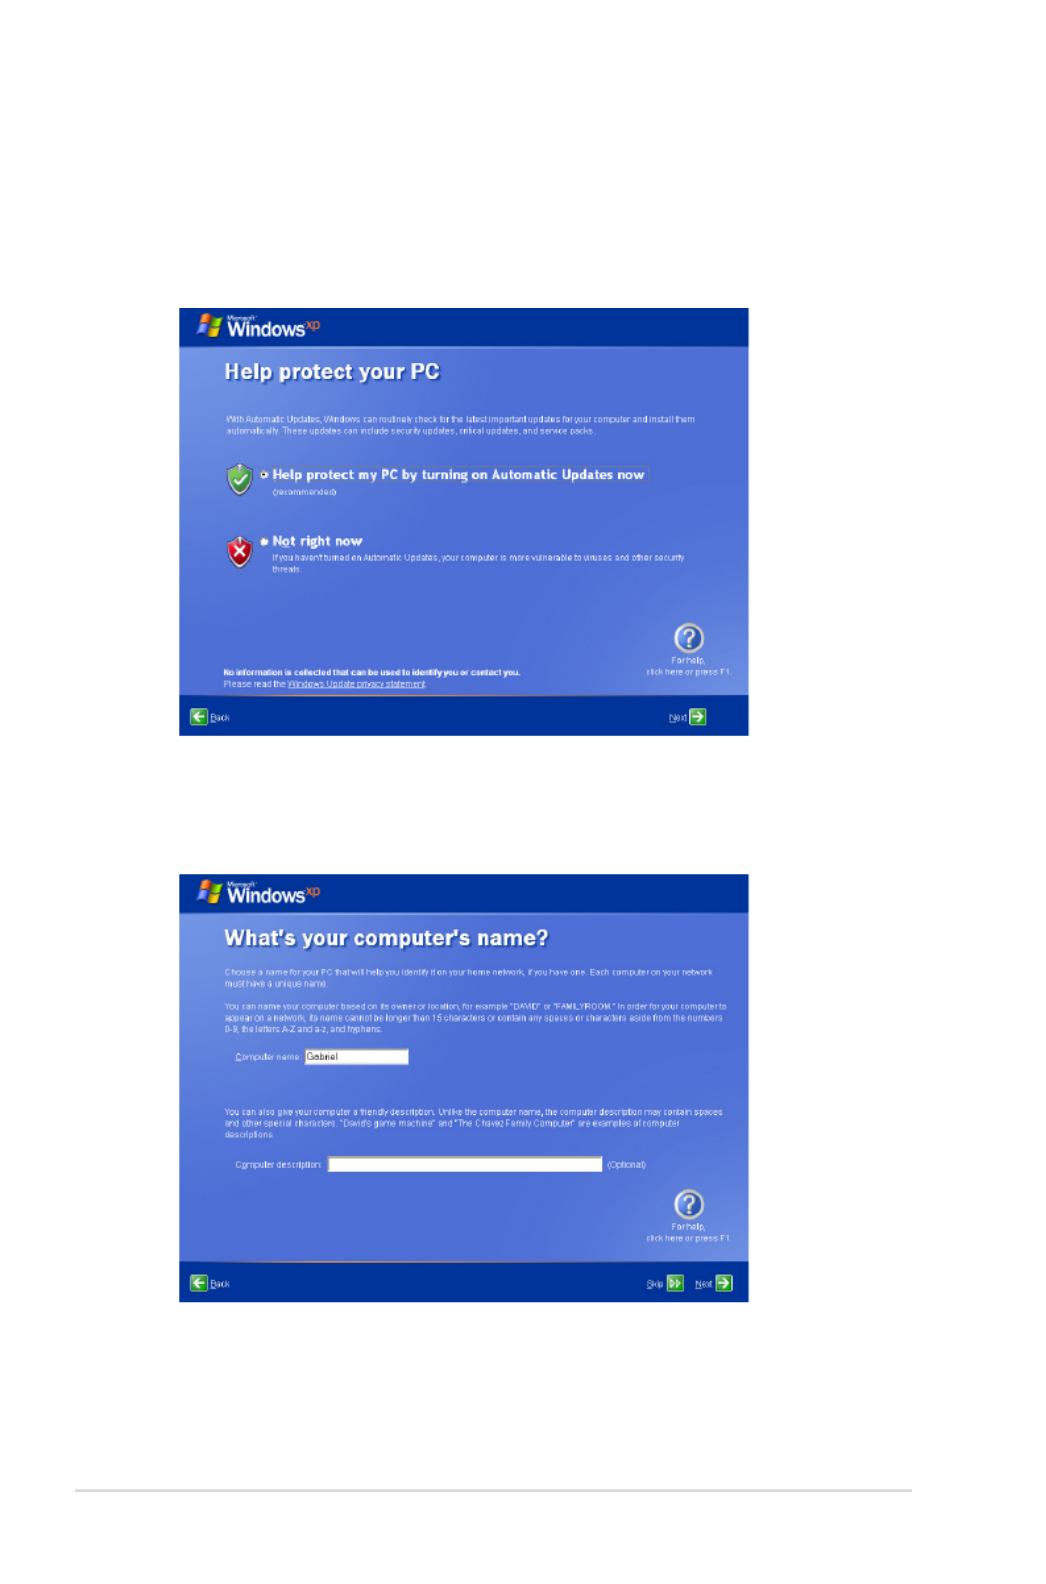
5. Click Help protect my PC by turning on Automatic Updates
now to get the latest important updates and click Next to
continue.
6. Type your computer’s name in the Computer name box and
click to continue.Next
7. Follow the onscreen instructions to register with Microsoft and
finish the initialization.

ASUS Eee PC
3-17
Desktop
The are several shortcuts on the desktop. Double-click them to
launch the corresponding applications and enter the specified
folders. Some applications would form minimized icons in the
Notification area.

3-18
Chapter 3: Getting Started
ASUS EeePC Tray Utility
The preloaded ASUS EeePC Tray utility allows you to turn off some
devices to minimize the power consumption and helps you adjust
the display resolution easily.
Enabling and Disabling Devices
To disable or enable devices
1. Right-click the ASUS EeePC Tray Utility icon in the Notification
area and the utility shows the available options:
Disable WLAN: Turns on and off the wireless LAN connection.
Disable Blue Tooth: Turns on and off the Bluetooth connection.
Disable Camera: Enable or disable the built-in camera.
2. Select an option to turn it on or off based on your needs. The
unavailable options are dimmed.
Bluetooth is available on selected models.

3-20
Chapter 3: Getting Started
Shutdown
Do the following instructions to turn down your Eee PC.
1. Click the button to display the start menu.start
2. Click Turn Off Computer.
1
2
3. Select Turn Off to power off your Eee PC.
3

Network Connection
ASUS Update
Bluetooth Connection (on selected models)
ASUS Instant Key
Super Hybrid Engine
Eee Storage
Video Conferencing
4
Using the Eee PC

4-2
Chapter 4: Using the Eee PC
Network Connection
Configuring a wireless network connection
1. Double-click the crossed wireless network icon in the
Notification area.
3. When connecting, you may
have to enter a password.
2. Select the wireless access
point you want to connect
to from the list and click
Connect to build the
connection.
If you cannot find the desired access point, click Refresh
network list in the left pane and search in the list again.
If the wireless connection icon does not show in the Notification
area. Activate the wireless LAN function by pressing
+
(<Fn> + <F2>) before configuring a wireless network connection.

ASUS Eee PC
4-3
4. After a connection has been
established, the connection
is shown on the list.
5. You can see the wireless
network icon in the
Notification area.
The wireless connection icon disappears when you Press
+
(<Fn> + <F2>) to disable the WLAN function.

4-4
Chapter 4: Using the Eee PC
Configuring a network connection
If you want to obtain network access, connect the network cable,
with RJ-45 connectors on each end, to the network port on the Eee
PC and the other end to a hub or switch. The illustration below is the
example of your Eee PC connected to a network hub or switch for
use with the built-in Ethernet controller. Connect to network before
enjoying all the network services and functions in Eee PC.
Using a dynamic IP:
1. Right-click the network
icon with a yellow
warning triangle in
the Notification area and
select Open Network
Connections.
Local Area Network
Network hub or switch
Network cable with RJ-45 connectors

ASUS Eee PC
4-5
3. Highlight Internet
Protocol(TCP/IP) and
click .Properties
4. Click Obtain an IP
address automatically
and click .OK
2. Right-click Local Area
Connection and select
Properties.

4-6
Chapter 4: Using the Eee PC
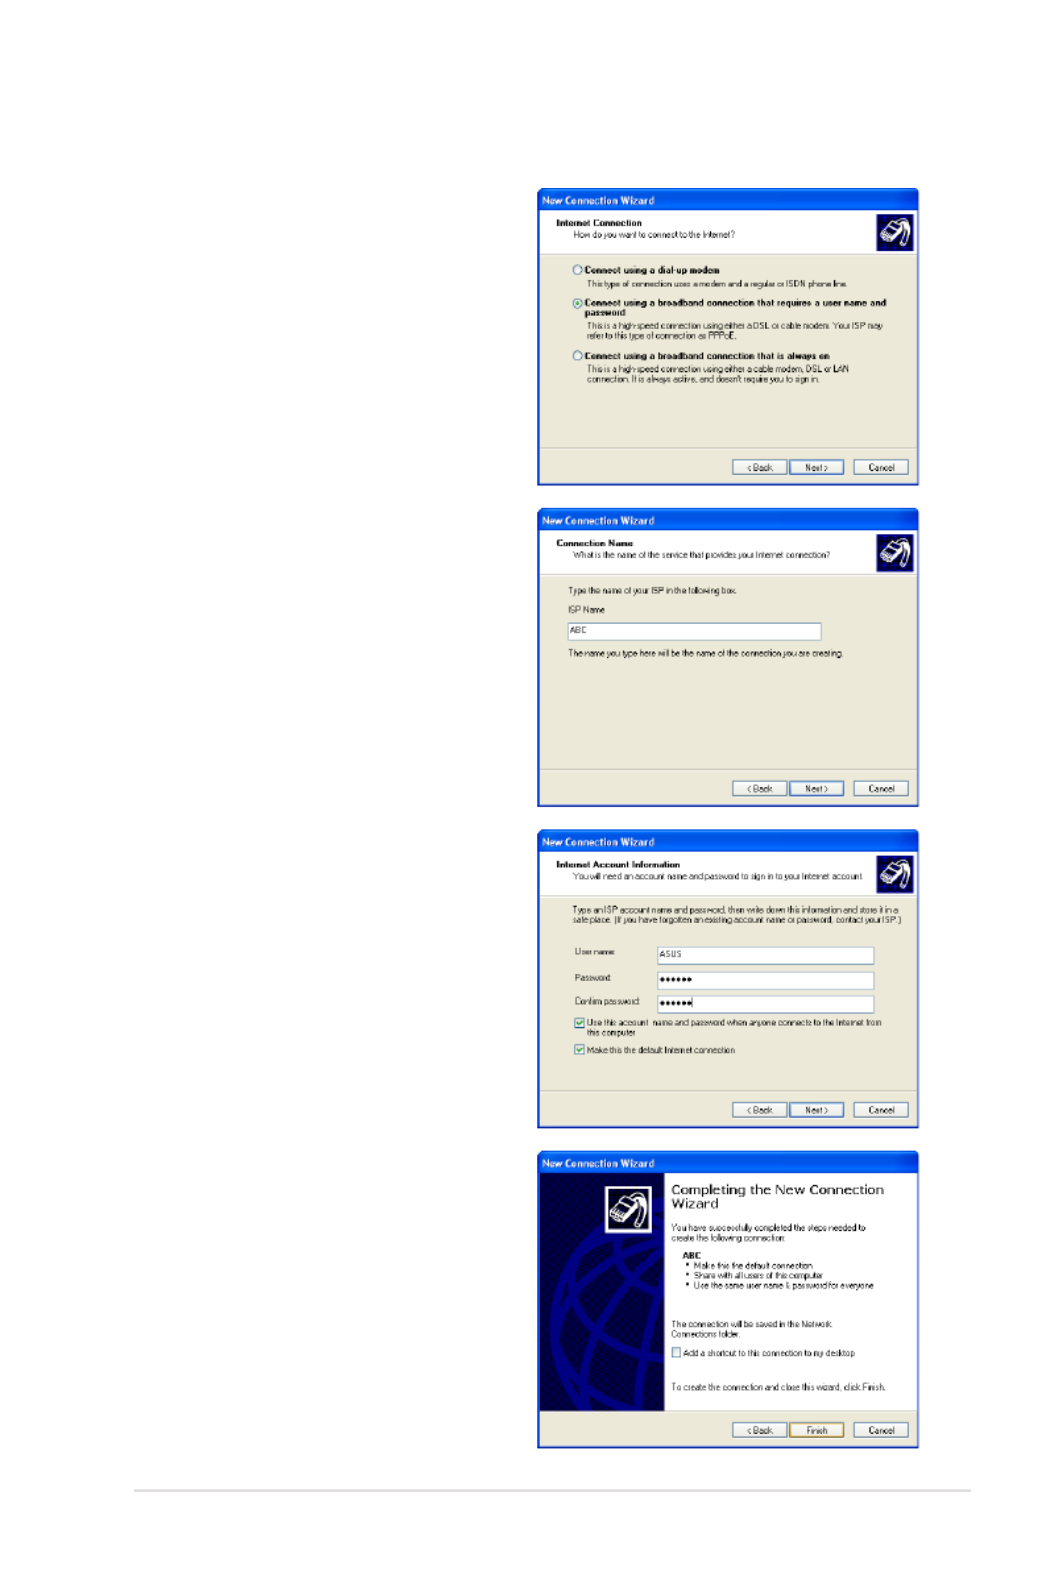
5. Click Create a new
connection to start the
New Connection Wizard.
6. Click .Next
7. Click Connect to the
Internet Next and click .
8. Click Set up my
connection manually.
ASUS Eee PC
4-7
9. Select your connection
type and click .Next
10. Enter your ISP Name and
click .Next
11. Enter your User name and
Password. Click Next.
12. Click Finish to finish the
configuration.

4-8
Chapter 4: Using the Eee PC
13. Enter your user name
and password. Click
Connect to connect to
the Internet.
Contact your Internet Service Provider (ISP) if you have problems
connecting to the network.

ASUS Eee PC
4-9
Using a static IP:
1. Repeat the step 1–3 of Using a dynamic IP to start the static
IP network configuration.
3. Enter the IP address, Subnet mask and Gateway from your
service provider.
4. If needed, enter the preferred DNS Server address and
alternative address.
5. After entering all the related values, click to build the OK
network connection.
2 Click Use the following
IP address.
Contact your Internet Service Provider (ISP) if you have
problems connecting to the network.
ASUS Eee PC
4-15
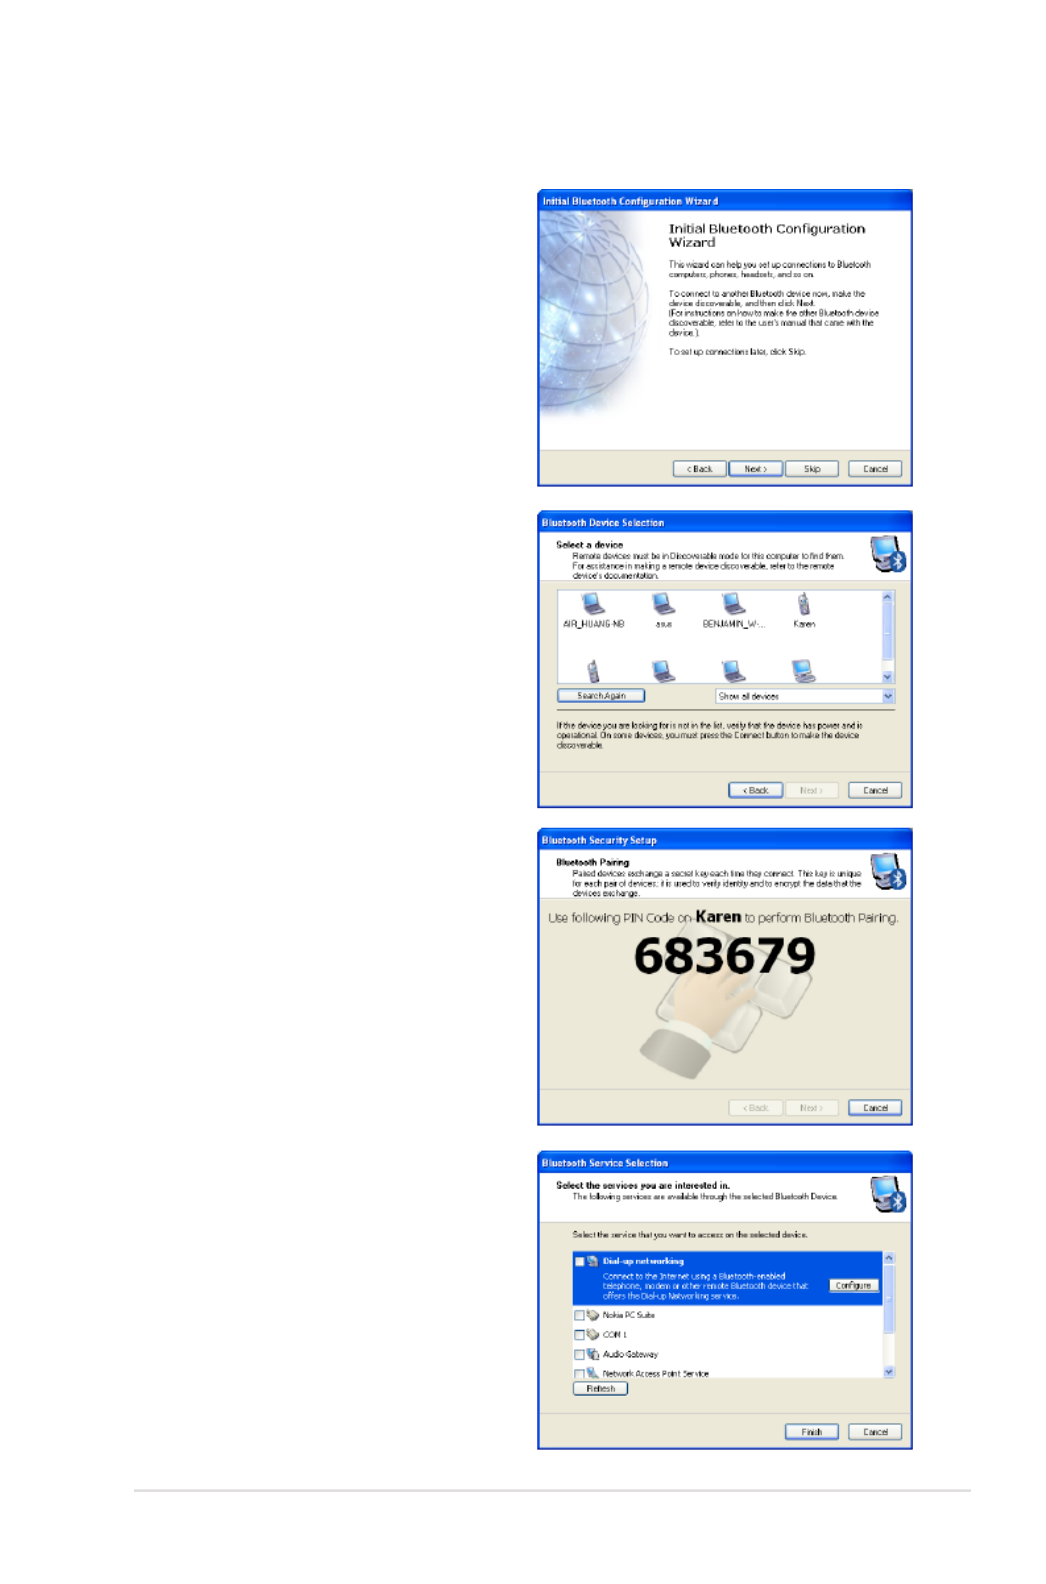
6. Click to start setting up Next
the Bluetooth connection.
7. Select a Bluetooth-enabled
device from the list and click
Next.
8. Enter the Bluetooth security
code and start pairing.
9. After the paired relationship
is built, select the service you
are interested in from the list
and click to use the Finish
selected service.

4-16
Chapter 4: Using the Eee PC
ASUS Instant Key
ASUS Instant Key allows you customized definitions to launch
frequently used applications with one touch of a button.
1. Click > > > > start All Programs ASUS EeePC ASUSInstantKey
> ASUSInstantKey.
3. Locate and select a preferred
application for the instant
key and click OK.
4. Click to finish the instant key setup and repeat the EXIT
previous steps to customize another instant key.
2. Click the button to Change
configure.
ASUS Eee PC
4-17
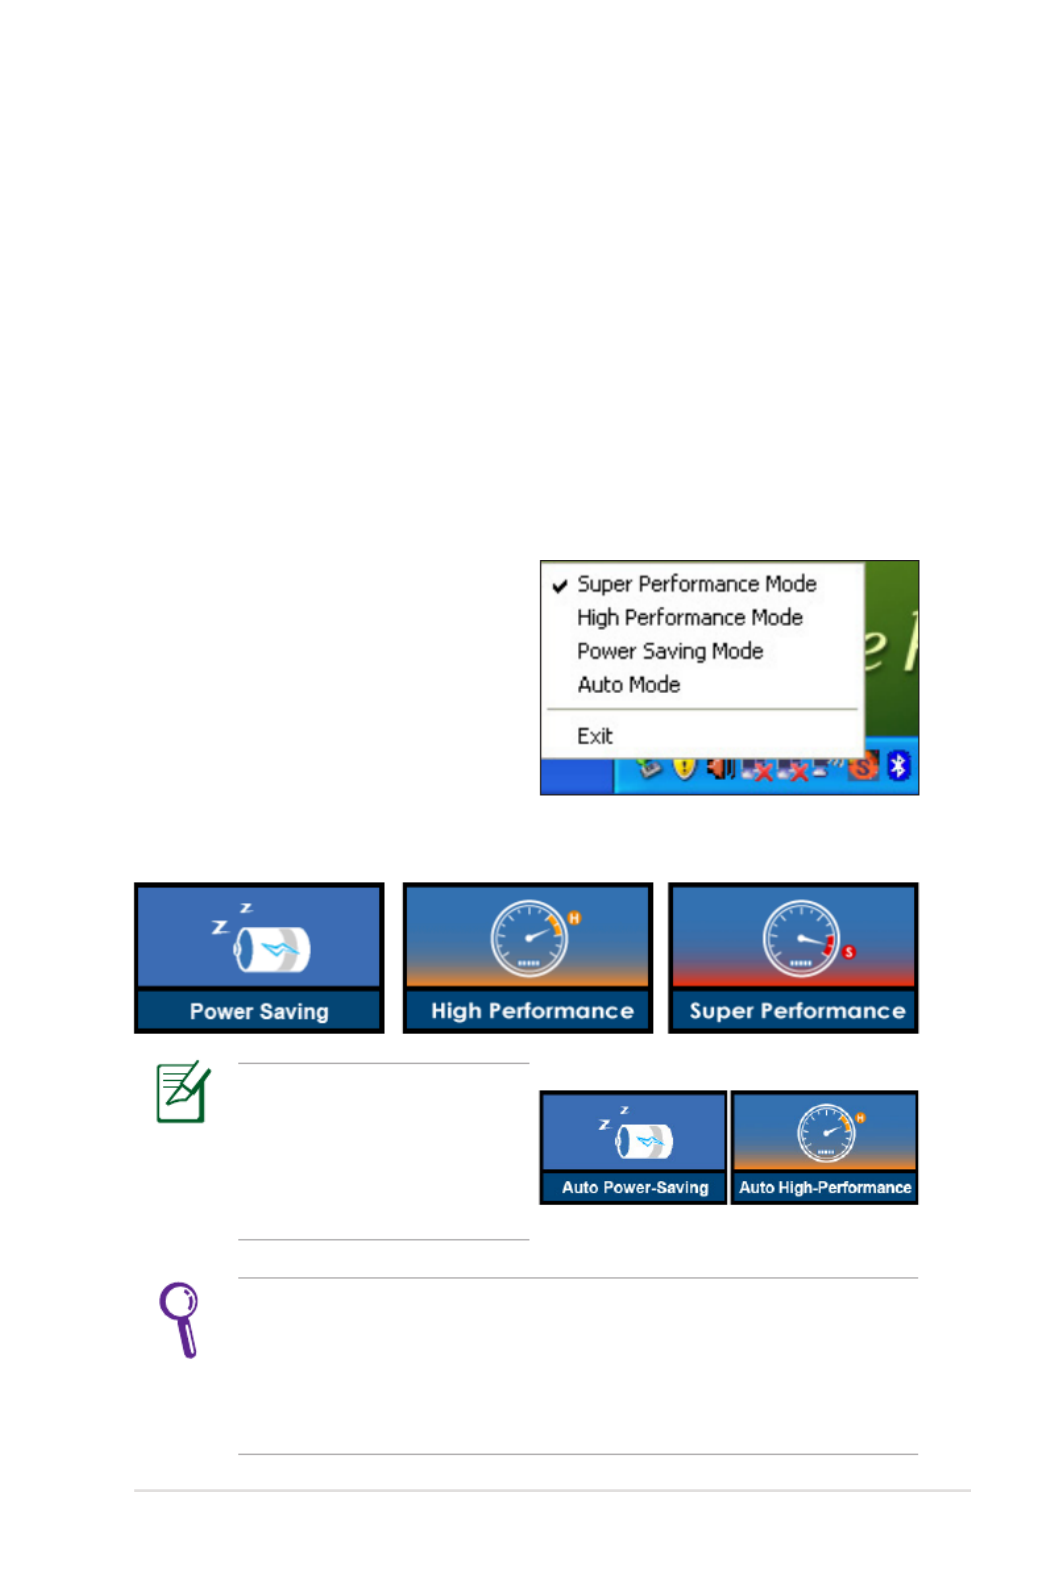
Super Hybrid Engine
Super Hybrid Engine offers different power modes. The assigned
instant key toggles power savings between various power saving
modes. The power saving modes control many aspects of your Eee
PC to maximize performance versus battery time. The selected mode
is shown on the display.
To change the power mode
• Click > > > > start All Programs ASUS EeePC
SuperHybridEngine SuperHybridEngine > .
• Press Instant Key 3 repeatedly to switch power modes.
• Right-click the Super Hybrid
Engine icon in the Notification
area, and select a preferred
power mode.
Super Hybrid Engine Modes
Auto High Performance
and Auto Power-Saving
mode are available only
when applying or removing
the power adapter.
If your external monitor functions abnormally in Power Saving
mode at a resolution of 1024 x 768 pixels or higher, press <Fn> +
<F5> repeatedly to switch the display mode to LCD Only LCD or
+ CRT Clone and reset the power mode to High Performance
or .Super Performance
4-18
Chapter 4: Using the Eee PC
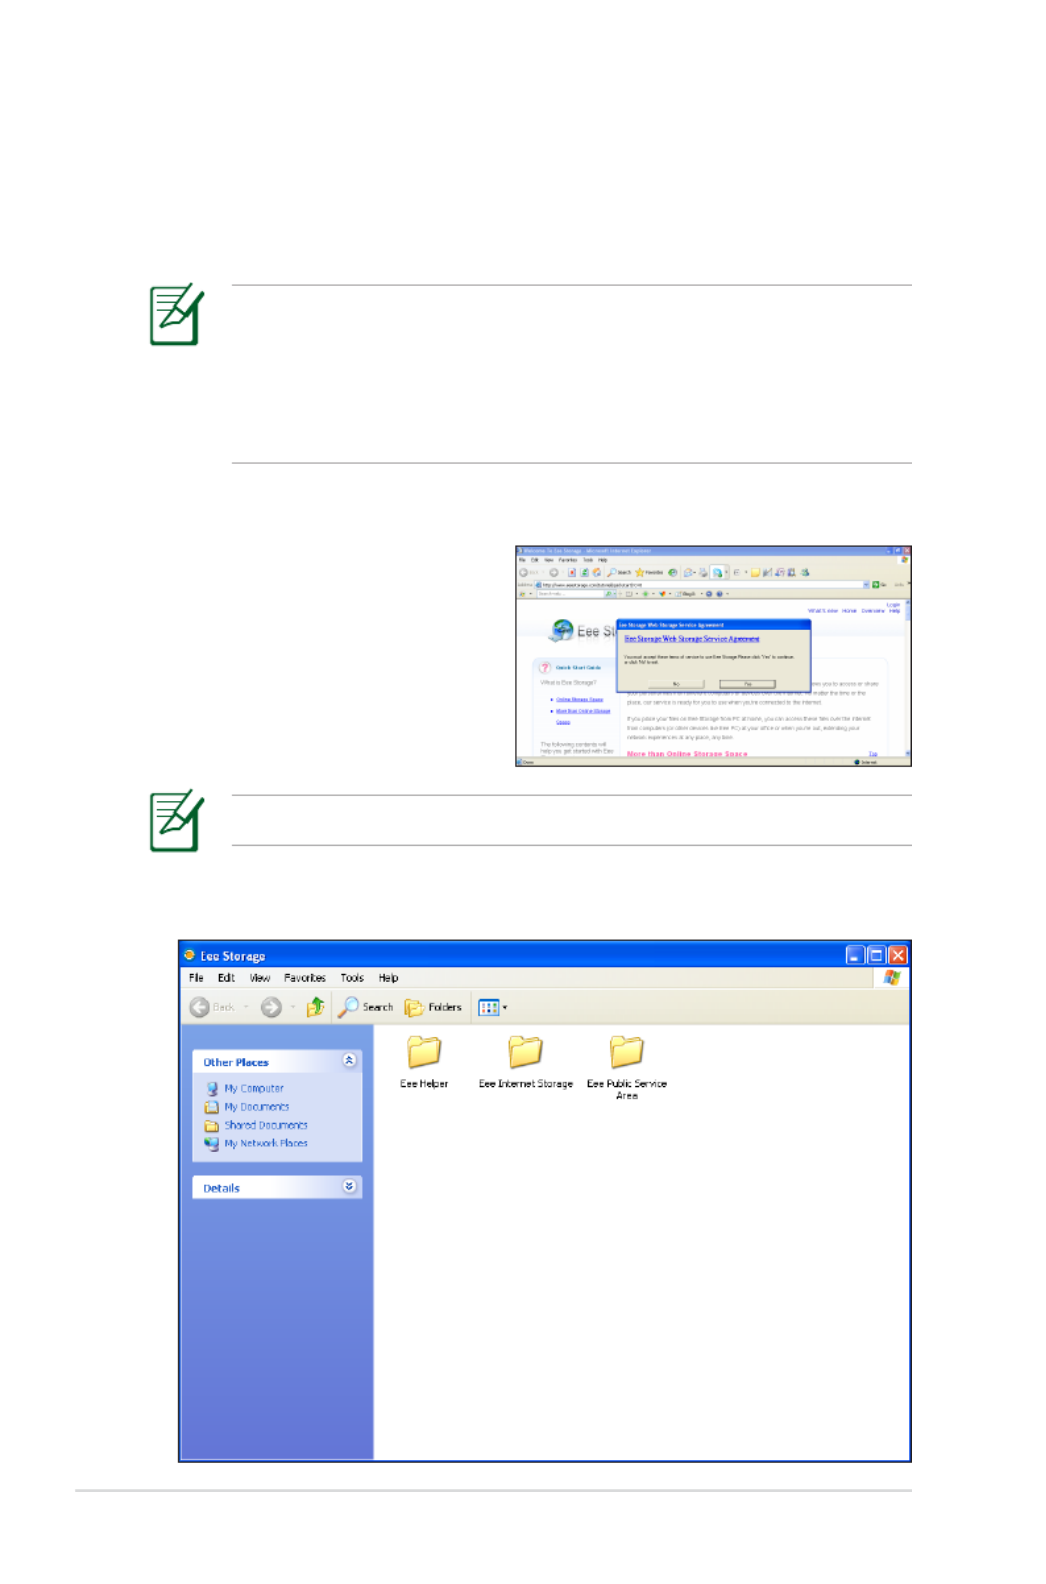
Eee Storage
Eee PC users can enjoy free online space. With Internet connection,
you can access and share any files whenever you want and wherever
you are.
Ensure that your Eee PC is connected to the Internet.
To use Eee Storage
1. Double-click the Eee
Storage shortcut on the
desktop, and read the
service agreement before
clicking Yes to continue.
The content of the free service provided to you is subject to Eee
Storage Web Hard Drive Service Agreement on Eee Storage
official website. Eee Storage reserves the rights to modify or
discontinue the provided web storage service with or without
further notice. Visit the official website for details.
2. Double-click Eee Internet Storage.

4-20
Chapter 4: Using the Eee PC
Video Conferencing
Skype enables users to make free calls to other Skype users or
cheaper calls to landlines or mobile phones with Internet access.
It also offers instant messaging and video conferencing function,
which users can use to chat online.
To start using Skype application
1. Double-click the Skype icon on the desktop.
2. Enter your Skype name and other information to create a new
Skype account. If you have already had a Skype account, click
Cancel to sign in directly.
3. Enter your Skype Name Password and in the box and click
Sign in.
4. You can make a video phone call now.
Ensure that you have checked the Start my video automatically
when I am in a call Video Settings check box in .
Ensure that Beam Forming Microphone Realtek in the tab in
HD Audio Manager is enabled. (Beam Forming Acoustic and
Echo Cancellation are enabled by default.) Doing so eliminates
surrounding noise interferences and enhances the quality of the
call. To obtain the best voice quality, we recommend you speak
right in front of the microphone.

Support DVD
System Recovery
Boot Booster
5
Support DVD &
System Recovery
Product specificaties
| Merk: | Asus |
| Categorie: | Laptop |
| Model: | Eee PC 1000HE |
| Kleur van het product: | Wit |
| Gewicht: | 1450 g |
| Breedte: | 266 mm |
| Diepte: | 191.2 mm |
| Bluetooth: | Ja |
| Beeldschermdiagonaal: | 10.1 " |
| Resolutie: | 1024 x 600 Pixels |
| Oorspronkelijke beeldverhouding: | 5:3 |
| Frequentie van processor: | 1.66 GHz |
| Processorfamilie: | Intel Atom® |
| Processormodel: | N280 |
| Aantal processorkernen: | 1 |
| Bluetooth-versie: | 2.1+EDR |
| Resolutie camera voorzijde (numeriek): | 1.3 MP |
| Inclusief besturingssysteem: | Windows XP Home Edition |
| Ethernet LAN: | Ja |
| Geïntegreerde geheugenkaartlezer: | Ja |
| Compatibele geheugenkaarten: | MMC,SD,SDHC |
| Audiosysteem: | HDA |
| Processor lithografie: | 45 nm |
| LED backlight: | Ja |
| Aantal USB 2.0-poorten: | 3 |
| VGA (D-Sub)poort(en): | 1 |
| Microfoon, line-in ingang: | Ja |
| Aantal Ethernet LAN (RJ-45)-poorten: | 1 |
| Aantal ingebouwde luidsprekers: | 2 |
| Hoofdtelefoonuitgangen: | 1 |
| Ingebouwde microfoon: | Ja |
| Intern geheugen: | 1 GB |
| Levensduur accu/batterij: | 9.5 uur |
| Intern geheugentype: | DDR2-SDRAM |
| Intel® Wireless Display (Intel® WiDi): | Nee |
| Stepping: | C0 |
| Systeembus: | - GT/s |
| Processor aantal threads: | 2 |
| Processor operating modes: | 32-bit |
| Processor cache: | 0.512 MB |
| Tjunction: | 90 °C |
| Bus type: | FSB |
| Thermal Design Power (TDP): | 2.5 W |
| Codenaam processor: | Diamondville |
| Processor cache type: | L2 |
| ECC ondersteund door processor: | Nee |
| Processorfabrikant: | Intel |
| Soort optische drive: | Nee |
| Ondersteunde instructie sets: | SSE2,SSE3,SSSE3 |
| Intel® My WiFi Technology (Intel® MWT): | Nee |
| Intel® Hyper Threading Technology (Intel® HT Technology): | Ja |
| Intel® Turbo Boost Technology: | Nee |
| Intel® Quick Sync Video Technology: | Nee |
| Intel® InTru™ 3D Technology: | Nee |
| Intel® Clear Video HD Technology (Intel® CVT HD): | Nee |
| Intel® Insider™: | Nee |
| Intel® Flex Memory Access: | Nee |
| Intel® AES New Instructions (Intel® AES-NI): | Nee |
| Enhanced Intel SpeedStep Technology: | Ja |
| Execute Disable Bit: | Ja |
| Thermal Monitoring Technologies: | Ja |
| Intel® Enhanced Halt State: | Nee |
| Intel® Clear Video Technology for Mobile Internet Devices (Intel® CVT for MID): | Nee |
| Intel® VT-x with Extended Page Tables (EPT): | Nee |
| Ingebouwde opties beschikbaar: | Nee |
| Intel® 64: | Nee |
| Intel® Virtualization Technology for Directed I/O (VT-d): | Nee |
| Intel® Clear Video-technologie: | Nee |
| Intel® Virtualization Technology (VT-x): | Nee |
| Verpakkingsgrootte processor: | 22 x 22 mm |
| Conflictvrije processor: | Nee |
| ARK ID processor: | 41411 |
| Intel® Trusted Execution Technology: | Nee |
| Intel® Anti-Theft Technology (Intel® AT): | Nee |
| Netwerkfuncties: | Fast Ethernet |
| Processorcode: | SLGL9 |
| Aanwijsapparaat: | Touchpad |
| HDD capaciteit: | 160 GB |
| CPU multiplier (bus/core ratio): | 10 |
| FSB Parity: | Nee |
| Front-side bus processor: | 667 MHz |
| Processing die grootte: | 26 mm² |
| Aantal Processing Die Transistors: | 47 M |
| Intel® Demand Based Switching: | Nee |
| Charging port type: | DC-in ingang |
| Processorserie: | Intel Atom N200 Series |
| Draadloze technologie: | IEEE 802.11 b/g/n |
| Hoogte (voorzijde): | 28.5 mm |
| Hoogte (achterzijde): | 38 mm |
| Intel® Dual Display Capable Technology: | Nee |
| Intel® FDI Technology: | Nee |
| Intel® Rapid Storage Technology: | Nee |
| Intel® Fast Memory Access: | Nee |
| Wifi: | Ja |
| Type product: | Netbook |
| Batterijtechnologie: | Lithium-Ion (Li-Ion) |
| Aantal batterijcellen: | 6 |
| Afbeeldingentypetoewijzing: | <div><img src="https://ark.intel.com/inc/images/diagrams/diagram-5.gif" title="Block Diagram" /></div> |
Heb je hulp nodig?
Als je hulp nodig hebt met Asus Eee PC 1000HE stel dan hieronder een vraag en andere gebruikers zullen je antwoorden
Handleiding Laptop Asus

15 November 2024
2 September 2024
8 April 2024
21 Februari 2024
21 Februari 2024
21 Februari 2024
21 Februari 2024
21 Februari 2024
21 Februari 2024
21 Februari 2024
Handleiding Laptop
- Laptop HP
- Laptop Sony
- Laptop Samsung
- Laptop Xiaomi
- Laptop Panasonic
- Laptop LG
- Laptop Huawei
- Laptop Medion
- Laptop Toshiba
- Laptop Acer
- Laptop Airis
- Laptop Alienware
- Laptop Apple
- Laptop Dell
- Laptop Denver
- Laptop Emachines
- Laptop Ematic
- Laptop Evga
- Laptop Fellowes
- Laptop Fujitsu
- Laptop Gigabyte
- Laptop Goclever
- Laptop Haier
- Laptop Hannspree
- Laptop Hercules
- Laptop Honor
- Laptop Hyundai
- Laptop Ibm
- Laptop Kogan
- Laptop Lenovo
- Laptop Lexibook
- Laptop Micromax
- Laptop Microsoft
- Laptop Mpman
- Laptop MSI
- Laptop Nec
- Laptop Packard Bell
- Laptop Peaq
- Laptop Pyle
- Laptop Razer
- Laptop Ricatech
- Laptop Schneider
- Laptop Sylvania
- Laptop Targa
- Laptop Thomson
- Laptop Trekstor
- Laptop Viewsonic
- Laptop Vizio
- Laptop Zebra
- Laptop Jay-tech
- Laptop Odys
- Laptop Olidata
- Laptop Oregon Scientific
- Laptop Naxa
- Laptop Aplic
- Laptop ADATA
- Laptop Humanscale
- Laptop Hamilton Buhl
- Laptop Compaq
- Laptop SIIG
- Laptop Tripp Lite
- Laptop SPC
- Laptop Prixton
- Laptop Coby
- Laptop AORUS
- Laptop Hähnel
- Laptop XPG
- Laptop ECS
- Laptop Inovia
- Laptop Atdec
- Laptop Getac
- Laptop Vulcan
- Laptop System76
- Laptop General Dynamics Itronix
- Laptop CTL
- Laptop Everex
- Laptop Dynabook
- Laptop TechBite
- Laptop Schenker
Nieuwste handleidingen voor Laptop

28 Maart 2025

27 Maart 2025
26 Maart 2025

4 Maart 2025
10 Februari 2025
10 Februari 2025

10 Februari 2025
5 Februari 2025
5 Februari 2025
30 Januari 2025