Archos Neon 40 Handleiding
Archos
Smartphone
Neon 40
Lees hieronder de 📖 handleiding in het Nederlandse voor Archos Neon 40 (197 pagina's) in de categorie Smartphone. Deze handleiding was nuttig voor 10 personen en werd door 2 gebruikers gemiddeld met 4.5 sterren beoordeeld
Pagina 1/197

1
English
Congratulations for the purchase of an ARCHOS device!
This quick start guide helps you to start using your device properly.
If you have more questions concerning the use of your device,
• You can consult the frequently asked questions on our website:
go to http://faq.archos.com/
• You can send us a message on Facebook:
go to www.facebook.com/ARCHOS
• You can contact our After-sales department:
go to www.archos.com, click Support > After-sales support >
• You can consult the declaration of conformity:
go to www.archos.com, click Support > Downloads >
As we are often updating and improving our products, your device’s software may have
a slightly different appearance or modified functionality than presented in this Quick
Start Guide.
Welcome

2
Package Contents
Check your product box for the following items:
-ARCHOS 40 Neon
-Battery
-Headset
-USB cable
-Charger
-Quick start guide
-Warranty Legal & Safety notices
The items supplied with your device and available accessories may vary depending on
your region or service provider. The supplied items are designed only for your device
and may not be compatible with other devices. Unapproved accessories may cause
your device to malfunction.

3
3 4
1 2
97
8
5
6
English
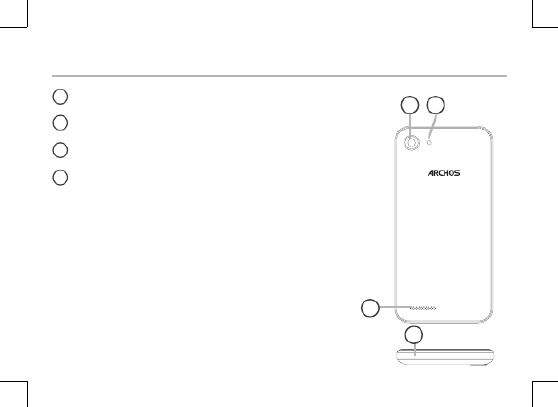
Description of the phone
1Headset jack
Micro-USB port
Phone speaker
Front camera
Volume buttons
ON/OFF button
Back
Home/Google NOW
Recent apps
2
3
4
5
6
7
8
9
4
10
12
11
13
Description of the phone
12
11
10 Camera
Flash light
Loudspeaker
Microphone
13

5
English
ON/OFF: when the device is off,
long press to turn on. When the
device is on, short press to turn off
the screen and long press to display
options.
Volume +/-: press +/- to adjust the
volume. When you press the button,
notication options are displayed.
You can select the most appropriate
one.
Back: press to go back to the
previous screen.
Home: short press to return to the
homescreen, long press to access
Google Now.
Recent apps: press to display recent
apps.
Micro-USB port: plug the provided
cable to charge the device or to
connect it to a computer.
Headphone jack: connect the
provided earphones to make hand-
free calls.
Camera & Flash: take pictures or
make movies. To extend movies
duration, insert a micro-SD card.
Activate the ash option in a dark
environment and use it as a torch
through the quick settings.

6
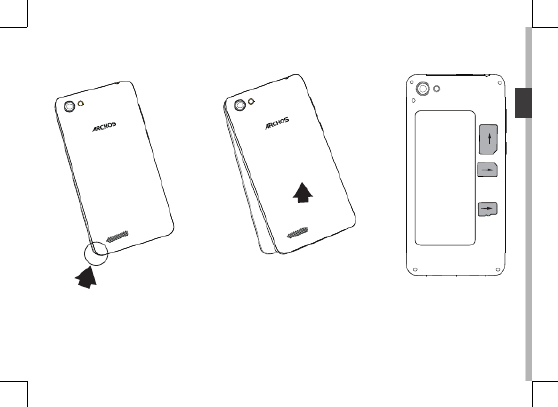
Assembling
After you have unpacked your mobile phone box:
1. Remove the device’s back cover using the notch.
2. Insert your SIM card or Memory card in the corresponding slot.
3. Insert the device’s battery.
4. Replace the back cover.
Getting started
3G/2G slot 1 When inserting your SIM card or micro-SD card, make sure
to follow the illustration, otherwise you may damage the
slot or the card.
3G/2G slot 2
Micro-SD card slot 3
8
Turning on
1. Plug the charging cable in the Micro-USB port and connect it to its
charger.
Before using your device for the rst time, charge its battery completely.
2. Press and hold the ON/OFF button to turn on the device.
The rst time you start up your ARCHOS, the installation wizard will help you
set up your device.
3. Follow the instructions.
If you have inserted a SIM card, you may need to enter a PIN code.
Beware of typing a wrong PIN code.
Tip:
Your device goes in standby mode when you do not use it for a specific period of
time. To wake up your device, press the ON/OFF button. To set the duration, go to
Settings > Display > Sleep.
Getting started

5
4
1
2
3
9
English
On your homescreen
1. Swipe right to access Google Now
2. Press to access all your apps
3. Hold your nger
on an app
to move it right and create a new
homescreen.
4. Say “Ok Google” to launch the search page.
5. Touch and pull down the status bar to display it. Touch
again the bar to reveal the quick settings.

10
5
4
3
Mobile data connection
If your mobile phone subscription includes a mobile data option, you should
be connected to the Internet without any further setup. The ARCHOS will
only have signal if you are in an area covered by your provider’s 3G network.
Activating/Deactivating the mobile data
Mobile Data & WiFi connection
1. Touch and pull down the status bar to display it.
2. Touch again the bar to reveal the quick settings.
3. Select the Settings icon.
4. In Wireless & networks, select Data usage, then the SIM
card tab.
5. Slide the Mobile data switch to turn on/off.

11
3
5
English
WiFi connection
WARNING: Make sure that you are in a WiFi zone. You can access the WiFi
settings quickly from the status bar.
1. Touch and pull down the status bar to display it.
2. Touch again the bar to reveal the quick settings.
3. Select the WiFi icon to activate the WiFi connection .
4. Select “WiFi” below the WiFi icon.
5. Touch the name of network you want to connect to.
Private networks are shown with a lock icon and will require
you to enter your password.

12
Adding a Google account
A Google account lets you take full
advantage of any Google apps and
services that you may want to use.
1. Go to “Settings” > “Accounts” >
“Add account”.
2. Select the account type “Google”
to add.
3. Follow the onscreen instructions
to enter information about the
account.
Once the account is created, you can
access Play Store, Gmail, Hangouts,
Maps and many other apps.
Synchronizing info
Information must be sync to be
saved. Your data is backed up on
Google servers.
1. Go to “Settings” > “Accounts” >
“Google”.
2. Select your account.
The list of information that can be
sync are displayed.
Automatic sync should be activated.
To launch the sync, press the Menu
button , then Sync now. You can
get them back in case of loss of
your device or SIM card. When your
Google account is added to a new
device, all your saved information is
transferred.
Google & Contacts

13
English
Saving your contacts
When your contacts are saved, they
are always available on the web
and can be synced to any Android
phone that’s set up with your
Google account.
1. Install the SIM card with your
contacts in your phone.
2. From the Home screen or the All
Apps screen, select the Contacts
app .
3. Touch the Menu button >
“Import/Export”.
4. In Import/export contacts, select
“Import from SIM card”.
5. Select your Google account.
6. Check contacts to be imported
and validate.
7. Once the contacts are imported
in the Google account, go to
“Settings” > “Accounts” > “Google”.
8. Select you Google account.
9. Select the Menu button , then
“Sync now”.
Your contacts are saved to your
Google account.

14
Moving a home screen item:
Touch and hold your nger onto it,
then slide it to the desired location,
and release your nger.
Removing a home screen item:
Touch and hold it, slide your nger
towards the top of the screen and
drop it over the "Remove" icon.
Uninstalling an item:
From the "All apps" screens, touch
and hold it, slide your nger towards
the top of the screen and drop it
over "Uninstall" bin.
Creating application folders:
Drop one app icon over another on
a home screen and the two icons
will be combined.
Widgets:
Hold your nger on a homescreen at
an empty location. Touch “Widgets”.
Changing your wallpaper:
Hold your nger on a home screen
at an empty location.
Touch “Wallpapers”.
Hints & tips for Android
TM

15
English
Locking the touchscreen:
Select the “Settings” app, then scroll
down and touch “Security”. Touch
“Screen lock”. Touch the type of lock
you would like to use. After you set
a lock, a lock screen is displayed
whenever your screen wakes up,
requesting the pattern, pin or other
specied key.
Mobile anti-theft:
1. Insert a SIM card in the device.
2. Go to Settings > Security and
select Mobile anti-theft.
3. Follow the onscreen instructions.

16
Troubleshooting
My phone is frozen or cannot switch on
Charge your device. Press the ON/
OFF button for 10 seconds.
My phone cannot connect to a network
or “No service” is displayed
Try connecting in another location. Verify
the network coverage with your operator.
Unable to make outgoing calls
Make sure your phone is connected
to a network, and the network is not
overloaded or unavailable.
Unable to receive incoming calls
Make sure your phone is switched on
and connected to a network (check for
overloaded or unavailable network).
SIM card PIN locked
Contact your network operator to obtain
the PUK code (Personal Unblocking Key).
To configure a new 3G network:
On your device, tap Settings.
1. Select Wireless & networks > More... >
Mobile networks.
2. In Mobile network settings, select your
operator in Network operators.
3. In Mobile network settings, select
Access point names, then select to
add new parameters and enter the exact
connection parameters provided by your
3G provider.

17
Français
Félicitations, vous venez d’acquérir un appareil ARCHOS!
Grâce à ce guide d’utilisation rapide, commencez à utiliser votre appareil en toute
facilité.
Si vous avez plus de questions concernant l’utilisation de votre appareil,
• Vous pouvez consulter la foire aux questions sur notre site Web :
allez sur http://faq.archos.com/
• Vous pouvez nous envoyer un message sur Facebook :
allez sur www.facebook.com/ARCHOS
• Vous pouvez contacter notre service après-vente :
allez sur www.archos.com, cliquez sur Support > Service après-vente >
• Vous pouvez consulter la déclaration de conformité :
allez sur www.archos.com, cliquez sur Support > Téléchargements >
Comme nous mettons à jour et améliorons régulièrement nos produits, le logiciel
de votre appareil peut présenter une interface ou des fonctionnalités légèrement
différentes de celles décrites dans ce guide.
Bienvenue

18
Contenu de la boîte
Vériez que les éléments ci-dessous sont présents dans la boîte :
-ARCHOS 40 Neon
-Batterie
-Kit piéton
-Câble USB
-Chargeur
-Guide d’utilisation rapide
-Guide des garanties et des mentions légales
Il se peut que les éléments fournis, de même que les accessoires, varient en fonction de
votre localité ou de votre opérateur.
Les éléments fournis sont conçus uniquement pour votre appareil et ils pourraient ne
pas être compatibles avec d’autres appareils.
Des accessoires non conformes peuvent être la source d’un mauvais fonctionnement.

19
3 4
1 2
97
8
5
6
Français
Description du téléphone
1
2
3
4
Prise kit piéton
Port Micro-USB
Haut-parleur
Appareil photo avant
Boutons de volume
Bouton ON/OFF
Retour
Accueil/Google NOW
Applications récentes
5
6
7
8
9

20
10
12
11
13
Description du téléphone
10
12
11
Appareil photo arrière
Flash
Haut-parleur
Micro
13

ON/OFF : Lorsque l’appareil est
éteint, faites un appui long pour
l’allumer. Lorsque l’appareil est
allumé, faites un appui court pour
éteindre l’écran et un appui long
pour afcher des options.
Volume+/- : Appuyez sur +/- pour
ajuster le son. Lorsque vous
appuyez sur le bouton, des options
de notications s’afchent.
Sélectionnez la notication
souhaitée.
Retour : Appuyez pour retourner à
l’écran précédent.
Accueil : Faites un appui court pour
retourner à l’écran d’accueil et un
appui long pour accéder à Google
Now.
Applications récentes : appuyez pour
afcher les applications récentes.
Port Micro-USB : branchez le câble
fourni pour charger l’appareil ou le
connecter à un ordinateur.
Port jack : connectez les écouteurs
fournis pour passer des appels en kit
mains libres
Appareil photo & Flash : prenez des
photos ou lmez. Pour des lms plus
longs, insérez une carte micro-SD.
Activez le ash dans l’obscurité
et utilisez le comme torche en
l’activant à partir des réglages
rapides
21
Français

23
1
2
3
Français

24
Allumer l’appareil
1. Branchez le câble de chargement dans le port micro-USB et connectez-le
à son chargeur.
Avant la première utilisation, chargez complètement la batterie.
2. Maintenez le bouton ON/OFF pour allumer l’appareil.
La première fois que vous allumez votre téléphone, l’assistant de démarrage
vous permet de le paramétrer.
3. Suivez les instructions à l’écran.
Si vous avez inséré une carte SIM dans votre téléphone, il se peut que vous
ayez besoin d’entrer un code PIN. Assurez-vous de saisir le bon code PIN.
ASTUCE :
L’écran tactile s’éteint après une certaine période d’inactivité. Pour rallumer l’écran,
faites un appui court sur le bouton ON/OFF. Pour définir la mise en veille, allez sur
Paramètres>Affichage>Veille.
Prise en main

26
5
4
3
Connexion Données mobiles
Si votre abonnement mobile inclut une option données mobiles, vous
devriez être connecté à Internet automatiquement. Votre téléphone n’aura
de signal que si vous êtes dans une zone de réseau 3G couverte par votre
opérateur.
Données mobiles & Connexion WiFi
Activer/Désactiver les données mobiles
1. Tirez vers le bas la barre de statuts an de l’afcher.
2. Une fois afchée, touchez-la à nouveau pour accéder aux
réglages rapides.
3. Sélectionnez l’icône Paramètres.
4. Dans la section “Sans l et réseaux”, sélectionnez
“Consommation de données”, puis l’onglet de la carte SIM.
5. Faites glisser l’interrupteur Données mobiles pour
activer/désactiver.

27
3
5
Français
Connexion WiFi
ATTENTION : assurez-vous d’être dans une zone couverte par un réseau WiFi.
Vous pouvez accéder rapidement aux paramètres WiFi à
partir de la barre de statuts.
1. Tirez vers le bas la barre de statuts an de l’afcher.
2. Une fois afchée, touchez-la à nouveau pour accéder aux
réglages rapides.
3. Sélectionnez l’icône WiFi pour activer la connexion .
4. Sélectionnez “WiFi” en bas de l’icône WiFi.
5. Sélectionnez le nom du réseau auquel vous voulez vous
connecter. Les réseaux privés sont afchés avec un cadenas.
Ils nécessitent un mot de passe.

28
Ajouter un compte Google
Un compte Google vous permet
de proter au maximum des
applications et des services Google
que vous pourriez utiliser.
1. Sélectionnez “Paramètres” >
“Comptes” > “Ajouter compte”.
2. Sélectionnez “Google” pour le type
de compte à ajouter.
3. Suivez les instructions à l’écran
pour saisir les informations
demandées.
Une fois que le compte est créé,
accédez aux applications Play Store,
Gmail, Hangouts, Maps et beaucoup
d’autres.
Synchroniser des informations
Vos informations doivent
être synchronisées an d’être
sauvegardées. Vos données sont
enregistrées sur les serveurs Google.
1. Sélectionnez “Paramètres” >
“Comptes” > “Google”.
2. Sélectionnez votre compte.
La liste des informations qu’on peut
synchroniser est achée.
La synchronisation automatique
est activée. Si vous voulez lancer
la synchronisation, appuyez sur
le bouton de Menu , puis sur
Synchroniser maintenant. Vous
pouvez les récupérer en cas de perte
de votre téléphone ou de votre
carte SIM. Lorsque vous ajoutez
votre compte Google à un nouvel
appareil, toutes les informations
sauvegardées sont collectées.
Compte Google & Contacts

29
Français
Sauvegarder vos contacts
Tous vos contacts sont disponibles
sur le Web et peuvent être
synchronisés sur n’importe quel
téléphone Android paramétré avec
votre compte Google.
1. Insérer votre carte SIM incluant
vos contacts dans votre téléphone.
2. A partir de l’écran d’accueil ou
de l’écran Toutes les applications,
sélectionnez l’application Contacts
.
3. Appuyez sur le bouton de Menu
puis sélectionnez “Importer/
Exporter”.
4. Dans “Importer/exporter contacts”,
sélectionnez “Importer à partir de la
carte SIM”.
5. Sélectionnez votre compte
Google.
6. Sélectionnez les contacts à
importer puis validez.
7. Une fois les contacts importés sur
votre compte Google, sélectionnez
“Paramètres” > “Comptes” > “Google”.
8. Sélectionnez votre compte
Google.
9. Appuyez sur le bouton de Menu
, puis sélectionnez “Synchroniser
maintenant”. Vos contacts sont
sauvegardés sur votre compte
Google.

30
Déplacer une icône de l’écran
d’accueil :
Maintenez votre doigt appuyé sur
l’icône jusqu’à ce que s’achent
les lignes de positionnement, puis
faites-la glisser vers l’emplacement
souhaité, et relâchez.
Supprimer une icône de l’écran
d’accueil :
Maintenez votre doigt appuyé sur
l’icône, puis faites-la glisser vers le
haut de l’écran, et déposez-la sur
l’icône Supprimer.
Désinstaller une application :
A partir de l’écran Toutes les
applications, maintenez votre doigt
appuyé sur l’icône, puis faites-la
glisser vers le haut de l’écran et
déposez-la sur l’icône Désinstaller.
Créer des dossiers d’applications :
A partir d’un écran d’accueil, déposez
une icône sur une autre pour les
rassembler.
Widgets :
Maintenez votre doigt appuyé sur
un emplacement vide de l’écran
d’accueil. Sélectionnez Widgets.
Changer le fond d’écran :
Maintenez votre doigt appuyé sur
un emplacement vide de l’écran
d’accueil. Sélectionnez fonds d’écran.
Trucs & Astuces pour Android
TM

31
Français
Verrouiller votre téléphone :
A partir du panneau des réglages
rapides dans la barre de statuts,
sélectionnez Paramètres. Faites
déler l’écran vers le bas, puis
sélectionnez Sécurité. Sélectionnez
Verrouillage de l’écran. Sélectionnez
le type de verrouillage que vous
voulez utiliser. Une fois que vous avez
sélectionné une option, un écran de
verrouillage s’ache chaque fois que
votre écran est réactivé. Vous êtes
alors invité à saisir le schéma, le code
PIN ou tout autre code spécié.
Anti-vol
1. Insérez une carte SIM dans votre
téléphone.
2. Ouvrez l’application Paramètres >
Sécurité et sélectionnez Mobile Anti-
theft (Anti-vol).
3. Suivez les instructions à l’écran.

32
Dépannage
Mon téléphone ne répond pas ou ne
s’allume pas
Chargez votre appareil. Appuyez 10
secondes sur le bouton ON/OFF.
Mon téléphone ne se connecte pas
au réseau ou affiche “Pas de service”
Tentez de vous connecter à partir d’un
autre endroit. Vérifiez la couverture
réseau avec votre opérateur.
Impossible de passer des appels
Assurez-vous que votre téléphone est
connecté au réseau et que le réseau
n’est ni saturé, ni indisponible.
Impossible de recevoir des appels
Assurez-vous que le téléphone est
allumé et connecté au réseau.
Carte SIM bloquée (mauvais code
PIN)
Contactez votre opérateur réseau afin
d’obtenir le code PUK.
Configurer votre connexion 3G
Sur votre appareil, sélectionnez
Paramètres :
1. Sélectionnez “Sans l et réseaux >
Plus > Réseaux mobiles”.
2. Dans Paramètres des réseaux
mobiles, sélectionnez “Opérateurs de
réseau” puis le réseau adapté.
3. Dans Paramètres des réseaux
mobiles, sélectionnez “Noms des
points d’accès”, puis sélectionnez
pour ajouter de nouveaux paramètres
et entrez les paramètres de connexion
exacts fournis par votre opérateur 3G.

33
Deutsch
Wir gratulieren Ihnen zum Kauf Ihres ARCHOS-Gerätes!
Diese Kurzanleitung hilft Ihnen beim korrekten Einsatz des Gerätes.
Sollten Sie weitere Fragen bezüglich der Benutzung Ihres Gerätes haben,
• Besuchen Sie den Abschnitt „Häug gestellte Fragen“ auf unserer Webseite:
Besuchen Sie http://faq.archos.com/
• Sie können uns über Facebook schreiben:
Besuchen Sie www.facebook.com/ARCHOS
• Sie können unseren Kundendienst kontaktieren:
Besuchen Sie www.archos.com, klicken Sie auf Support > Kundendienst >
• Sehen Sie unsere Konformitätserklärung ein:
Besuchen Sie www.archos.com, klicken Sie Support > Downloads >
Da wir unsere Produkte oft aktualisieren und verbessern, kann die Software Ihres
Gerätes visuell oder in der Funktionalität leicht von der Kurzanleitung abweichen.
Willkommen

34
Verpackungsinhalt
In der Verpackung müssen folgende Elemente enthalten sein:
- ARCHOS 40 Neon
- Batterie
- Headset
- USB-Kabel
- Ladegerät
- Benutzerhandbuch
- Garantie, Impressum und Sicherheitshinweise
Die mit Ihrem Gerät mitgelieferten Elemente und das verfügbare Zubehör können je
nach Region oder Dienstleister abweichen.
Die mitgelieferten Elemente wurden ausschließlich für Ihr Gerät entwickelt und sind mit
anderen Geräten nicht kompatibel.
Nicht genehmigtes Zubehör kann zu einer Fehlfunktion Ihres Geräts führen.

35
3 4
1 2
97
8
5
6
Deutsch
Beschreibung des Geräts
1
2
3
4
Kopfhöreranschluss
Micro-USB-Anschluss
Lautsprecher
Frontkamera
Lautstärketasten
EIN/AUS-Taste
Zurück
Home/Google NOW
Letzte Apps
5
6
7
8
9

38
Montage
Nach dem Auspacken des Mobiltelefons:
1. Heben Sie die Rückabdeckung des Geräts mithilfe der Einkerbung an.
2. Stecken Sie eine SIM-Karte oder micro-SD-Karte in den entsprechenden
Steckplatz ein.
3. Legen Sie den Akku des Geräts ein.
4. Bringen Sie die Rückabdeckung wieder an.
3G/2G 1 Beachten Sie beim Einführen der SIM-Karte oder micro-
SD-Karte unbedingt die Illustration, der Steckplatz oder die
Karte könnten sonst beschädigt werden.
3G/2G 2
micro-SD-Karte 3
Erste Schritte
39
1
2
3
Deutsch

40
Tipp:
Wird der Touchscreen über einen bestimmten Zeitraum hinweg nicht benutzt, wird
dieser vom Gerät abgeschaltet. Um den Bildschirm wieder einzuschalten, drücken Sie
die EIN/AUS-Taste. Für die Einstellung der Dauer gehen Sie zu Einstellungen > Anzeige
> Display-Timeout.
Erste Schritte
Einschalten
1. Stecken Sie das Ladekabel in den Micro-USB-Anschluss und verbinden Sie
es mit dem Ladegerät.
Vor der erstmaligen Benutzung des Geräts sollte der Akku vollständig
aufgeladen werden.
2. Drücken und halten Sie die EIN/AUS-Taste, um das Gerät einzuschalten.
Beim ersten Einschalten des ARCHOS wird Sie der Installationsassistent bei
der Konguration Ihres Geräts unterstützen.
3. Folgen Sie den Anweisungen.
Haben Sie eine SIM-Karte eingesteckt, muss unter Umständen ein PIN-Code
eingegeben werden.
Geben Sie unbedingt die richtige PIN-Nummer ein.

41
5
4
1
2
3
Deutsch
Auf Ihrem Startbildschirm
1. Nach recht
wischen für den Zugriff auf Google Now
2. drücken für den Zugriff auf Ihre Apps
3. Halten Sie
Ihren Finger
auf einer App
um sie nach rechts zu verschieben und
um einen neuen Startbildschirm zu
erstellen.
4. "Ok Google"
sagen um die Suchseite zu öffnen.
5. Die Statusleiste nach unten ziehen, dann drücken, um die
Schnelleinstellungen anzuzeigen.

42
5
4
3
Mobildatenverbindung
Beinhaltet Ihr Mobilfunkvertrag eine Mobildatenoption, sollte ohne weitere
Einrichtung eine Verbindung zum Internet hergestellt werden. Beachten Sie,
dass der ARCHOS nur dann ein Signal erhält, wenn Sie sich im Bereich des
3G-Netzwerks Ihres Anbieters benden.
Mobildaten & WLAN-Verbindung
Aktivierung/Deaktivierung der Mobildaten
1. Die Statusleiste berühren und nach unten ziehen, um
diese anzuzeigen.
2. Die Leiste erneut berühren, um die Schnelleinstellungen
anzuzeigen.
3. Wählen Sie das Symbol "Einstellungen".
4. Unter "WLAN & Netzwerke" wählen Sie "Datennutzung"
und dann die Registerkarte "SIM-Karte".
5. Schieben Sie den Schalter "Mobilfunkdaten" auf Ein/Aus.

43
3
5
Deutsch
WLAN-Verbindung
ACHTUNG: Überprüfen Sie, ob Sie sich in einer WLAN-Zone benden. Über
die Statusleiste kann schnell auf die
WLAN-Einstellungen zugegrien werden.
1. Die Statusleiste berühren und nach unten ziehen, um diese
anzuzeigen.
2. Die Leiste erneut berühren, um die Schnelleinstellungen
anzuzeigen.
3. Wählen Sie das WLAN-Symbol zur Aktivierung der
WLAN-Verbindung .
4. Wählen Sie "WLAN" unter dem WLAN-Symbol.
5. Tippen Sie auf den Namen des Netzwerks, mit dem eine
Verbindung hergestellt werden soll.
Private Netzwerke werden mit einem Schlosssymbol angezeigt
und hier muss das Passwort eingegeben werden.

44
Google-Konten & Kontakte
Google-Konto hinzufügen
Mit einem Google-Konto können
Sie Ihre Google-Apps und Dienste in
vollem Umfang nutzen.
1. Gehen Sie zu "Settings" >
"Accounts" > "Add account"
("Einstellungen" > "Konten &
Synchronisierung" > "Konto
hinzufügen").
2. Wählen Sie für das hinzuzufügende
Konto den Typ "Google".
3. Folgen Sie den Anweisungen auf
dem Bildschirm und geben Sie die
Informationen für das Konto ein.
Nachdem das Konto erstellt wurde,
können Sie auf Play Store, Gmail,
Hangouts, Maps und viele andere
Apps zugreifen.
Synchronisierungsinformationen
Die Informationen müssen synchron
sein, um gespeichert werden zu
können. Ihre Daten werden auf
Google-Servern gesichert.
1. Gehen Sie zu "Einstellungen" >
"Konten" > "Google".
2. Wählen Sie Ihr Konto aus.
Die Liste der synchronisierbaren
Informationen wird angezeigt.
Im Falle eines Geräte- oder SIM-
Kartenverlusts können diese
wiederhergestellt werden.
Wird Ihr Google-Konto einem neuen
Gerät hinzugefügt, werden Ihre
gespeicherten Informationen erfasst.

45
Deutsch
Speicherung Ihrer Kontakte
Alle Ihre Kontakte sind im Web immer
verfügbar und können mit jedem
Android-Telefon synchronisiert
werden, das mit dem gleichen
Google-Konto eingerichtet ist.
1. Legen Sie die SIM-Karte mit Ihren
Kontakten in Ihr Telefon ein.
2. Wählen Sie vom Bildschirm „Home“
oder „All Apps (Alle Anwendungen)“
aus die App „Contacts (Kontakte)“ .
3. Tippen Sie auf die Menü-Taste
> “Import/Export” (Importieren/
Exportieren).
4. Unter “Import/export contacts”
(Kontakte importieren/exportieren)
wählen Sie Import from SIM card (Von
SIM-Karte importieren).
5. Wählen Sie Ihr Google-Konto aus.
6. Markieren Sie die zu
importierenden Kontakte und
bestätigen Sie.
7. Nachdem die Kontakte in Ihr
Google-Konto importiert wurden,
gehen Sie zu „Einstellungen > Konten
> Google“.
8. Wählen Sie Ihr Google-Konto aus.
9. Drücken Sie die Menü-Taste und
dann “Jetzt synchronisieren“.
Ihre Kontakte werden in Ihrem
Google-Konto gespeichert.

47
Deutsch
leeren Stelle. Berühren Sie
„Hintergrundbilder“.
Touchscreen sperren:
Berühren Sie Einstellungen auf dem
Schnelleinstellungen-Dashboard in
der Statusleiste. Scrollen Sie nach
unten und berühren Sie “Sicherheit”.
Berühren Sie Bildschirmsperrung.
Berühren Sie die gewünschte
Art der Sperrung. Nach erfolgter
Sperrung wird ein Sperrbildschirm
angezeigt, sobald der Bildschirm
aktiviert wird. Auf diesem ist ein
Muster, eine PIN oder ein anderer
festgelegter Schlüssel einzugeben.
Handy Anti-Diebstahl:
Legen Sie eine SIM-Karte in das
Gerät ein.
Gehen Sie zu Einstellungen>
Sicherheit, und wählen Sie Handy-
Anti-Diebstahl.
Folgen Sie den Anweisungen.

48
Fehlerbehebung
Mein Telefon ist abgestürzt oder es kann
nicht eingeschaltet werden
Laden Sie das Gerät auf. Drücken Sie die
ON/OFF Taste während 10 Sekunden.
Mein Telefon kann nicht mit einem
Netzwerk verbinden oder es wird „Kein
Dienst“ angezeigt
Testen Sie das Gerät an einem
anderen Standort. Überprüfen Sie die
Netzwerkabdeckung bei Ihrem Anbieter.
Keine ausgehenden Anrufe möglich
Überprüfen Sie die Verbindung Telefon -
Netzwerk und ob das Netzwerk überlastet
oder nicht verfügbar ist.
Eingehende Anrufe können nicht
empfangen werden
Überprüfen Sie, ob das Telefon
eingeschaltet und mit einem Netzwerk
verbunden und ob das Netzwerk
überlastet oder nicht verfügbar ist.
PIN der SIM-Karte gesperrt
Wenden Sie sich an Ihren
Netzwerkbetreiber, um den PUK-Code zu
erhalten.
Konfiguration eines neuen
3G-Netzwerks:
Tippen Sie auf Ihrem Gerät auf
„Einstellungen“.
1. Wählen Sie Wireless & networks > More...
> Mobilnetzwerke.
2. Wählen Sie in den „Mobilnetzwerk“-
Einstellungen aus den Netzwerkanbietern
Ihren Anbieter aus.
3. Wählen Sie in den „Mobilnetzwerk“-
Einstellungen den Namen des Access
Points.
Wählen Sie , um neue Parameter
hinzuzufügen, und geben Sie die exakten
Verbindungsparameter ein, die Sie von
Ihrem 3G-Anbieter erhalten haben.

49
Español
¡Felicidades por la compra de su dispositivo ARCHOS!
La guía rápida de inicio le ayudará a utilizar su dispositivo de forma correcta.
Si tiene cualquier duda acerca de la utilización de su dispositivo,
• Puede consultar las preguntas más frecuentes en nuestro sitio web:
entre en http://faq.archos.com/
• Puede enviarnos un mensaje en Facebook:
entre en www.facebook.com/ARCHOS
• Puede contactarnos a través de nuestro departamento de posventa:
entre en www.archos.com, haga clic en Support (Asistencia) > After-sales
support (Asistencia posventa) >
• Puede consultar la declaración de conformidad:
entre en www.archos.com, haga clic en Support (Asistencia) > Downloads
(Descargas) >
Al estar actualizando y mejorando constantemente nuestros productos, la apariencia
o el software de su dispositivo pueden variar ligeramente con respecto a lo descrito en
esta Guía Rápida de Inicio.
Bienvenido

50
Compruebe que la caja del producto incluya los elementos siguientes:
-ARCHOS 40 Neon
-Batería
-Headset
-USB cable
-Cargador
-Guía de usuario
-Avisos de garantía, legales y de seguridad
Los elementos suministrados con su dispositivo y los accesorios disponibles pueden
variar según la zona geográfica o proveedor de servicio utilizado. Los elementos
suministrados han sido desarrollados en exclusiva para este dispositivo y pueden no ser
compatibles con otros dispositivos. La utilización de accesorios no homologados podría
ocasionar un funcionamiento defectuoso del producto.
Contenido de la caja

51
3 4
1 2
97
8
5
6
EspañolEspañol
Descripción del dispositivo
Conector de headset
Puerto micro USB
Altavoz
Cámara frontal
Botones de volumen
Botón ON/OFF
Atrás
Inicio/Google NOW
Apps recientes
1
2
3
4
5
6
7
8
9

53
EspañolEspañol
Botón ON/OFF: con el dispositivo
apagado: mantenga pulsado para
encenderlo. Con el dispositivo
encendido: pulse brevemente para
desactivar la pantalla, mantenga
pulsado para mostrar las opciones.
Botones de volumen: pulse +/-
para ajustar el volumen. Pulse el
botón para mostrar las opciones
de noticación. Seleccione la más
apropiada.
Atrás: pulse para volver a la
pantalla anterior.
Inicio: pulsación corta para volver
a la pantalla principal, pulsación
larga para entrar en Google Now.
Apps recientes: pulse para mostrar
las aplicaciones recientes.
Puerto micro USB: enchufe el
cable suministrado para cargar
el dispositivo o conectarlo a un
ordenador.
Conector de headset: conecte los
auriculares suministrados para
hacer llamadas con manos libres.
Camera & Flash: para hacer fotos
o vídeos. Inserte una tarjeta micro
SD para aumentar la duración de
los vídeos. Active la opción ash
en entornos con poca luz o utilícela
como linterna a través de los ajustes
rápidos.
54
Montaje
Una vez el teléfono móvil fuera de su caja:
1. Retire la cubierta posterior del dispositivo utilizando la muesca.
2. Inserte su tarjeta SIM o micro SD en la ranura correspondiente.
3. Inserte la batería del dispositivo.
4. Vuelva a colocar la cubierta posterior.
Primeros pasos
3G/2G 1 Al insertar una tarjeta SIM o una tarjeta micro SD,
asegúrese de hacerlo conforme a la ilustración, de lo
contrario podría dañar la ranura o la tarjeta.
3G/2G 2
Tarjeta micro SD 3

1
2
3
EspañolEspañol
55
EspañolEspañol
1
2
3

56
Consejos:
El dispositivo desactiva la pantalla táctil tras un determinado periodo sin utilizar. Para
volver a activar la pantalla, pulse el botón ON/OFF.Para escoger una duración, vaya a
Ajustes>Pantalla>Tiempo espera pantalla.
Encendido
1. Enchufe el cable de carga al puerto micro USB y conéctelo al cargador.
Antes de utilizar el dispositivo por primera vez, cargue completamente la
batería.
2. Mantenga pulsado el botón ON/OFF para encender el dispositivo.
La primera vez que encienda el ARCHOS, el asistente de instalación le
ayudará a congurar su dispositivo.
3. Siga las instrucciones.
Si ha introducido una tarjeta SIM, deberá teclear el código PIN.
Tenga cuidado de no introducir un código PIN incorrecto.
Primeros pasos

59
3
5
Español
Conexión WiFi
ADVERTENCIA: Asegúrese de que se encuentra en una zona con cobertura
WiFi. Puede acceder rápidamente a los ajustes WiFi
desde la barra de estado.
1. Toque y arrastre hacia abajo la barra de estado para
mostrarla.
2. Vuelva a tocar la barra para mostrar los ajustes rápidos.
3. Seleccione el icono WiFi para activar la conexión WiFi
.
4. Seleccione “WiFi” bajo el icono WiFi.
5. Toque el nombre de la red a la que se desee conectar.
Las redes privadas aparecen con un icono de candado, lo que
signica que deberá introducir una contraseña.

64
Mi teléfono está bloqueado o no lo
puedo encender
Cargue el dispositivo. Pulse el botón
ON / OFF durante 10 segundos.
Mi teléfono no puede conectarse
a la red o aparece un mensaje de
“Sin servicio”
Pruebe a conectarse desde otro
lugar. Compruebe la cobertura de
red de su operador.
No consigo hacer llamadas
Asegúrese de que el teléfono esté
conectado a una red y de que la red
no esté sobrecargada o indisponible.
No consigo recibir llamadas
Compruebe que su teléfono esté
encendido y conectado a una
red (verifique que la red no esté
sobrecargada o indisponible).
El PIN de mi tarjeta SIM está
bloqueado
Póngase en contacto con su
operador de telefonía para obtener
el código PUK (Clave de Desbloqueo
Personal).
Para configurar una nueva red 3G:
En su dispositivo, pulse Ajustes.
1. Seleccione Conexiones
inalámbricas y redes > Más... > Redes
móviles.
2. En la conguración de red
móvil, seleccione su operador en
Operadores de red.
3. En la conguración de red móvil,
seleccione Nombres de punto de
acceso.
4. Seleccione para añadir
nuevos parámetros e introducir los
parámetros de conexión exactos
proporcionados por su proveedor
3G.
Resolución de problemas

71
1
2
3
Italiano

72
Suggerimenti:
Il dispositivo disattiva il touch screen quando non lo si utilizza per un periodo
determinato. Per attivare lo schermo, premere il pulsante ON/OFF. Per impostare la
durata, andare su Settings (Impostazioni)> Display> Sleep (Sospensione).
Accensione
1. Inserire il cavo di ricarica nella porta micro-USB e collegarlo al
caricabatterie.
Prima di utilizzare il dispositivo per la prima volta, caricare completamente
la batteria.
2. Tenere premuto il pulsante ON/OFF per accendere il dispositivo.
Alla prima accensione di ARCHOS, l'installazione guidata supporterà l'utente
nella congurazione del dispositivo.
3. Seguire le istruzioni.
Se l'utente ha inserito una scheda SIM, potrebbe essere richiesto un codice
PIN. Inserire con attenzione il codice PIN.
Introduzione
Product specificaties
| Merk: | Archos |
| Categorie: | Smartphone |
| Model: | Neon 40 |
Heb je hulp nodig?
Als je hulp nodig hebt met Archos Neon 40 stel dan hieronder een vraag en andere gebruikers zullen je antwoorden
Handleiding Smartphone Archos

7 Juni 2023
27 Mei 2023
27 Mei 2023
26 Mei 2023
14 Mei 2023
12 Mei 2023
9 Mei 2023
7 Mei 2023
7 Mei 2023
3 Mei 2023
Handleiding Smartphone
- Smartphone Philips
- Smartphone HP
- Smartphone Sony
- Smartphone Samsung
- Smartphone Xiaomi
- Smartphone Panasonic
- Smartphone Brondi
- Smartphone LG
- Smartphone Huawei
- Smartphone Asus
- Smartphone AEG
- Smartphone Fysic
- Smartphone Garmin
- Smartphone Gigaset
- Smartphone Honeywell
- Smartphone Motorola
- Smartphone Medion
- Smartphone Nokia
- Smartphone Toshiba
- Smartphone Wiko
- Smartphone Yarvik
- Smartphone Acer
- Smartphone Aiwa
- Smartphone Albrecht
- Smartphone Alcatel
- Smartphone Alcatel-Lucent
- Smartphone Alecto
- Smartphone Aligator
- Smartphone Allview
- Smartphone Amazon
- Smartphone Amplicom
- Smartphone Amplicomms
- Smartphone Androidtech
- Smartphone Apple
- Smartphone AQISTON
- Smartphone AT Telecom
- Smartphone Audioline
- Smartphone Auro
- Smartphone Avus
- Smartphone Beafon
- Smartphone Benefon
- Smartphone BenQ
- Smartphone Binatone
- Smartphone Blackberry
- Smartphone Blaupunkt
- Smartphone Blu
- Smartphone Bluebird
- Smartphone BQ
- Smartphone Brigmton
- Smartphone Bury
- Smartphone Danew
- Smartphone Dell
- Smartphone Denver
- Smartphone Doogee
- Smartphone Doro
- Smartphone Easypix
- Smartphone Echo
- Smartphone Ecom
- Smartphone Emporia
- Smartphone Energizer
- Smartphone Energy Sistem
- Smartphone Fairphone
- Smartphone Fero
- Smartphone Garmin-Asus
- Smartphone Geemarc
- Smartphone General Mobile
- Smartphone Gigabyte
- Smartphone Gionee
- Smartphone Goclever
- Smartphone Google
- Smartphone GreatCall
- Smartphone Haier
- Smartphone Hammer
- Smartphone Handheld
- Smartphone Hannspree
- Smartphone Hisense
- Smartphone HomTom
- Smartphone Honor
- Smartphone HTC
- Smartphone Hyundai
- Smartphone I.safe Mobile
- Smartphone Iget
- Smartphone Infinix
- Smartphone InFocus
- Smartphone Intermec
- Smartphone Intex
- Smartphone Itel
- Smartphone ITT
- Smartphone Kazam
- Smartphone Klipad
- Smartphone Kodak
- Smartphone Kogan
- Smartphone KPN
- Smartphone Kurio
- Smartphone Kyocera
- Smartphone Lava
- Smartphone Leagoo
- Smartphone Lenovo
- Smartphone Leotec
- Smartphone Lexibook
- Smartphone Logicom
- Smartphone Lumigon
- Smartphone Manta
- Smartphone Maxcom
- Smartphone Maxx
- Smartphone Media-tech
- Smartphone Meizu
- Smartphone Micromax
- Smartphone Microsoft
- Smartphone Mio
- Smartphone Mitsubishi
- Smartphone Mobistel
- Smartphone Mpman
- Smartphone Mustang
- Smartphone Nec
- Smartphone Nedis
- Smartphone Neffos
- Smartphone NGM
- Smartphone Nordmende
- Smartphone NTech
- Smartphone NUU Mobile
- Smartphone Palm
- Smartphone Pantech
- Smartphone Phicomm
- Smartphone Polaroid
- Smartphone Prestigio
- Smartphone Profoon
- Smartphone Razer
- Smartphone RCA
- Smartphone Realme
- Smartphone RugGear
- Smartphone Sagem
- Smartphone Sanyo
- Smartphone Sencor
- Smartphone Sharp
- Smartphone Silvercrest
- Smartphone Sonim
- Smartphone Sony Ericsson
- Smartphone Spice
- Smartphone Storex
- Smartphone Sunny
- Smartphone Sunstech
- Smartphone Swissvoice
- Smartphone Switel
- Smartphone T-Mobile
- Smartphone TCL
- Smartphone Tecdesk
- Smartphone Telefunken
- Smartphone Telme
- Smartphone Telstra
- Smartphone Tesla
- Smartphone Thomson
- Smartphone Tiptel
- Smartphone TP Link
- Smartphone Trekstor
- Smartphone Ulefone
- Smartphone UMi
- Smartphone UTStarcom
- Smartphone Vestel
- Smartphone Vivax
- Smartphone Vivo
- Smartphone Vodafone
- Smartphone Wileyfox
- Smartphone Wolder
- Smartphone Wolfgang
- Smartphone Xtreamer
- Smartphone Yota
- Smartphone Zipy
- Smartphone ZTE
- Smartphone O2
- Smartphone OK
- Smartphone Olympia
- Smartphone OnePlus
- Smartphone Oppo
- Smartphone Overmax
- Smartphone CSL
- Smartphone Krüger And Matz
- Smartphone NGS
- Smartphone Umidigi
- Smartphone Facom
- Smartphone Bush
- Smartphone Infiniton
- Smartphone Nevir
- Smartphone Aplic
- Smartphone Alba
- Smartphone Majestic
- Smartphone Trevi
- Smartphone XD
- Smartphone AT&T
- Smartphone Billow
- Smartphone SPC
- Smartphone EVOLVEO
- Smartphone Lark
- Smartphone BGH
- Smartphone CAT
- Smartphone Coolpad
- Smartphone Crosscall
- Smartphone Custom
- Smartphone EStar
- Smartphone Freeman
- Smartphone Karbonn
- Smartphone Keneksi
- Smartphone Konrow
- Smartphone M3 Mobile
- Smartphone Maxwest
- Smartphone Mediacom
- Smartphone ORA
- Smartphone Oukitel
- Smartphone Piranha
- Smartphone Plum
- Smartphone TAG Heuer
- Smartphone Tremay
- Smartphone Cubot
- Smartphone JCB
- Smartphone Aspera
- Smartphone CRUX
- Smartphone Casper
- Smartphone Unnecto
- Smartphone MyPhone
- Smartphone Primux
- Smartphone ToughGear
- Smartphone Komu
- Smartphone Verykool
- Smartphone Senifone
- Smartphone Syco
- Smartphone Pharos
- Smartphone ITTM
- Smartphone Cyrus
- Smartphone Posh Mobile
- Smartphone THL
- Smartphone NGM-Mobile
- Smartphone Nothing
- Smartphone Tecno
- Smartphone Olitech
- Smartphone Mobiola
- Smartphone TIM
- Smartphone Nubia
- Smartphone LeEco
- Smartphone Best Buy
- Smartphone GSmart
- Smartphone Bea-fon
- Smartphone Opticon
- Smartphone Saiet
- Smartphone Jitterbug
- Smartphone POCO
- Smartphone HMD
- Smartphone Opis
- Smartphone Krüger&Matz
- Smartphone Volla
- Smartphone Nothing Tech
- Smartphone Kalley
Nieuwste handleidingen voor Smartphone
2 April 2025

29 Maart 2025
9 Maart 2025
25 Februari 2025
25 Februari 2025
25 Februari 2025

25 Februari 2025
25 Februari 2025
25 Februari 2025
25 Februari 2025