Ag Neovo TX-2202 Handleiding
Lees hieronder de 📖 handleiding in het Nederlandse voor Ag Neovo TX-2202 (47 pagina's) in de categorie Monitor. Deze handleiding was nuttig voor 52 personen en werd door 2 gebruikers gemiddeld met 4.5 sterren beoordeeld
Pagina 1/47

TX-1502, TX-1702, TX-1902 & TX-2202 Touch Screen Monitor
User Manual
www.agneovo.com

TABLE OF CONTENTS
2
SAFETY INFORMATION
WEEE 4 ...........................................................................................................................................................
PRECAUTIONS
Notice 5 ...........................................................................................................................................................
Cautions When Setting Up 5 ...........................................................................................................................
Cautions When Using 6 ...................................................................................................................................
Cleaning and Maintenance 7 ...........................................................................................................................
Notice for the LCD Monitor 7 ...........................................................................................................................
CHAPTER 1: PRODUCT DESCRIPTION
1.1 Package Contents 8 ..................................................................................................................................
1.2 Removing/Attaching Cable Cover 9 ..........................................................................................................
1.3 Installing the Stand 10 ...............................................................................................................................
1.4 Adjusting the Tilt ...................................................................................................................................10
1.5 Wall Mounting ....................................................................................................................................... 11
1.6 LCD Monitor Overview 12 .........................................................................................................................
1.6.1 Front View .................................................................................................................................12
1.6.2 Rear View ..................................................................................................................................12
1.6.3 Control Buttons..........................................................................................................................13
CHAPTER 2: MAKING CONNECTIONS
2.1 Connecting the AC Power 16 ....................................................................................................................
2.2 Connecting Input Source Signals 17 .........................................................................................................
2.3 Connecting the Wired OSD Controller 17 .................................................................................................
2.4 Connecting USB for Touch Screen Control 18 ..........................................................................................
Touch Disable Function 18 ..................................................................................................................
2.5 Ventilation Requirements for Enclosure Locating 19 .................................................................................
CHAPTER 3: USING THE LCD MONITOR
3.1 Turning on the Power 20 ...........................................................................................................................
3.2 Displaying the OSD Menu 21 ....................................................................................................................
3.3 Adjusting Monitor Brightness 22 ................................................................................................................
3.4 Adjusting Monitor Contrast 23 ...................................................................................................................
CHAPTER 4: ON SCREEN DISPLAY MENU
4.1 Using the OSD Menu 24 ...........................................................................................................................
4.2 OSD Menu Tree 26 ...................................................................................................................................
CHAPTER 5: ADJUSTING THE LCD MONITOR
5.1 Picture Menu 27 ........................................................................................................................................
5.2 Colour Menu 29 .........................................................................................................................................
5.3 OSD Menu 30 ............................................................................................................................................
5.4 System Menu 31 .......................................................................................................................................
CHAPTER 6: APPENDIX
6.1 Warning Messages 32 ...............................................................................................................................
6.2 Timing ...................................................................................................................................................33
6.3 Touch Screen Driver Installation 35 ...........................................................................................................

3
TABLE OF CONTENTS
6.3.1 Optional Calibration Tool Install 35 .................................................................................................
6.3.2 Driver Installation Instructions 36 ...................................................................................................
6.4 Cleaning 37 ...............................................................................................................................................
6.5 Troubleshooting .................................................................................................................................... 38
6.6 Transporting the LCD Monitor ..............................................................................................................39
CHAPTER 7: SPECIFICATIONS
7.1 Monitor Specications .......................................................................................................................... 43
7.2 Monitor Dimensions 44 ..............................................................................................................................

SAFETY INFORMATION
4
WEEE
Information for users applicable in European Union countries.
The symbol on the product or its packaging signies that this product has to be
disposed separately from ordinary household wastes at its end of life. Please kindly
be aware that this is your responsibility to dispose electronic equipment at recycling
centers so as to help conserve natural resources. Each country in the European Union
should have its collection centers for electrical and electronic equipment recycling.
For information about your recycling drop off area, please contact your local related
electrical and electronic equipment waste management authority or the retailer where
you bought the product.
SAFETY INFORMATION
5
PRECAUTIONS
PRECAUTIONS
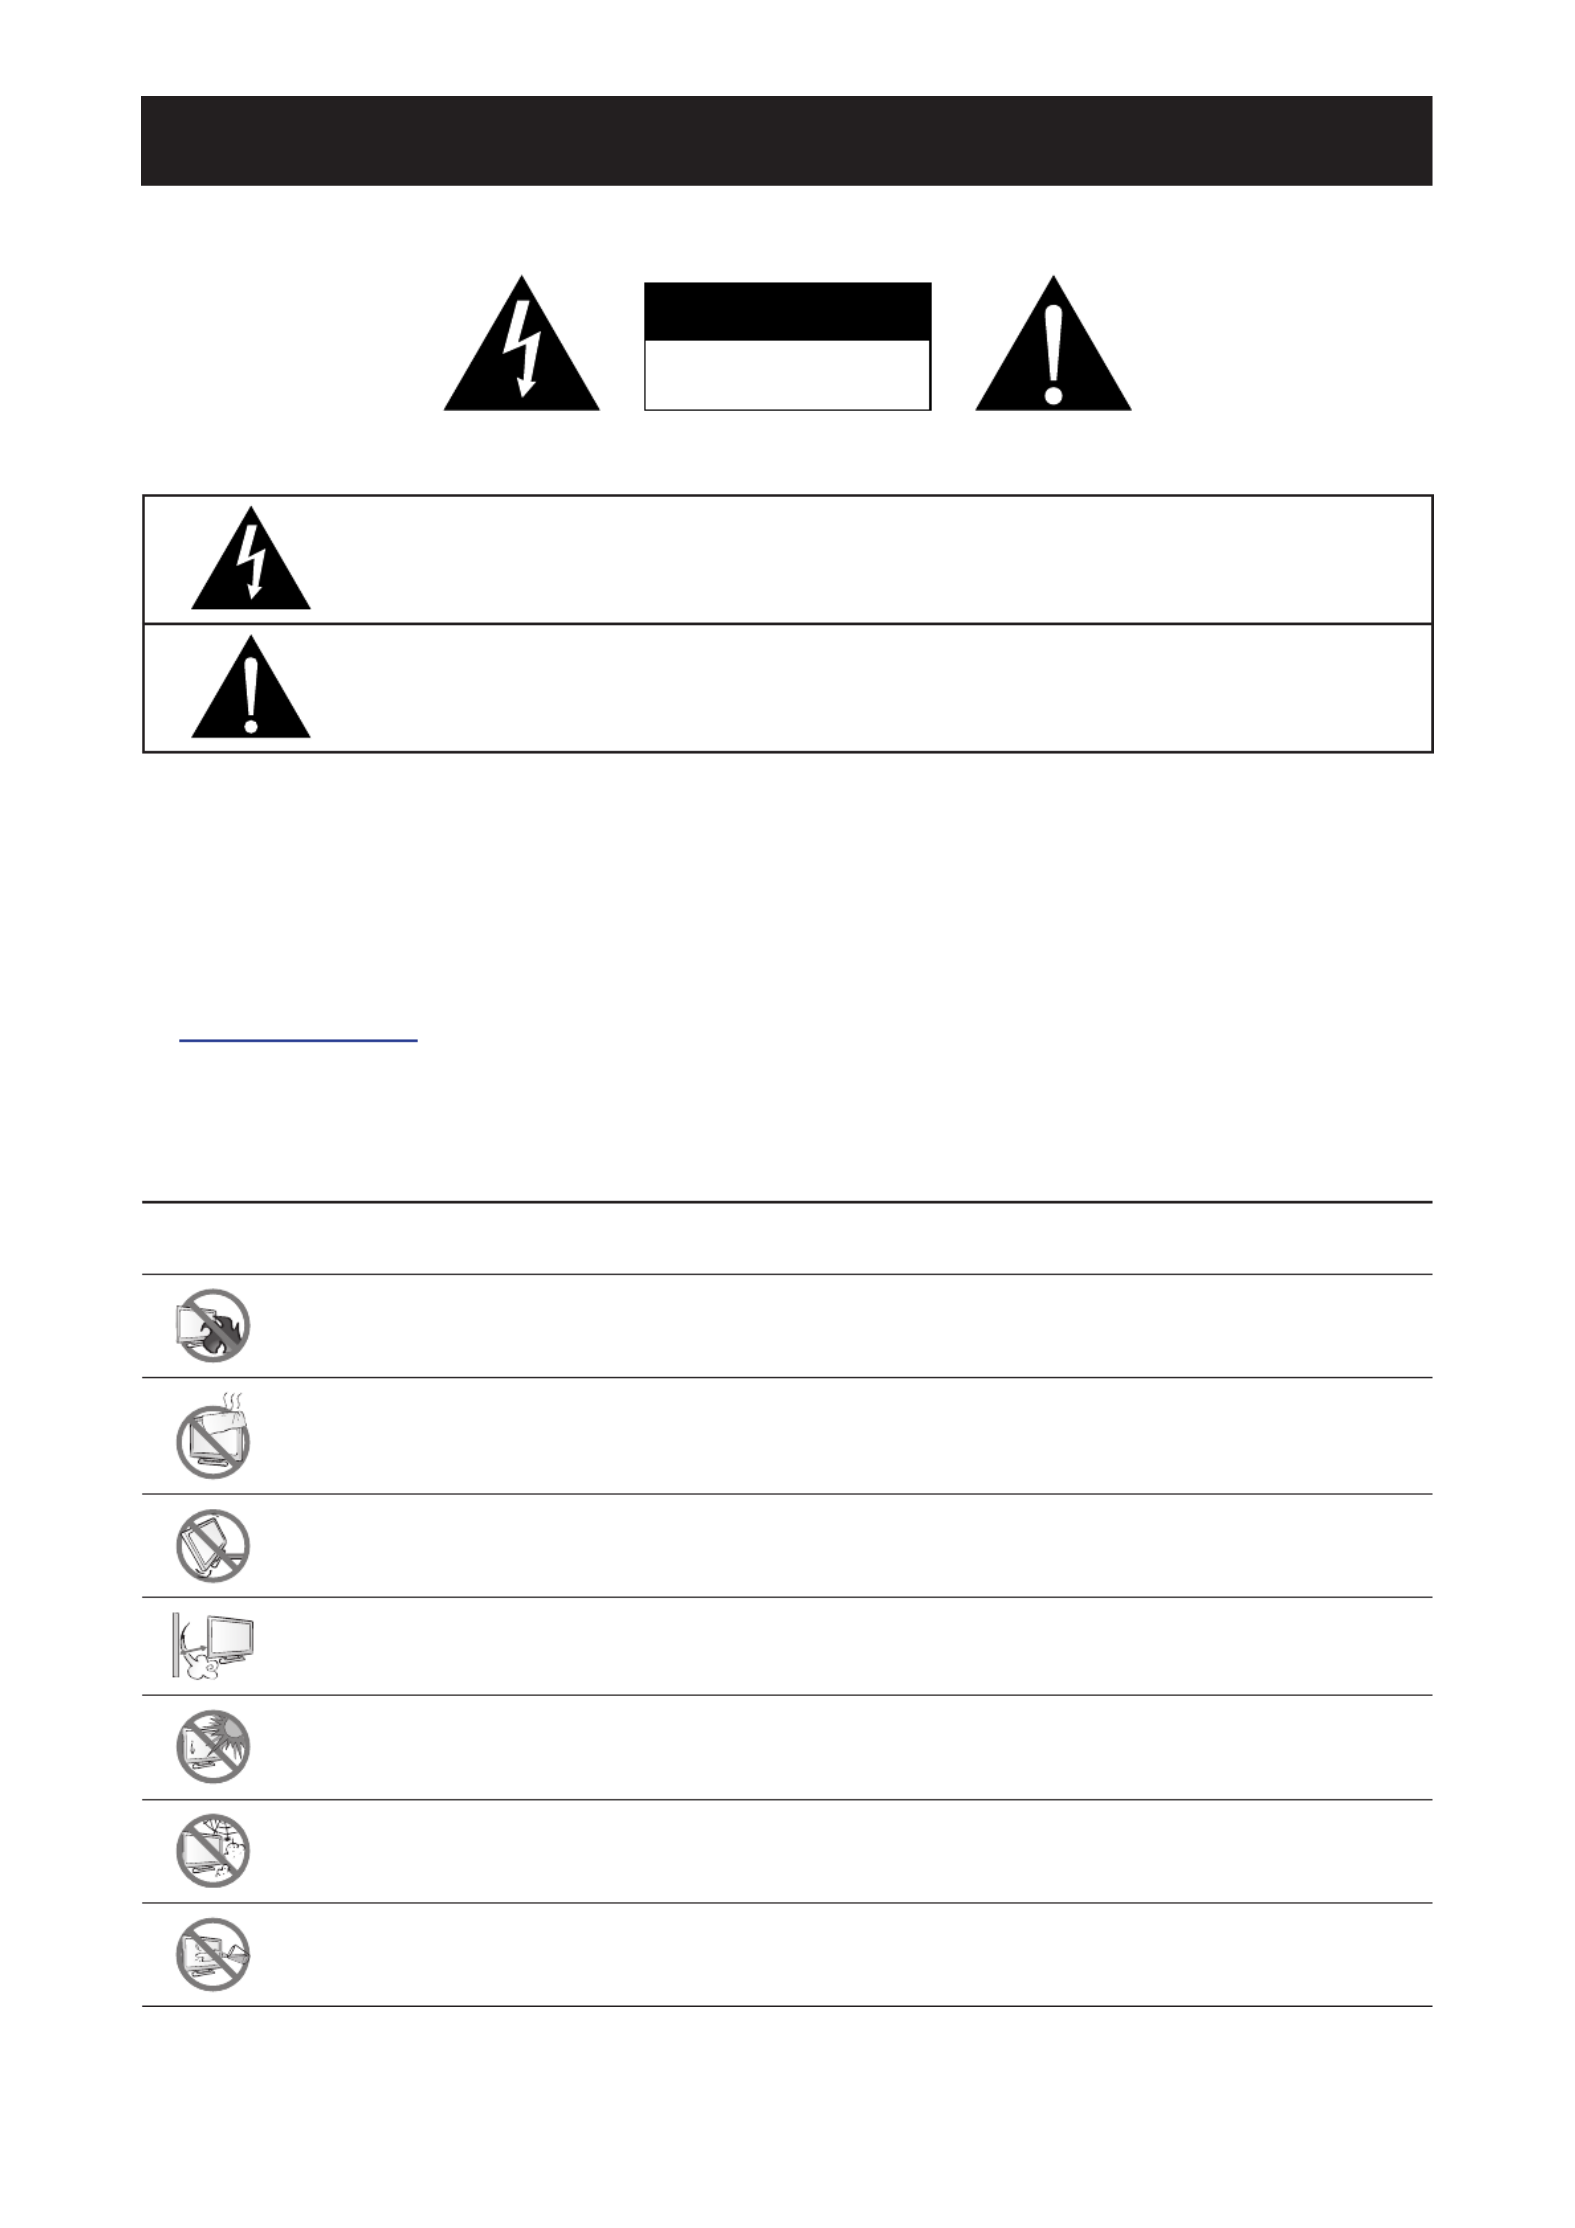
CAUTION
RISK OF ELECTRIC SHOCK
DO NOT OPEN
Symbols used in this manual
This icon indicates the existence of a potential hazard that could result in personal injury
or damage to the product.
This icon indicates important operating and servicing information.
Notice
• Read this User Manual carefully before using the LCD monitor and keep it for future reference.
• The product specications and other information provided in this User Manual are for reference only. All
information is subject to change without notice. Updated content can be downloaded from our web site at
www.agneovo.com.
• To protect your rights as a consumer, do not remove any stickers from the LCD monitor. Doing so may
affect the determination of the warranty period.
Cautions When Setting Up
Do not place the LCD monitor near heat sources, such as a heater, exhaust vent, or in direct
sunlight.
Do not cover or block the ventilation holes in the housing.
Place the LCD monitor on a stable area. Do not place the LCD monitor where it may subject to
vibration or shock.
Place the LCD monitor in a well-ventilated area.
Do not place the LCD monitor outdoors.
Do not place the LCD monitor in a dusty or humid environment.
Do not spill liquid or insert sharp objects into the LCD monitor through the ventilation holes.
Doing so may cause accidental re, electric shock or damage the LCD monitor.
Precautions
6
PRECAUTIONS
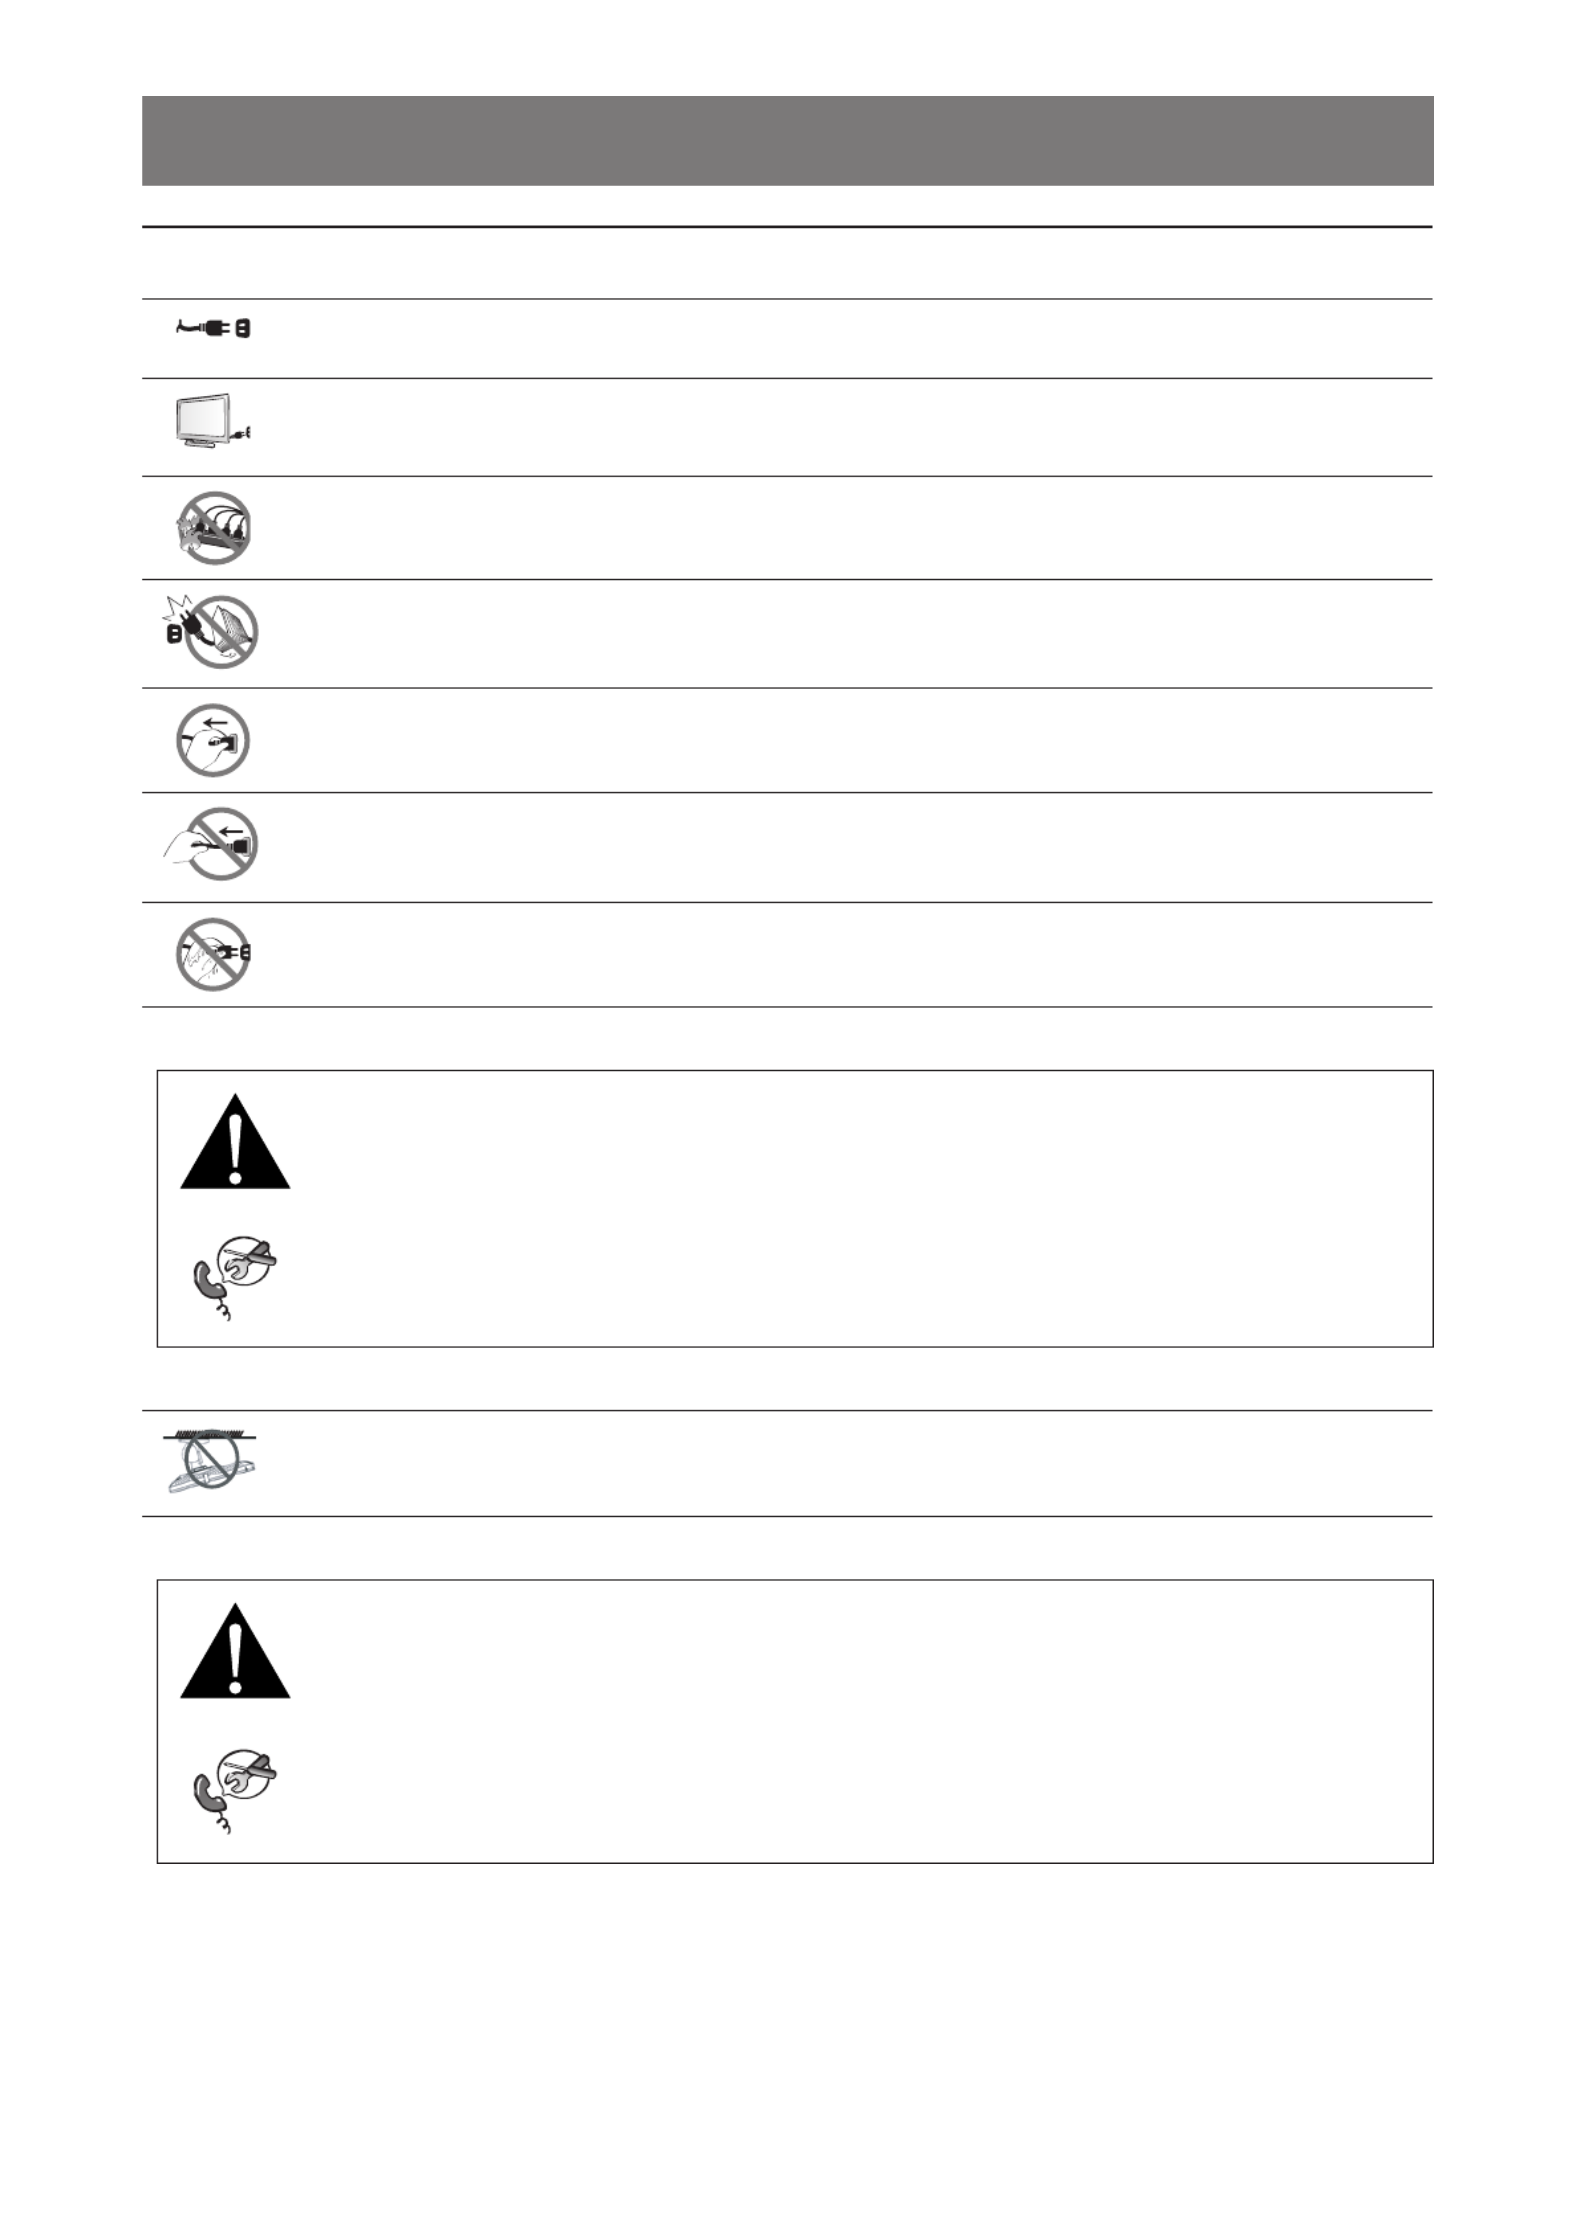
Cautions When Using
Use only the power cord supplied with the LCD monitor.
The power outlet should be installed near the LCD monitor and be easily accessible.
If an extension cord is used with the LCD monitor, ensure that the total current consumption
plugged into the power outlet does not exceed the ampere rating.
Do not allow anything to rest on the power cord. Do not place the LCD monitor where the
power cord may be stepped on.
If the LCD monitor will not be used for an indenite period of time, unplug the power cord from
the power outlet.
To disconnect the power cord, grasp and pull by the plug head. Do not tug on the cord; doing
so may cause re or electric shock.
Do not unplug or touch the power cord with wet hands.
WARNING:
Unplug the power cord from the power outlet and refer to qualied service personnel under
the following conditions:
• When the power cord is damaged.
• If the LCD monitor has been dropped or the housing has been damaged.
• If the LCD monitor emits smoke or a distinct odor.
Ceiling mount or mount on any other horizontal surface overhead are not advisable.
WARNING:
Installation in contravention of the instructions may result in undesirable consequences,
particularly hurting people and damaging property. Users who have already mounted the
monitor on the ceiling or any other horizontal surface overhead are strongly advised to
contact AG Neovo for consultations and solutions to help ensure a most pleasurable and
fullling monitor experience.
7
PRECAUTIONS
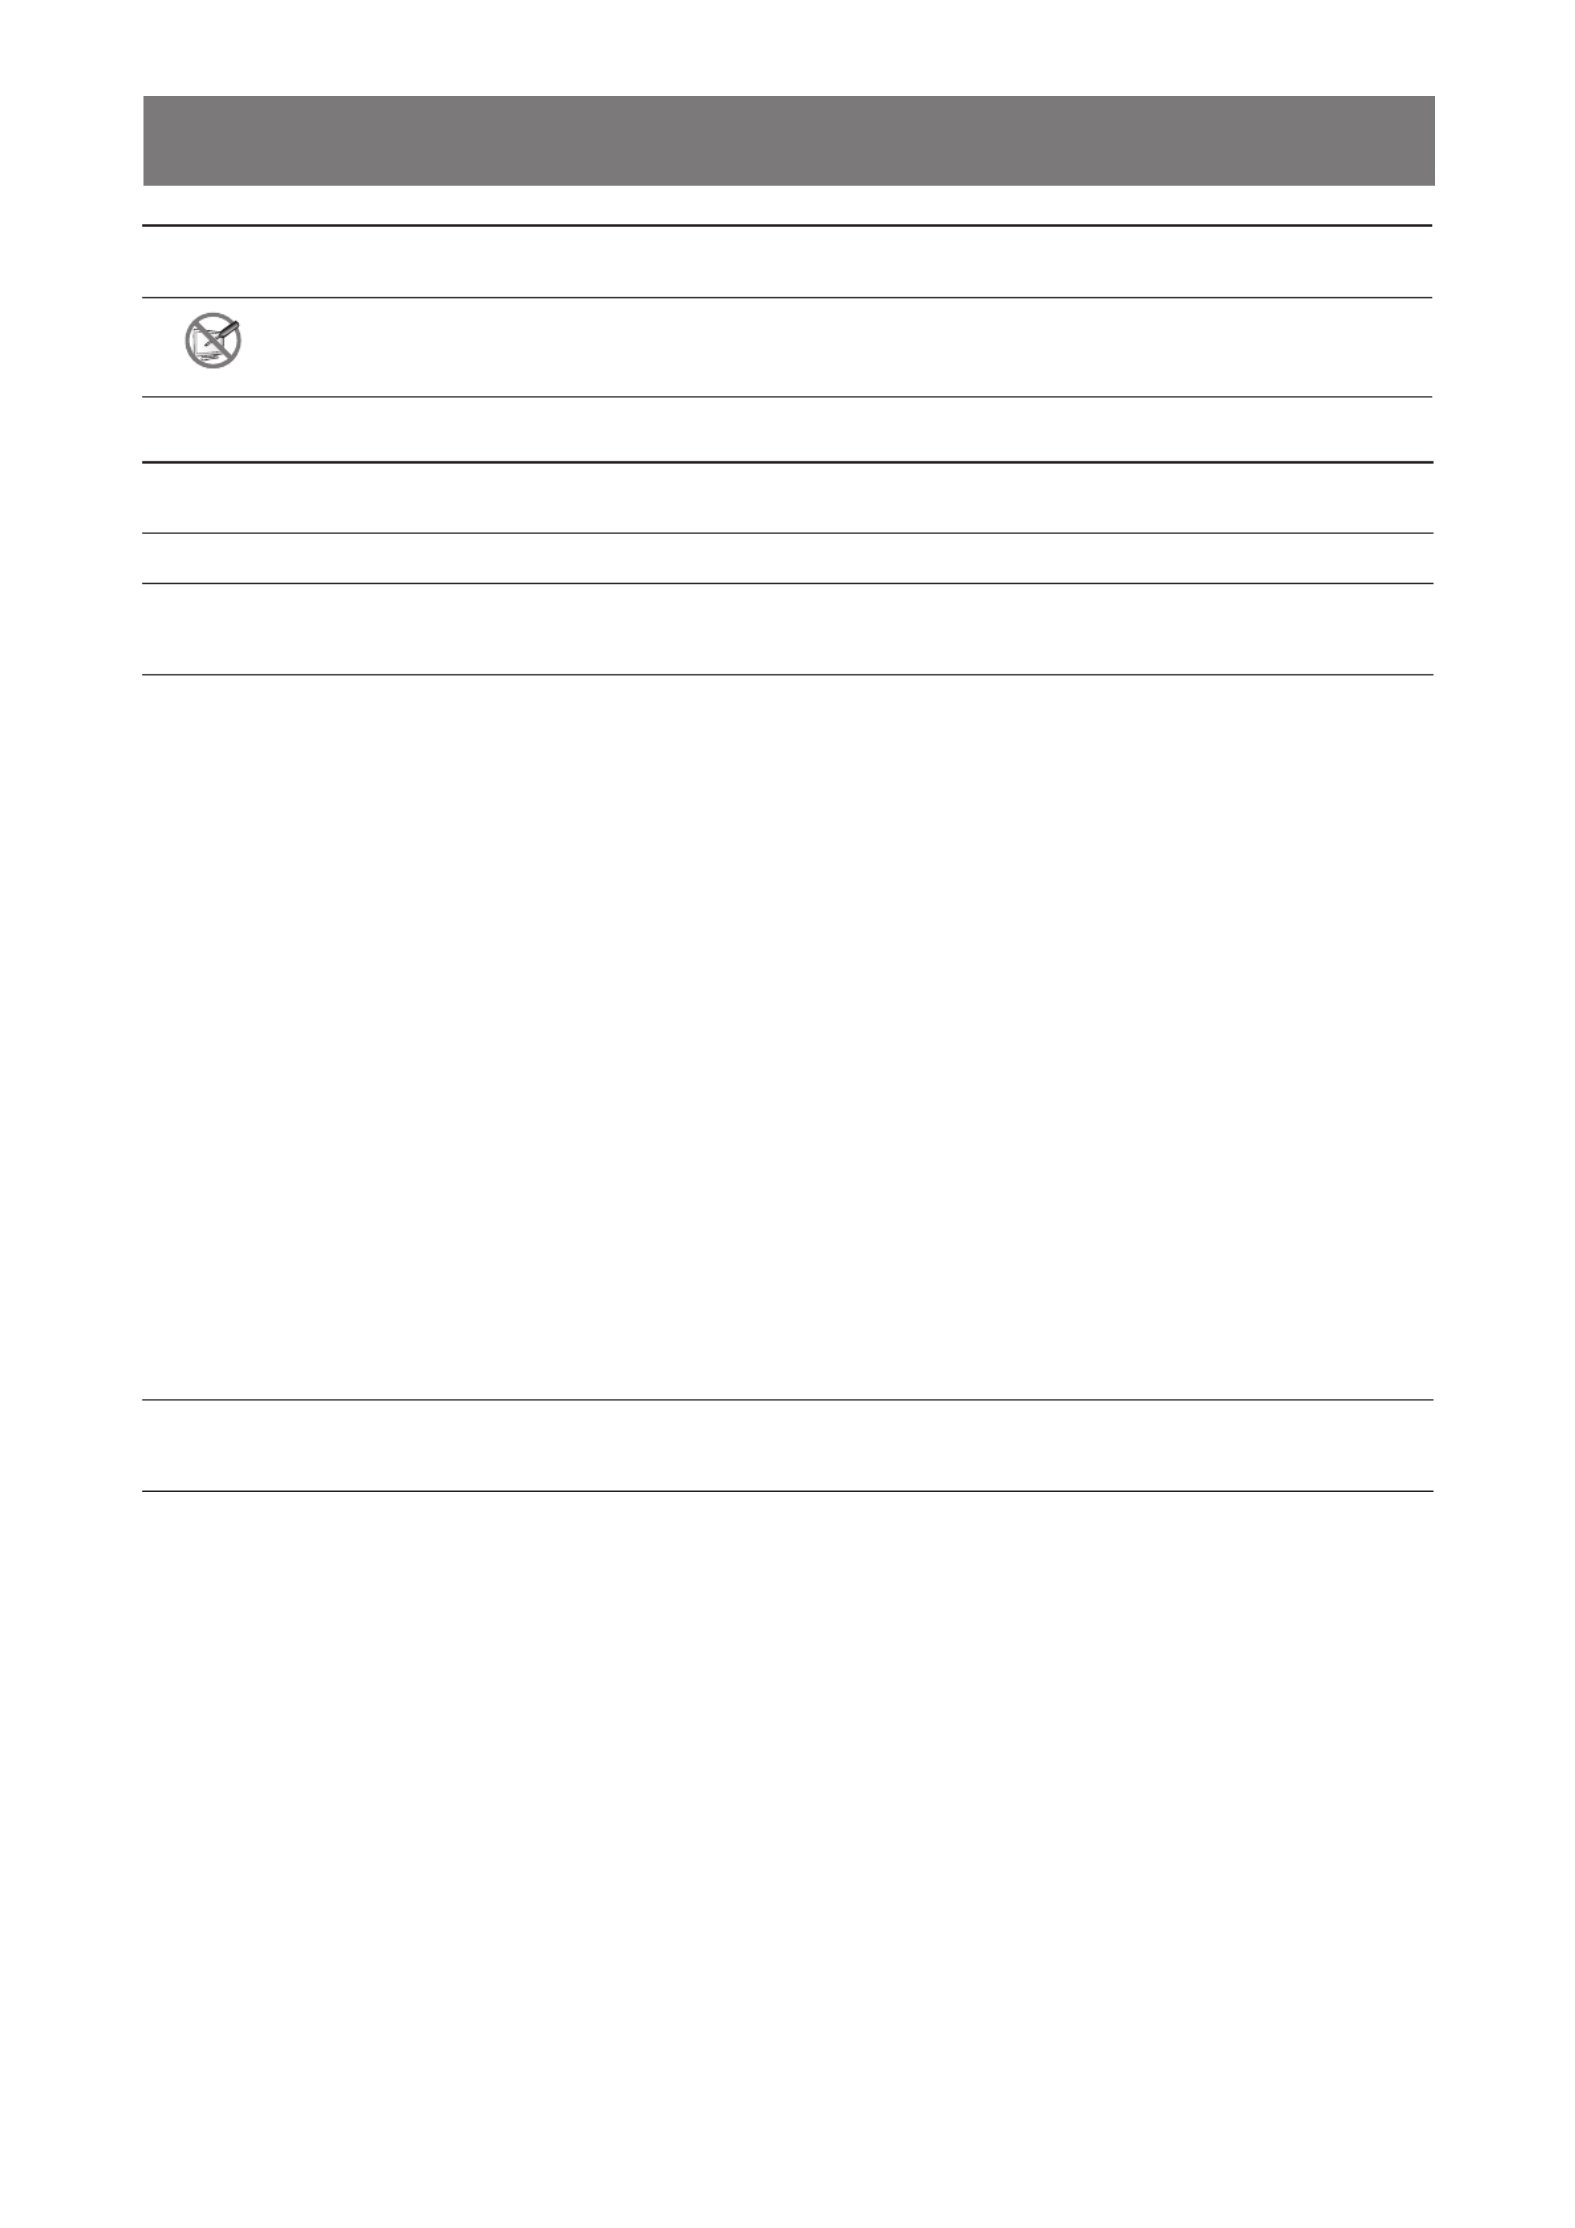
Cleaning and Maintenance
Do not attempt to service the LCD monitor yourself, refer to qualied service personnel.
Opening or removing the covers may expose you to dangerous voltage or other risks.
Notice for the LCD Monitor
In order to maintain the stable luminous performance, it is recommended to use low brightness setting.
Due to the lifespan of the lamp, it is normal that the brightness quality of the LCD monitor may decrease
with time.
When static images are displayed for long periods of time, the image may cause an imprint on the LCD
monitor. This is called image retention or burn-in.
To prevent image retention, do any of the following:
• Set the LCD monitor to turn off after a few minutes of being idle.
• Use a screen saver that has moving graphics or a blank white image.
• Switch desktop backgrounds regularly.
• Adjust the LCD monitor to low brightness settings.
• Turn off the LCD monitor when the system is not in use.
Things to do when the LCD monitor shows image retention:
• Turn off the LCD monitor for extended periods of time. It can be several hours or several days.
• Use a screen saver and run it for extended periods of time.
• Use a black and white image and run it for extended periods of time.
There are millions of micro transistors inside the LCD monitor. It is normal for a few transistors to be
damaged and to produce spots. This is acceptable and is not considered a failure.

CHAPTER 1: PRODUCT DESCRIPTION
8
1.1 Package Contents
When unpacking, check if the following items are included in the package. If any of them is missing or
damaged, contact your dealer.
Chapter 1: Product Description
LCD Monitor
Quick Start Guide
Power Adaptor(*)
Warranty Card
Power Cord
USB CableVGA Cable
TX-1502/1702/1902 TX-2202
TX-1502/1702/1902/2202_Quick Guide_V010
Quick Start Guide
TX -1502, T X -1702, TX -1902 & TX -2202 L CD M onitor
Note:(*)
• Use only the supplied power cord.
• The above pictures are for reference only. Actual items may vary upon shipment.
• (*) Must use only the supplied power adapter:
- Vendor: Delta
- Model no.: ADP-50YH B
- Rating: DC 12V, 4.16A
HDMI Cable
Cable Cover and Screw
(M3 x 6)
10
PRODUCT DESCRIPTION
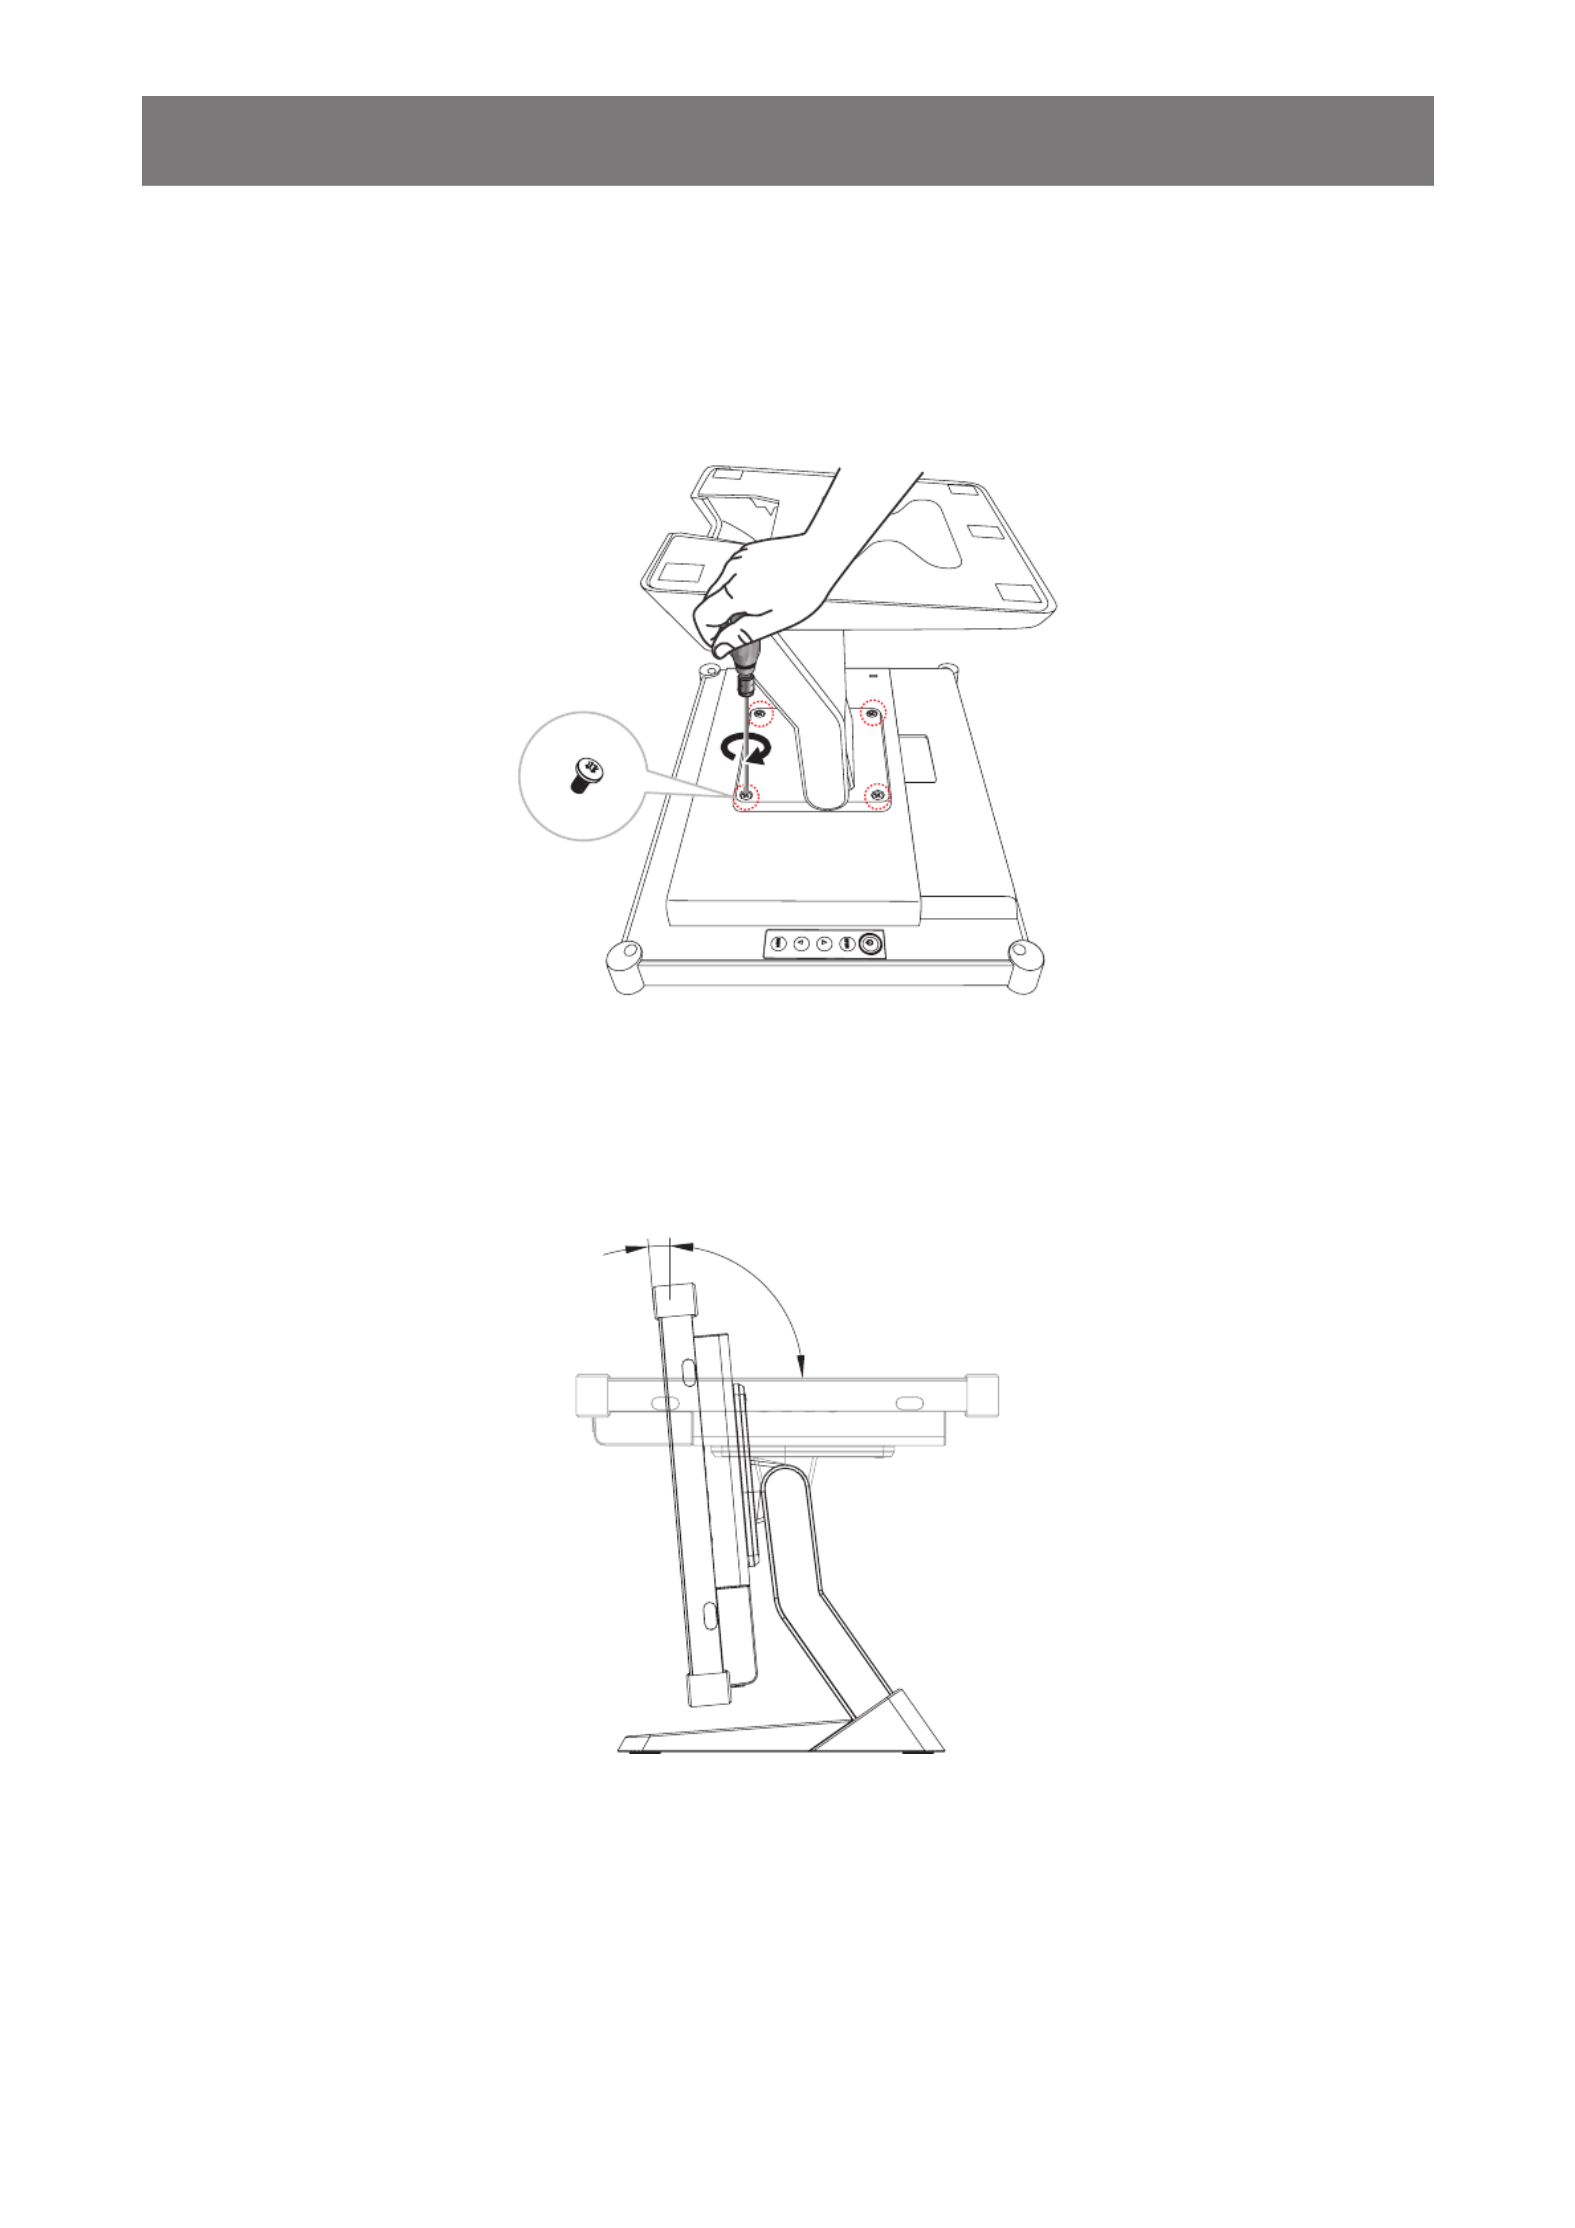
1.3 Installing the Stand
1. Lay the LCD monitor face down on a at even surface.
2. By aligning with the screw holes, install the stand to the rear of the LCD monitor.
3. Attach the stand to the monitor with the screws.
1.4 Adjusting the Tilt
For comfort viewing, tilt the LCD monitor up to an angle of -5° to 90°. Hold the stand with one hand and use
the other to adjust the LCD monitor to the desired angle.
90°
-5°

11
PRODUCT DESCRIPTION
1.5 Wall Mounting
To wall-mount the LCD monitor, screw the mounting bracket to the VESA holes at the rear of the LCD monitor.
MENU
SELECT
100
mm
100
mm
MENU
SELECT
100
mm
100
mm
TX-1502/1702/1902 TX-2202
Note: Take measures to prevent the LCD monitor from falling down and lessen possible injury and damage
to the monitor in case of earthquakes or other disasters.
• Use only the 100 x 100 mm wall mount kit recommended by AG Neovo. All
AG Neovo wall mount kits comply with VESA standard.
• Secure the LCD monitor on a solid wall strong enough to bear its weight.
• It is suggested to wall mount the LCD monitor without tilting it facing
downward.
• For TX-1502/1702/1902, the distance between the back cover surface and
the bottom of the screw hole is 8 mm. Please use four M4 screws diameter
with proper length to mount your monitor. The mounting stand must be able
to support at least 10.1 lb (4.6 kg) (TX-1502), 12.8 lb (5.8 kg) (TX-1702), or
14.3 lb (6.5 kg) (TX-1902).
• For TX-2202, the distance between the back cover surface and the bottom
of the screw hole is 7 mm. Please use four M4 screws diameter with proper
length to mount your monitor. The mounting stand must be able to support
at least 6.1 kg (13.5 lb).

12
PRODUCT DESCRIPTION
1.6 LCD Monitor Overview
1.6.1 Front View
TX-1502/1702/1902 TX-2202
1.6.2 Rear View
MENU
SELECT
MENU
SELECT
DC IN DisplayPort HDMI VGA RJ11 USB
1 2 3 4 5 6
TX-1502/1702/1902 TX-2202
1DC IN:
Connect with the supplied power adaptor.
2DisplayPort:
Connect DisplayPort signals input.
3HDMI:
Connect HDMI signals input.
4VGA:
Connect VGA signals input.

13
PRODUCT DESCRIPTION
5RJ11:
Connect with wired OSD control. (Don’t connect telephone or internet cable to RJ-Type port.)
6USB:
Connect USB for touch screen control.
1.6.3 Control Buttons
MENU
SELECT
MENU
SELECT
MENU
SELECT
1
2
3
4
5
6
TX-1502/1702/1902 TX-2202
1MENU:
• OSD menu ON/OFF and return to main item.
2UP (p): Hot Key: Brightness
• When OSD menu is ON, navigate through adjustment icons or adjust a function.
• When the UP key is pressed, the brightness can be adjusted. The UP/DOWN key can be used
for brightness adjustment.
Brightness
Pr es s <▲, ▼ > t o djust and <M enu> t o Exit A
50

14
PRODUCT DESCRIPTION
3DOWN ( ): Hot Key: Contrastq
• When OSD menu is ON, navigate through adjustment icons or adjust a function.
• When the DOWN key is pressed, the contrast can be adjusted. The UP/DOWN key can be used
for contrast adjustment.
Contrast
Pr es s <▲, ▼ > t o djust an d <M en u > t o E xi t A
50
4SELECT:
• When OSD menu is ON, the key is used for function adjustment conrmation.
• When selecting the input source:
- If the monitor is in ON mode, press the SELECT key for 3 seconds to turn on the “Source
Select” menu.
- If the monitor is in Standby mode, press the SELECT key for 1 second to turn on the “Source
Select” menu.
Note: For detailed adjustment of “Source Select”, please refer to page 31.
5POWER ( ):
• Press to turn the monitor ON or OFF.
6Power Indicator (for TX-2202 only):
Indicate the operating status of the LCD monitor:
• Lights Green when the LCD monitor is turned on.
• Lights Amber when the LCD monitor is in standby mode.
• Lights Off when the LCD monitor is turned off.
15
PRODUCT DESCRIPTION
Note: To lock/unlock the MENU key and/or the key, press the MENU and keys simultaneously. Then q
select the desired lock/unlock function.
Pre ss< ▲,▼ > t o dj us t a nd <Me nu > t o E xit A
Lock
OSD Key Inactive
Power Key Inactive
Pre ss< ▲,▼ > t o dj us t a nd <Me nu > t o E xit A
Lock
No Yes
CHAPTER 2: MAKING CONNECTIONS
16
CAUTION:
Make sure that the LCD monitor is not connected to the power outlet before making any
connections. Connecting cables while the power is ON may cause possible electric shock or
personal injury.
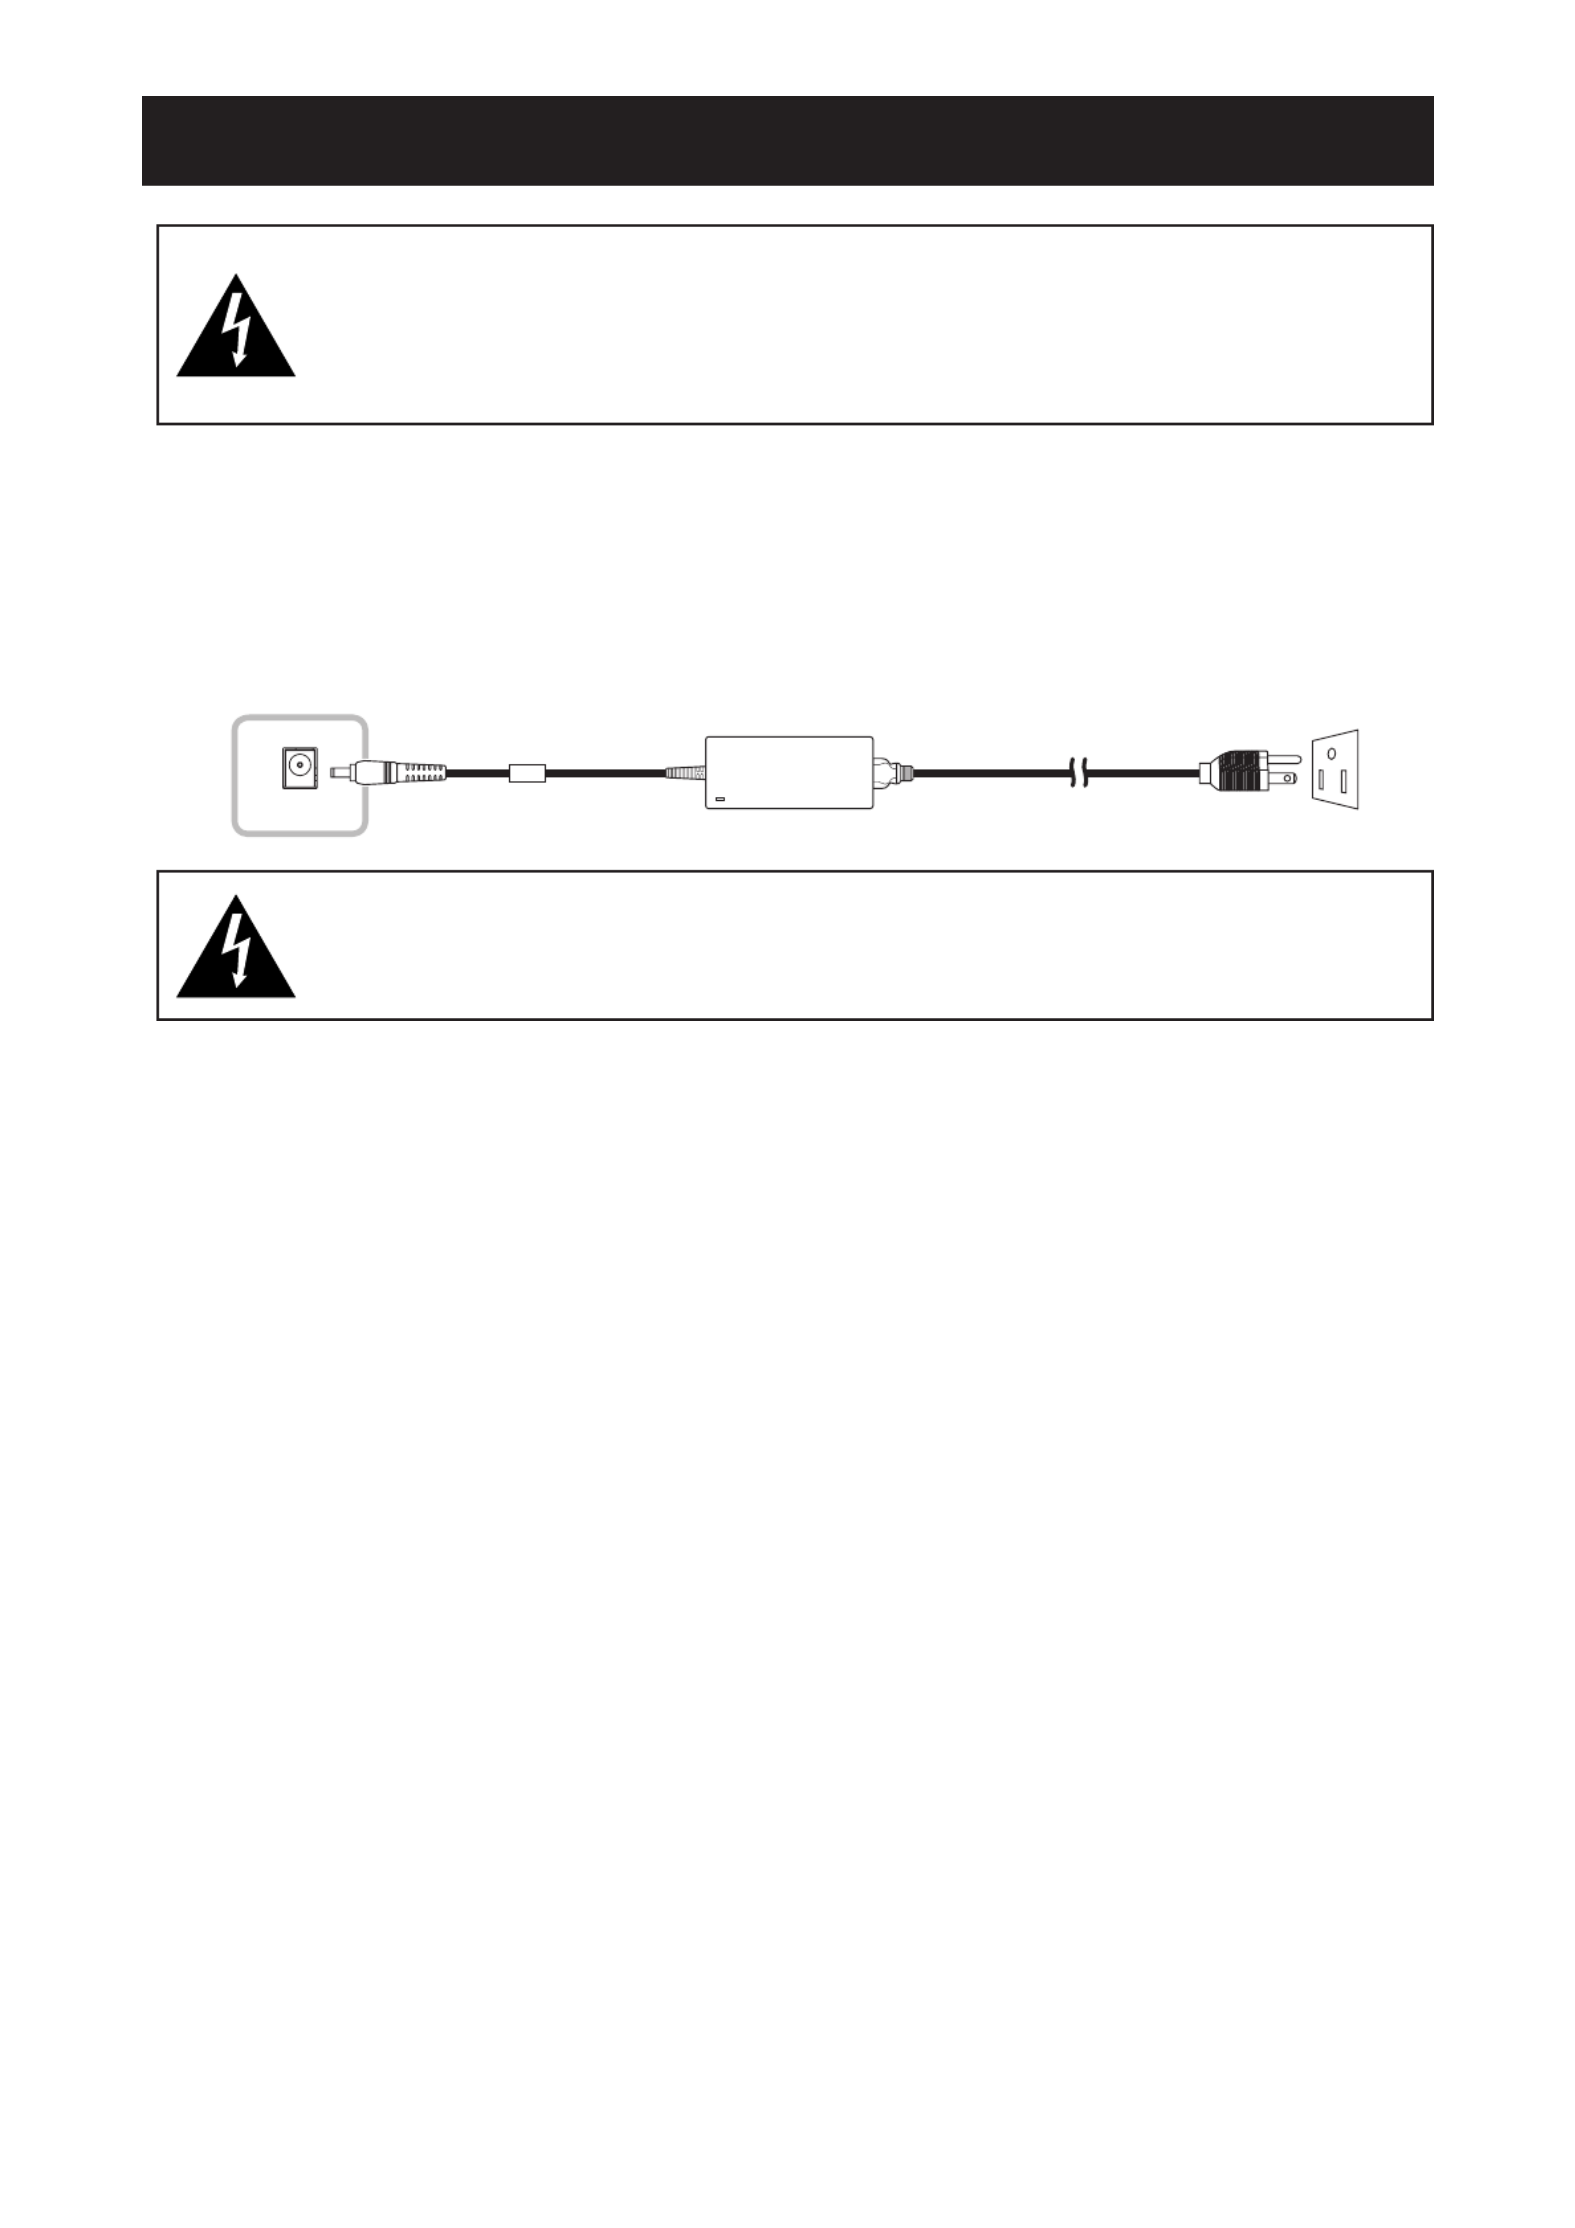
2.1 Connecting the AC Power
1. Connect the power cord to the power adapter.
2. Connect the power adapter to the DC power input at the rear of the LCD monitor.
3. Connect the power cord plug to a power outlet or a power supply.
DC IN
AC IN
CAUTION:
When unplugging the power cord, hold the power cord by the plug head. Never pull by the cord.
Chapter 2: Making Connections

17
MAKING CONNECTIONS
2.2 Connecting Input Source Signals
Input source signals can be connected with either of the following cables:
DisplayPort HDMI VGA
DisplayPort HDMI VGA
• DisplayPort
Connect one end of a DP cable to the DisplayPort
connector of the LCD monitor and the other end to the
DisplayPort connector of the computer.
• HDMI
Connect one end of an HDMI cable to the HDMI connector
of the LCD monitor and the other end to the HDMI
connector of the computer.
• VGA
Connect one end of a D-Sub (VGA) cable to the D-Sub
(VGA) connector of the LCD monitor and the other end to
the D-Sub (VGA) connector of the computer.
Note: To ensure the LCD monitor works well with your
computer, please congure the display mode of
your graphics card to make it less than or equal to
1024 x 768 (for TX-1502), 1280 x 1024 (for TX-
1702 & TX-1902), or 1920 x 1080 (for TX-2202)
resolution and make sure the timing of the display
mode is compatible with the LCD monitor. For
compatible Video Modes of your LCD monitor,
please refer to “6.2 Timing” on page 33.
2.3 Connecting the Wired OSD Controller
Connect the wired OSD controller (optional, not supplied) to the RJ11 connector of the LCD monitor.
RJ11
MENU
SELECT
MENU
SELECT
18
MAKING CONNECTIONS
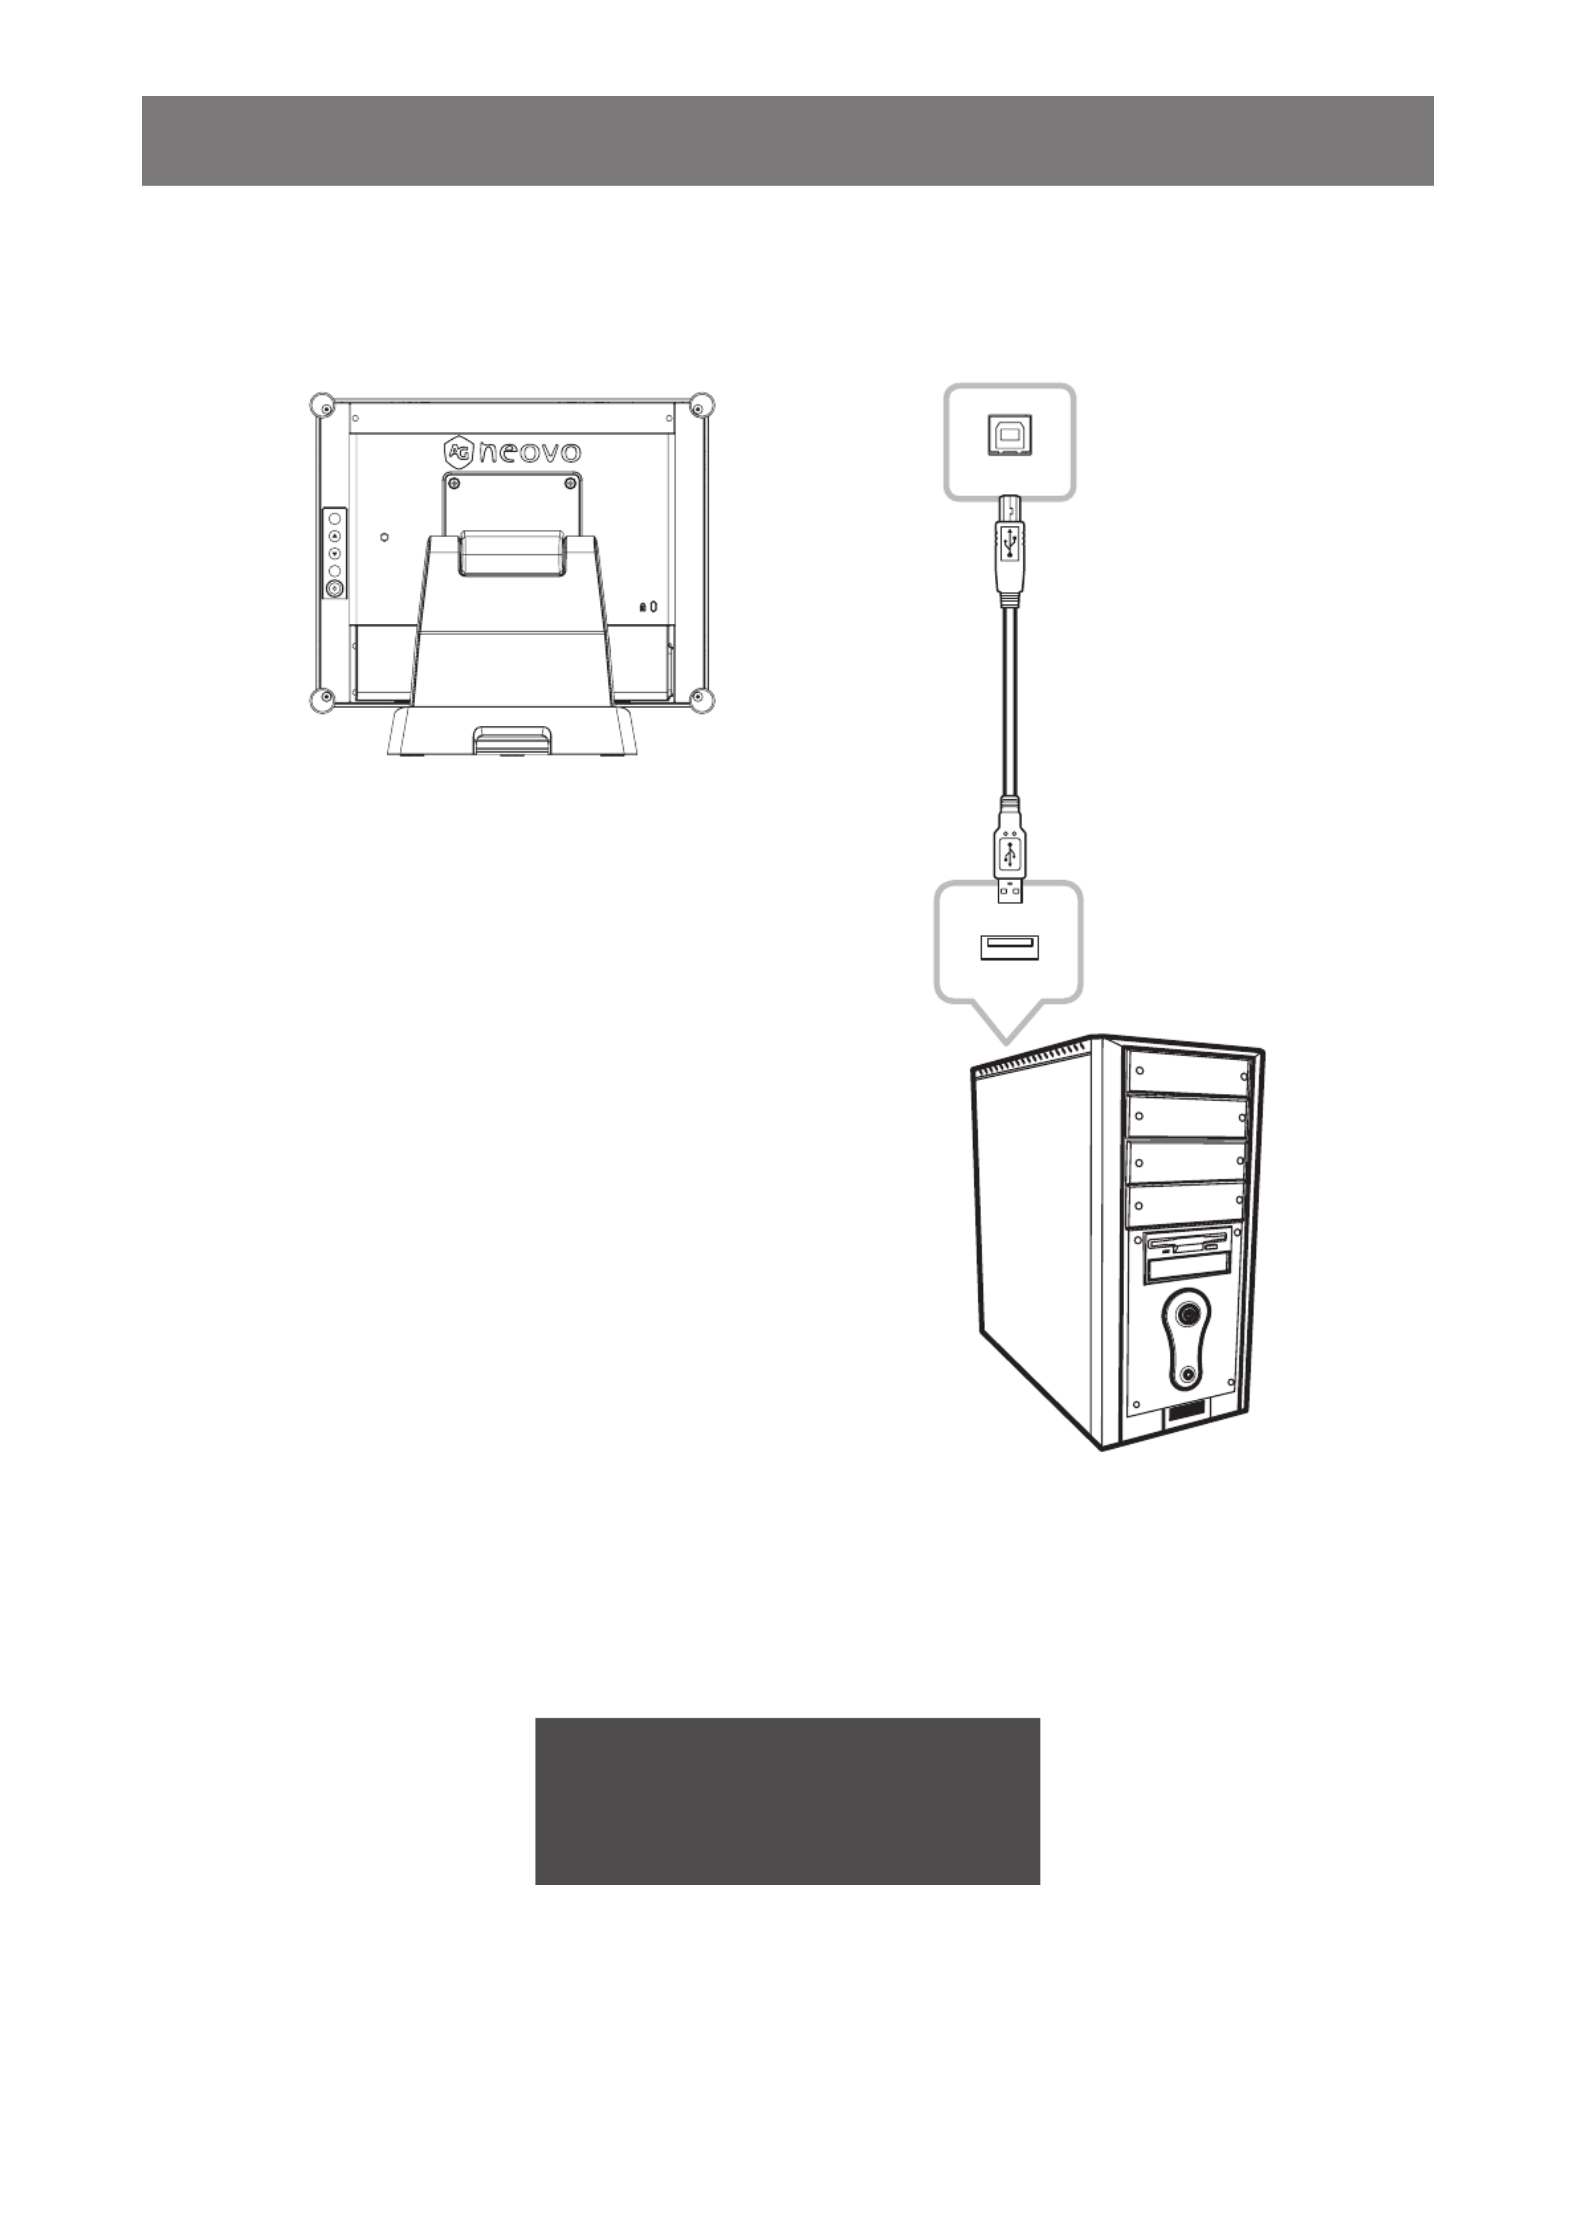
2.4 Connecting USB for Touch Screen Control
Connect one end of a USB cable to the USB connector of the LCD monitor and the other end to the USB
connector of the computer.
USB
USB
MENU
SELECT
Touch Disable Function
To disable the touch function, do the following:
1. Press “Menu” and “Select” keys simultaneously. The “Touch disable” message appears on
the screen.
Touch disable
2. To enable the touch function, press “Menu” and “Select” keys simultaneously for ve
seconds.

19
MAKING CONNECTIONS
2.5 Ventilation Requirements for Enclosure Locating
To allow heat to disperse, avoid installing the LCD monitor directly on the cabinet wall and make sure the
operating/storage temperature/humidity requirements are met as described below:
• Operating conditions: 0°C-40°C (32°F-104°F)
• Operating humidity (non-condensing): 20%-80%
• Operating altitude: < 10,000 feet (3,048m)
• Storage conditions: -20°C-60°C (-4°F-140°F)
• Storage humidity (non-condensing): 10%-90%
CHAPTER 3: USING THE LCD MONITOR
20
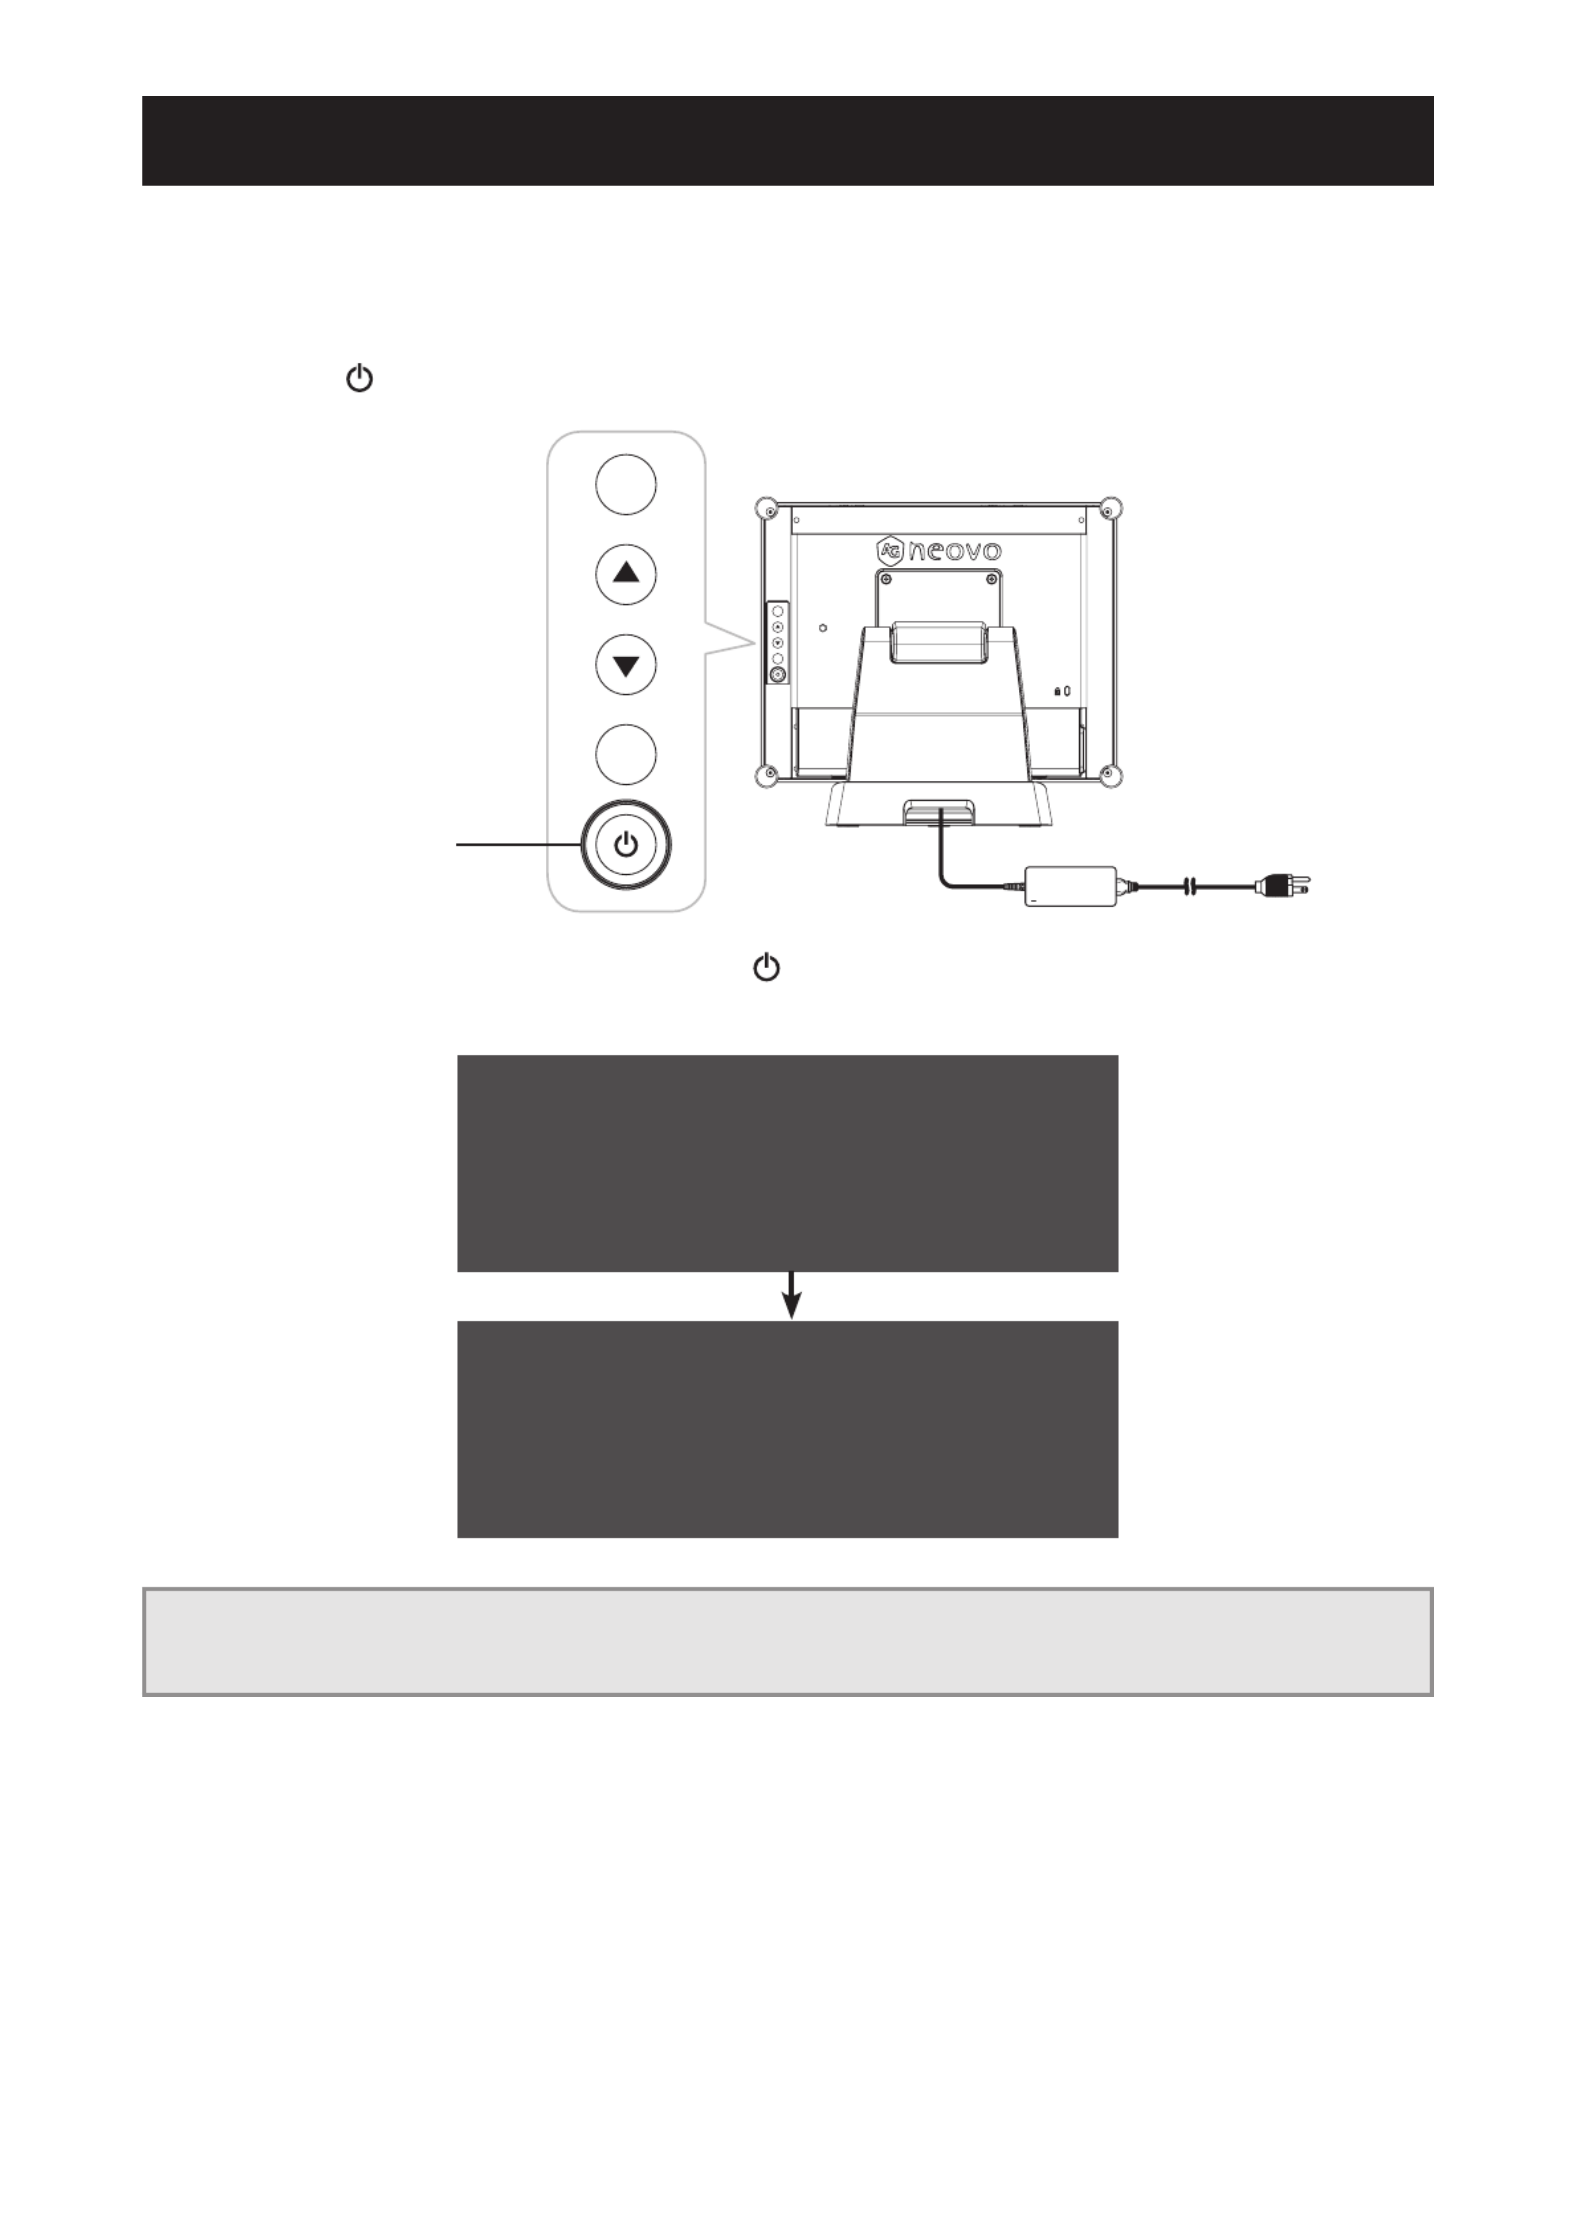
3.1 Turning on the Power
1. Connect the power to the LCD monitor. Refer to page 16.
2. Press the key on the control panel to turn the LCD monitor on.
MENU
SELECT
MENU
SELECT
Power Key
When the LCD monitor is turned on, press the key on the control panel three times to turn off the LCD
monitor.
Do you want to turn off?
Please press the power button again.
Note: The LCD monitor still consumes power as long as the power cord is connected to the power outlet.
Disconnect the power cord to completely cut off power.
Chapter 3: Using the LCD Monitor
21
USING THE LCD MONITOR
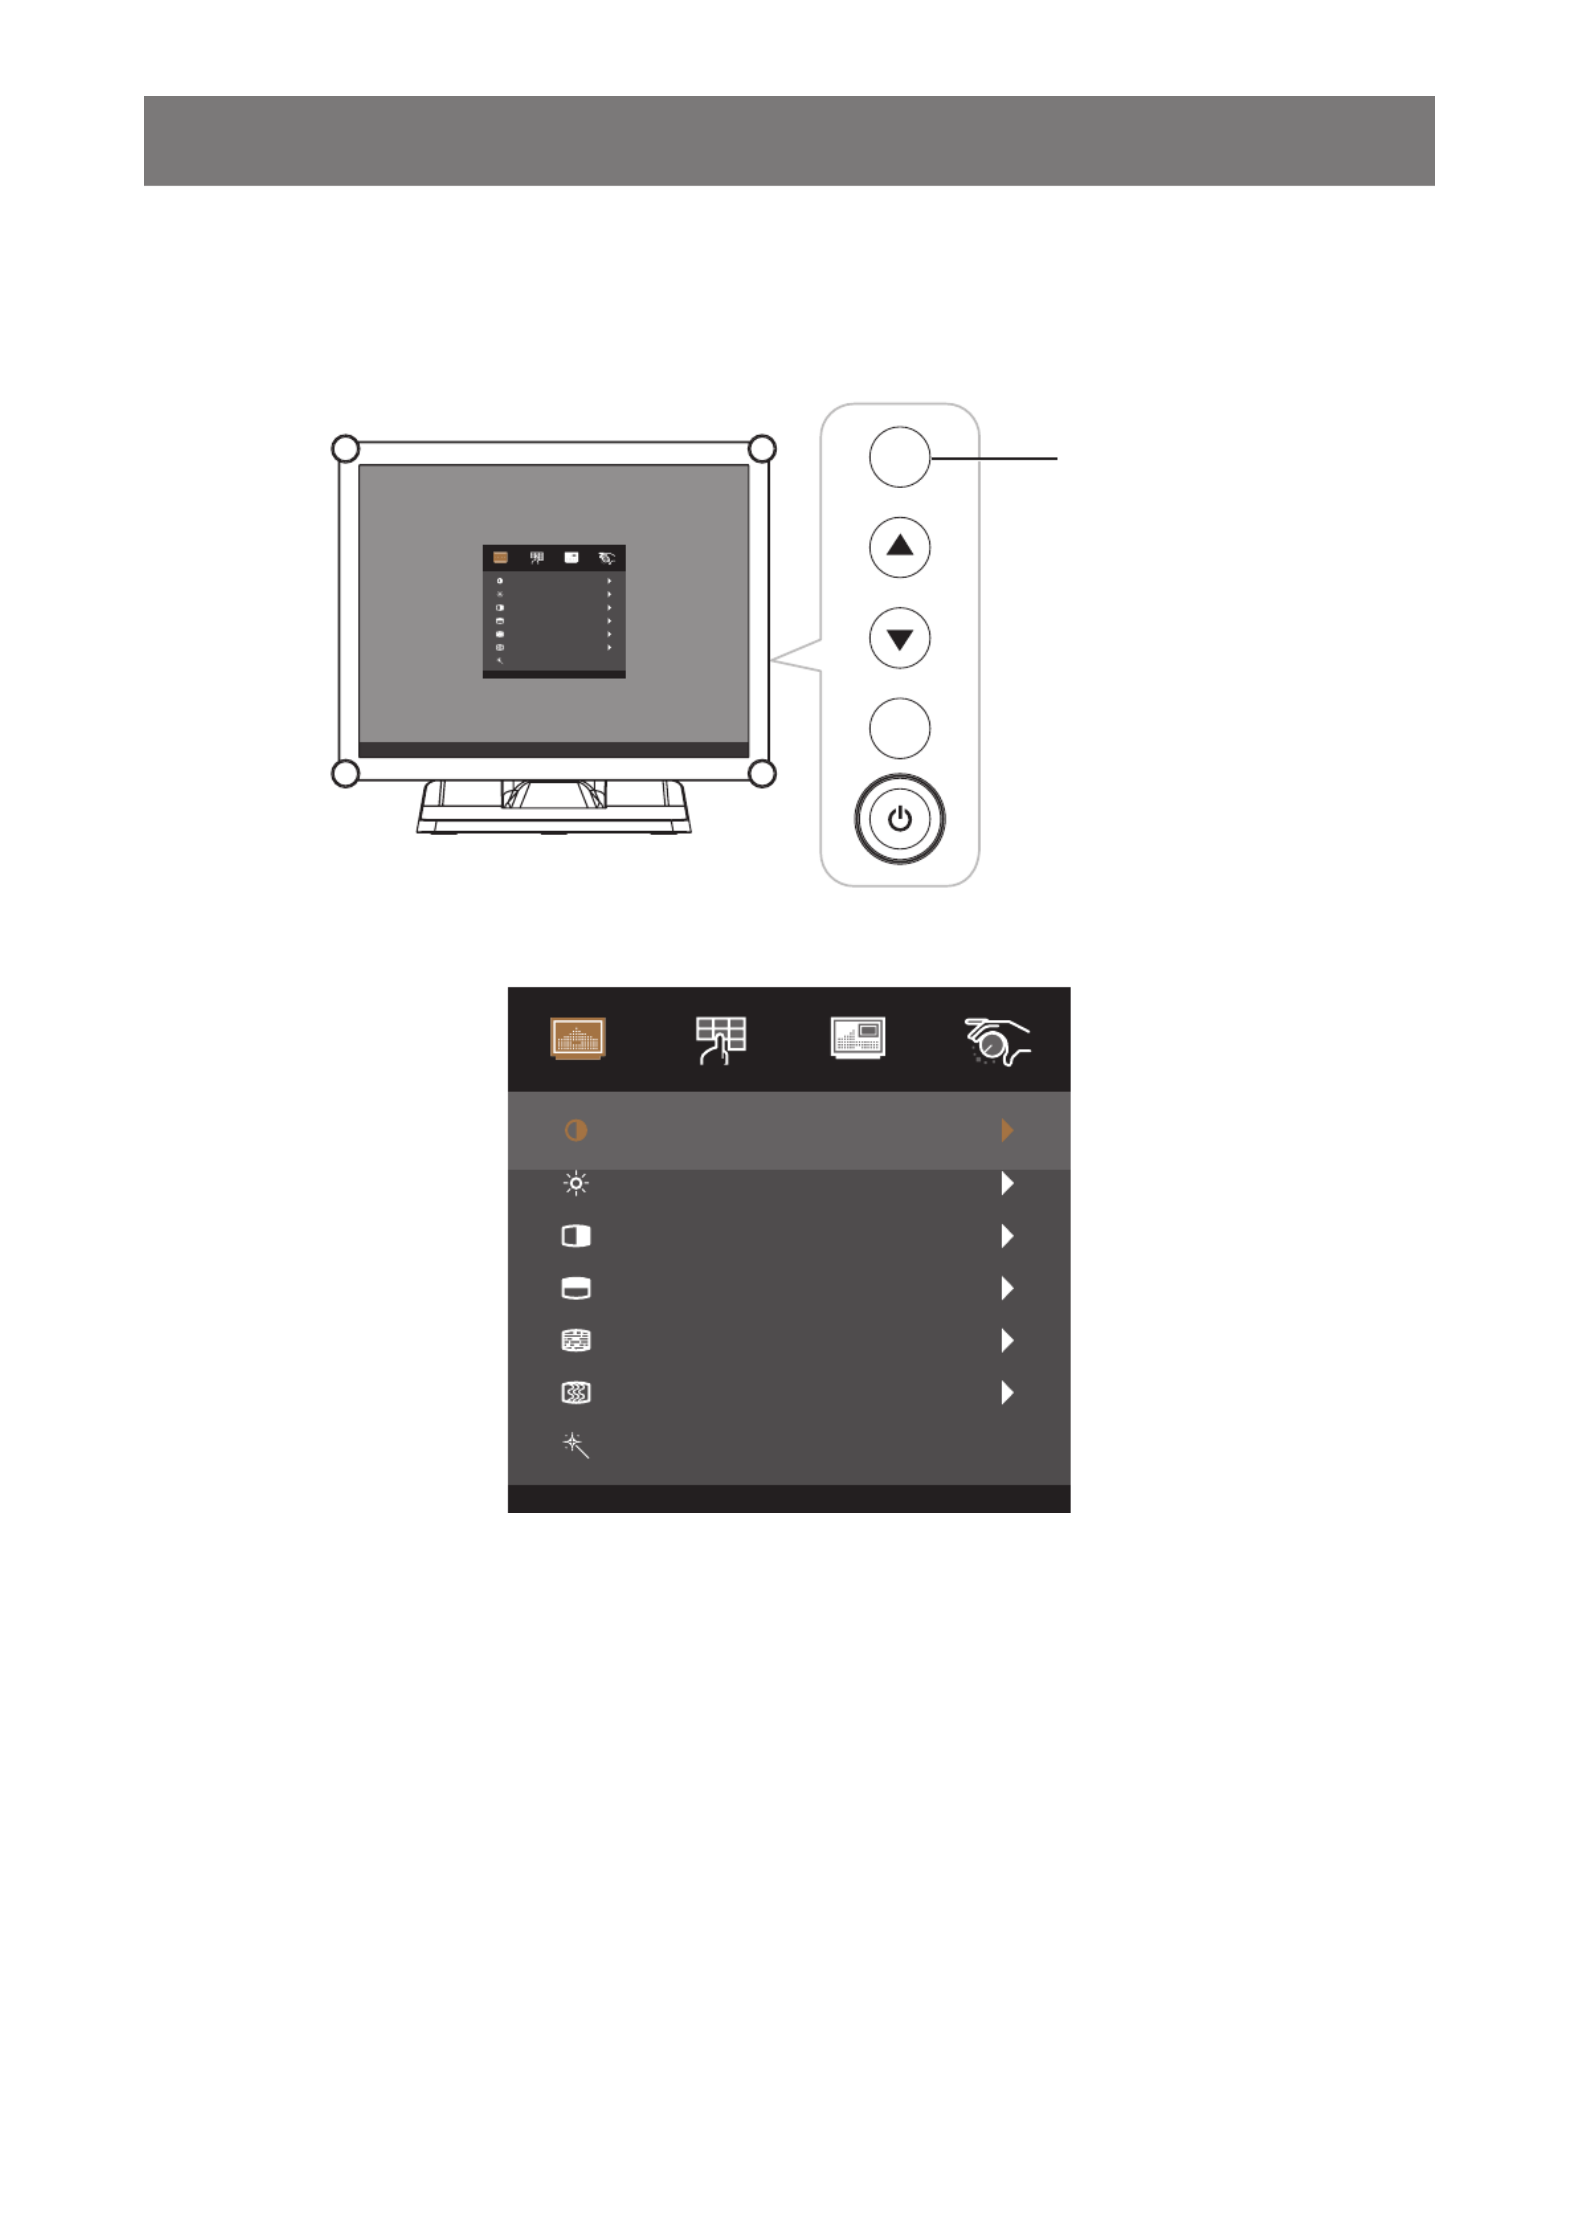
3.2 Displaying the OSD Menu
Press the MENU key to open the OSD menu. Press the MENU key again to close the OSD menu.
For more information on adjusting settings, refer to page 24.
Cont rast
Bright ness
H- Posit ion
V-Position
Phase
Cloc k
Auto d just A
<Se l e ct >= En t e < ▲, ▼> =Mo ve , < Me nu> =E xir, t
50
80
50
50
14
50
Pict ure Colour OSD Syst em
MENU
SELECT
MENU Key
The following menu appears on the screen:
Contrast
Brightness
H-Position
V-Position
Phase
Clock
Auto Adjust
<Sel ect> =En te r, <▲ ,▼> =Mov e, <M en u>=E xi t
50
80
50
50
14
50
Picture Colour OSD System
22
USING THE LCD MONITOR
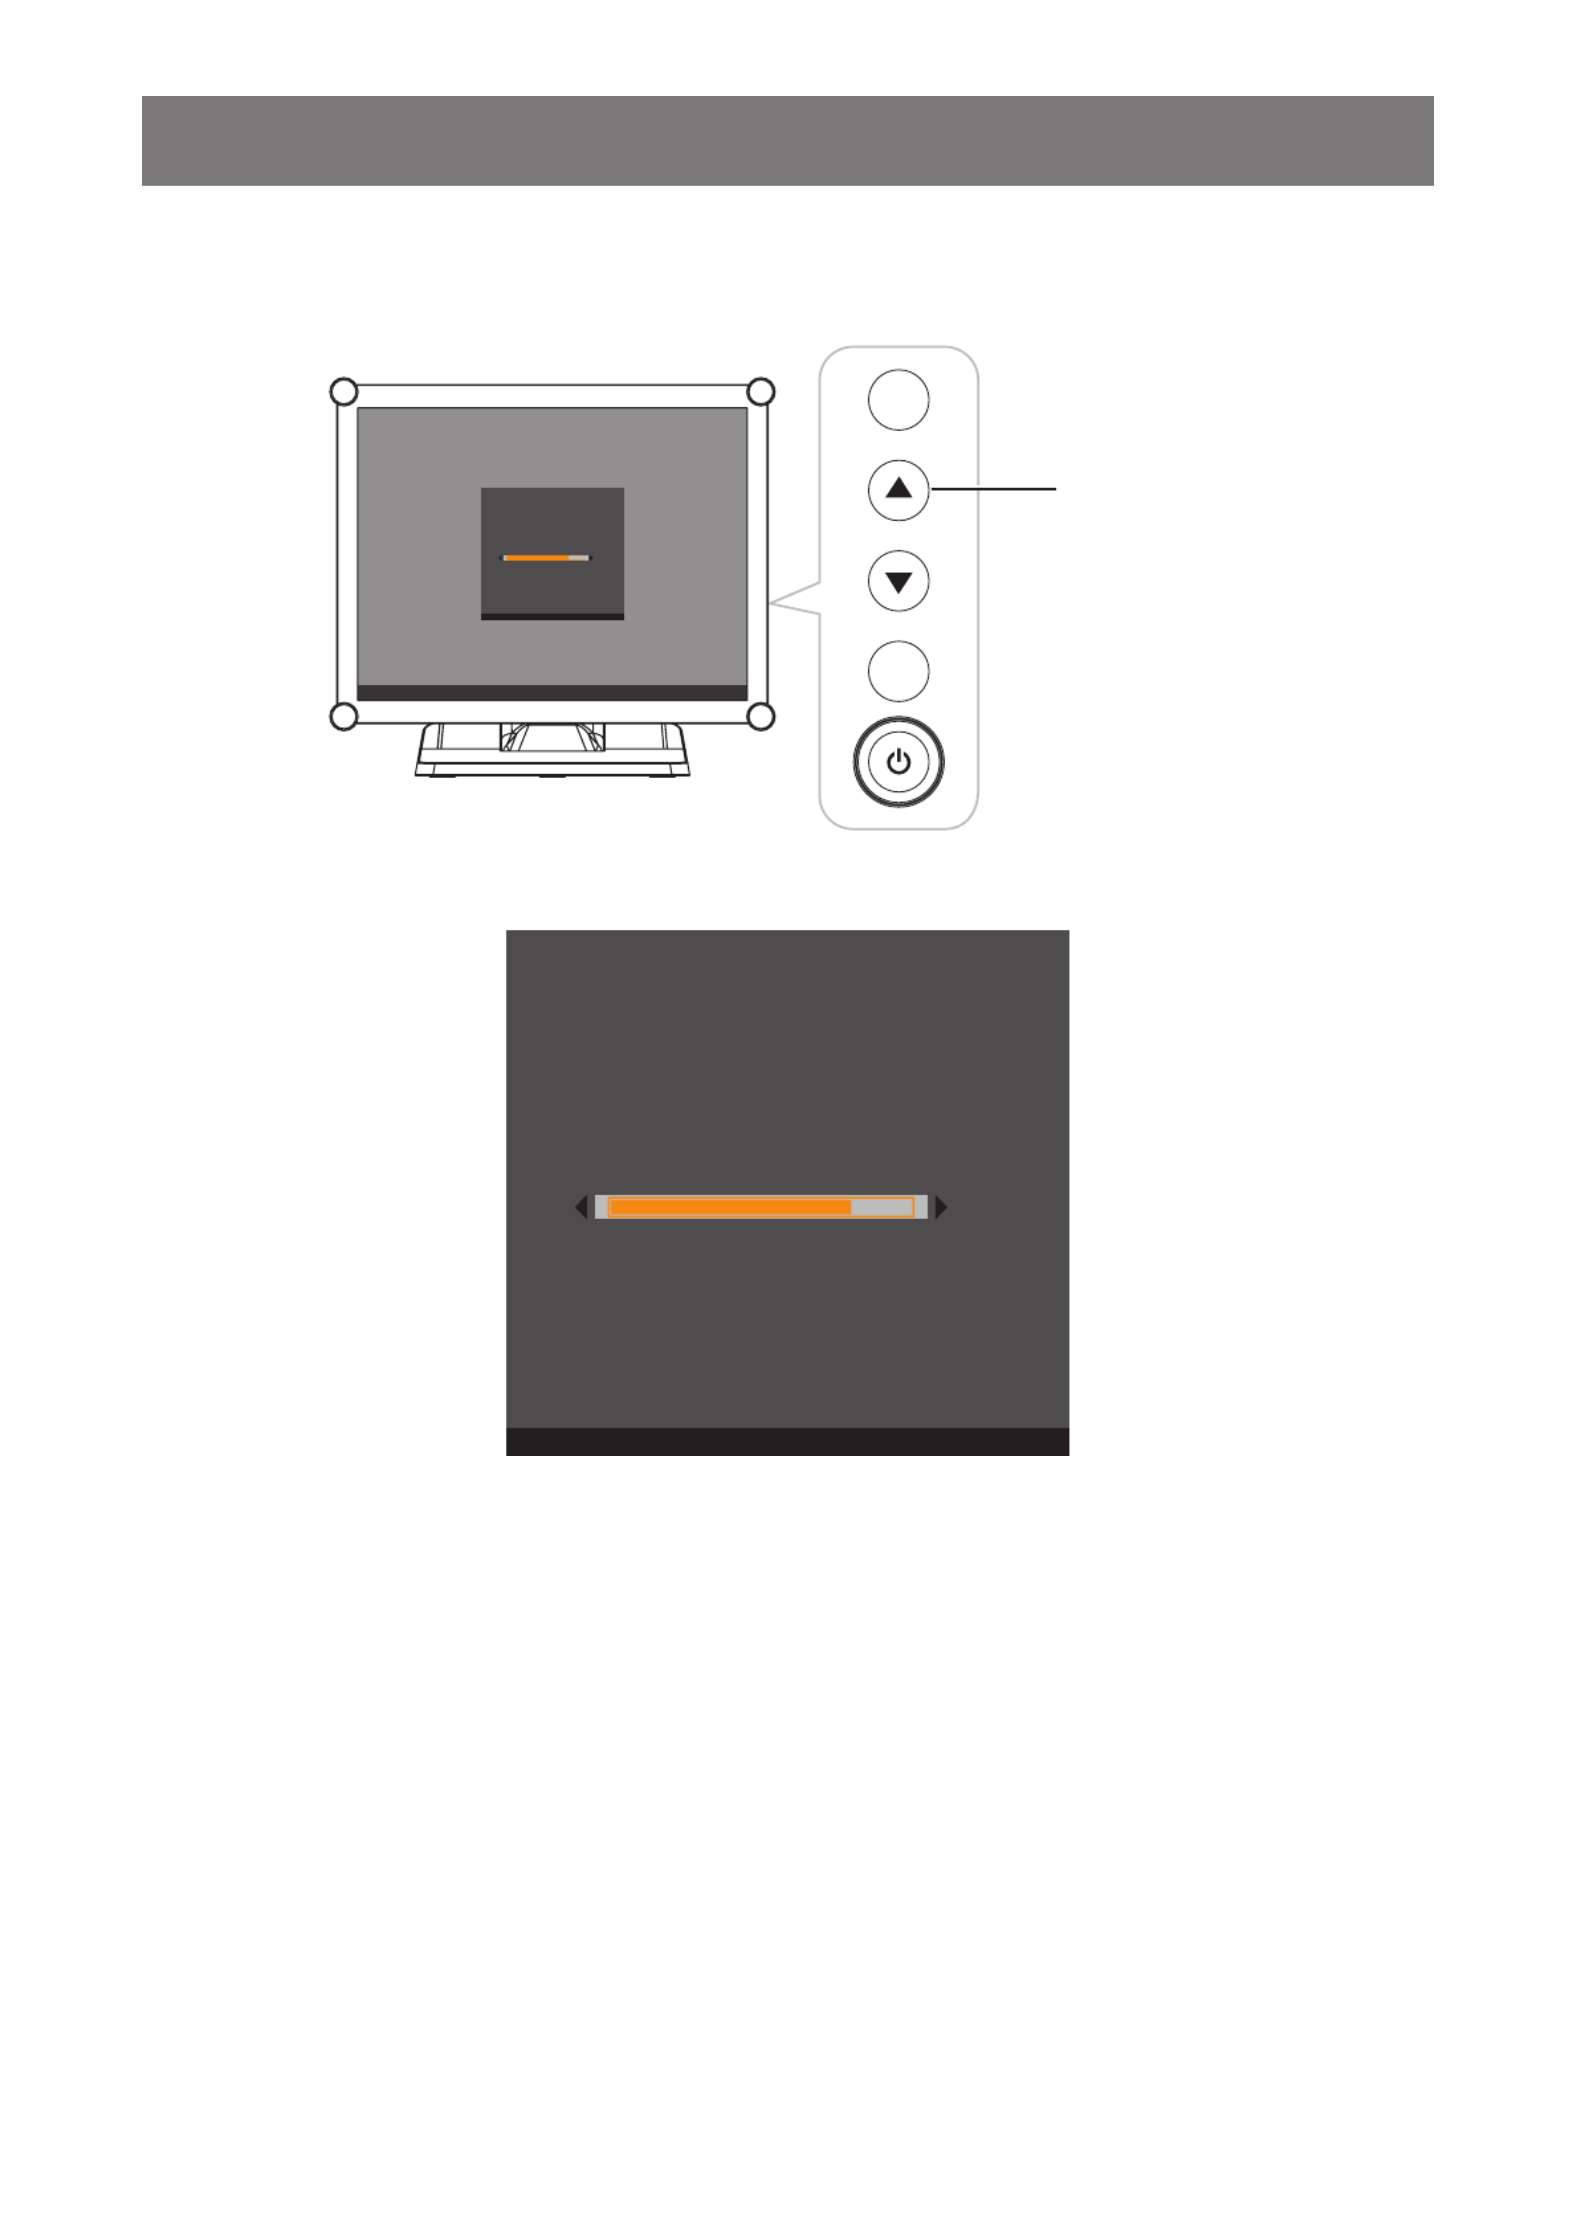
3.3 Adjusting Monitor Brightness
Press the key to open the Brightness quick menu.p
MENU
SELECT
Bright ness
Pr es s <▲, ▼> t o d j u s t a n d <Me n u> t o E x i t A
50
UP Key
The following menu appears on the screen:
Brightness
Pre ss< ▲,▼ > t o dj us t a nd <Me nu > t o E xit A
50
Then press the /p q keys to adjust the LCD monitor brightness level.

23
USING THE LCD MONITOR
3.4 Adjusting Monitor Contrast
Press the key to open the Contrast quick menu.q
MENU
SELECT
Cont rast
Pr es s <▲, ▼> t o Ad ju s t a n d <Me n u> t o Ex it
50
DOWN Key
The following menu appears on the screen:
Contrast
Pre ss< ▲,▼ > t o dj us t a nd <Me nu > t o E xit A
50
Then press the /p q keys to adjust the LCD monitor contrast level.
CHAPTER 4: ON SCREEN DISPLAY MENU
24
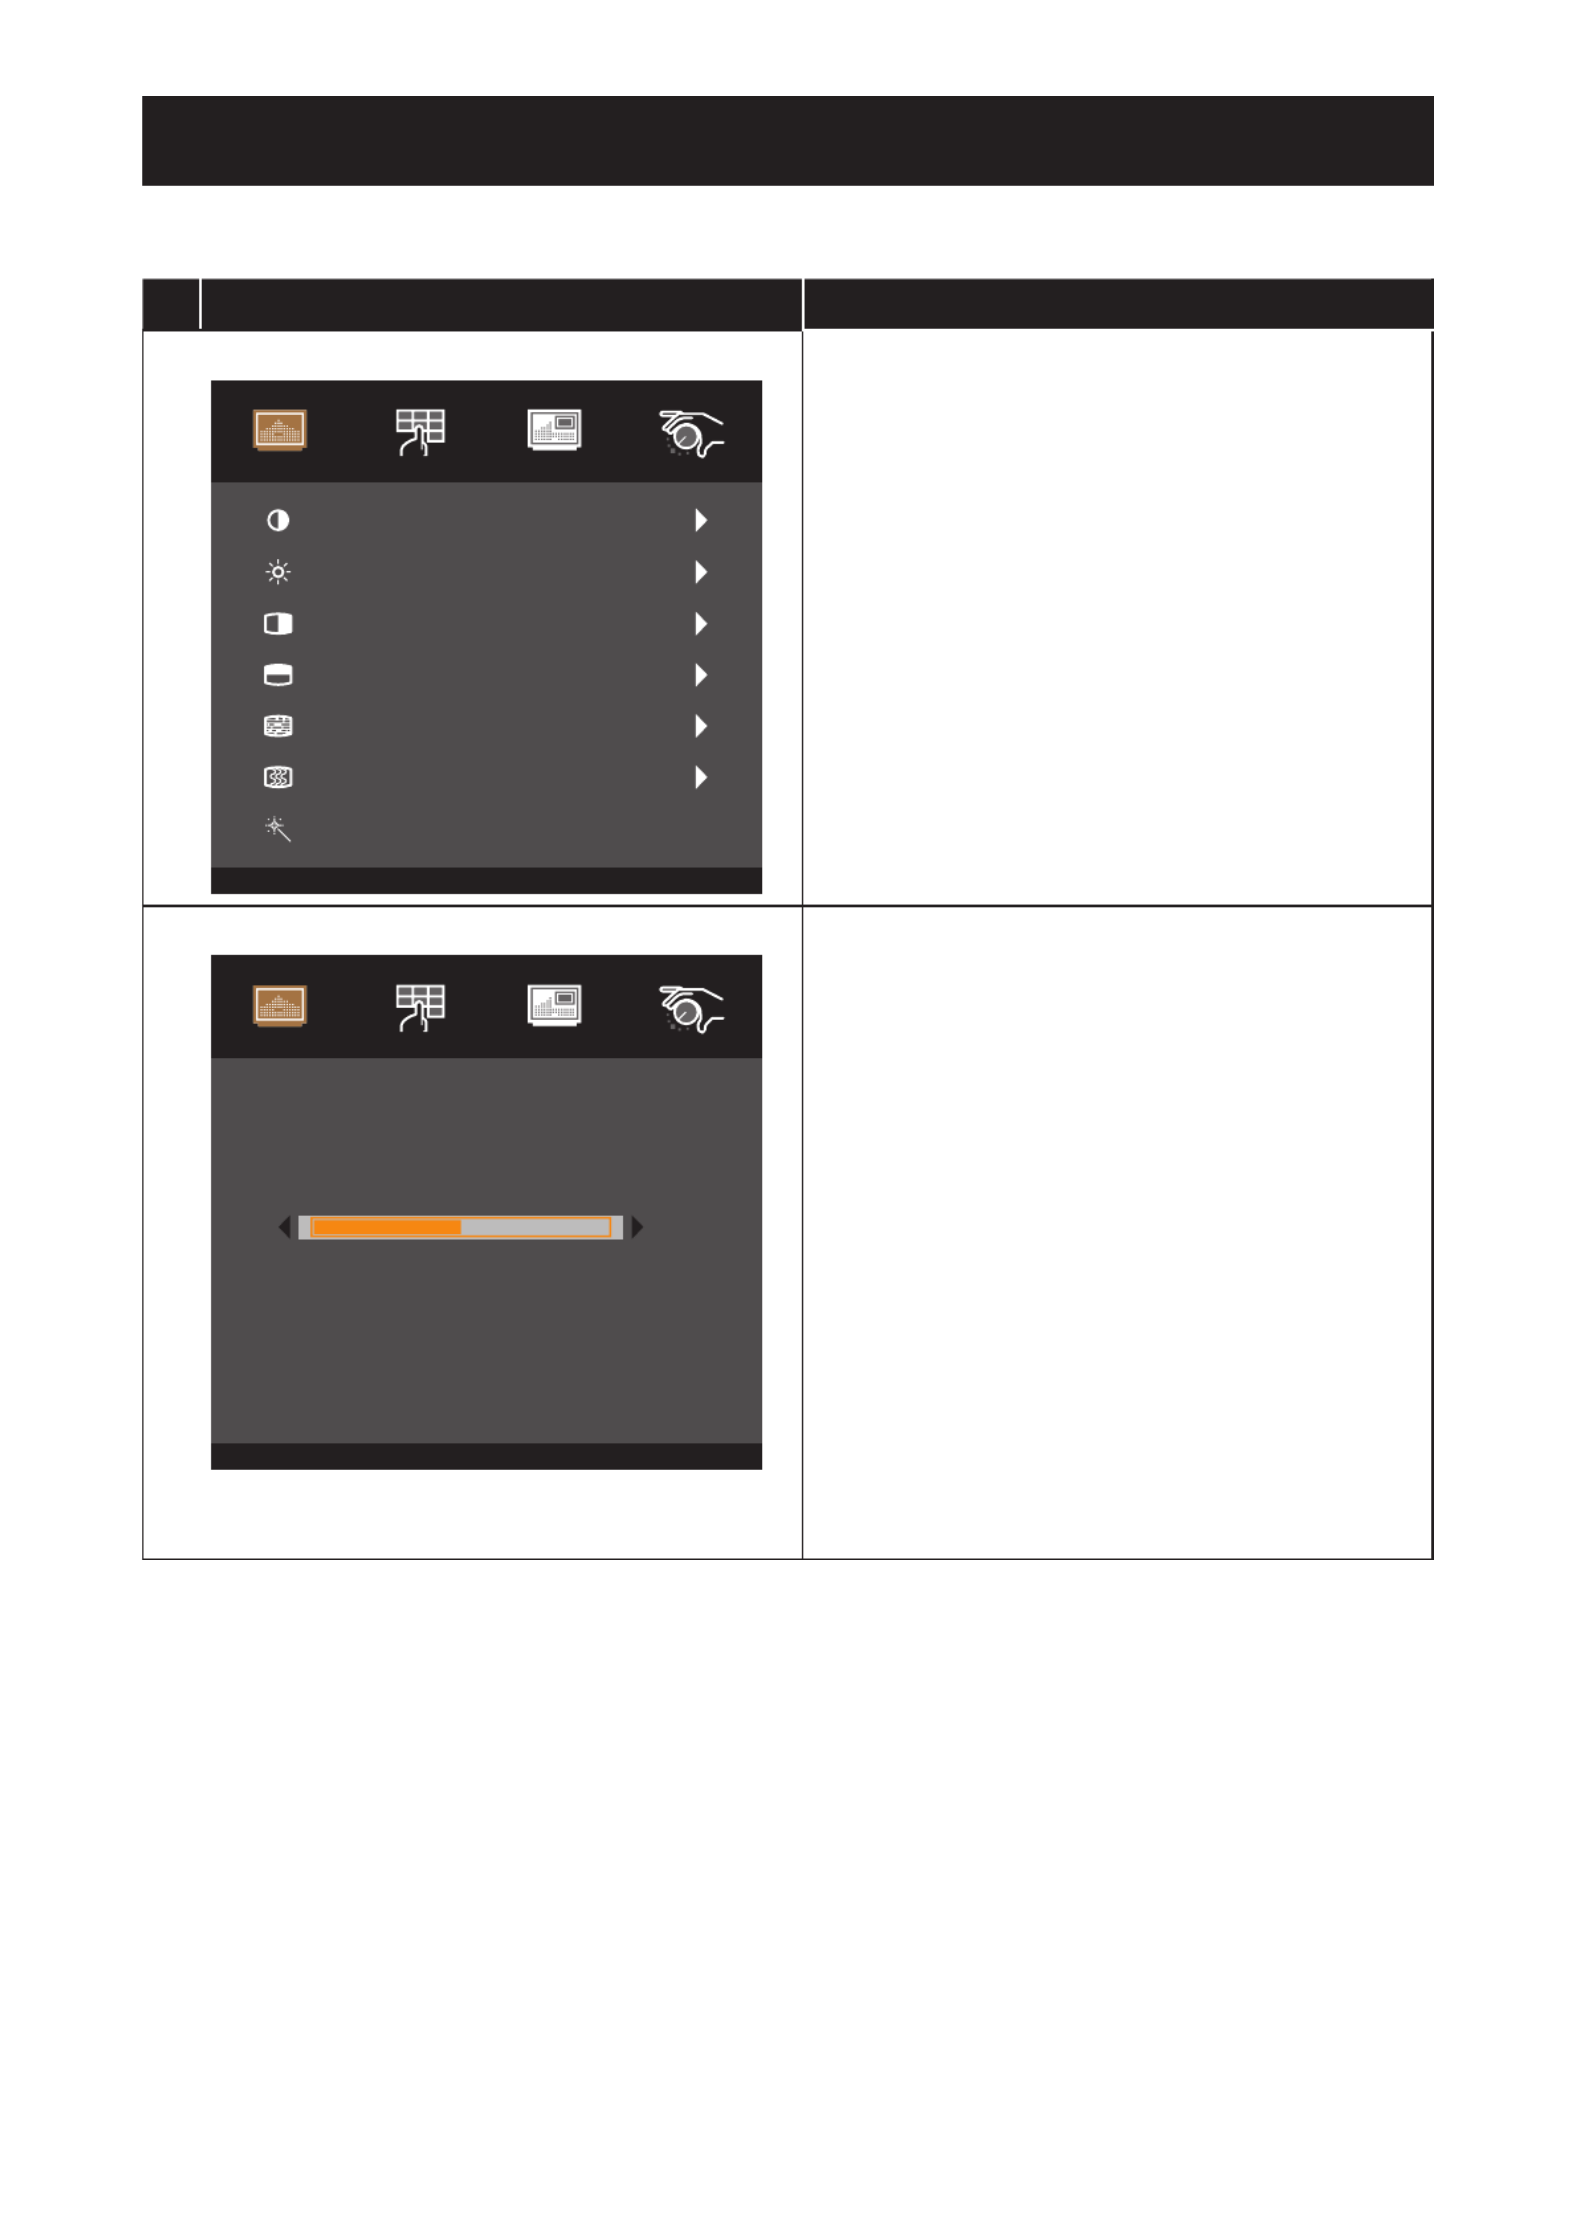
4.1 Using the OSD Menu
# Menu Navigation Operation
1Display the main menu screen.
Contrast
Brightness
H-Position
V-Position
Phase
Clock
Auto Adjust
<Sel ect>=En te <▲ ,▼>=M ove, <M en u >=Ex ir, t
50
80
50
50
14
50
Picture Colour OSD System
Press .MENU
2Enter the submenu.
Contrast
Press <▲,▼ > to dj u st an d <Men u > to Exi t A
50
Picture Colour OSD System
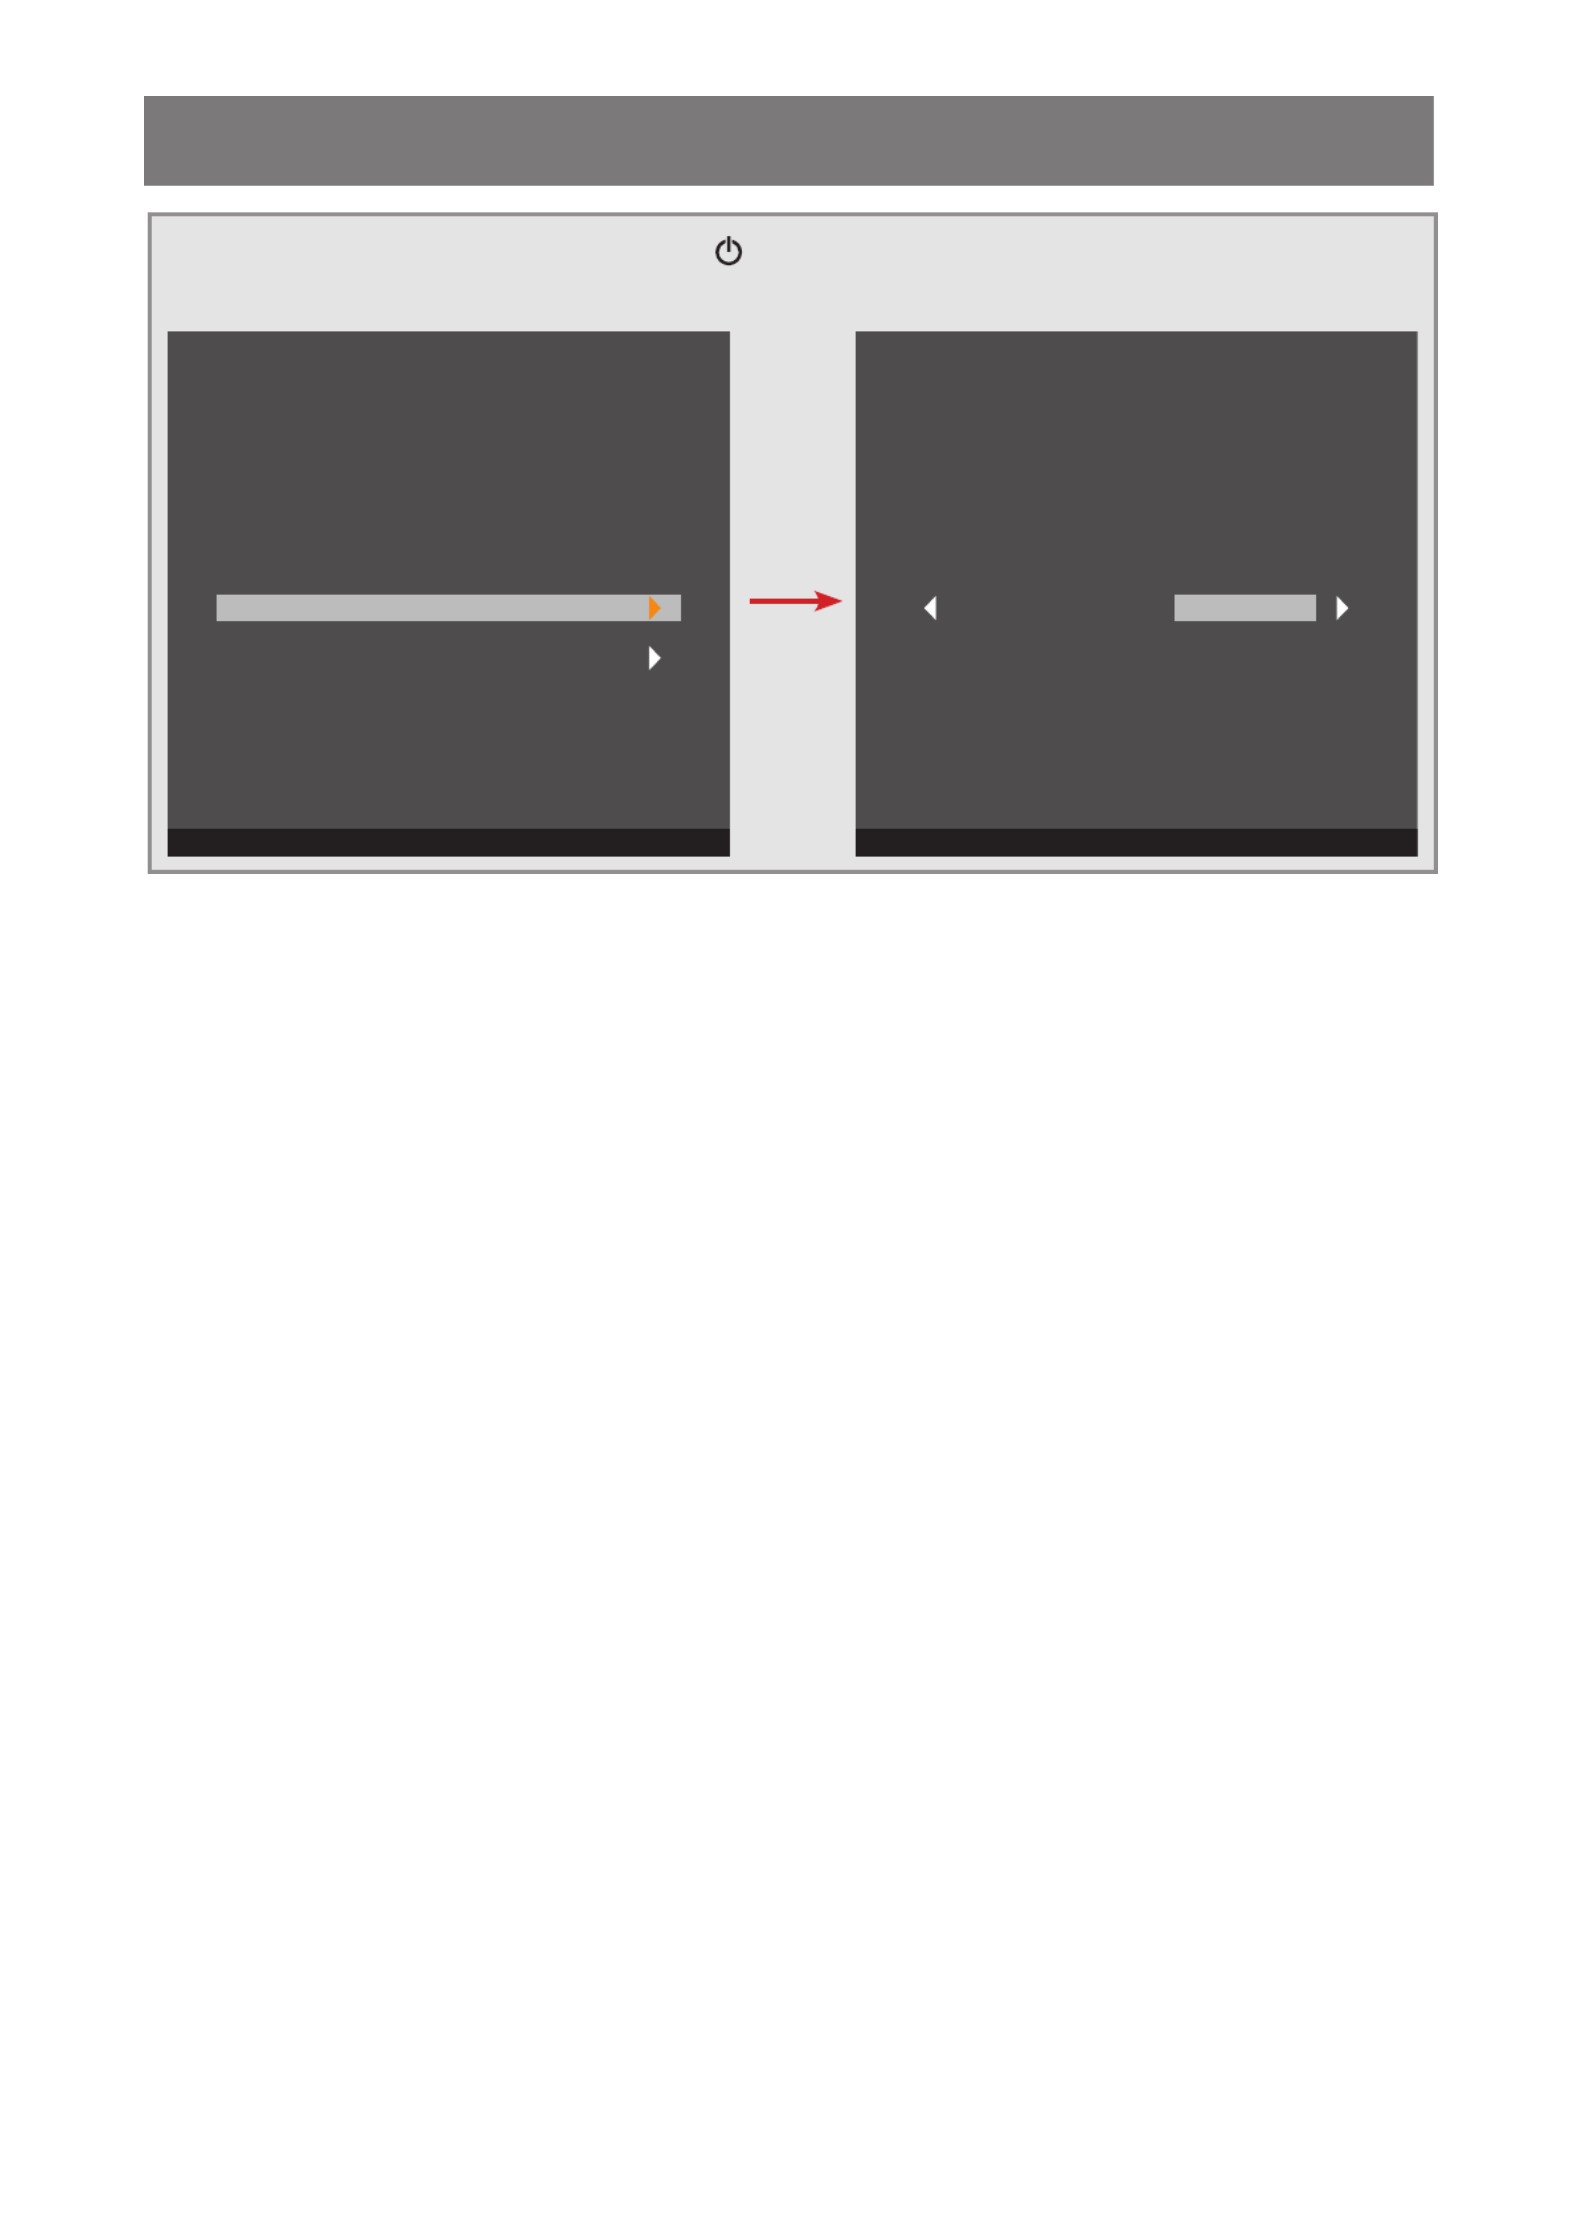
The active main menu and submenu icon is
highlighted in orange.
1 Press p q/ to select the main menu item.
2 Press SELECT to enter the submenu.
3 Press p q/ to select the submenu item.
4 Press SELECT to enter the selected submenu.
Chapter 4: On Screen Display Menu
25
ON SCREEN DISPLAY MENU
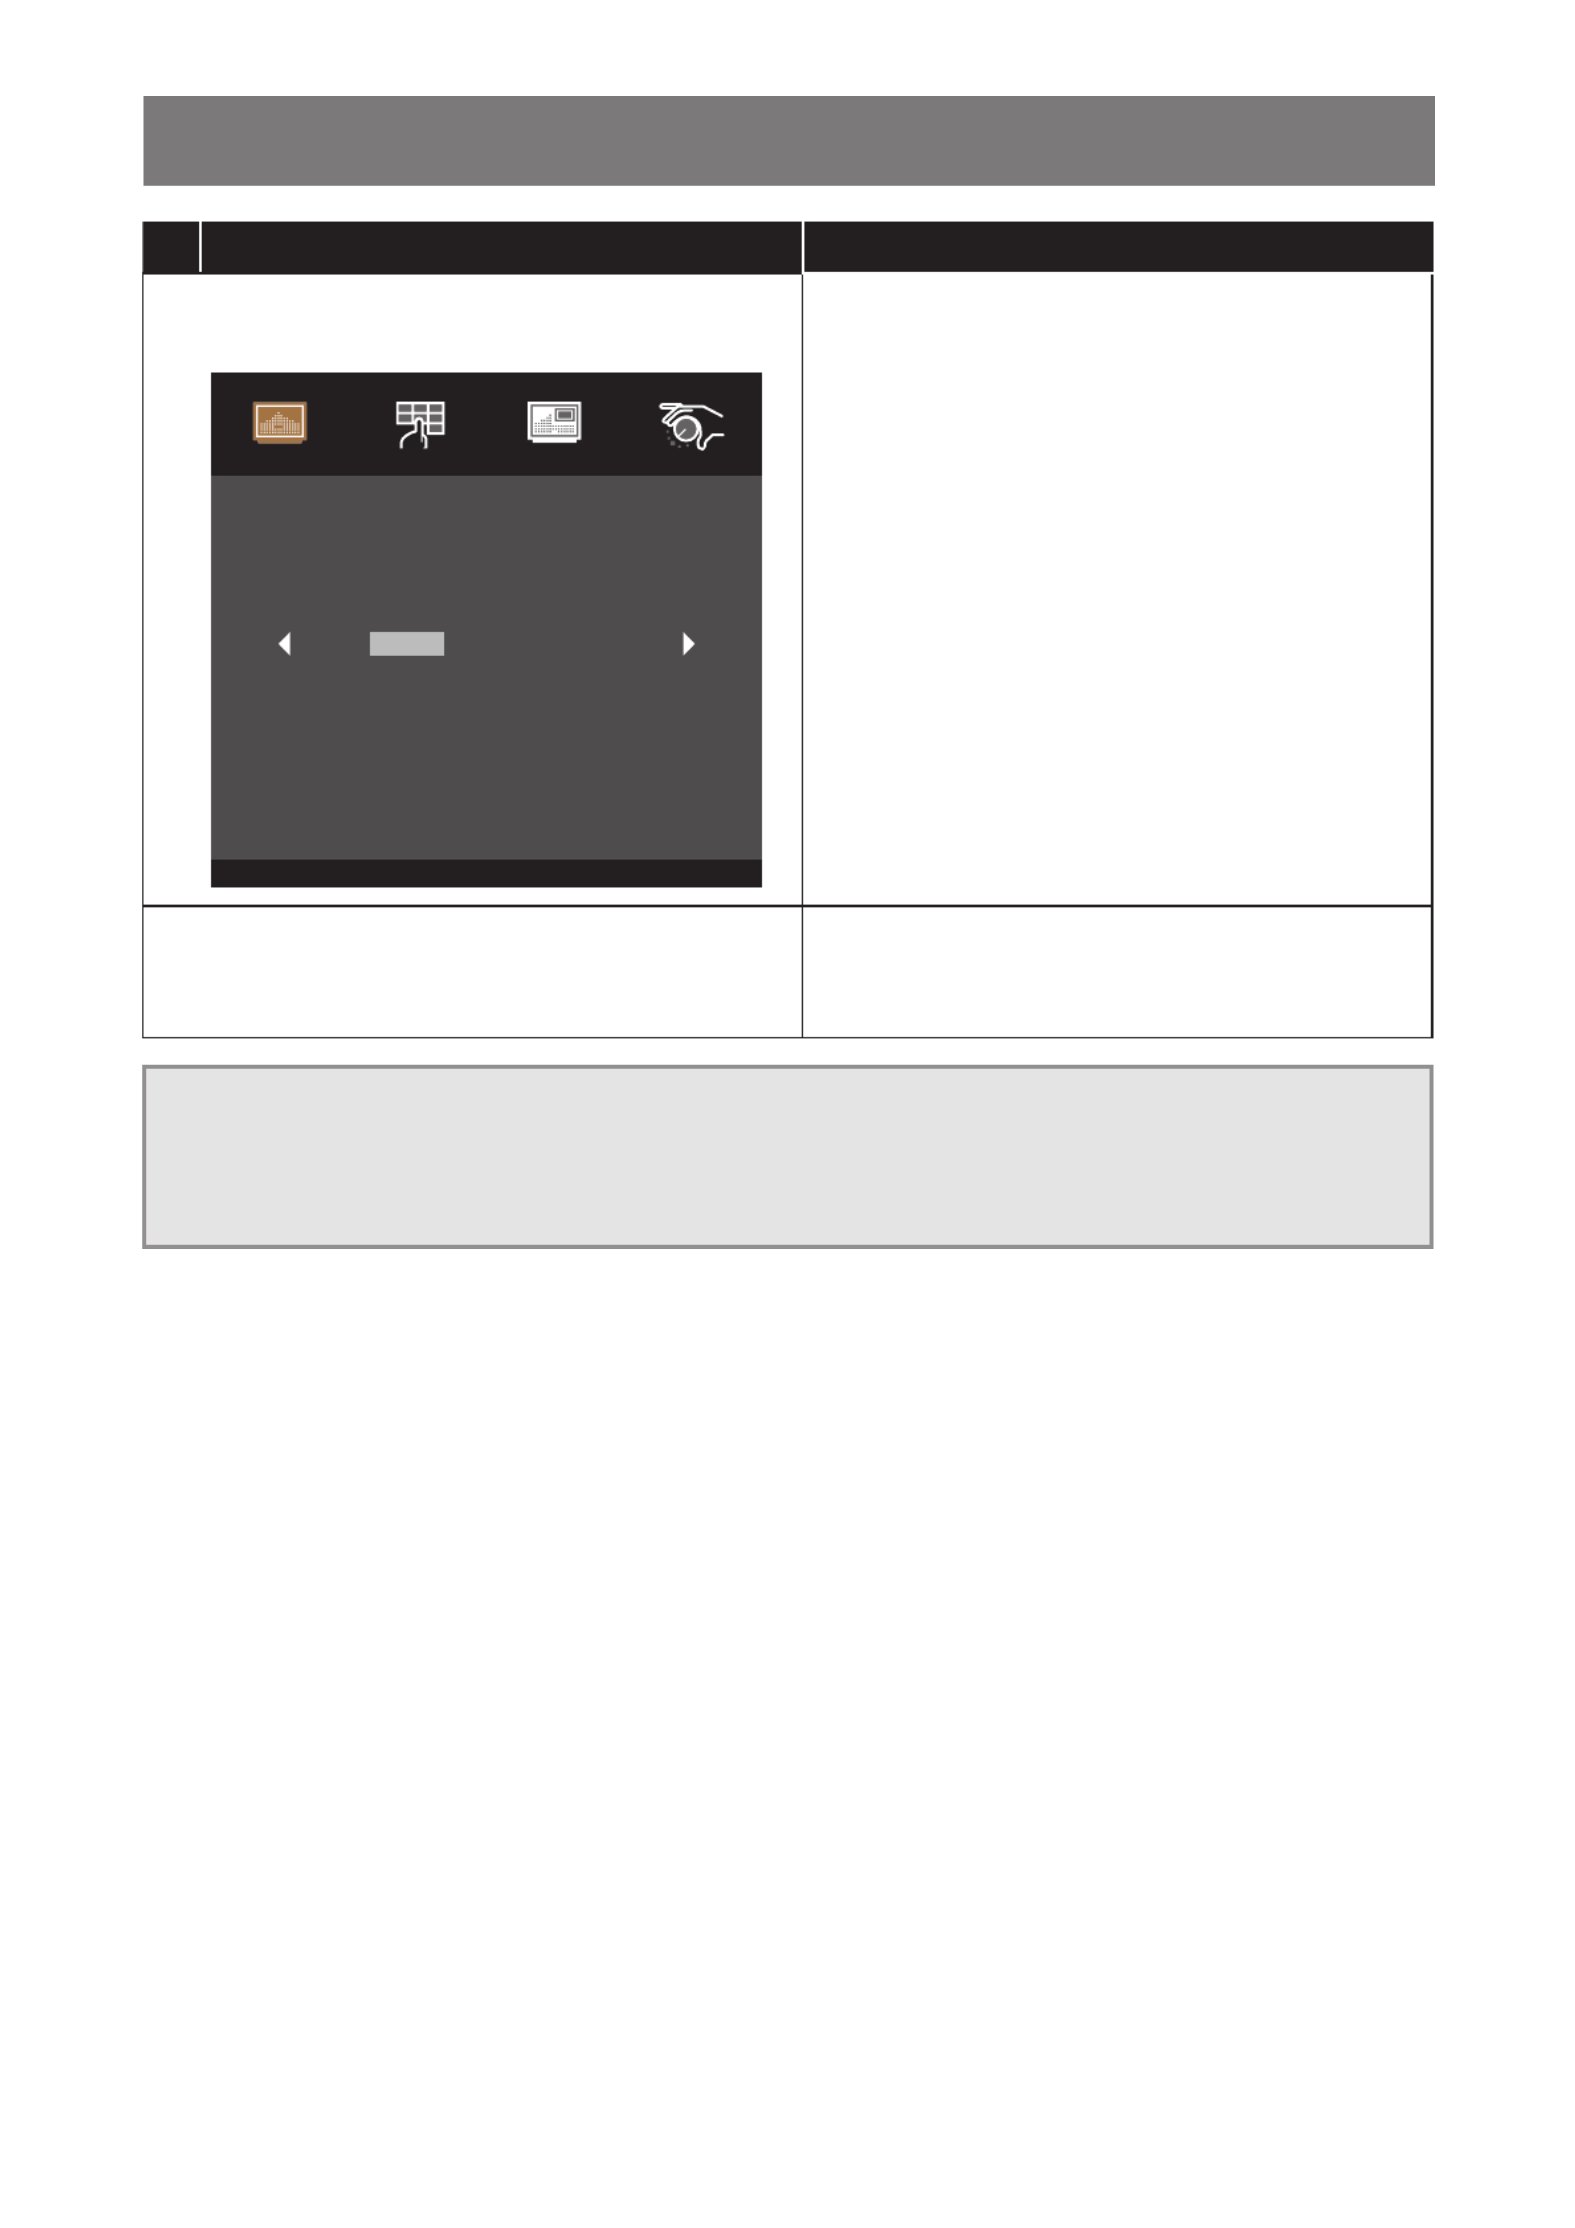
# Menu Navigation Operation
3Adjust the settings or select the value.
For example:
Auto Adjust
Press <▲,▼ > to dj u st an d <Men u > to Exi t A
YesNo
Picture Colour OSD System
1 Press p/q to adjust the value or select the setting.
2 Press SELECT to conrm the setting (if necessary).
4Return to the previous menu and/or close the
OSD window.
Press MENU once to return to the previous menu.
Press MENU repeatedly (if necessary) to close the
OSD window.
Note: When settings are modied, all changes are saved when the user does the following:
• Proceeds to another menu
• Exits the OSD menu
• Waits for the OSD menu to disappear

26
ON SCREEN DISPLAY MENU
4.2 OSD Menu Tree
Main Menu Submenu Reference
Picture Contrast Refer to page 27.
Brightness
H-Position
V-Position
Phase
Clock
Auto Adjust
Colour Colour Refer to page 29.
Red
Green
Blue
Sharpness
OSD OSD Timeout Refer to page 30.
OSD Position
OSD H-Position
OSD V-Position
System Reset Refer to page 31.
Language
Source Select
Information
Factory
Note: Availability of some menu items depend on the input source signal. If the menu is not available, it is
disabled and greyed out.
27
CHAPTER 5: ADJUSTING THE LCD MONITOR
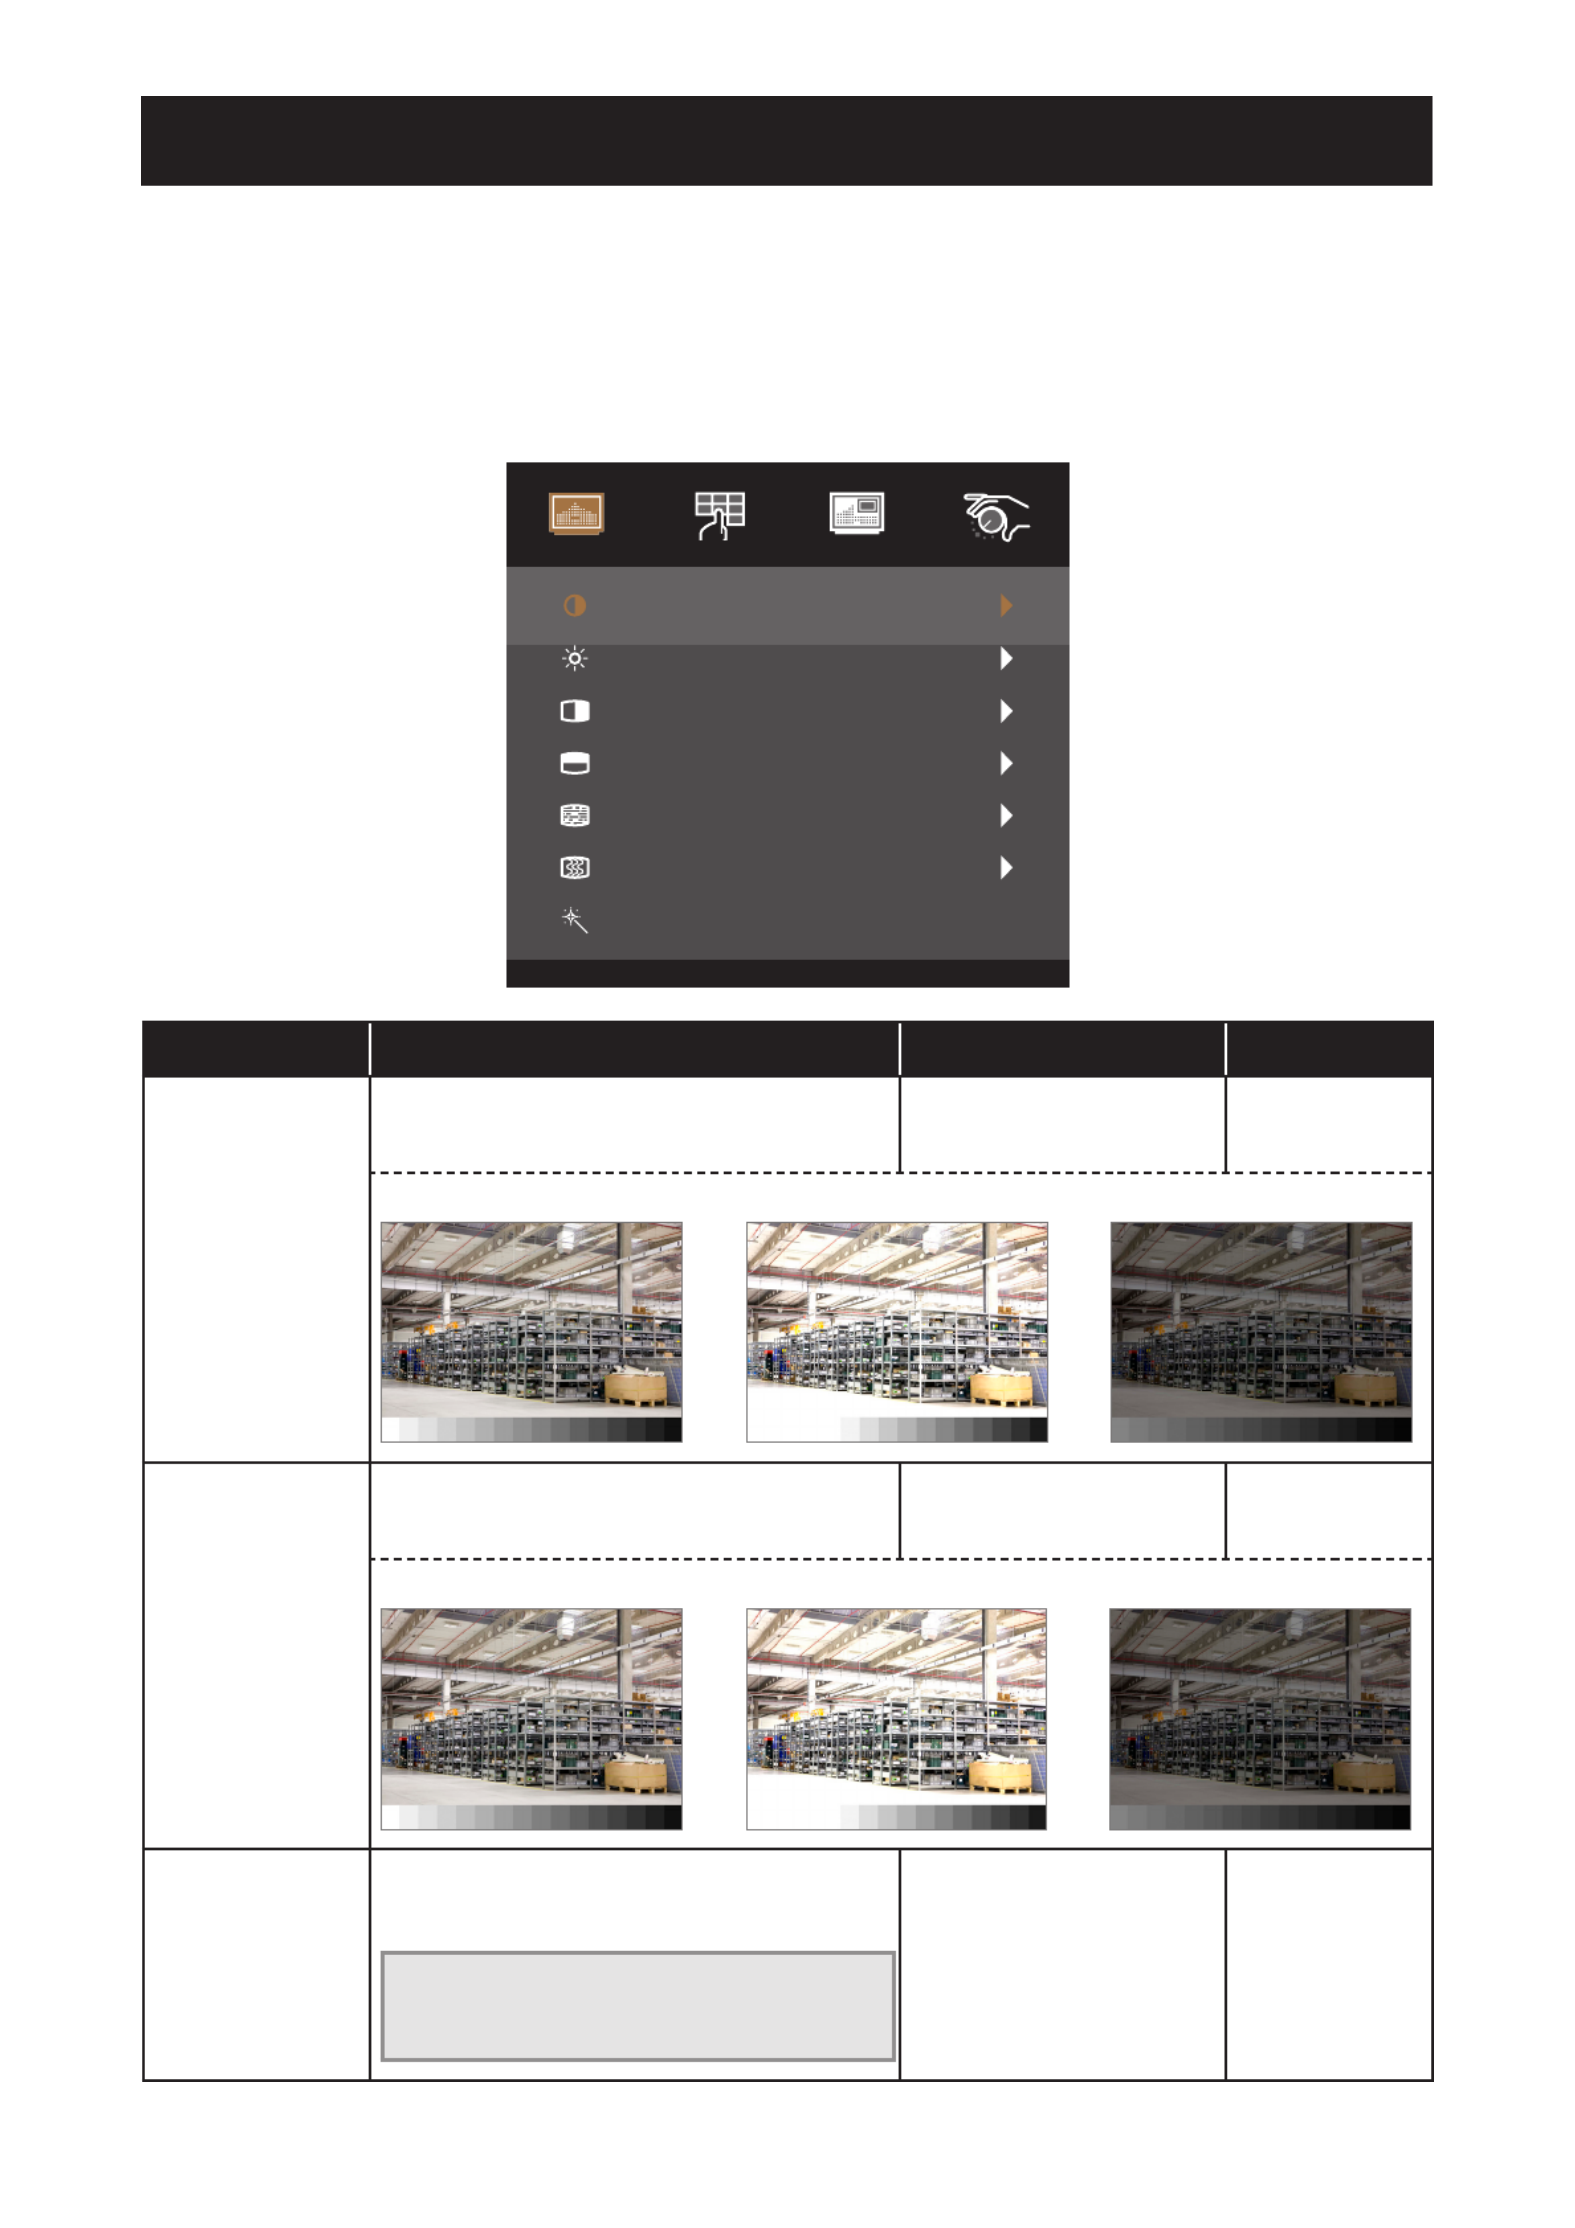
5.1 Picture Menu
1. Press MENU on the control panel to call out the OSD window.
2. Press to select Picture and then press SELECT to enter the menu.p/q
3. Press to select the submenu item and then press SELECT to enter its settings.p/q
Contrast
Brightness
H-Position
V-Position
Phase
Clock
Auto Adjust
<Sel ect> =En te r, <▲ ,▼> =Mov e, <M en u>=E xi t
50
80
50
50
14
50
Picture Colour OSD System
Item Function Operation Range
Contrast Adjusts the difference between the black
level and the white level.
Press to adjust the p q/
value.
0 to 100
Original Setting High Setting Low Setting
Brightness Adjusts the luminance of the screen image. Press to adjust the p q/
value.
0 to 100
Original Setting High Setting Low Setting
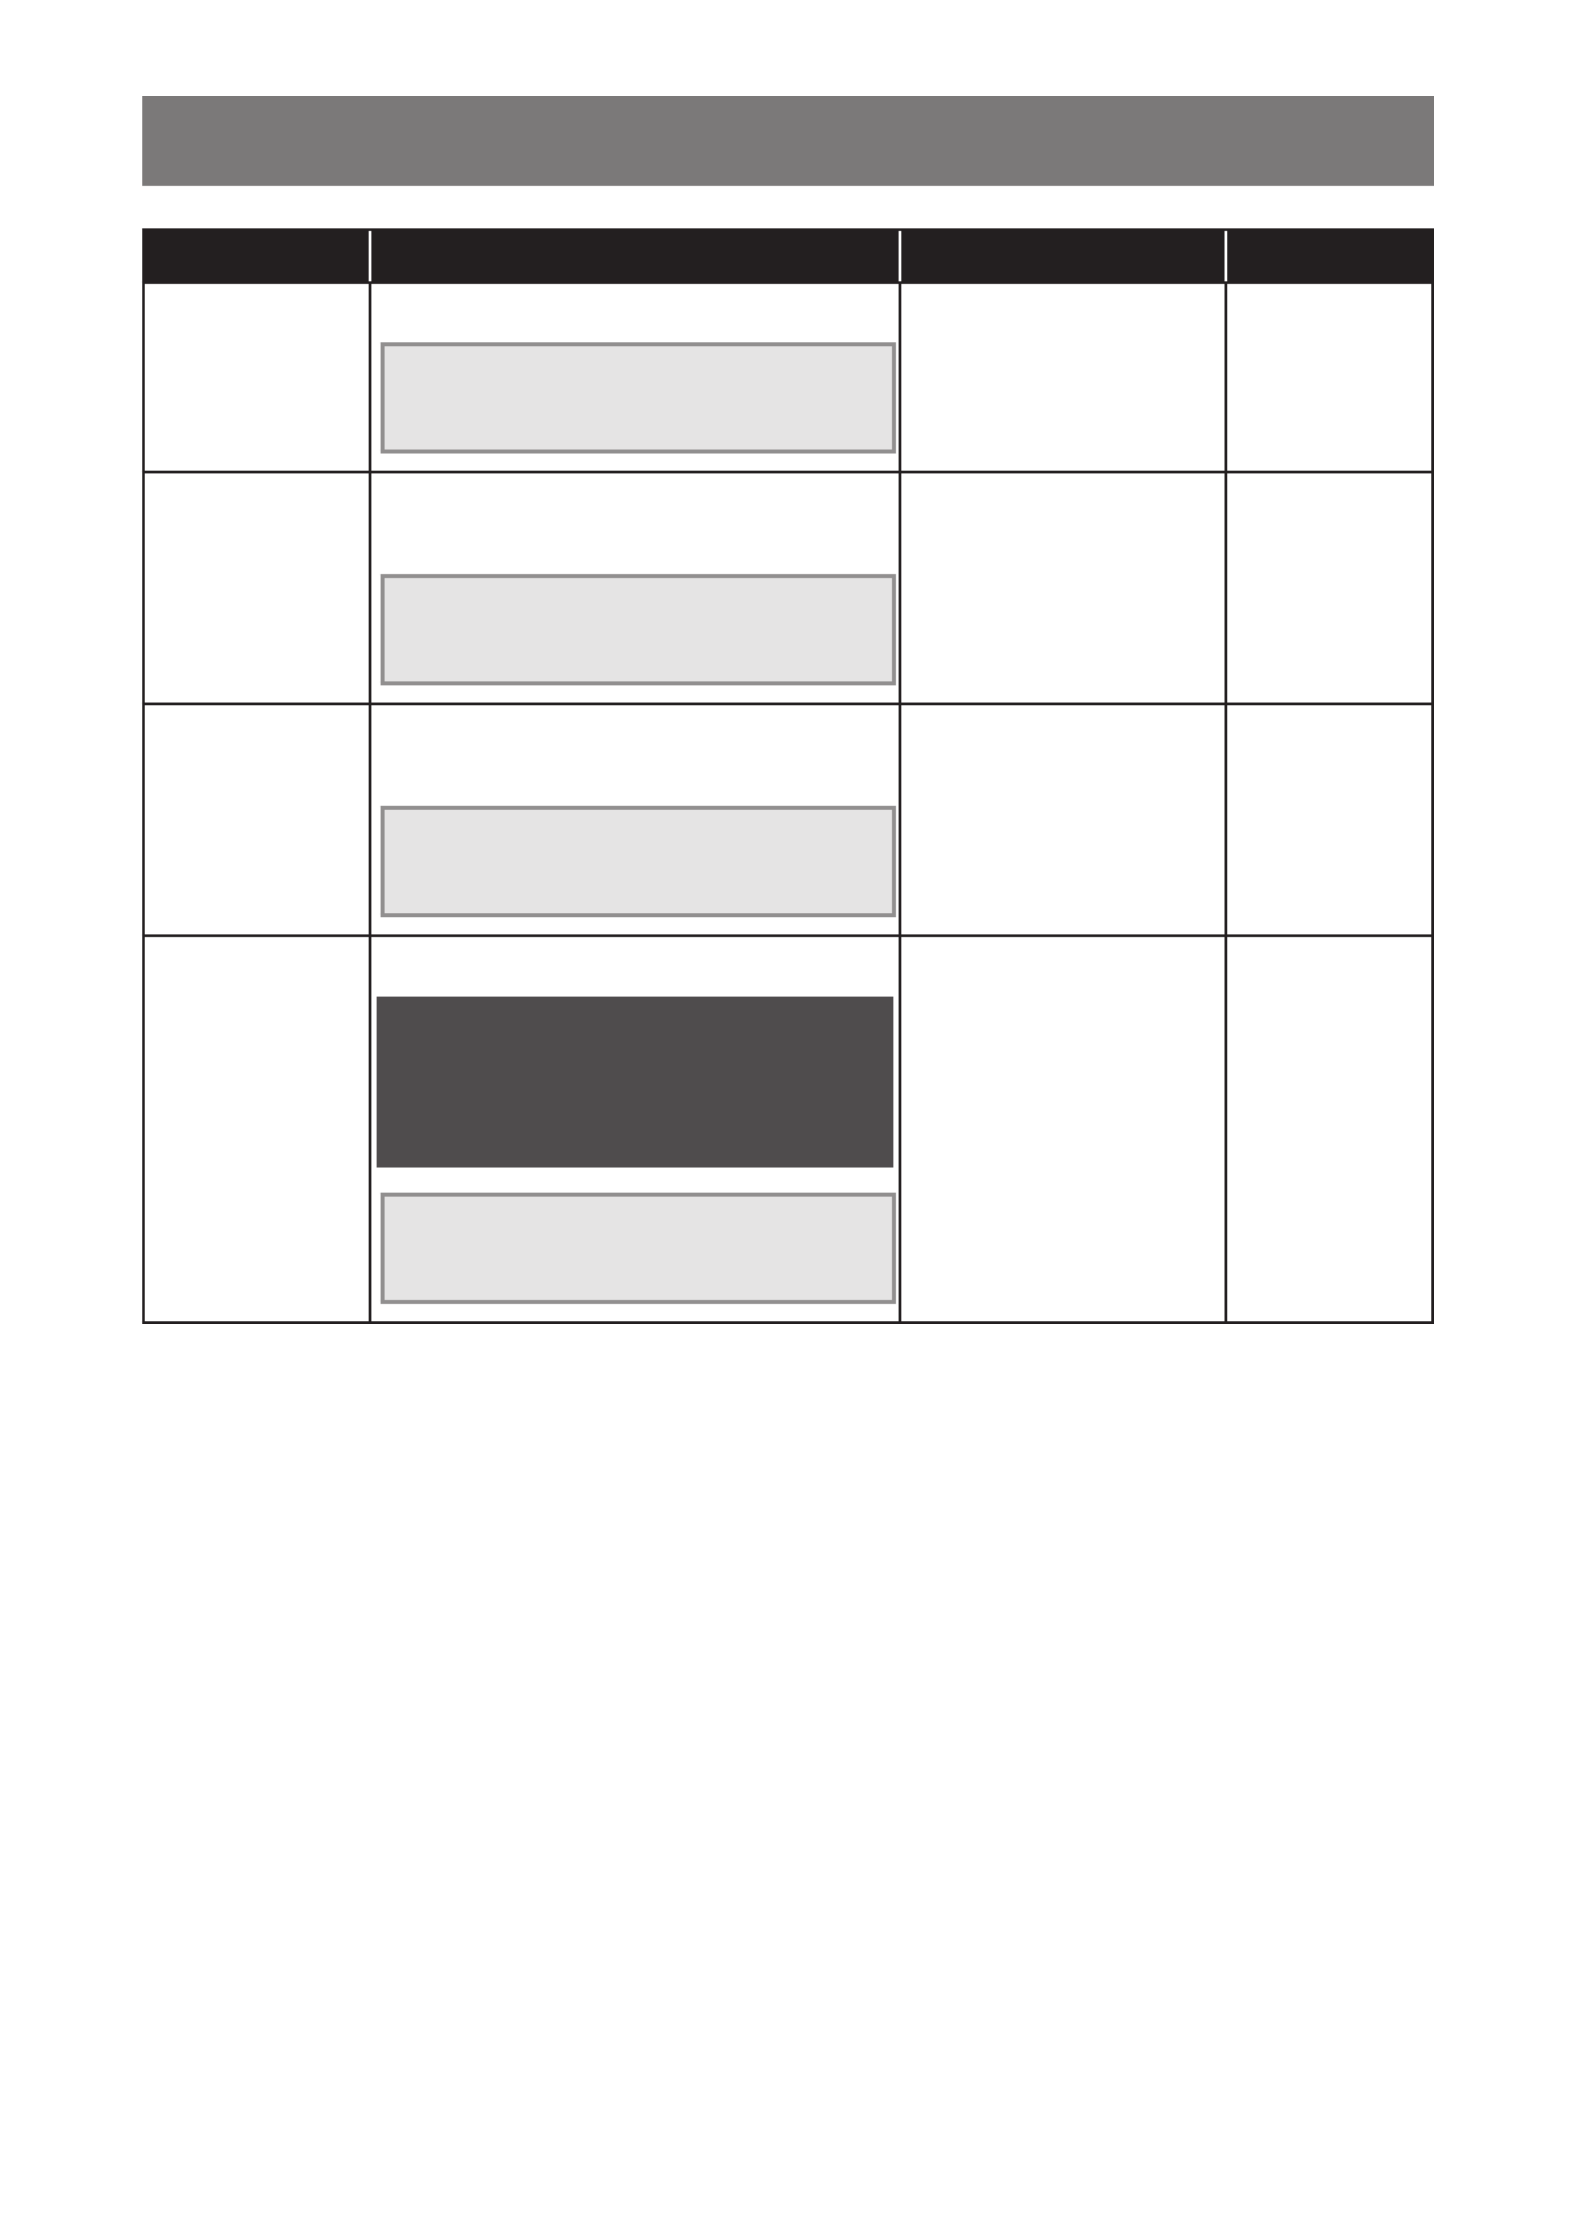
H-Position
(Horizontal
Position)
Moves the screen image to the left or to the
right.
Note: This menu item is only available if
the source is VGA.
Press to adjust the p q/
value.
0 to 100
Chapter 5: Adjusting the LCD Monitor
28
ADJUSTING THE LCD MONITOR
Item Function Operation Range
V-Position
(Vertical Position)
Moves the screen image up or down.
Note: This menu item is only available if
the source is VGA.
Press to adjust the p q/
value.
0 to 100
Phase Adjusts the phase timing to synchronise
with the video signal.
Note: This menu item is only available if
the source is VGA.
Press to adjust the p q/
value.
0 to 100
Clock Adjusts the frequency timing to
synchronise with the video signal.
Note: This menu item is only available if
the source is VGA.
Press to adjust the p q/
value.
0 to 100
Auto Adjust Automatically optimises image display.
Auto In Progress
Note: This menu item is only available if
the source is VGA.
Press to select the p q/
setting and then press
SELECT to conrm.
No
Yes
Auto Adjust

29
ADJUSTING THE LCD MONITOR
5.2 Colour Menu
1. Press MENU on the control panel to call out the OSD window.
2. Press to select Colour and then press SELECT to enter the menu.p/q
3. Press to select the submenu item and then press SELECT to enter its settings.p/q
Colour
Red
Green
Blue
Sharpness
<Sel ect> =En te r, <▲ ,▼> =Mov e, <M en u>=E xi t
User
100
100
100
50
Picture OSD SystemColour
Item Function Operation Range
Colour Provides several colour adjustment
settings.
Press to select the p q/
setting and then press
SELECT to conrm.
5500K
6500K
7500K
9300K
User
Colour temperature can be set to:
• 5500K: Applies a reddish tint for warmer colours.
• 6500K: This is the default colour temperature commonly used for normal lighting
conditions.
• 7500K: Applies the screen colour between red and blue.
• 9300K: Applies a bluish tint for cooler colours.
• User: This allows users to set the colour temperature by adjusting the Red, Green,
and Blue value according to one’s preference.
Sharpness Adjusts the clarity and focus of the screen
image.
Note: The Sharpness function is not
supported with the following
resolutions:
• TX-1502: 1024x768
• TX-1702&TX-1902: 1280x1024
• TX-2202: 1920x1080
Press to adjust the p q/
value.
0 to 100
30
ADJUSTING THE LCD MONITOR
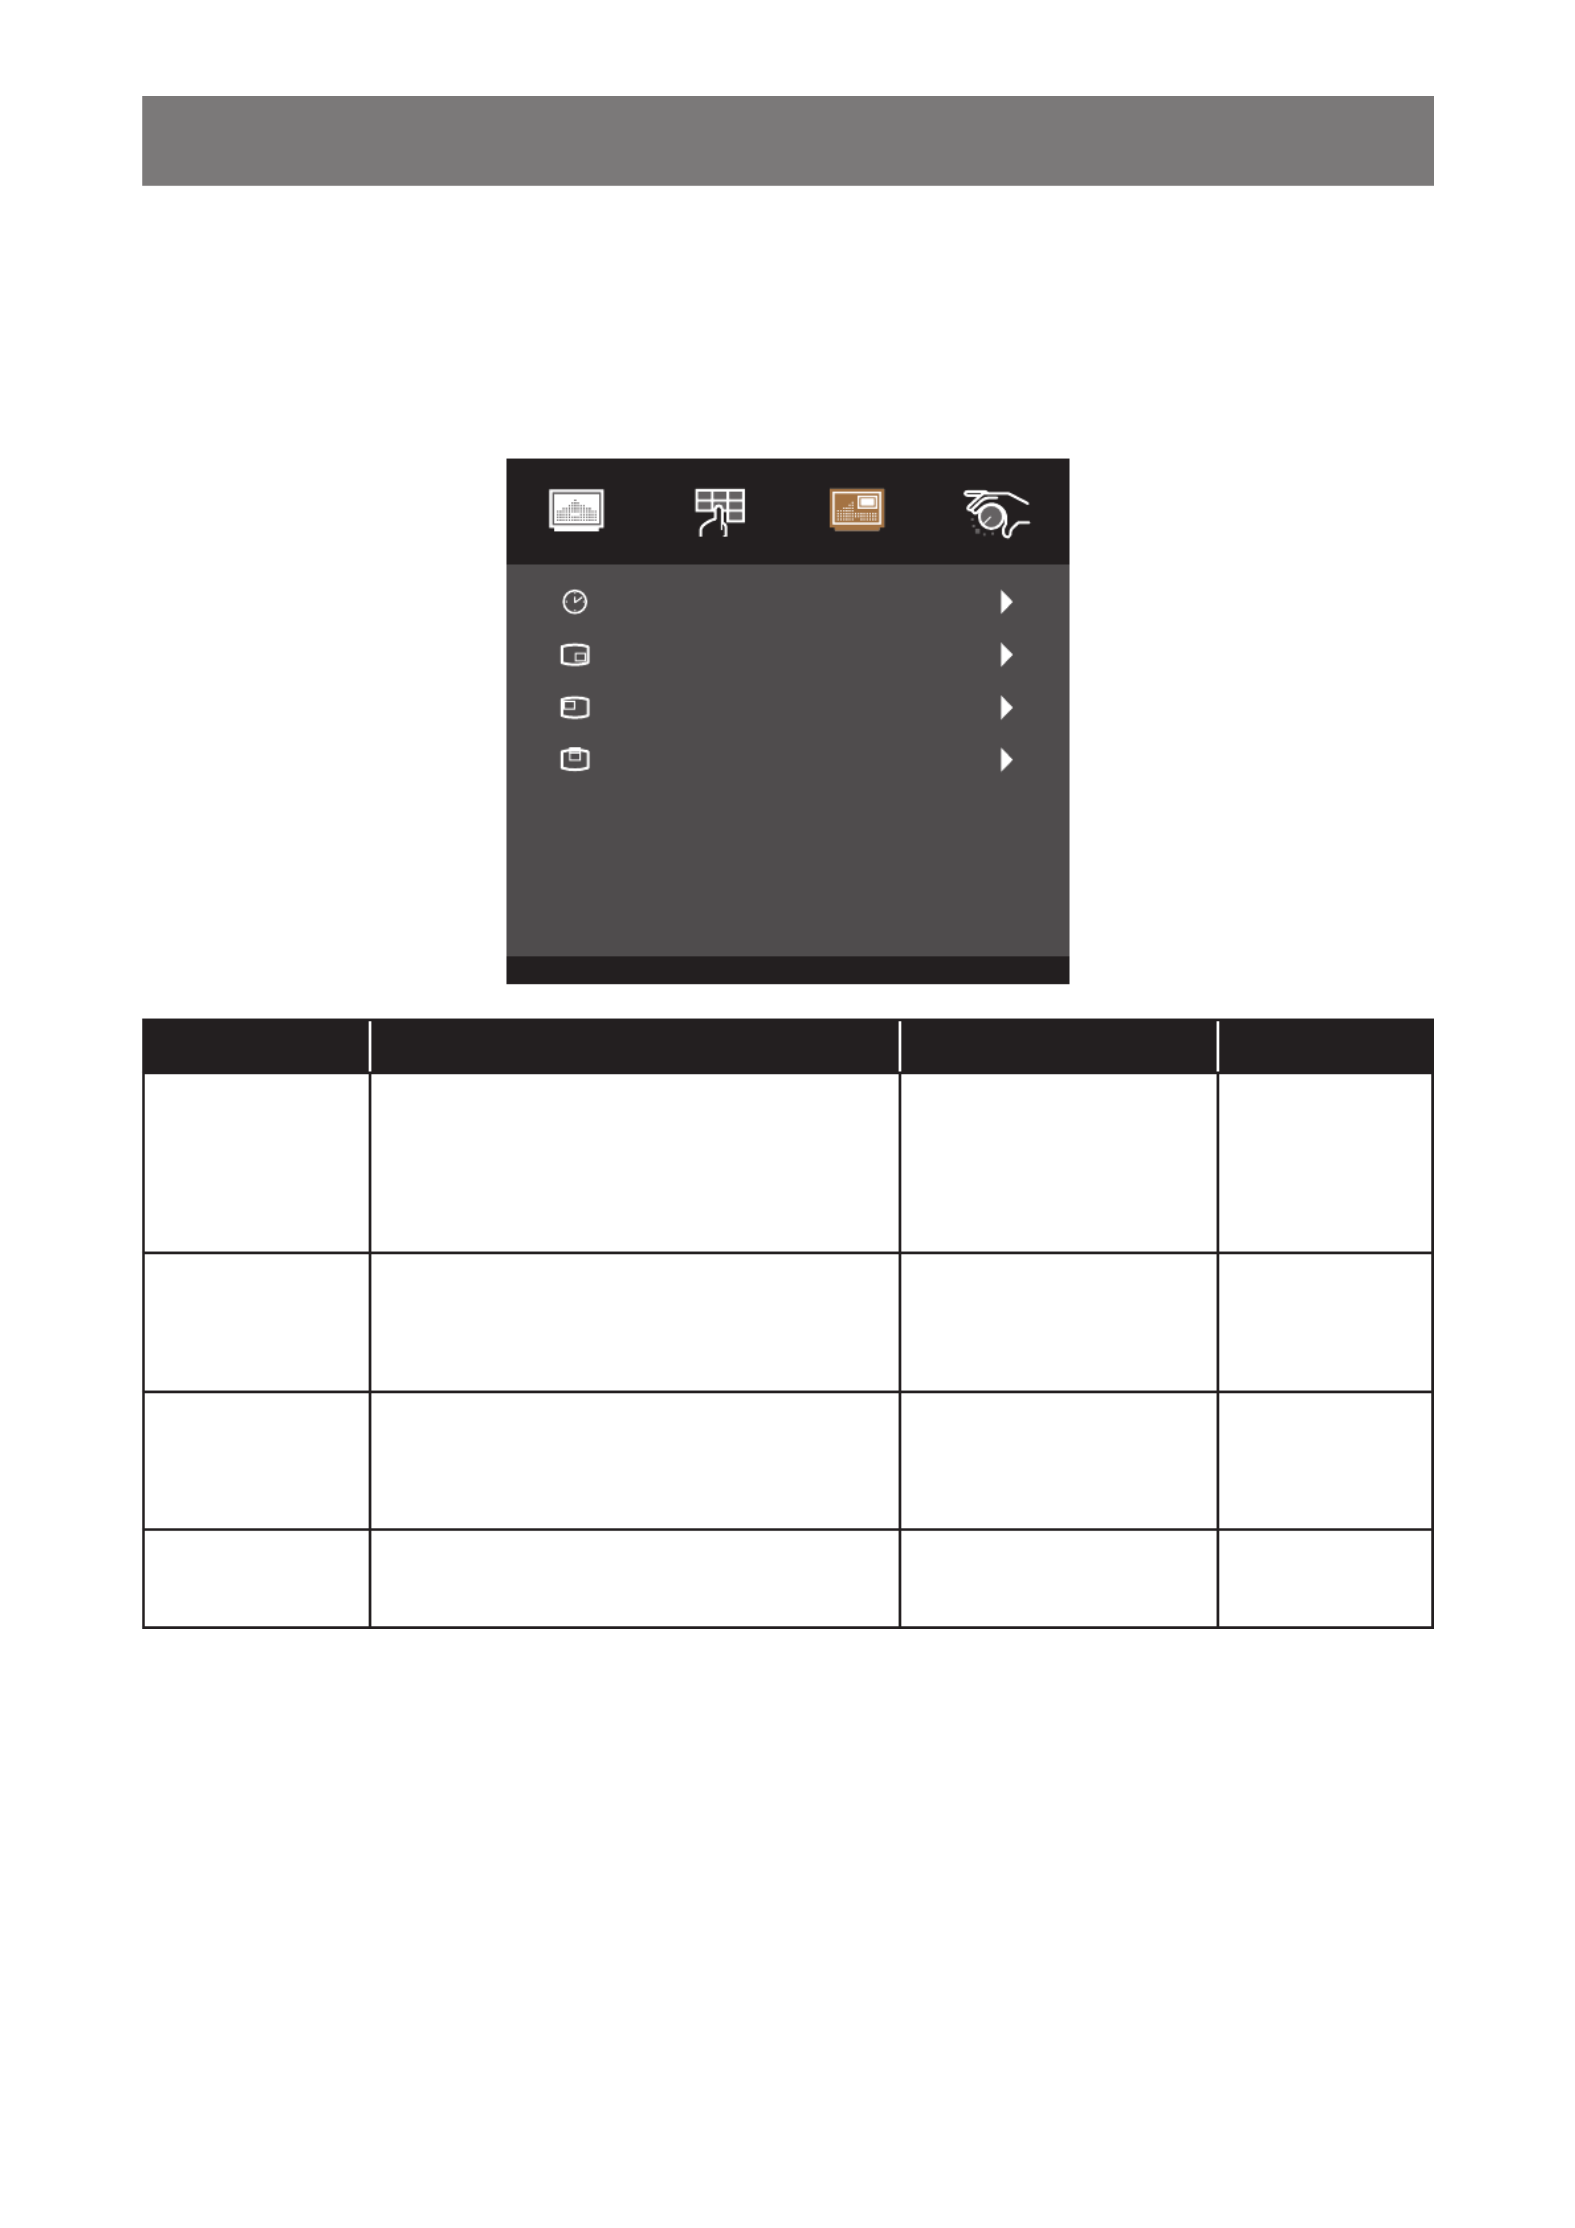
5.3 OSD Menu
1. Press MENU on the control panel to call out the OSD window.
2. Press to select OSD and then press SELECT to enter the menu.p/q
3. Press to select the submenu item and then press SELECT to enter its settings.p/q
OSD Timeout
OSD Position
OSD H-Position
OSD V-Position
<Sel ect> =En te <▲, ▼>=M ove , < Me nu >=Exir, t
15
User
50
50
Picture Colour SystemOSD
Item Function Operation Range
OSD Timeout Sets the length of time (in seconds) the
OSD screen is displayed. When the time
elapses, the OSD screen is automatically
inactivated.
Press to adjust the p q/
value.
5 to 60
OSD Position Sets the OSD window location on the
screen.
Press to select the p q/
setting and then press
SELECT to conrm.
User-dened
OSD H-Position
(Horizontal
Position)
Moves the OSD window to the left or right
of the screen.
Press to adjust the p q/
value.
0 to 100
OSD V-Position
(Vertical Position)
Moves the OSD window up or down the
screen.
Press to adjust the p q/
value.
0 to 100

31
ADJUSTING THE LCD MONITOR
5.4 System Menu
1. Press MENU on the control panel to call out the OSD window.
2. Press to select System and then press SELECT to enter the menu.p/q
3. Press to select the submenu item and then press SELECT to enter its settings.p/q
Reset
Language
Source Select
Information
Factory
<Sel ect> =En te <▲, ▼>=M ove , < Me nu >=Exir, t
English
Auto
Picture Colour SystemOSD
Item Function Operation Range
Reset Resets the device to the factory default
settings.
Press to select the p q/
setting and then press
SELECT to conrm.
No
Yes
Language Selects the language used for OSD menus. Press to select the p q/
setting and then press
SELECT to conrm.
English
Français
Deutsch
Italiano
Español
日本語
繁中
简中
Source Select Sets the input source.
Note: If the source is set to “Auto” then
the monitor detects the input
source automatically.
Press to select the p q/
setting and then press
SELECT to conrm.
Auto
VGA
HDMI
DP
Information View the source, resolution, and frequency. Press MENU to return to
the System menu.
N/A
Factory This is maintance function for service main.
Do not operate this function.
N/A N/A

CHAPTER 6: APPENDIX
32
6.1 Warning Messages
When any of these warning messages appear, check the following items.
Warning Message Cause Solution
No Signal
The LCD monitor cannot detect the
input source signal.
√Check if the input source is
turned ON.
√Check if the signal cable is
properly connected.
√Check if any pin inside the
cable connector is twisted or
broken.
Out of Range
The resolution or the refresh rate of
the graphics card of the computer
is set too high.
Note: If you see the “Out of
Range” message on the
screen, then the OSD menu
cannot be operated.
√Change the resolution or the
refresh rate of the graphics card.
WARNING!
ACCEPT CANCEL
C H A N G I N G T H E F O L L O W I N G S E T T I N G I N
O S D M E N U M A Y I RN C R E A S E T H E P O W E
C O N S U M P T I O N O F Y O U R M O N I T O R .
- B R I G H T N E S S
- C O L O U R
D O A N T Y O U W T O C O N T I N U E C H A N G E ?T O
Increasing the brightness and/or
contrast may increase the power
consumption of the monitor.
√ Select “ACCEPT” to conrm
or “CANCEL” to cancel the
modications.
Monitor will go into Standby mode.
The LCD monitor is in Standby
mode. The LCD monitor will enter
Standby mode when experiencing
a sudden signal disconnecting
problem.
√Check if the signal cable is
properly connected.
√The monitor can be activated
by pressing any keyboard,
triggering the mouse, or touching
the screen.
√Check if the correct source is
selected in the OSD > System
> Source select menu. Refer to
page 31.
Chapter 6: Appendix
33
CHAPTER 6: APPENDIX
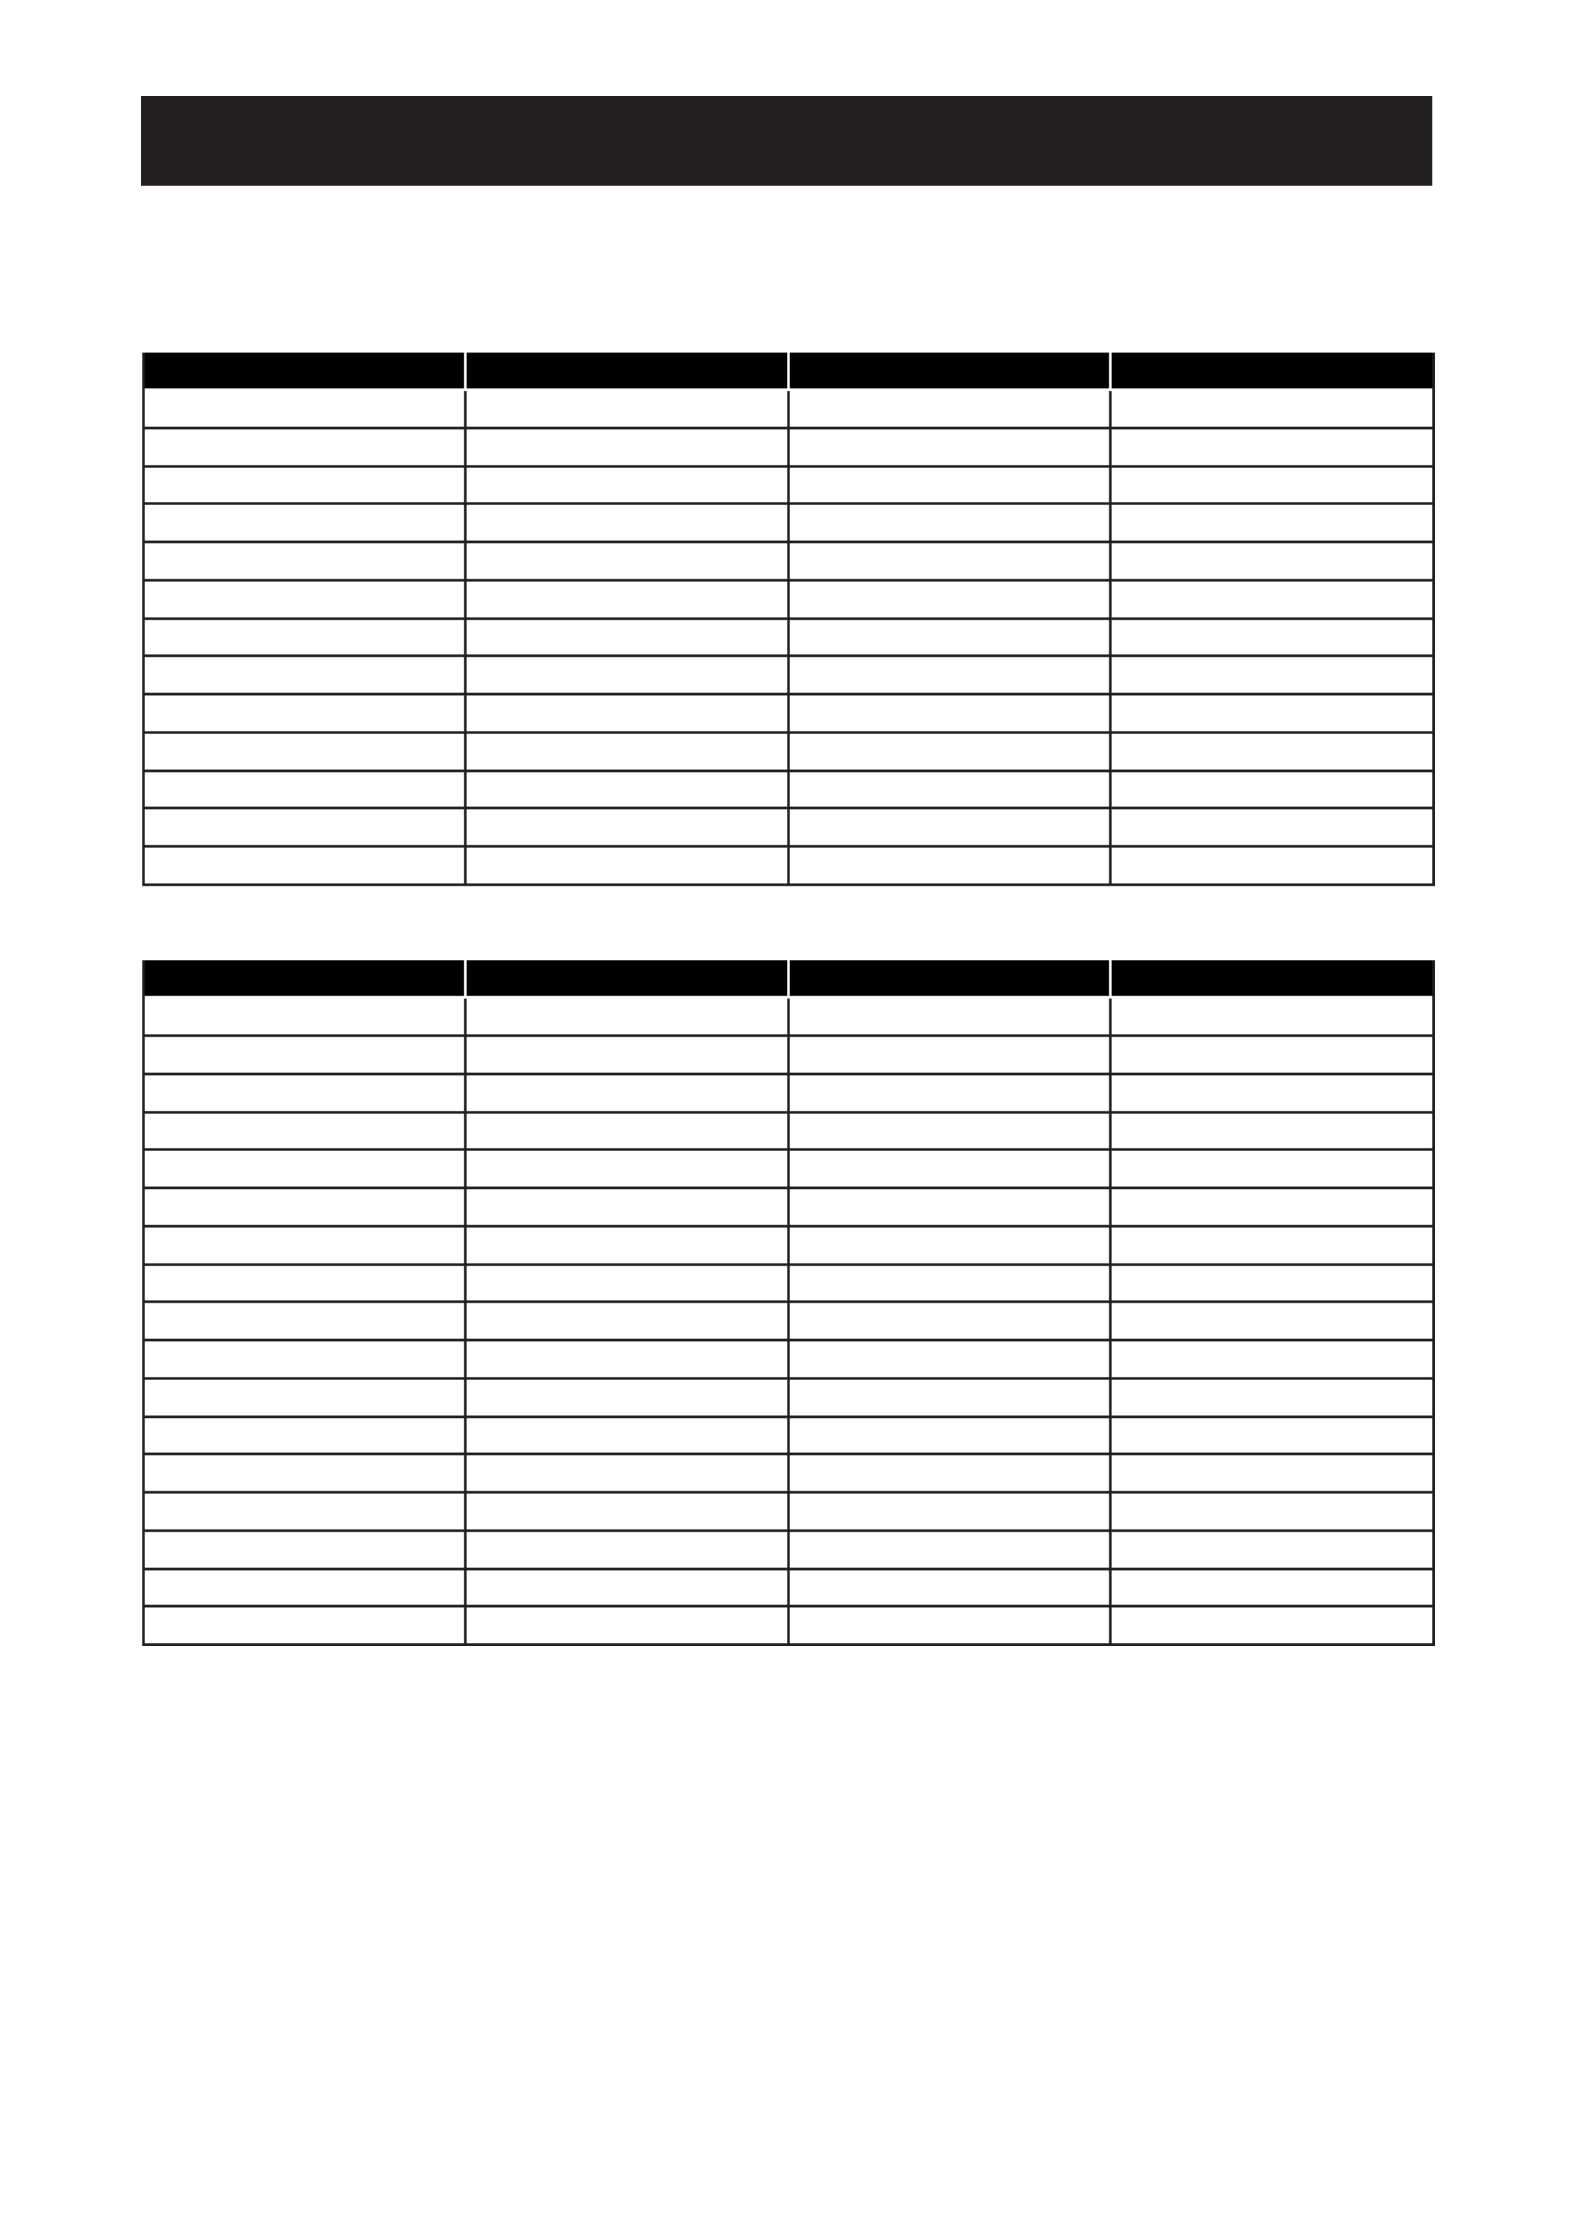
6.2 Timing
TX-1502
Mode Resolution H-Frequency(khz) V-Frequency(hz)
IBM VGA 720 x 400 31.47 70
IBM VGA 640 x 480 31.47 60
Apple MacII 640 x 480 35.00 67
VESA VGA 640 x 480 37.86 72
VESA VGA 640 x 480 37.50 75
VESA SVGA 800 x 600 35.16 56
VESA SVGA 800 x 600 37.88 60
VESA SVGA 800 x 600 48.08 72
VESA SVGA 800 x 600 46.88 75
Apple Mac 832 x 624 49.72 75
VESA XGA 1024 x 768 48.36 60
VESA XGA 1024 x 768 56.48 70
VESA XGA 1024 x 768 60.02 75
TX-1702/TX1902
Mode Resolution H-Frequency(khz) V-Frequency(hz)
IBM VGA 720 x 400 31.47 70
IBM VGA 640 x 480 31.47 60
Apple MacII 640 x 480 35.00 67
VESA VGA 640 x 480 37.86 72
VESA VGA 640 x 480 37.50 75
VESA SVGA 800 x 600 35.16 56
VESA SVGA 800 x 600 37.88 60
VESA SVGA 800 x 600 48.08 72
VESA SVGA 800 x 600 46.88 75
Apple Mac 832 x 624 49.72 75
VESA XGA 1024 x 768 48.36 60
VESA XGA 1024 x 768 56.48 70
VESA XGA 1024 x 768 60.02 75
VESA SXGA 1280 x 1024 64.00 60
VESA SXGA 1280 x 1024 80.00 75
VESA SXGA 1152 x 864 67.50 75
VESA SXGA 1280 x 960 60.00 60
CHAPTER 6: APPENDIX
34
TX-2202
Mode Resolution H-Frequency(khz) V-Frequency(hz)
IBM VGA 720 x 400 31.47 70
IBM VGA 640 x 480 31.47 60
Apple MacII 640 x 480 35.00 67
VESA VGA 640 x 480 37.86 72
VESA VGA 640 x 480 37.50 75
VESA SVGA 800 x 600 35.16 56
VESA SVGA 800 x 600 37.88 60
VESA SVGA 800 x 600 48.08 72
VESA SVGA 800 x 600 46.88 75
Apple Mac 832 x 624 49.72 75
VESA XGA 1024 x 768 48.36 60
VESA XGA 1024 x 768 56.48 70
VESA XGA 1024 x 768 60.02 75
VESA SXGA 1280 x 1024 64.00 60
VESA SXGA 1280 x 1024 80.00 75
VESA SXGA 1152 x 864 67.50 75
VESA SXGA 1280 x 960 60.00 60
WXGA+ 1440 x 900 56.00 60
WXGA+ 1440 x 900 70.60 75
WSXGA+ 1680 x 1050 65.29 60
WSXGA+ 1680 x 1050 (VGA only) 82.30 75
VESA WXGA 1280 x 768 47.77 60
WSXGA+ 1920 x 1080 67.50 60
35
CHAPTER 6: APPENDIX
6.3 Touch Screen Driver Installation
The LCD monitor is available with USB connections. The touch driver can be downloaded from
https://www.eeti.com/documentation.html website.
The supported operating systems are Windows® 7/8/10, Windows VISTA/XP/2000/CE/XP Embedded, Mac
OS 10.10-10.14, Linux 2.6.36 later/3.x.x/4.x.x/5.x.x, Android 2.3 upwards (Windows 7/8/10 Multi touch without
driver).
Please Note:
• Your LCD monitor is Microsoft® Windows® HID (Human Interface Device) compatible if you use the USB
touch screen interface. No additional software driver is required for general operation of the touch screen.
Note: A calibration tool can be installed for improved touch position accuracy. Please refer to “6.3.1
Optional Calibration Tool Install”.
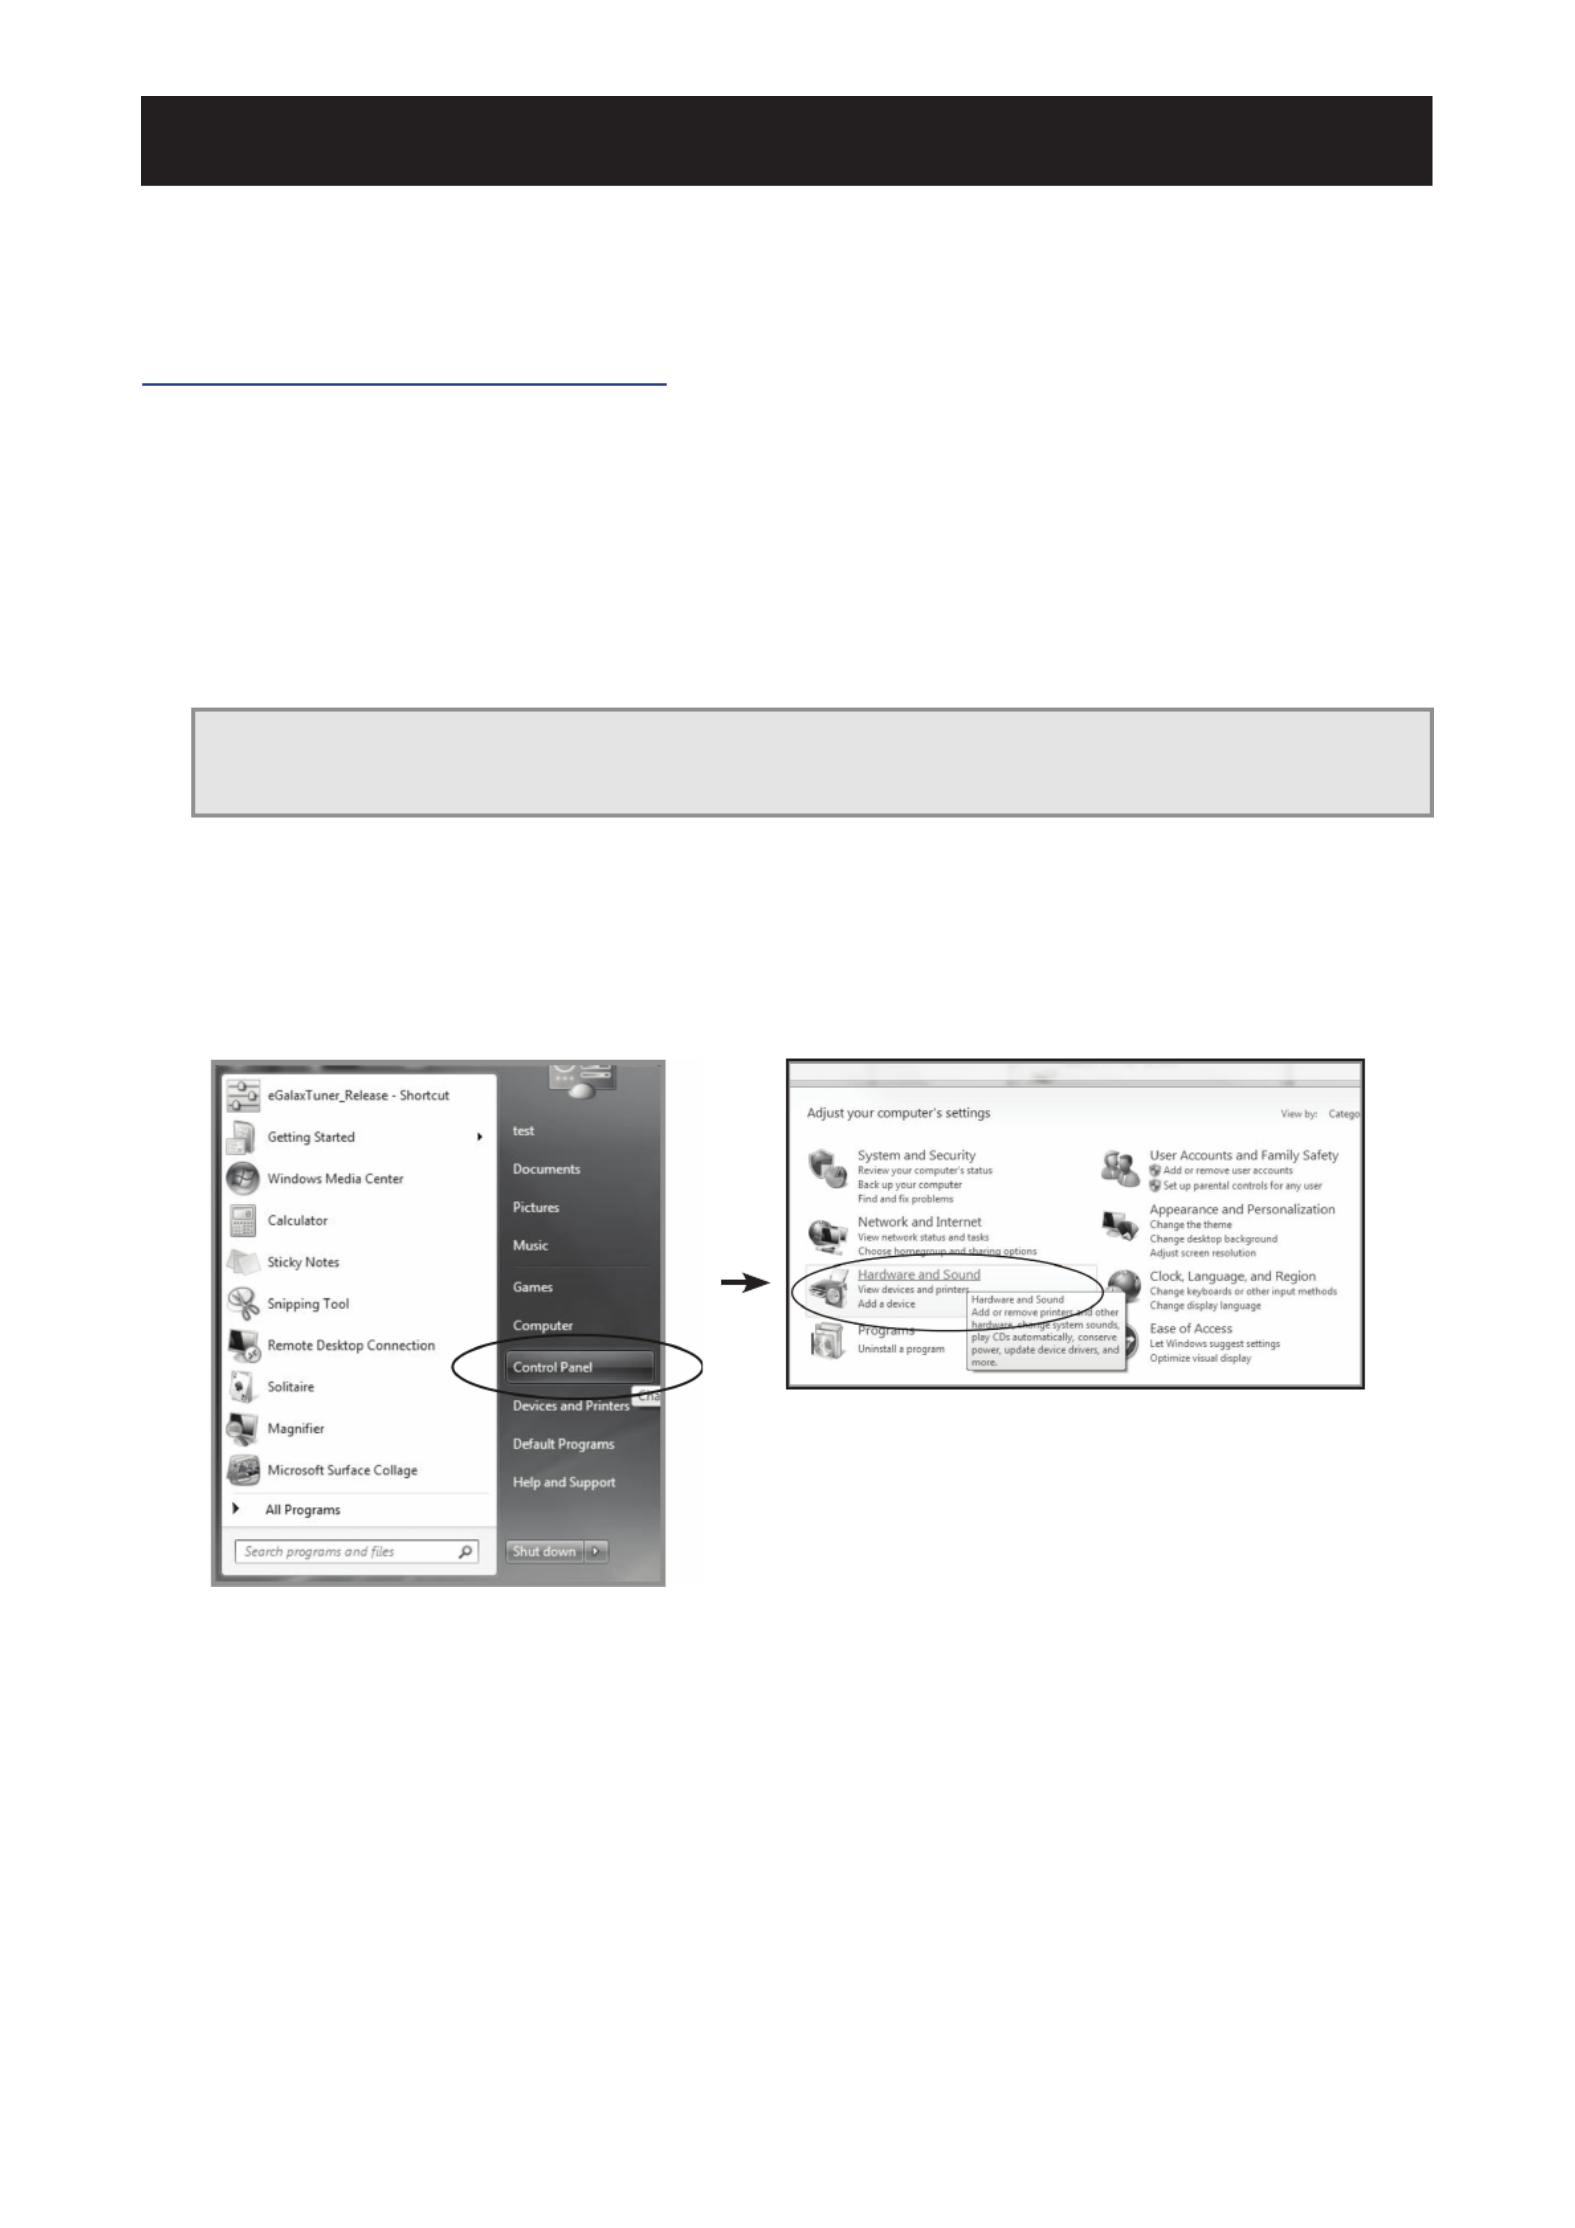
6.3.1 Optional Calibration Tool Install
To calibrate the touch screen in Windows 7/8/10 environment:
1. Tap Start > Control Panel > Hardware and Sound.

CHAPTER 6: APPENDIX
36
2. In Tablet PC Settings, tap “Calibrate the screen for pen or touch input”.
3. On the Display tab, in Display options, tap “Calibrate” and then “Yes” to allow the program
to make changes.
4. Follow the on-screen instructions to calibrate the touch screen.
6.3.2 Driver Installation Instructions
If you are using a PC running Windows VISTA, XP, 2000, follow the instructions below:
1. Power on the PC.
2. Make sure the USB cable is connected from the PC to the LCD monitor.
3. Open the corresponding driver folder le.
4. Follow the step-by-step instructions as shown on the pop-up windows.
If you are using a PC running Windows® XP Embedded, follow the instructions below:
• Express:
1. Power on the computer.
2. Make sure the USB cable is connected to the computer.
3. Make sure your EWF is disabled. If your EWF is enabled, please disable the EWF by using
the EWF Manager command.
4. Once the EWF is disabled, click on the XP driver and follow the step-by-step instructions as
shown on the pop-up windows.
• Custom:
1. Power on the computer.
2. Make sure the USB cable is connected to the computer.
3. Follow the step-by-step instructions found in the driver folder le.
Product specificaties
| Merk: | Ag Neovo |
| Categorie: | Monitor |
| Model: | TX-2202 |
| Kleur van het product: | Grijs |
| Gewicht verpakking: | 9800 g |
| Breedte verpakking: | 610 mm |
| Diepte verpakking: | 320 mm |
| Hoogte verpakking: | 460 mm |
| Materiaal behuizing: | Metaal |
| Internationale veiligheidscode (IP): | IP65 |
| Ondersteunde mobiele besturingssystemen: | Android |
| LED-indicatoren: | Ja |
| In hoogte verstelbaar: | Nee |
| Beeldschermdiagonaal: | 21.5 " |
| Resolutie: | 1920 x 1080 Pixels |
| Touchscreen: | Ja |
| Inclusief besturingssysteem: | Windows 10 |
| Kijkhoek, horizontaal: | 178 ° |
| Kijkhoek, verticaal: | 178 ° |
| Meegeleverde kabels: | AC, HDMI, USB, VGA |
| Beeldscherm vorm: | Flat |
| Typische contrastverhouding: | 1000:1 |
| Touch technologie: | Multi-touch |
| Helderheid: | 250 cd/m² |
| Touch screen type: | Capacitief |
| Markt positionering: | Bedrijf |
| Frequentiebereik horizontaal: | 30 - 84 kHz |
| Frequentiebereik verticaal: | 50 - 76 Hz |
| VGA (D-Sub)poort(en): | 1 |
| Aantal HDMI-poorten: | 1 |
| Bevestigingsmogelijkheid voor kabelslot: | Ja |
| Kabelslot sleuf type: | Kensington |
| Ingebouwde luidsprekers: | Nee |
| Stroomverbruik (in standby): | 0.7 W |
| Certificering: | CE, LVD, WEEE, RoHS, REACH, EAC |
| Beeldscherm, aantal kleuren: | 16.78 miljoen kleuren |
| Stroomverbruik (indien uit): | 0.3 W |
| HD type: | Full HD |
| Ingebouwde microfoon: | Nee |
| HDMI: | Ja |
| HDMI versie: | 1.4 |
| Display technologie: | IPS |
| Responstijd: | 5 ms |
| Pixel pitch: | 0.248 x 0.248 mm |
| VESA-montage: | Ja |
| Paneelmontage-interface: | 100 x 100 mm |
| Antireflectiescherm: | Ja |
| Bedrijfsuren (uren/dagen): | 24/7 |
| Duurzaamheidscertificaten: | CE, REACH, RoHS, WEEE |
| Helderheid (typisch): | 250 cd/m² |
| RGB-kleurruimte: | NTSC |
| Ingebouwde camera: | Nee |
| Diepte ( zonder voet ): | 48.5 mm |
| Hoogte (zonder voet ): | 324.3 mm |
| Breedte ( zonder voet ): | 528.6 mm |
| Gewicht (zonder voet): | 4800 g |
| Plug and play: | Ja |
| Aantal DisplayPorts: | 1 |
| Energieverbruik (HDR) per 1000 uur: | - kWu |
| Energieverbruik (SDR) per 1000 uur: | - kWu |
| Breedte apparaat (met standaard): | 528.6 mm |
| Diepte apparaat (met standaard): | 214.2 mm |
| Hoogte apparaat (met standaard): | 346.7 mm |
| Gewicht (met standaard): | 6100 g |
| AMD FreeSync: | Nee |
| NVIDIA G-SYNC: | Nee |
| Ondersteunt Windows: | Windows 10, Windows 7, Windows 8 |
| Backlight type: | LED |
| Soort voeding: | Extern |
| Temperatuur bij opslag: | -20 - 60 °C |
| Soort paneel: | IPS |
| Ondersteunt Mac-besturingssysteem: | Mac OS X 10.10 Yosemite, Mac OS X 10.11 El Capitan, Mac OS X 10.12 Sierra, Mac OS X 10.13 High Sierra, Mac OS X 10.14 Mojave |
| Luchtvochtigheid bij opslag: | 10 - 90 procent |
| AC-adapter, uitgangsspanning: | 12 V |
| Naleving van duurzaamheid: | Ja |
| Ondersteunt Linux: | Ja |
| Ingebouwde USB-hub: | Nee |
| NTSC-dekking (normaal): | 72 procent |
| Staander inbegrepen: | Ja |
| Afneembare standaard: | Ja |
| Ophangsysteem voor aan de muur: | Ja |
| Hoeveelheid simultane aanraakpunten: | 10 |
| Touchscreen technologie: | Capacitief |
| Hardheid oppervlak: | 7H |
| USB Touch port: | Ja |
| Stroomverbruik (typisch): | 16 W |
| Bedrijfstemperatuur (T-T): | 0 - 40 °C |
| Relatieve vochtigheid in bedrijf (V-V): | 20 - 80 procent |
| Bereik kantelhoek: | -5 - 90 ° |
| Code geharmoniseerd systeem (HS): | 85285210 |
| Waasniveau: | 25 procent |
| Glas dikheid: | 2.05 mm |
| Aantal USB Touch-poorten: | 1 |
| kantel aanpassingen: | Ja |
Heb je hulp nodig?
Als je hulp nodig hebt met Ag Neovo TX-2202 stel dan hieronder een vraag en andere gebruikers zullen je antwoorden
Handleiding Monitor Ag Neovo

25 Februari 2025
14 Januari 2025
14 Januari 2025
11 November 2024
11 November 2024
11 November 2024
12 September 2024
15 Juli 2024
11 Juni 2024
11 Juni 2024
Handleiding Monitor
- Monitor Bosch
- Monitor Philips
- Monitor HP
- Monitor Sony
- Monitor Samsung
- Monitor Xiaomi
- Monitor Panasonic
- Monitor Epson
- Monitor LG
- Monitor Huawei
- Monitor Asus
- Monitor Canon
- Monitor Daewoo
- Monitor Garmin
- Monitor Honeywell
- Monitor JVC
- Monitor JBL
- Monitor Medion
- Monitor Olympus
- Monitor Pioneer
- Monitor Toshiba
- Monitor Xerox
- Monitor Yamaha
- Monitor Yealink
- Monitor Abus
- Monitor Acer
- Monitor Acti
- Monitor Alesis
- Monitor Alienware
- Monitor Alpine
- Monitor AOC
- Monitor AOpen
- Monitor Apc
- Monitor Apple
- Monitor Archos
- Monitor Asrock
- Monitor Barco
- Monitor Behringer
- Monitor Belinea
- Monitor BenQ
- Monitor Blaupunkt
- Monitor BlueBuilt
- Monitor Boss
- Monitor Brandson
- Monitor Danfoss
- Monitor Dell
- Monitor Denver
- Monitor Eizo
- Monitor Emachines
- Monitor EverFocus
- Monitor Faytech
- Monitor Focal
- Monitor Fujitsu
- Monitor Ganz
- Monitor GeoVision
- Monitor Gigabyte
- Monitor GlobalTronics
- Monitor Godox
- Monitor Haier
- Monitor Hannspree
- Monitor Hercules
- Monitor Hikvision
- Monitor Hisense
- Monitor Hitachi
- Monitor HKC
- Monitor Hyundai
- Monitor Ibm
- Monitor IHealth
- Monitor Iiyama
- Monitor InFocus
- Monitor Insignia
- Monitor Interlogix
- Monitor Kogan
- Monitor Konig
- Monitor LaCie
- Monitor Legamaster
- Monitor Lenovo
- Monitor LightZone
- Monitor M-Audio
- Monitor Mackie
- Monitor Mad Catz
- Monitor Marquant
- Monitor Marshall
- Monitor Maxdata
- Monitor Maxell
- Monitor Midas
- Monitor Mirai
- Monitor Mitsubishi
- Monitor Monacor
- Monitor MSI
- Monitor Nec
- Monitor Newstar
- Monitor Packard Bell
- Monitor Peaq
- Monitor Peerless
- Monitor Plantronics
- Monitor Prestigio
- Monitor Provision ISR
- Monitor Pyle
- Monitor Razer
- Monitor RCF
- Monitor Renkforce
- Monitor Ricoh
- Monitor Ring
- Monitor Salora
- Monitor Samson
- Monitor Sanyo
- Monitor Schneider
- Monitor Sharp
- Monitor Silvercrest
- Monitor Simrad
- Monitor Skytronic
- Monitor Smart
- Monitor Soundstream
- Monitor Sunny
- Monitor Sunstech
- Monitor Tannoy
- Monitor TCL
- Monitor Terra
- Monitor Tesla
- Monitor Thomson
- Monitor Triton
- Monitor Velleman
- Monitor Viessmann
- Monitor Viewsonic
- Monitor Vitek
- Monitor Vivitek
- Monitor Waeco
- Monitor Westinghouse
- Monitor Wyse - Dell
- Monitor Xoro
- Monitor Zalman
- Monitor Jay-tech
- Monitor Jensen
- Monitor Joy-it
- Monitor Jung
- Monitor Odys
- Monitor Omron
- Monitor ONYX
- Monitor Optoma
- Monitor Orion
- Monitor 3M
- Monitor Continental Edison
- Monitor Caliber
- Monitor CSL
- Monitor Monoprice
- Monitor Shure
- Monitor Voxicon
- Monitor EMOS
- Monitor Festo
- Monitor Newline
- Monitor Atlona
- Monitor Hamlet
- Monitor Cooler Master
- Monitor NZXT
- Monitor Thermaltake
- Monitor Citizen
- Monitor Kubo
- Monitor Eurolite
- Monitor Corsair
- Monitor Deltaco
- Monitor KeepOut
- Monitor Ozone
- Monitor Tripp Lite
- Monitor Chauvet
- Monitor Approx
- Monitor Cisco
- Monitor KTC
- Monitor ARRI
- Monitor Bauhn
- Monitor LC-Power
- Monitor HyperX
- Monitor Atomos
- Monitor Yorkville
- Monitor Jupiter
- Monitor Adam
- Monitor Genelec
- Monitor AORUS
- Monitor Avocor
- Monitor DoubleSight
- Monitor Planar
- Monitor SEIKI
- Monitor EC Line
- Monitor MicroTouch
- Monitor HoverCam
- Monitor ELO
- Monitor IFM
- Monitor DataVideo
- Monitor Kindermann
- Monitor ART
- Monitor Da-Lite
- Monitor Allen & Heath
- Monitor ProXtend
- Monitor AJA
- Monitor Adj
- Monitor Ikan
- Monitor Element
- Monitor Dahua Technology
- Monitor Neumann
- Monitor Peerless-AV
- Monitor PreSonus
- Monitor IK Multimedia
- Monitor Swissonic
- Monitor QSC
- Monitor ESI
- Monitor Marshall Electronics
- Monitor RGBlink
- Monitor POSline
- Monitor Dynaudio
- Monitor Krom
- Monitor Vorago
- Monitor Extron
- Monitor Promethean
- Monitor Fostex
- Monitor Prowise
- Monitor Neets
- Monitor AMX
- Monitor Stairville
- Monitor Crestron
- Monitor I3-Technologies
- Monitor CTOUCH
- Monitor SMART Technologies
- Monitor BOOX
- Monitor SPL
- Monitor Aputure
- Monitor Drawmer
- Monitor Blue Sky
- Monitor Advantech
- Monitor Iadea
- Monitor Sonifex
- Monitor Kali Audio
- Monitor Kramer
- Monitor Avantone Pro
- Monitor AVer
- Monitor ITek
- Monitor Posiflex
- Monitor Vimar
- Monitor Speco Technologies
- Monitor Akuvox
- Monitor Antelope Audio
- Monitor X-Rite
- Monitor EKO
- Monitor IBoardTouch
- Monitor PeakTech
- Monitor Elite Screens
- Monitor Hollyland
- Monitor Mitsai
- Monitor V7
- Monitor Palmer
- Monitor TV One
- Monitor Christie
- Monitor Hanwha
- Monitor Phoenix Contact
- Monitor COMMBOX
- Monitor Yiynova
- Monitor Pelco
- Monitor Lilliput
- Monitor KRK
- Monitor Ernitec
- Monitor Planet Audio
- Monitor Datacolor
- Monitor Fluid
- Monitor Postium
- Monitor HELGI
- Monitor Desview
- Monitor Syscom
- Monitor Allsee
- Monitor Alogic
- Monitor Night Owl
- Monitor ProDVX
- Monitor Varad
- Monitor PureTools
- Monitor CTL
- Monitor Game Factor
- Monitor Nixeus
- Monitor Chimei
- Monitor Blue Sea
- Monitor AMCV
- Monitor SWIT
- Monitor TVLogic
- Monitor Feelworld
- Monitor GeChic
- Monitor Oecolux
- Monitor ADS-TEC
- Monitor Satco
- Monitor SideTrak
- Monitor TRIUMPH BOARD
- Monitor Casalux
- Monitor Positivo
- Monitor Transvideo
- Monitor Innocn
- Monitor Shimbol
- Monitor Raysgem
- Monitor Motrona
- Monitor Ikegami
- Monitor Wohler
- Monitor Elvid
- Monitor Portkeys
- Monitor Neat
- Monitor Mimo Monitors
- Monitor Gamber-Johnson
- Monitor Enttec
- Monitor American Dynamics
- Monitor AIS
- Monitor Eve Audio
- Monitor Wortmann AG
- Monitor Viotek
- Monitor Vidi-Touch
- Monitor CoolerMaster
- Monitor Mobile Pixels
- Monitor Atlantis Land
- Monitor HEDD
- Monitor Colormetrics
- Monitor Monkey Banana
- Monitor SmallHD
- Monitor IStarUSA
- Monitor Qian
- Monitor UPERFECT
- Monitor Freedom Scientific
- Monitor OSEE
- Monitor GVision
- Monitor Mybeo
- Monitor Bearware
- Monitor IOIO
- Monitor DTEN
- Monitor Cocopar
- Monitor Titan Army
- Monitor BookIT
- Monitor Wimaxit
- Monitor Delvcam
- Monitor Xenarc
- Monitor Japannext
Nieuwste handleidingen voor Monitor

8 April 2025

8 April 2025

7 April 2025
7 April 2025

4 April 2025

4 April 2025
2 April 2025
1 April 2025
30 Maart 2025
30 Maart 2025