Mars Gaming MC-400 Handleiding
Mars Gaming
Niet gecategoriseerd
MC-400
Bekijk gratis de handleiding van Mars Gaming MC-400 (1 pagina’s), behorend tot de categorie Niet gecategoriseerd. Deze gids werd als nuttig beoordeeld door 32 mensen en kreeg gemiddeld 4.9 sterren uit 16.5 reviews. Heb je een vraag over Mars Gaming MC-400 of wil je andere gebruikers van dit product iets vragen? Stel een vraag
Pagina 1/1
MANUAL
I / O PANEL
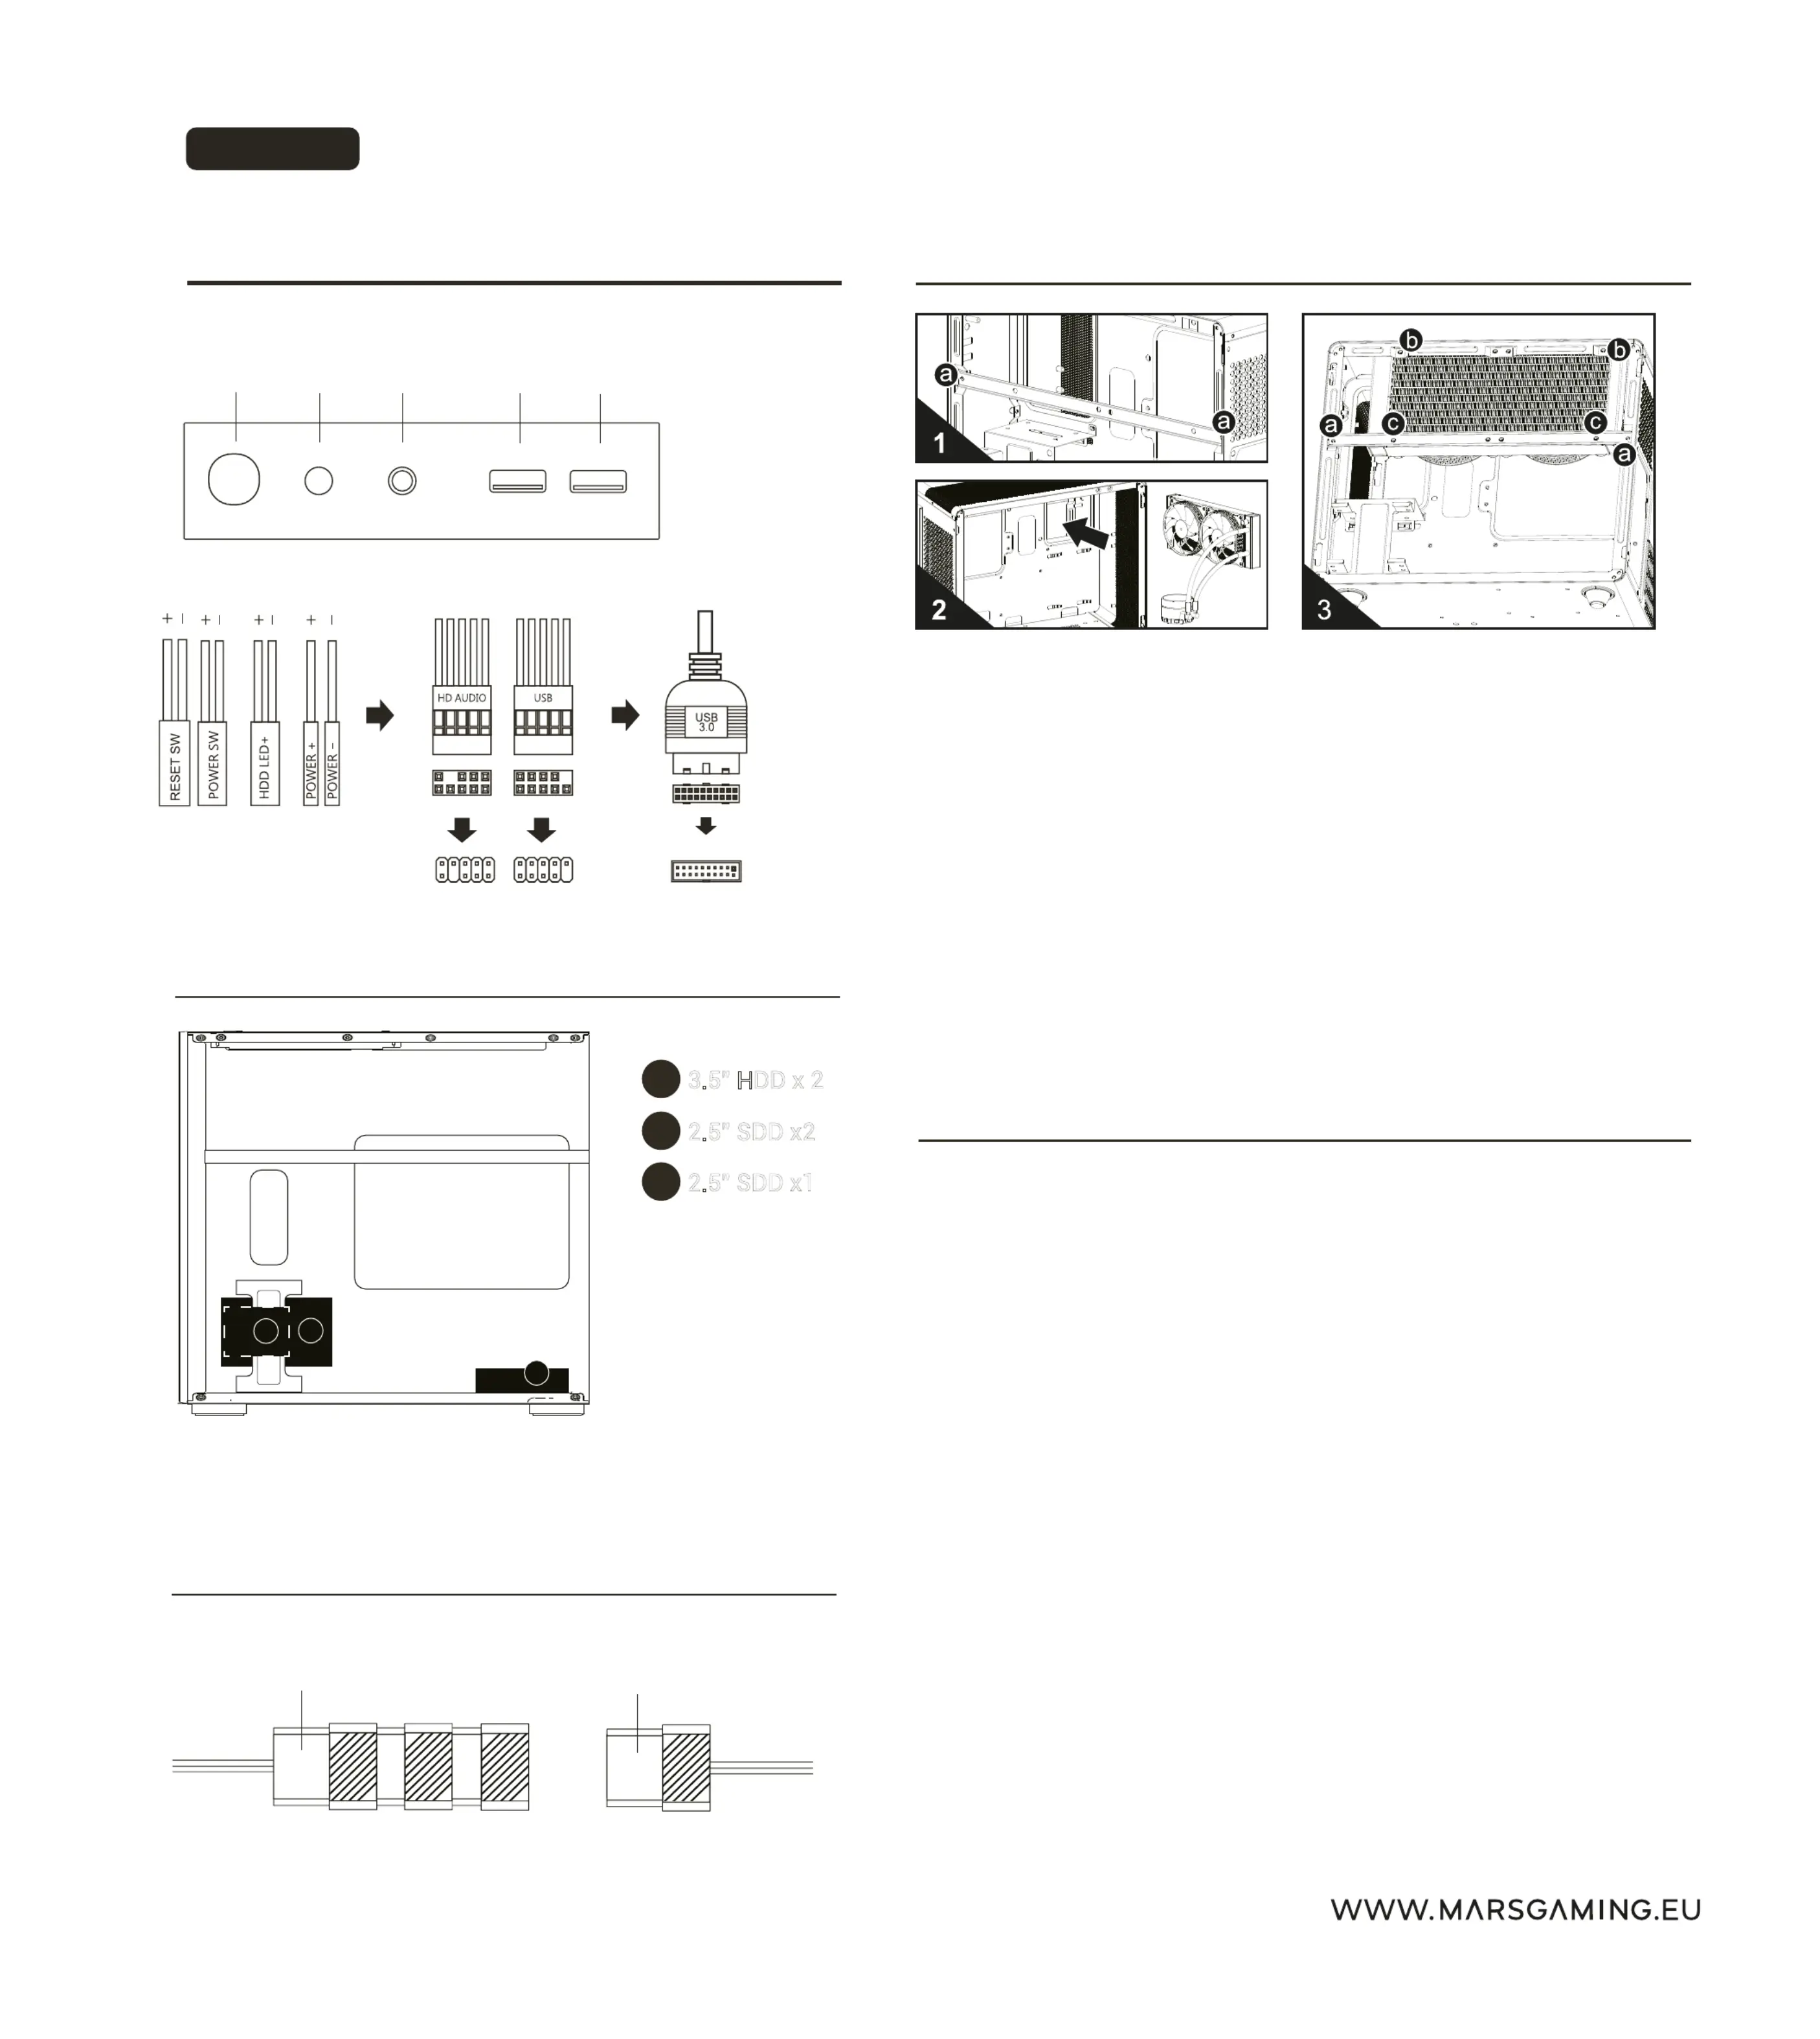
WATER COOLING
INSTALLATION
Instalación refrigeración líquida - Instalação de refrigeração líquida - Impianto di
raffreddamento a liquido - Installation de refroidissement liquide - Flüssigkühlung
Installation - Instalacja chłodzenia cieczą - Vloeistof koeling installatie
EN
Keep children away from the case parts while installing the
computer. Watch your hands and fingers while handling and
installing the parts. Unplug the power supply cable and clean
only with a dry cloth, do not use aerosol or liquid cleaning
agents. Do not attempt to repair the product yourself. At the
end of the product life please dispose this product at your local
waste collection/recycling centre.
ES
Mantenga a los niños alejados de las piezas de la caja mientras
monta el ordenador. Proteja las manos y los dedos mientras
manipula e instala las piezas. Desconecte el cable de aliment-
ación y límpielo únicamente con un paño seco, no utilice
productos de limpieza en aerosol o líquidos. No intente reparar
el producto usted mismo. Al final de la vida útil del producto,
deséchelo en su centro local de recolección/reciclaje de
desechos.
PT
Mantenha as crianças afastadas das peças da caixa durante a
montagem do computador. Proteja as mãos e os dedos ao
manusear e instalar peças. Desconecte o cabo de alimentação
e limpe apenas com um pano seco, não use limpadores em
spray ou líquidos. Não tente reparar o produto sozinho. No final
da vida útil do produto, elimine-o no centro de
reciclagem/recolha de resíduos local.
IT
Tenere i bambini lontani dalle parti della custodia durante
l'assemblaggio del computer. Proteggere le mani e le dita
durante la manipolazione e l'installazione delle parti. Scollegare
il cavo di alimentazione e pulire solo con un panno asciutto,
non utilizzare spray o detergenti liquidi. Non tentare di riparare il
prodotto da soli. Al termine del ciclo di vita del prodotto,
smaltirlo presso il centro locale di raccolta/riciclaggio dei rifiuti.
FR
Tenez les enfants éloignés des pièces du boîtier lors de
l'assemblage de l'ordinateur. Protégez vos mains et vos doigts
lors de la manipulation et de l'installation des pièces.
Débranchez le cordon d'alimentation et nettoyez uniquement
avec un chiffon sec, n'utilisez pas de spray ou de nettoyants
liquides. N'essayez pas de réparer le produit vous-même. À la
fin de la durée de vie du produit, mettez-le au rebut dans votre
centre local de collecte/recyclage des déchets.
DE
Halten Sie Kinder beim Zusammenbau des Computers von den
Gehäuseteilen fern. Schützen Sie Hände und Finger beim
Handhaben und Installieren von Teilen. Ziehen Sie das
Netzkabel ab und reinigen Sie es nur mit einem trockenen Tuch,
verwenden Sie keine Sprays oder Flüssigreiniger. Versuchen Sie
nicht, das Produkt selbst zu reparieren. Entsorgen Sie das
Produkt am Ende seiner Lebensdauer bei Ihrem örtlichen
Abfallsammel-/Recyclingzentrum.
PL
Trzymaj dzieci z dala od części obudowy podczas montażu
komputera. Chroń ręce i palce podczas przenoszenia i montażu
części. Odłącz przewód zasilający i czyść tylko suchą szmatką,
nie używaj środków czyszczących w sprayu ani w płynie. Nie
próbuj samodzielnie naprawiać produktu. Po zakończeniu
eksploatacji produktu należy go oddać do lokalnego punktu
zbiórki/recyklingu odpadów.
NL
Houd kinderen uit de buurt van de onderdelen van de behuizing
tijdens het installeren van de computer. Let op uw handen en
vingers tijdens het hanteren en installeren van de onderdelen.
Trek de stekker uit het stopcontact en reinig alleen met een
droge doek, gebruik geen spuitbus of vloeibare reinigingsmid-
delen. Probeer het product niet zelf te repareren. Aan het einde
van de levensduur van het product dient u dit product in te
leveren bij uw plaatselijke afvalinzamelings-/recyclingcentrum.
USB USB
POWER RESET
MIC & AUDIO
EN
1. Unscrew the "A" position screws of the radiator bracket and remove it.
2. Pass the radiator or pump through the hole as shown in the illustration
2 and put it in the back of the motherboard.
3. Align the radiator with the “B” holes and fix the screws, put the bracket
and screw them in the “A” position and put the “C” screws.
ES
1. Desenrosque los tornillos de las posiciones "A" del soporte del radiador
y retíralo.
2. Pase el radiador o la bomba a través del orificio como se muestra en la
ilustración 2 y colóquelo en la parte trasera de la placa base.
3. Alinee el radiador con los agujeros “B” y fija los tornillos, coloque el
soporte y atorníllelo en la posición “A” y coloque los tornillos en “C”.
PT
1. Desparafuse os parafusos das posições "A" do suporte do radiador e
remova-o.
2. Passe o radiador ou bomba pelo orifício conforme a ilustração 2 e
coloque-o na parte traseira da placa-mãe.
3. Alinhe o radiador com os furos “B” e fixe os parafusos, coloque o
suporte e parafuse-os na posição “A” e coloque os parafusos “C”.
IT
1. Svitare le viti delle posizioni "A" della staffa del radiatore e rimuoverla.
2. Passare il radiatore o la pompa attraverso il foro come mostrato
nell'illustrazione 2 e inserirlo nella parte posteriore della scheda madre.
3. Allineare il radiatore con i fori “B” e fissare le viti, posizionare la staffa e
avvitarle nella posizione “A” e inserire le viti “C”.
FR
1. Dévissez les vis de position "A" du support de radiateur et retirez-le.
2. Passez le radiateur ou la pompe à travers le trou comme indiqué sur
l'illustration 2 et placez-le à l'arrière de la carte mère.
3. Alignez le radiateur avec les trous "B" et fixez les vis, placez le support
et vissez-les en position "A" et placez les vis "C".
DE
1. Dévissez les vis des positions "A" du support du radiateur et retirez-le.
2. Passez le radiateur ou la pompe à travers le trou comme indiqué sur
l'illustration 2 et placez-le à l'arrière de la carte mère.
3. Alignez le radiateur avec les trous "B" et fixez les vis, placez le support
et vissez-les en position "A" et placez les vis "C".
PL
1. Odkręć śruby w pozycjach „A” wspornika chłodnicy i zdejmij go.
2. Przełóż chłodnicę lub pompę przez otwór pokazany na ilustracji 2 i
umieść ją z tyłu płyty głównej.
3. Wyrównaj grzejnik z otworami „B” i przykręć śruby, załóż wspornik i
przykręć je w pozycji „A” i włóż śruby „C”.
NL
1. Draai de schroeven van de "A"-posities van de radiatorsteun los en
verwijder deze.
2. Voer de radiator of pomp door het gat zoals weergegeven in afbeelding
2 en plaats deze achter op het moederbord.
3. Lijn de radiator uit met de "B" -gaten en bevestig de schroeven, plaats
de beugel en schroef ze in de "A" -positie en plaats de "C" -schroeven.
FAN CONNECTION
Conexión ventiladores - Conexão do ventilador - Collegamento
ventola - Connexion ventilateur - Lüfteranschluss - Połączenie
wentylatora - Ventilator aansluiting
Declaration of conformity / Declaración de conformidad / Déclaration de conformité / Dichiarazione di conformità / Declaração de
conformidade / Konformitätserklärung / Deklaracja zgodności / Conformiteitsverklaring www.marsgaming.eu/en/conformity
1
2
3
2.5" SSD & 3.5" HDD
3.5” HDD x 2
1
2.5” SDD x2
2
2.5” SDD x1
3
PSU
MOLEX
Product specificaties
| Merk: | Mars Gaming |
| Categorie: | Niet gecategoriseerd |
| Model: | MC-400 |
| Kleur van het product: | Wit |
| Gewicht: | 3800 g |
| Breedte: | 276 mm |
| Diepte: | 356 mm |
| Hoogte: | 304 mm |
| Breedte verpakking: | 340 mm |
| Diepte verpakking: | 325 mm |
| Hoogte verpakking: | 405 mm |
| Soort: | PC |
| Vormfactor: | Mini Tower |
| Aan-/uitknop: | Ja |
| Aantal USB 2.0-poorten: | 1 |
| Geschikt voor: | Gamen |
| Verlichtingslocatie: | Case fans |
| Aantal poorten USB 3.2 Gen 1 (3.1 Gen 1) Type A: | 1 |
| Combo koptelefoon/microfoon port: | Ja |
| Reset button: | Ja |
| SSD-vormfactor: | 2.5" |
| Vermogenstoevoer inclusief: | Nee |
| Aantal 2.5" bays: | 3 |
| Aantal 3.5" bays: | 2 |
| Ondersteunde HDD-groottes: | 2.5, 3.5 " |
| Aantal uitbreidingssleuven: | 4 |
| Verbeterd kabelbeheer: | Ja |
| Aantal storage drives ondersteund: | 5 |
| Belichting: | Ja |
| Supported motherboard form factors: | Micro ATX, Mini-ITX |
| Zijraam: | Ja |
| Geharde glaspla(a)t(en): | Ja |
| Maximum CPU cooler hoogte: | 160 mm |
| Maximum grafische kaart lengte: | 340 mm |
| Maximale aantal ventilators voorkant: | 2 |
| Voorste ventilators ondersteunende diameters: | 120 mm |
| Maximaal aantal ventilators bovenkant: | 4 |
| Bovenste ventilators ondersteunende diameters: | 120 mm |
| Maximaal aantal ventilators achterkant: | 1 |
| Achterkant ventilators ondersteunende diameters: | 120 mm |
| Geïnstalleerde ventilators achterkant: | 1x 120 mm |
| Aantal geïntstalleerde ventilators voorkant: | 1x 120 mm |
| Maximaal aantal ventilators onderkant: | 2 |
| Ondersterste ventilators ondersteunende diameters: | 120 mm |
| Aantal interne 3.5" baaien: | 2 |
| Ondersteunde afmetingen achterste radiator: | 120 mm |
| Ondersteunde afmetingen zijradiator: | 120,240 mm |
| Vloeibare koeling geïnstalleerd: | Ja |
Heb je hulp nodig?
Als je hulp nodig hebt met Mars Gaming MC-400 stel dan hieronder een vraag en andere gebruikers zullen je antwoorden
Handleiding Niet gecategoriseerd Mars Gaming

19 Augustus 2025

18 Augustus 2025

18 Augustus 2025

12 Augustus 2025

11 Augustus 2025

11 Augustus 2025

11 Augustus 2025

11 Augustus 2025

11 Augustus 2025

16 Juni 2025
Handleiding Niet gecategoriseerd
- Coyote
- Nitecore
- Astell&Kern
- TC Helicon
- Łucznik
- Bigben
- ViewCast
- SMC
- The Grainfather
- Emerson
- Diana
- Bachmann
- JVC
- Rosieres
- Heitronic
Nieuwste handleidingen voor Niet gecategoriseerd

17 September 2025

17 September 2025

17 September 2025

17 September 2025

17 September 2025

17 September 2025

17 September 2025

17 September 2025

17 September 2025

17 September 2025